TaskTracker学习笔记
上次分析完JobTracker通过TaskScheduler如何把作业分配给TaskTracker,这次把目光 移动到TaskTracker上面。TaskTracker在这里其实是一个slave的从属关系。我在后面的分析会通过TaskTracker的执行流程,主要讲他的2个过程的分析1.作业启动执行2.与JobTracker的heatbeat的过程。2个过程都是非常的典型。
与JobTracker一样,TaskTracker也是作为一项服务所运行的,他也有自己的main函数入口。下面是一张全局的TaskTracker执行过程流程图:
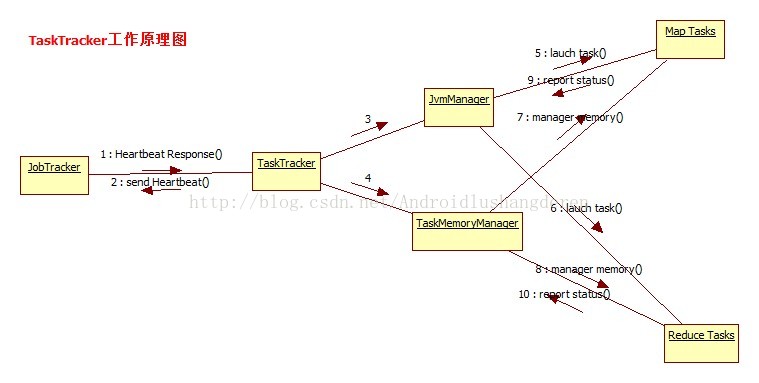
jvmManager负责为每个Task分配一个java虚拟机环境让其执行,避免任务之间的干扰,TaskMemoryManager负责任务内存的监控,对于某些任务恶意消耗资源内存,会给予杀死此任务的处理。
1.TaskTracker任务启动
下面从main函数的入口开始分析一下TaskTracker的执行流程:
/**
   * Start the TaskTracker, point toward the indicated JobTracker
   * taskTracker同样也是一个服务程序,main函数开始执行
   */
  public static void main(String argv[]) throws Exception {
    StringUtils.startupShutdownMessage(TaskTracker.class, argv, LOG);
    if (argv.length != 0) {
      System.out.println("usage: TaskTracker");
      System.exit(-1);
    }
    try {
      //初始化作业配置
      JobConf conf=new JobConf();
      // enable the server to track time spent waiting on locks
      ReflectionUtils.setContentionTracing
        (conf.getBoolean("tasktracker.contention.tracking", false));
      //初始化度量统计系统
      DefaultMetricsSystem.initialize("TaskTracker");
      //根据作业配置初始化TaskTracker
      TaskTracker tt = new TaskTracker(conf);
      //注册MBean,方便外界工具检测TaskTracker的状态
      MBeans.register("TaskTracker", "TaskTrackerInfo", tt);
      //执行TaskTracker服务主程序
      tt.run();
    } catch (Throwable e) {
      LOG.error("Can not start task tracker because "+
                StringUtils.stringifyException(e));
      System.exit(-1);
    }
}/**
* The server retry loop.
* This while-loop attempts to connect to the JobTracker. It only
* loops when the old TaskTracker has gone bad (its state is
* stale somehow) and we need to reinitialize everything.
*/
public void run() {
try {
getUserLogManager().start();
//开启CleanUp清理线程
startCleanupThreads();
boolean denied = false;
while (running && !shuttingDown && !denied) {
boolean staleState = false;
try {
// This while-loop attempts reconnects if we get network errors
while (running && !staleState && !shuttingDown && !denied) {
try {
//offerService()执行了核心的启动操作
State osState = offerService();
if (osState == State.STALE) {
staleState = true;
} else if (osState == State.DENIED) {
denied = true;
}
....../**
* Main service loop. Will stay in this loop forever.
* 主要的循环服务操作
*/
State offerService() throws Exception {
.....
// Send the heartbeat and process the jobtracker's directives
//发送给JobTracker心跳包
HeartbeatResponse heartbeatResponse = transmitHeartBeat(now);
// Note the time when the heartbeat returned, use this to decide when to send the
// next heartbeat
lastHeartbeat = System.currentTimeMillis();
....
//在这里获取了心跳回应中的action命令
TaskTrackerAction[] actions = heartbeatResponse.getActions();
if(LOG.isDebugEnabled()) {
LOG.debug("Got heartbeatResponse from JobTracker with responseId: " +
heartbeatResponse.getResponseId() + " and " +
((actions != null) ? actions.length : 0) + " actions");
}
if (reinitTaskTracker(actions)) {
return State.STALE;
}
// resetting heartbeat interval from the response.
heartbeatInterval = heartbeatResponse.getHeartbeatInterval();
justStarted = false;
justInited = false;
if (actions != null){
for(TaskTrackerAction action: actions) {
if (action instanceof LaunchTaskAction) {
//如果是执行Task任务指令,执行添加任务到任务队列中
addToTaskQueue((LaunchTaskAction)action);
} else if (action instanceof CommitTaskAction) {
//如果是提交任务的指令,则执行后面的操作
CommitTaskAction commitAction = (CommitTaskAction)action;
if (!commitResponses.contains(commitAction.getTaskID())) {
LOG.info("Received commit task action for " +
commitAction.getTaskID());
commitResponses.add(commitAction.getTaskID());
}
} else {
//其他的指令一律添加到tasksToCleanup队列中等待被处理
tasksToCleanup.put(action);
}
}
}
.....
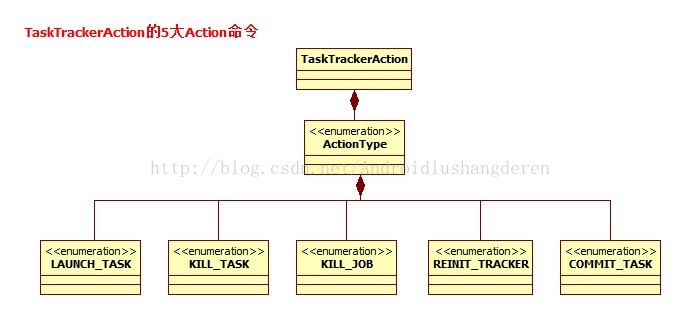
具体什么意思,看上面的英文解释就能理解了吧,上面代表了6种命令操作,我们侧重看第一个launch_task的命令执行,在上面的判断执行方法是addToTaskQueue();方法:
private void addToTaskQueue(LaunchTaskAction action) {
	//任务类型加入到任务待执行的容器中
    if (action.getTask().isMapTask()) {
      mapLauncher.addToTaskQueue(action);
    } else {
      reduceLauncher.addToTaskQueue(action);
    }
}class TaskLauncher extends Thread {
private IntWritable numFreeSlots;
private final int maxSlots;
private List<TaskInProgress> tasksToLaunch;
....public void addToTaskQueue(LaunchTaskAction action) {
//新建1个TIP,并加入tasksToLaunch列表
synchronized (tasksToLaunch) {
TaskInProgress tip = registerTask(action, this);
tasksToLaunch.add(tip);
//唤醒所有被tasksToLaunch wait的操作,说明此时有新的任务了
tasksToLaunch.notifyAll();
}
}public void run() {
while (!Thread.interrupted()) {
try {
TaskInProgress tip;
Task task;
synchronized (tasksToLaunch) {
while (tasksToLaunch.isEmpty()) {
tasksToLaunch.wait();
}
//get the TIP
tip = tasksToLaunch.remove(0);
task = tip.getTask();
LOG.info("Trying to launch : " + tip.getTask().getTaskID() +
" which needs " + task.getNumSlotsRequired() + " slots");
}
//wait for free slots to run
.....
//got a free slot. launch the task
startNewTask(tip);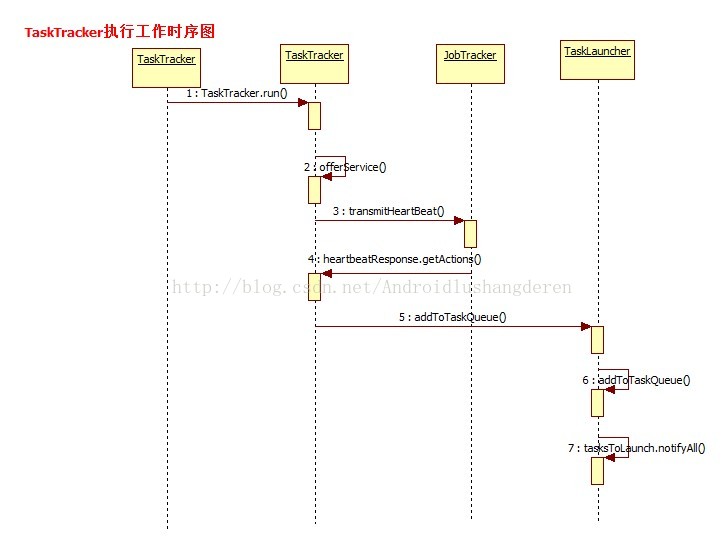
2.Heateat过程
下面我们看另外一个流程,心跳机制。此过程的实现同样的主要是在offerService的循环操作中。首先第一步,判断是否到了发送心跳包的时间,因为心跳包是隔周期性的时间发送的,所以这里必须会进行判读:
/**
   * Main service loop.  Will stay in this loop forever.
   * 主要的循环服务操作
   */
  State offerService() throws Exception {
    long lastHeartbeat = System.currentTimeMillis();

    while (running && !shuttingDown) {
      try {
        long now = System.currentTimeMillis();

        // accelerate to account for multiple finished tasks up-front
        //判断上次心跳的时间+心跳等待时间是否已经到了当前时间,如果到了可以发送新的心跳包
        long remaining =
          (lastHeartbeat + getHeartbeatInterval(finishedCount.get())) - now;
        //如果还没到,时间有剩余,则要强行等待剩余的时间
        while (remaining > 0) {
          // sleeps for the wait time or
          // until there are *enough* empty slots to schedule tasks
          synchronized (finishedCount) {
            finishedCount.wait(remaining);

            // Recompute
            now = System.currentTimeMillis();
            remaining =
              (lastHeartbeat + getHeartbeatInterval(finishedCount.get())) - now;

            if (remaining <= 0) {
              // Reset count
              finishedCount.set(0);
              break;
            }
          }
        }
..........
// If the TaskTracker is just starting up:
// 1. Verify the buildVersion
// 2. Get the system directory & filesystem
if(justInited) {
//验证版本号,如果版本号不对,则返回拒绝状态
String jobTrackerBV = jobClient.getBuildVersion();
if(!VersionInfo.getBuildVersion().equals(jobTrackerBV)) {
String msg = "Shutting down. Incompatible buildVersion." +
"\nJobTracker's: " + jobTrackerBV +
"\nTaskTracker's: "+ VersionInfo.getBuildVersion();
LOG.error(msg);
try {
jobClient.reportTaskTrackerError(taskTrackerName, null, msg);
} catch(Exception e ) {
LOG.info("Problem reporting to jobtracker: " + e);
}
return State.DENIED;
}// Send the heartbeat and process the jobtracker's directives
//发送给JobTracker心跳包
HeartbeatResponse heartbeatResponse = transmitHeartBeat(now);
里面2大包含类ResourceStatus(TaskTracker资源使用情况),TaskTrackerHealthStatus(TaskTracker节点健康状况)。首先当然是新建一个Status了:
/**
   * Build and transmit the heart beat to the JobTracker
   * 将TaskTracker自身的状态信息发送给JobTracker,并获得一个心跳包的回应
   * @param now current time
   * @return false if the tracker was unknown
   * @throws IOException
   */
  HeartbeatResponse transmitHeartBeat(long now) throws IOException {
    ....
    //
    // Check if the last heartbeat got through...
    // if so then build the heartbeat information for the JobTracker;
    // else resend the previous status information.
    //
    if (status == null) {
      synchronized (this) {
        status = new TaskTrackerStatus(taskTrackerName, localHostname,
                                       httpPort,
                                       cloneAndResetRunningTaskStatuses(
                                         sendCounters),
                                       failures,
                                       maxMapSlots,
                                       maxReduceSlots);
      }
//
    // Check if we should ask for a new Task
    // 检测TaskTracker是否需要一个新 Task任务
    //
    boolean askForNewTask;
    long localMinSpaceStart;
    synchronized (this) {
      //通过判断当前所占据的slots数量是否已经达到最大slot的数量作为标准
      askForNewTask =
        ((status.countOccupiedMapSlots() < maxMapSlots ||
          status.countOccupiedReduceSlots() < maxReduceSlots) &&
         acceptNewTasks);
      localMinSpaceStart = minSpaceStart;
} //
// Xmit the heartbeat
// 通过JobClient发送给JobTracker,并获得1个回复
//
HeartbeatResponse heartbeatResponse = jobClient.heartbeat(status,
justStarted,
justInited,
askForNewTask,
heartbeatResponseId);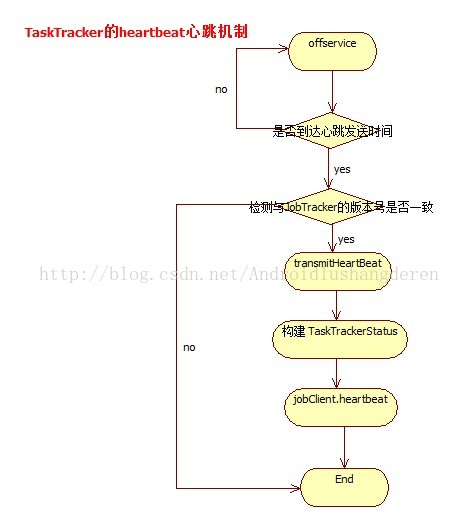
总结
2个过程都是在offerService核心服务程序中执行的。了解完JobTracker和TaskTracker的工作原理,在聊了具体Task任务的执行的5个阶段,从微观Task细节的执行到宏观上作业调度的原理分析理解,的确对MapReduce计算模型的理解上升了许多的层次。

 浙公网安备 33010602011771号