vue3学习第一天
第一章
Options API与Composition API
重写双向绑定
vue2
基于Object.defineProperty()实现
vue3 基于Proxy
proxy与Object.defineProperty(obj, prop, desc)方式相比有以下优势:
//丢掉麻烦的备份数据
//省去for in 循环
//可以监听数组变化
//代码更简化
//可以监听动态新增的属性;
//可以监听删除的属性 ;
//可以监听数组的索引和 length 属性;
   let proxyObj = new Proxy(obj,{
        get : function (target,prop) {
            return prop in target ? target[prop] : 0
        },
        set : function (target,prop,value) {
            target[prop] = 888;
        }
    })
Vue3 优化Vdom
https://vue-next-template-explorer.netlify.app/
在这个网站可以看到静态标记
TEXT = 1 // 动态文本节点
CLASS=1<<1,1 // 2//动态class
STYLE=1<<2,// 4 //动态style
PROPS=1<<3,// 8 //动态属性,但不包含类名和样式
FULLPR0PS=1<<4,// 16 //具有动态key属性,当key改变时,需要进行完整的diff比较。
HYDRATE_ EVENTS = 1 << 5,// 32 //带有监听事件的节点
STABLE FRAGMENT = 1 << 6, // 64 //一个不会改变子节点顺序的fragment
KEYED_ FRAGMENT = 1 << 7, // 128 //带有key属性的fragment 或部分子字节有key
UNKEYED FRAGMENT = 1<< 8, // 256 //子节点没有key 的fragment
NEED PATCH = 1 << 9, // 512 //一个节点只会进行非props比较
DYNAMIC_SLOTS = 1 << 10 // 1024 // 动态slot
HOISTED = -1 // 静态节点
BALL = -2
支持多个根节点
支持render JSX
Vue3源码引入tree shaking特性,将全局 API 进行分块。如果你不使用其某些功能,它们将不会包含在你的基础包中
就是比如你要用watch 就是import {watch} from 'vue' 其他的computed 没用到就不会给你打包减少体积
第二章
环境配置 略
npm init vite@latest 使用vite
开始 {#getting-started} | Vite中文网 (vitejs.cn)
nvm nrm 的使用
第三章
在vite中使用scss 直接npm install --save-dev sass 就可以 无需额外配置
Vite目录
public 下面的不会被编译 可以存放静态资源
assets 下面可以存放可编译的静态资源
components 下面用来存放我们的组件
App.vue 是全局组件
main ts 全局的ts文件
index.html 非常重要的入口文件 (webpack,rollup 他们的入口文件都是enrty input 是一个js文件 而Vite 的入口文件是一个html文件,他刚开始不会编译这些js文件 只有当你用到的时候 如script src="xxxxx.js" 会发起一个请求被vite拦截这时候才会解析js文件)
vite config ts 这是vite的配置文件具体配置项 后面会详解
VsCode Vue3 插件推荐 Vue Language Features (Volar)
SFC 语法规范
*.vue 件都由三种类型的顶层语法块所组成:'<template>'、<script>、<style>
每个 *.vue 文件最多可同时包含一个顶层 <template> 块。
其中的内容会被提取出来并传递给 @vue/compiler-dom,预编译为 JavaScript 的渲染函数,并附属到导出的组件上作为其 render 选项。
<script>
每一个 *.vue 文件可以有多个 <script> 块 (不包括<script setup>)。
该脚本将作为 ES Module 来执行。
其默认导出的内容应该是 Vue 组件选项对象,它要么是一个普通的对象,要么是 defineComponent 的返回值。
<script setup>
每个 *.vue 文件最多只能有一个 <script setup> 块 (不包括常规的 <script>)
该脚本会被预处理并作为组件的 setup() 函数使用,也就是说它会在每个组件实例中执行。<script setup> 的顶层绑定会自动暴露给模板。更多详情请查看 <script setup> 文档。
<style>
一个 *.vue 文件可以包含多个 <style> 标签。
<style> 标签可以通过 scoped 或 module attribute (更多详情请查看 SFC 样式特性) 将样式封装在当前组件内。多个不同封装模式的 <style> 标签可以在同一个组件中混
四、模板语法&vue指令
插值表达式操作API
<template>
  <div>{{ message.split('-') }}</div>
</template>


<script setup lang="ts">;
const message:string = "h-e-l-l-o"
</script>
指令
v- 开头都是vue 的指令
v-text 用来显示文本
v-html 用来展示富文本
v-if 用来控制元素的显示隐藏(切换真假DOM)
v-else-if 表示 v-if 的“else if 块”。可以链式调用
v-else v-if条件收尾语句
v-show 用来控制元素的显示隐藏(display none block Css切换)
v-on 简写@ 用来给元素添加事件
v-bind 简写: 用来绑定元素的属性Attr
v-model 双向绑定
v-for 用来遍历元素
v-on修饰符阻止冒泡案例
@click.stop = 'child'
阻止表单提交
@click.prevent = 'submit'
bind绑定class
<template>
  <div :class="[flag ? 'active' : 'other', 'h']">12323</div>
</template>


<script setup lang="ts">;
const flag: boolean = false;
</script>


<style>
.active {
  color: red;
}
.other {
  color: blue;
}
.h {
  height: 300px;
  border: 1px solid #ccc;
}
</style>
2
<template>
  <div :class="flag">{{flag}}</div>
</template>


<script setup lang="ts">;
type Cls = {
  other: boolean,
  h: boolean
}
const flag: Cls = {
  other: false,
  h: true
};

var myBoolean = new Boolean(flag)
console.log('myBoolean',myBoolean)//myBoolean [Boolean: true]

</script>


<style>
.active {
  color: red;
}
.other {
  color: blue;
}
.h {
  height: 300px;
  border: 1px solid #ccc;
}
</style>
五、虚拟DOM与diff算法
https://github.com/vuejs/core 源码地址
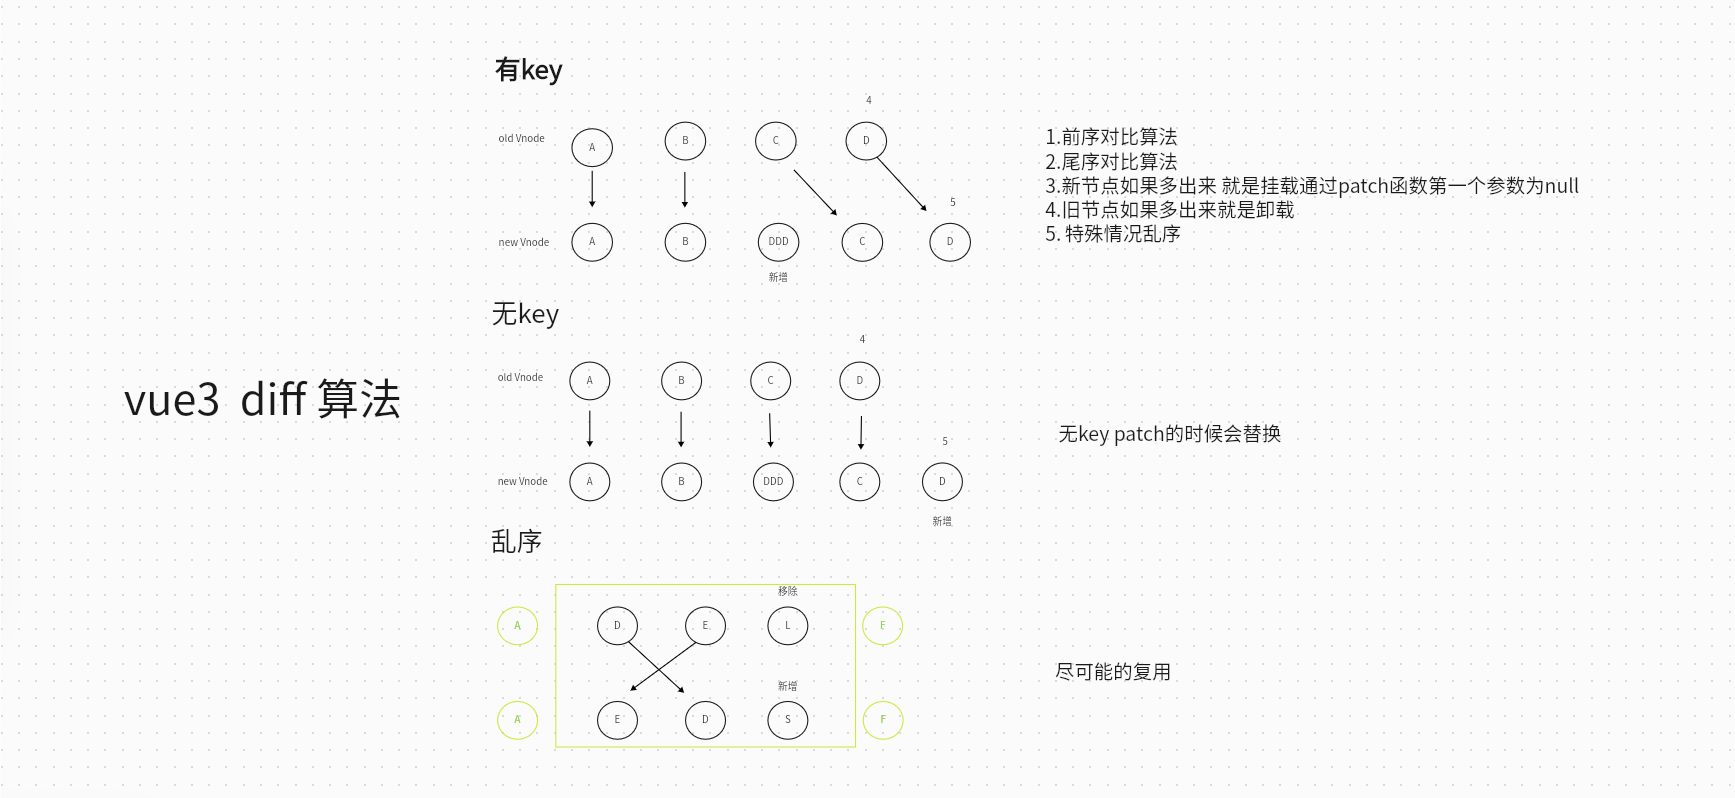
有key的话先进行双向的对比,最后剩下中间的乱序的再来进行对比 避免浪费性能
六、Ref全家桶
<template>
  <div>
    <button @click="changeMsg">change</button>
    <div>{{  message  }}</div>
    <div>{{  shallow  }}</div>
    <div>{{ custom }}</div>
  </div>
</template>


<script setup lang="ts">;
import { ref, Ref, isRef, shallowRef, triggerRef, customRef } from 'vue'
let message: Ref<string> = ref("我是message")
let notRef: number = 1
let shallow = shallowRef({
  msg: 'message',
  info: {
    name: '孙悟空',
    age: '18'
  }
})
function MyRef<T>(value: T) {
  return customRef((track, trigger) => {
    return {
      get() {
        track()
        return value
      }, set(newValue: T) {
        value = newValue
        trigger()
      }
    }

  })
}
let custom = MyRef<string>('custom')
const changeMsg = () => {
  message.value = "change msg" //使用ref劫持到数据的变化从而在页面上触发更新
  console.log('message', message)
  console.log('notRef', isRef(notRef), 'message', isRef(message))
  custom.value = 'customchanged'//自定义Ref
  shallow.value.msg = 'changed'
  shallow.value.info = { name: 'xxx', age: '20' }//ref更新会造成shallowRefer的更新
}
const change = () => {
  shallow.value.msg = 'changed'
  shallow.value.info = { name: 'xxx', age: '20' }//修改对象中的属性
  // triggerRef(shallow)//强制刷新页面

}
</script>;
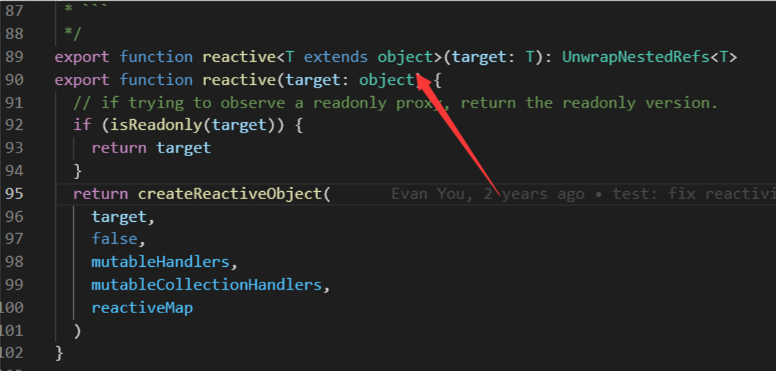
七、Reactive全家桶
import { reactive} from 'vue'
let person = reactive('sad')
会报错的 只能接收复杂数据类型
<template>
  <div>
    <div>msg {{  msg  }}</div>
    <div>obj{{  obj  }}</div>
    <div> per{{ person }}</div>
    <button @click="change1">change1</button>
    <button @click="change2">change2</button>
    <div>{{ state }}</div>
  </div>
</template>


<script setup lang="ts">;
import { reactive, readonly, shallowReactive } from 'vue'
let msg = reactive<number[]>([])//可以传复杂数据类型
type Person = {
  list?: Array<number>
}
let person = reactive<Person>({
  list: []
})
const copy = readonly(person)
person.list?.push(1)
// copy.list = person.list?.push(1)//Set operation on key "list" failed: target is readonly.
let obj = reactive({
  name: '孙悟空'
})
obj.name = '猪八戒'//复杂数据类型直接用reactive 比较方便

setTimeout(() => {
  let arr = [1, 2, 3, 4, 5, 6, 7, 8, 9]
  // msg = arr   这样直接赋值的话会破坏掉reactive的响应式
  //数组异步赋值问题
  //直接赋值会破坏响应式
  // 解决  1. push  方法 不会破坏响应式
  msg.push(...arr)
  console.log('msg', msg)
  //解决2   包裹一层对象
  person.list = arr;
  console.log(person);
}, 1000)

const obj1 = {
  a: 1,
  first: {
    b: 2,
    second: {
      c: 3
    }
  }
}
const state = shallowReactive(obj1)

function change1() {
  state.a = 7//浅层修改可以生效
}
function change2() {
  state.first.b = 8
  state.first.second.c = 9
  console.log(state);//深层修改
}
// change1()
// change2()  在DOM挂载之前这些操作都是 会生效的   只有在DOM生效之后shallowReactive才是只有浅修改的
</script>;
八、to全家桶
toRef toRefs toRaw
<template>
  <div>
    <button @click="change">按钮</button>
    {{  state  }}
    <button @click="change1">按钮</button>
    {{  state1  }}
  </div>
</template>

<script setup lang="ts">;
import { reactive, toRef, toRefs, toRaw } from 'vue'

const obj = {
  foo: 1,
  bar: 1
}
const state = toRef(obj, 'bar')
// bar 转化为响应式对象
const change = () => {
  state.value++
  console.log(obj, state)//会对原始数据和响应数据造成影响  但是视图不会发生变化
}

const obj1 = reactive({
  foo: 1,
  bar: 1
})
const state1 = toRef(obj1, 'bar')
const change1 = () => {
  state1.value++//如果原始数据是reactive 绑定的  再通过toRef创建新的响应对象时   再修改响应对象的内容视图会触发更新
  console.log(obj1, state1)
}

let obj2 = reactive({
  foo: 1,
  bar: 2
})
// let {foo,bar} = obj2
// console.log(foo, bar);//数字类型并不是响应式的
let { foo, bar } = toRefs(obj2);
console.log(foo, bar);//响应式的了  在底层的也是去调用 toRef的


const obj3 = reactive({

  foo: 1,
  bar: 2
})
const raw = toRaw(obj3);
console.log('raw.bar',raw.bar)//变回数字类型了  将响应式的数据对象变回不响应的了
</script>
九、computed
<template>
  <div>
    <input type="text" v-model="firstName">
    <input type="text" v-model="lastName">
    <div>
      {{  firstName  }}--{{  lastName  }}
    </div>
    <div>函数型{{ name }}</div>
    <div>对象型{{ obj }}</div>
    <Shop />
  </div>

</template>

<script setup lang="ts">;
import { computed, ref } from 'vue'
import Shop from './components/shop.vue'
let firstName = ref('')
let lastName = ref('')
//函数型
const name = computed(() => {
  return firstName.value + '·' + lastName.value
})
//对象型
const obj = computed({
  get() {
    return firstName.value + '·' + lastName.value
  },
  set() {
    firstName.value + '·' + lastName.value
  }
})
</script>;

<style scoped>
</style>
十、watch
<template>
  <div>
    <input v-model="msg" type="text" />
    <input v-model="data1" type="text" />
    <input v-model="data2" type="text" />
    <input v-model="data3" type="text" />
    <br>
    ref 深层
    <input v-model="refObj.nav.bar.name" type="text" />
    <br>
    reactive深层
    <input v-model="obj.nav.bar.name" type="text" />
    <br>
    reactive的单一值
    <input v-model="reac.name" type="text" />
  </div>
</template>

<script setup lang="ts">;
/**
 * watch第一个参数监听源
 * watch第二个参数回调函数cb(newVal,oldVal)
 * watch第三个参数一个options配置项是一个对象{
 *  immediate:true //是否立即调用一次
 *  deep:true //是否开启深度监听
 * }
 */
import { ref, watch, reactive } from 'vue'
let msg = ref<string>('')
//监听一个值
watch(msg, (newValue, oldValue) => {
  console.log('newValue', newValue)
  console.log('oldValue', oldValue)
})

//监听多个值
let data1 = ref('')
let data2 = ref('')
let data3 = ref('')
//注意变成数组了
watch([data1, data2, data3], (newValue, oldValue) => {
  console.log('newValue', newValue)
  console.log('oldValue', oldValue)
})

//监听ref深层
let refObj = ref({
  nav: {
    bar: {
      name: ""
    }
  }
})
watch(refObj, (newValue, oldValue) => {
  console.log('newValue', newValue)
  console.log('oldValue', oldValue)
}, {
  immediate: true,
  deep: true,
})//得加deep

//监听reactive 对象的深层
let obj = reactive({
  nav: {
    bar: {
      name: ""
    }
  }
})
watch(obj, (newValue, oldValue) => {
  console.log('newValue', newValue)
  console.log('oldValue', oldValue)
})

//监听reactive 的单一值
let reac = reactive({
  name1: '',
  name: ''
})
watch(() => reac.name, (newValue, oldValue) => {
  console.log('newValue', newValue)
  console.log('oldValue', oldValue)
})
</script>

<style scoped>
</style>

 浙公网安备 33010602011771号