Flutter 陈航 23-事件循环 Event Loop 异步 线程 Isolate
目录
23 | 单线程模型怎么保证UI运行流畅?
Flutter 框架是基于单线程模型的 Dart,与原生 Android 和 iOS 的多线程机制相比,单线程的 Dart 是如何从语言设计层面和代码运行机制上保证 Flutter UI 流畅性的呢?
Event Loop
事件循环模型
Dart 是单线程的,这意味着 Dart 代码是按照在 main() 出现的次序,一个接一个地执行的,不会被其他代码中断。
Dart 当然也支持异步,单线程和异步并不冲突。
为什么单线程也可以异步?这里有一个大前提,那就是我们的 App 绝大多数时间都在等待,而这些等待行为并不是阻塞的。
比如,网络请求 Socket 本身提供了 select 模型可以异步查询;而文件 IO,操作系统也提供了基于事件的回调机制。
所以,基于这些特点,单线程模型可以在等待的过程中做别的事情,等真正需要响应结果了,再去做对应的处理。因为等待过程并不是阻塞的,所以给我们的感觉就像是同时在做多件事情一样。但其实始终只有一个线程在处理你的事情。
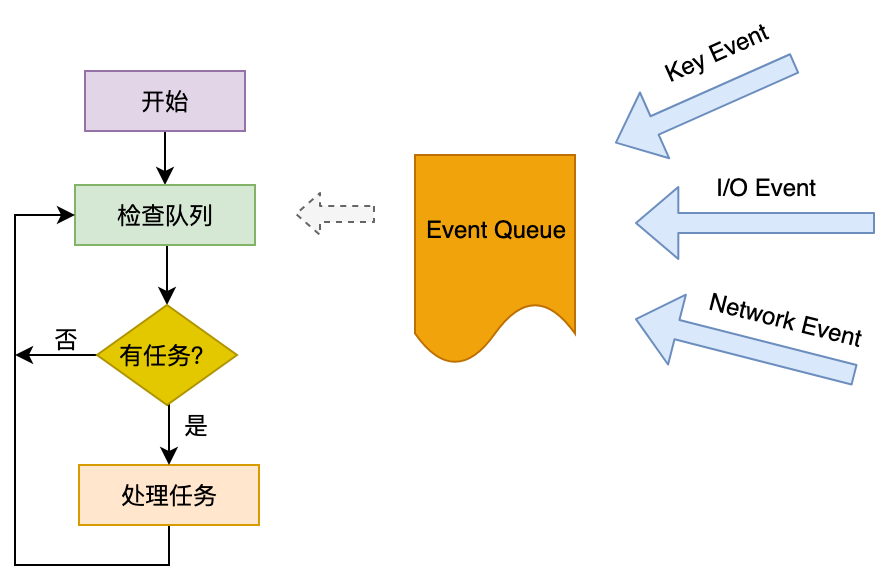
等待这个行为是通过 Event Loop 驱动的。事件队列 Event Queue 会把其他平行世界(比如 Socket)完成的,需要主线程响应的事件放入其中。像其他语言一样,Dart 也有一个巨大的事件循环,在不断的轮询事件队列、取出事件(比如键盘事件、I\O 事件、网络事件等),在主线程同步执行其回调函数。
微任务队列
在 Dart 中,实际上有两个队列,一个是事件队列(Event Queue),另一个则是微任务队列(Microtask Queue)。
微任务队列,顾名思义,表示一个短时间内就会完成的异步任务。微任务队列在事件循环中的优先级是最高的,在每一次事件循环中,Dart 总是先去微任务队列中查询是否有可执行的任务,如果没有,才会处理后续的事件队列的流程。
所以,Dart 中 Event Loop 完整版的流程图,应该如下所示:
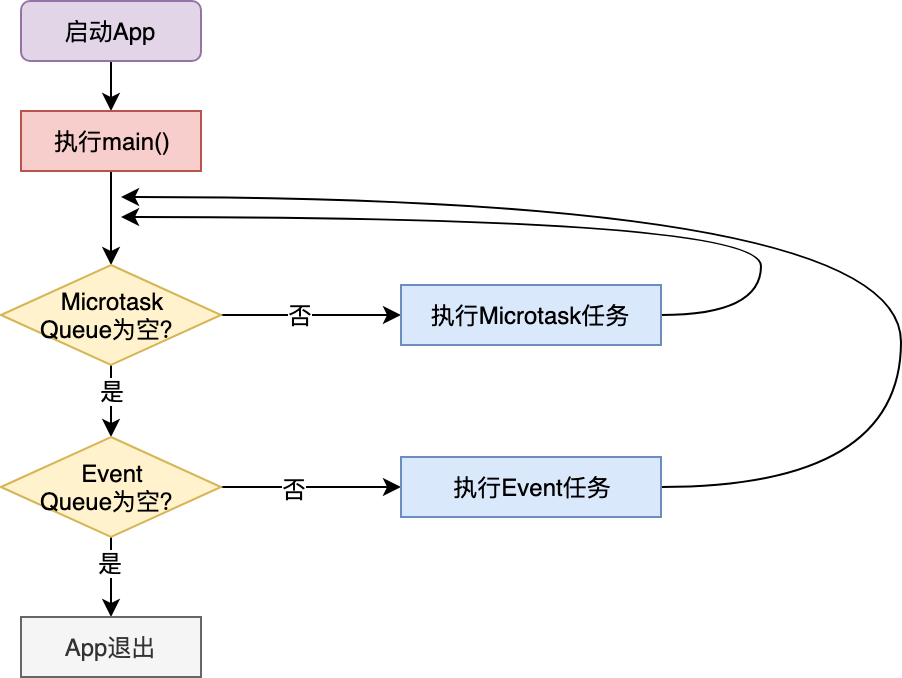
一般的异步任务通常很少必须要在事件队列前完成,因此很少会使用微任务队列。Flutter 内部,也只有 7 处需要高优执行任务的场景用到了而已。而像 I/O、绘制、定时器这些异步事件,都是通过事件队列驱动主线程执行的。
微任务队列使用场景:手势识别、文本输入、滚动视图、保存页面效果等
异步任务
Future
Dart 为 Event Queue 的任务建立提供了一层封装,叫作 Future,它表示一个在未来时间才会完成的任务。
把一个函数体放入 Future,就完成了从同步任务到异步任务的包装。Future 还提供了链式调用的能力,可以在异步任务执行完毕后依次执行链路上的其他函数体。
- 在声明一个 Future 时,Dart 会将异步任务的函数体放入事件队列,然后
立即返回,后续的代码继续同步执行。 - 当同步执行的代码执行完毕后,事件队列会按照事件加入的顺序依次取出,并同步执行 Future 的函数体及后续的
then。 - then 与 Future 函数体共用一个事件循环,如果有多个 then,它们也会按照链式调用的先后顺序
同步执行。 - 如果 Future 执行体已经执行完毕,或者为 null,此时通过其引用调用 then 后,会将 then 方法体放入微任务队列。
简单案例
main() async {
  Future(() => flog("f1")) // 先加入事件队列(即先声明)的任务先执行
      .then((_) => flog("then 1")) // then 在 Future 结束后立即执行
      .then((_) => flog("then 2"));

  flog("main");

  Future(() => flog("f2")).then((_) => flog("then 3"));

  flog("main delay");
  await Future.delayed(const Duration(seconds: 1), () => flog("main end")); // 防止 main 提前结束
}
main
main delay
f1
then 1
then 2
f2
then 3
main end
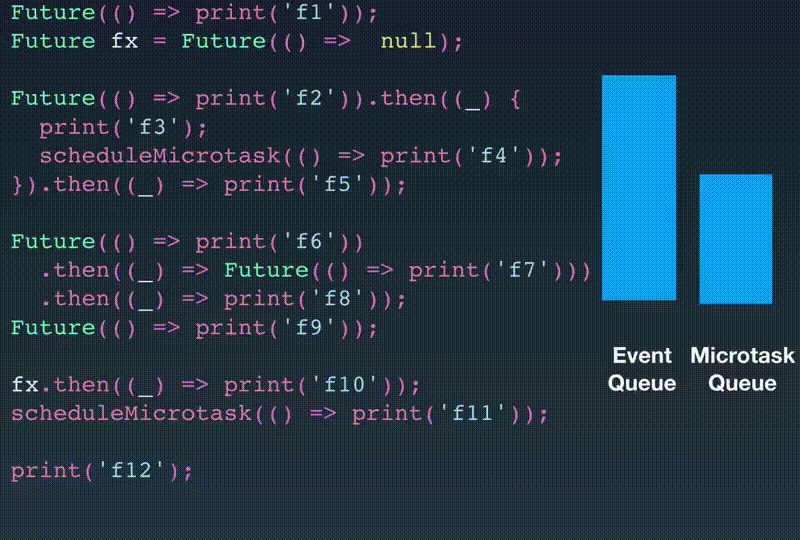
官方综合案例
main() async {
  testFuture();
  await Future.delayed(const Duration(seconds: 1), () => flog("main end")); // 防止 main 提前结束
}

void testFuture() {
  Future(() => flog('f1')); // 声明一个 Future
  Future fx = Future(() => null); // 声明 Future fx,其执行体为 null

  Future(() => flog('f2')).then((_) {
    flog('f3');
    scheduleMicrotask(() => flog('f4')); // 在第一个 then 回调里启动了一个微任务
  }).then((_) => flog('f5'));

  Future(() => flog('f6'))
      .then((_) => Future(() => flog('f7'))) // 第一个 then 是一个 Future
      .then((_) => flog('f8'));

  Future(() => flog('f9'));

  fx.then((_) => flog('f10')); // 往执行体为 null 的 fx 注册了了一个 then

  scheduleMicrotask(() => flog('f11')); // 启动一个微任务
  flog('f12');
}
- f12:因为其他语句都是异步任务,所以先打印
f12 - f11:异步任务中,微任务队列优先级最高,因此随后打印
f11 - f1:然后按照 Future 声明的先后顺序,先打印
f1 - f10:
- 接下来本是要执行 fx 的
- 由于 fx 的执行体是 null,相当于执行完毕了,因此会将 fx 的 then 放入微任务队列
- 接下来本是要执行 f2 的,但是因为微任务队列不为空,所以会最先打印微任务队列中的
f10 - 这一块的代码和解释不是很匹配,具体可以看下面另一个测试案例
- f2:然后按照 Future 声明的先后顺序,打印
f2 - f3:
- 然后执行 then,打印
f3 - 然后将 f4 加入了微任务队列,所以要到下一个事件循环才执行
- 然后执行 then,打印
- f5:后续的 then 继续同步执行,所以先打印
f5 - f4:接下来本是要执行 f6 的,但是因为微任务队列不为空,所以会最先打印微任务队列中的
f4 - f6:
- 然后打印
f6 - 然后执行第一个 then,由于是一个Future(异步任务),因此 f7 会被放入事件队列中
- 后续的 then 要在第一个 then 之后同步执行
- 然后打印
- f9:然后打印
f9 - f7:然后打印
f7 - f8:
- 然后打印
f8 - 注意:这里的 f8 并不是异步任务(因为没有创建 Future),所以不会被放入事件队列中
- 但是:因为这里的 f8 是 f7 的 then,所以它是在 f7 执行完成后和 f7 同步执行的
- 然后打印
改造后的案例
- then 是和 Future 同步执行的
- then 并不会放入队列,他只是在 Future 执行完后同步执行而已
- 如果 Future 执行体已执行完毕(或者为null),在执行到 Future 的 then 时,会将 then 放入微任务队列
main() async {
  testFuture();
  await Future.delayed(const Duration(seconds: 1), () => flog("main end")); // 防止 main 提前结束
}

void testFuture() {
  Future(() => flog('f1')).then((_) => flog('f1-then'));
  Future future = Future(() => flog('future'));
  Future futureNull = Future(() => null);

  Future(() => flog('f2--------------------------')).then((_) {
    flog('f2-then1');
    Future(() => flog('f2-then1-Future[可理解为第二级队列]'));
    future.then((_) => flog('future-then[微任务]'));
    scheduleMicrotask(() => flog('scheduleMicrotask[微任务]'));
    futureNull.then((_) => flog('futureNull-then[微任务]'));
  }).then((_) => flog('f2-then2'));

  Future(() => flog('f3--------------------------'))
      .then((_) => Future(() => flog('f4[可理解为第二级队列]'))) // 一个新的 Future
      .then((_) => flog('f4-then'));

  Future(() => flog('f5'));

  futureNull.then((_) => flog('futureNull-then1'));
  future.then((_) => flog('future-then1'));
  futureNull.then((_) => flog('futureNull-then2'));
  future.then((_) => flog('future-then2'));

  flog('main start');
}
main start
f1
f1-then
future
future-then1
future-then2
futureNull-then1
futureNull-then2
f2--------------------------
f2-then1
f2-then2
future-then[微任务]
scheduleMicrotask[微任务]
futureNull-then[微任务]
f3--------------------------
f5
f2-then1-Future[可理解为第二级队列]
f4[可理解为第二级队列]
f4-then
main end
异步函数同步等待
异步函数返回时,其内部执行动作并未结束,因此对调用者来说,有两个选择:
- 异步处理:在返回的 Future 对象上注册一个 then,等 Future 的执行体结束以后,再进行异步处理
- 同步等待:同步等待 Future 执行体结束,此时需要在调用处使用 await,在调用处的函数体使用 async
main() async {
  flog("main start");
  String result = await Future.delayed(const Duration(seconds: 1), () => "main end");
  flog(result);
}
为什么要加 async?
因为 Dart 中的 await 并不是阻塞等待,而是异步等待。
await 不是阻塞等待
main() async {
  flog("main start");

  Future(() => flog('f1'))
      .then((_) async => await Future(() => flog('f2'))) // 放入 Event Queue
      .then((_) => flog('f2-then'));
  Future(() => flog('f3'));

  await Future.delayed(const Duration(seconds: 1), () => flog("main end")); // 防止 main 提前结束
}
main start
f1
f3
f2
f2-then
main end
上面的 await 并不能阻塞 f3 的执行。
await 不会向上传递
main() async {
  flog("main start");
  func(); // 调用一个异步函数
  flog("main after");
  await Future.delayed(const Duration(seconds: 1), () => flog("main end")); // 防止 main 提前结束
}

Future<int> fetchContent() => Future<int>.delayed(const Duration(seconds: 1), () => 30);

func() async => flog(await fetchContent()); // 同步等待另一个异步函数返回
main start
main after
30
main end
await 与 async 只对调用上下文的函数有效,并不向上传递。如果我们想在 main 函数中也同步等待,需要在调用异步函数时也加上 await。
await func(); // 调用一个异步函数并同步等待,结果:【main after】将在【30】之后打印
Isolate
尽管 Dart 是基于单线程模型的,但为了进一步利用多核 CPU,将 CPU 密集型运算进行隔离,Dart 也提供了多线程机制,即 Isolate。
每个 Isolate 都有自己的 EventLoop 与 EventQueue,Isolate 之间不共享任何资源,只能依靠消息机制通信,因此也就没有资源抢占问题。
Isolate 会开辟新的内存栈,对内存有更多要求(大约20MB)
简单案例
Isolate 的创建非常简单,我们只要给定一个函数入口,创建时再传入一个参数,就可以启动了。
main() async {
  Isolate.spawn(doSth, "from Isolate").then((value) => flog(value)); // Instance of 'Isolate'
  await Future.delayed(const Duration(seconds: 1), () => flog("main end")); // 防止 main 提前结束
}

doSth(msg) => flog(msg); // Shell: from Isolate
Instance of 'Isolate'
Shell: from Isolate
main end
发送管道 SendPort
Isolate 通过发送管道 SendPort 实现消息通信机制。我们可以在启动 Isolate 时将主 Isolate 的发送管道作为参数传给它,这样并发 Isolate 就可以在任务执行完毕后利用这个发送管道给我们发消息了。
main() async {
  ReceivePort receivePort = ReceivePort(); // 创建管道
  receivePort.listen((data) => flog("监听管道回传消息: ${data.toString()}"));

  Isolate? isolate = await Isolate.spawn(getMsg, receivePort.sendPort); // 传入主 Isolate 的发送管道

  await Future.delayed(const Duration(seconds: 1), () {
    receivePort.close(); // 关闭管道
    isolate?.kill(priority: Isolate.immediate); // 杀死 Isolate
    isolate = null;
    flog("main end");
  });
}
getMsg(sendPort) {
  int millisecond = DateTime.now().millisecond;
  flog("millisecond = $millisecond");
  sendPort.send(millisecond);
}
Shell: millisecond = 832
监听管道回传消息: 832
main end
双向通信
发送管道是单向的,如果 Isolate 执行任务时,需要依赖主 Isolate 给它发送参数,执行完毕后还需要回传执行结果给主 Isolate,这样双向通信的场景,我们只需让并发 Isolate 也回传一个发送管道即可。
main() async {
  ReceivePort mainResponse = ReceivePort(); // 创建一个管道,用于接收 Isolate 回传管道
  ReceivePort mainAnswer = ReceivePort(); // 创建另一个管道,用于接收 Isolate 执行结果

  await Isolate.spawn(_isolate, mainResponse.sendPort); // [1]
  SendPort isolateSendPort = await mainResponse.first as SendPort; // [3] 获取 Isolate 回传的管道
  isolateSendPort.send(["白乾涛", mainAnswer.sendPort]); // [4] 往 Isolate 回传的管道中发送消息

  var result = await mainAnswer.first; // [7] 获取 Isolate 回传的执行结果
  flog("收到回传的结果:$result");
}

/// Isolate 函数体,参数是主线程传入的管道
_isolate(mainResponseSendPort) async {
  ReceivePort isolateReceivePort = ReceivePort(); // 创建管道
  mainResponseSendPort.send(isolateReceivePort.sendPort); // [2] 往主线程回传 Isolate 的管道

  List message = await isolateReceivePort.first as List; // [5] 获取主线程发送的消息
  String data = message[0].toString(); // 参数
  SendPort mainAnswerSendPort = message[1] as SendPort; // 回传结果的管道
  flog("收到传递的参数:$data");

  mainAnswerSendPort.send(data.length); // [6] 往主线程回传 Isolate 的执行结果
}
Shell: 收到传递的参数:白乾涛
收到回传的结果:3
双向通信:优化版
上面方法中,先后发给了并发 Isolate 两个 SendPor,下面可优化为只发一个 SendPort。
main() async {
  ReceivePort mainResponse = ReceivePort(); // 创建一个管道,用于接收 Isolate 回传管道
  await Isolate.spawn(_isolate, mainResponse.sendPort); // [1]
  mainResponse.listen((message) {
    if (message is SendPort) {
      SendPort isolateSendPort = message; // [3] 获取 Isolate 回传的管道
      isolateSendPort.send("白乾涛"); // [4] 往 Isolate 回传的管道中发送消息
    } else {
      flog("收到回传的结果:$message"); // [7] 获取 Isolate 回传的执行结果
    }
  });
  await Future.delayed(const Duration(seconds: 1), () => flog("main end")); // 防止 main 提前结束
}

_isolate(mainResponseSendPort) async {
  ReceivePort isolateReceivePort = ReceivePort(); // 创建管道
  mainResponseSendPort.send(isolateReceivePort.sendPort); // [2] 往主线程回传 Isolate 的管道

  var data = await isolateReceivePort.first; // [5] 获取主线程发送的消息
  flog("收到传递的参数:$data");

  mainResponseSendPort.send(data.length); // [6] 往主线程回传 Isolate 的执行结果
}
compute 函数
Flutter 提供了支持并发计算的 compute 函数,其内部对 Isolate 的创建和双向通信进行了封装抽象,屏蔽了很多底层细节,我们在调用时只需要传入函数入口和函数参数,就能够实现并发计算和消息通知。
main() async {
  var result = await compute(getResult, "白乾涛");
  flog("收到回传的结果:$result");
}

int getResult(data) {
  flog("收到传递的参数:$data");
  return data.toString().length;
}
Shell: 收到传递的参数:白乾涛
收到回传的结果:3
总结
- Dart 是单线程的,但通过事件循环可以实现
异步 - Future 是异步任务的封装,借助于 await 与 async,我们可以通过事件循环实现
非阻塞的同步等待 - Isolate 是 Dart 中的多线程,可以实现并发,有自己的事件循环与 Queue,
独占资源 - Isolate 之间可以通过
消息机制进行单向通信,这些传递的消息通过对方的事件循环驱动对方进行异步处理
在 UI 编程过程中,异步和多线程是两个相伴相生的名词,也是很容易混淆的概念。对于异步方法调用而言,代码不需要等待结果的返回,而是通过其他手段(比如通知、回调、事件循环或多线程)在后续的某个时刻主动(或被动)地接收执行结果。
因此,从辩证关系上来看,异步与多线程并不是一个同等关系:异步是目的,多线程只是实现异步的手段之一。在 Flutter 中,借助于 UI 框架提供的事件循环,可以不用阻塞的同时等待多个异步任务,因此并不需要开多线程。
2023-1-9
本文来自博客园,作者:白乾涛,转载请注明原文链接:https://www.cnblogs.com/baiqiantao/p/17035861.html

 浙公网安备 33010602011771号