IO模型
推荐博客:Java NIO:浅析I/O模型
1.寻常io
寻常io写入:
public static  void testBasicFileIO() throws Exception {
        byte[] data = "123456789\n".getBytes();
        String path =  "/root/testfileio/out.txt";
        File file = new File(path);
        FileOutputStream out = new FileOutputStream(file);
            out.write(data);
    }
寻常io缓存写入:
  public static void testBufferedFileIO() throws Exception {
        byte[] data = "123456789\n".getBytes();
        String path =  "/root/testfileio/out.txt";
        File file = new File(path);
        BufferedOutputStream out = new BufferedOutputStream(new FileOutputStream(file));
        while(true){
            Thread.sleep(10);
            out.write(data);
        }
    }
这两种写入方式的区别在于第二种使用了Buffered缓存,首先io写入模型如下:
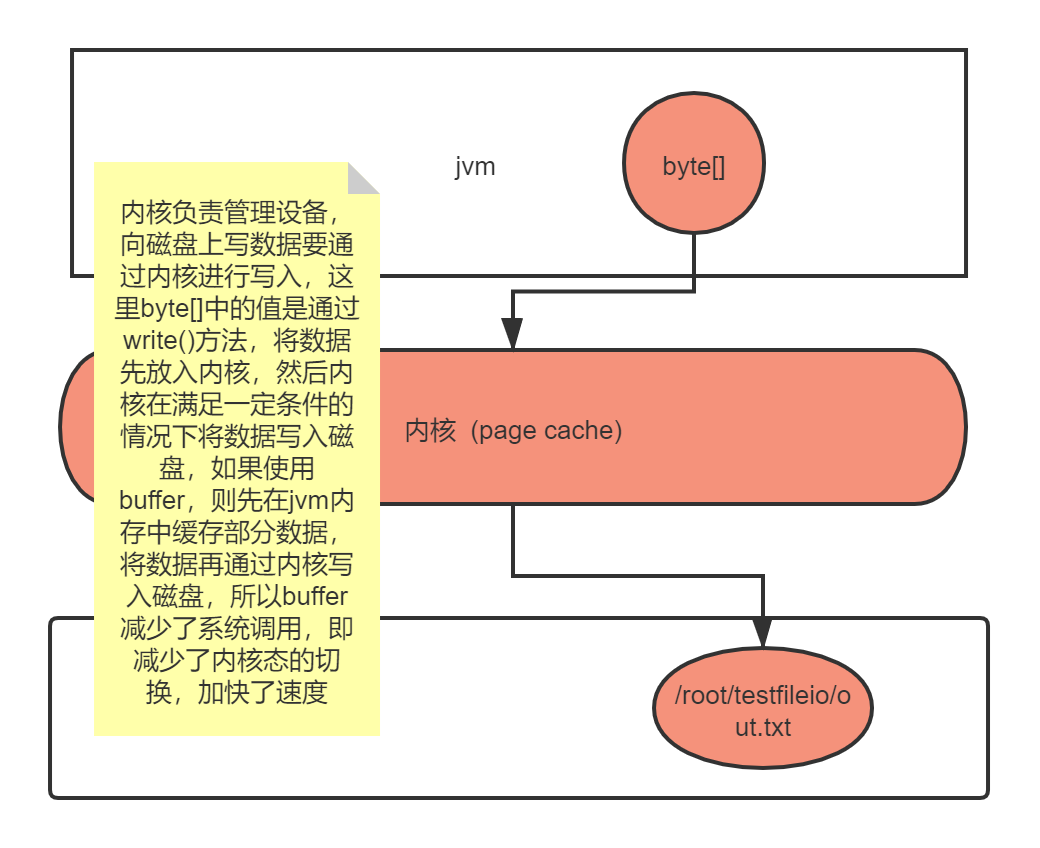
这种写法的缺点,只能按照顺序读取数据,即当文件读取到某个位置时,只能从头再读或者继续向下读取,且该读取方式为同步阻塞
2.NIO 新的io
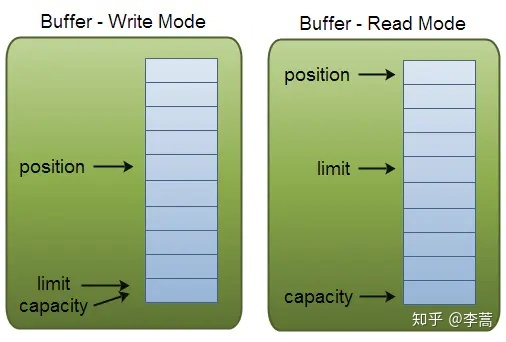
传统io是面向流的,nio是面向块的 a.容量(capacity) b.界限(limit) c.位置(position),缓冲区本质上是一个可以写入数据的内存块,然后可以再次读取,该对象提供了一组方法,可以更轻松地使用内存块,使用缓冲区读取和写入数据 通常遵循以下四个步骤:
1. 写数据到缓冲区;
2. 调用buffer.flip()方法;
3. 从缓冲区中读取数据;
4. 调用buffer.clear()或buffer.compat()方法;
当向buffer写入数据时,buffer会记录下写了多少数据,一旦要读取数据,需要通过flip()方法将Buffer从写模式切换到读模式,在读模式下可以读取之前写入到buffer的所有数据,一旦读完了所有的数据,就需要清空缓冲区,让它可以再次被写入。
 /**创建byte缓存*/
        ByteBuffer byteBuffer=ByteBuffer.allocate(20);
        // ByteBuffer allocateDirect=ByteBuffer.allocateDirect(1024);堆外分配
        /**创建byte[],用于put,当大小大于上面创建的bytebuffer时,报BufferOverflowException*/
        byte [] bytes={'q','w','e','r','t','1','2',3,4,5,6,7,8,9};
        /**打印指针,当为null时,指针指向0的位置*/
        System.out.println("position = " + byteBuffer.position());
        System.out.println(byteBuffer);
        /**将bytes放入ByteBuffer*/
        System.out.println("put = " + byteBuffer.put(bytes));
        byteBuffer.get();
        System.out.println("get = "+byteBuffer);
        byteBuffer.flip();
        System.out.println("flip = " + byteBuffer);
        byteBuffer.compact();
        System.out.println("compact = " + byteBuffer);
        System.out.println("isDirect = " + byteBuffer.isDirect());
输出:
position = 0
java.nio.HeapByteBuffer[pos=0 lim=20 cap=20]
put = java.nio.HeapByteBuffer[pos=14 lim=20 cap=20]
get = java.nio.HeapByteBuffer[pos=15 lim=20 cap=20]
flip = java.nio.HeapByteBuffer[pos=0 lim=15 cap=20]
compact = java.nio.HeapByteBuffer[pos=15 lim=20 cap=20]
isDirect = false
调用get和put方法会将position向后移动,调用flip方法,position移植到0,limit移植到之前position位置,做了一次读写交换,调用compact将position移动到之前有值最大位置,limit移动到capacity位置
/**
 * 一、缓冲区(Buffer):在java NIO中负责数据的存取。缓冲区就是数组。用于存储
 * 不同数据类型的数据
 *
 * 根据数据类型的不同(boolean除外),提供对应类型的缓冲区:
 * ByteBuffer - 最常用的
 * CharBuffer
 * ShortBuffer
 * IntBuffer
 * LongBuffer
 * FloatBuffer
 * DoubleBuffer
 *
 * 上述的缓冲区的管理方式几乎是一致的 ,通过allocate()获取缓冲区
 *
 * 二、缓冲区里面的存取数据的两个核心方法:
 * put():存入数据到缓冲区中
 * get():获取缓冲区中的数据
 *
 * 四 、缓冲区中的核心属性
 * capacity:容量,表示缓冲区中最大存储数据的容量,一旦声明了则不能改变。
 * limit:表示缓冲区中可以操作数据的大小。(limit后数据是不可以进行读写的)
 * position:位置,表示缓冲区正在操作数据的位置。
 * mark:标记,表示记录当前position的位置,可以通过reset()恢复到mark的位置
 *
 * 0 <= mark <= position <= limit <= capacity
 */
public class TestBuffer {

    @Test
    public void test2() {
        String str = "abcde";
        ByteBuffer buf = ByteBuffer.allocate(1024);
        buf.put(str.getBytes());

        buf.flip();

        byte[] dst = new byte[buf.limit()];
        buf.get(dst,0,2);
        System.out.println(new String(dst, 0, 2));

        System.out.println(buf.position());

        //mark():标记
        buf.mark();
        buf.get(dst,2,2);
        System.out.println(new String(dst,2,2));
        System.out.println(buf.position());

        //reset()
        buf.reset();
        System.out.println(buf.position());

        //判断缓冲区中是否还有剩余数据
        if (buf.hasRemaining()) {
            //如果有的话,那么获取缓冲区中可以操作的数量
            System.out.println(buf.remaining());
        }
    }

    @Test
    public void test1() {
        String str = "abcde";
        //1.分配一个指定大小的缓冲区
        ByteBuffer buf = ByteBuffer.allocate(1024);
        System.out.println("-------allocate()-------");
        System.out.println("正在操作的位置 "+buf.position());
        System.out.println("缓冲区中可操作数据的大小 "+buf.limit());
        System.out.println("容量 "+buf.capacity());

        //2.利用put()方法存入数据到缓冲区
        buf.put(str.getBytes());
        System.out.println("-------put()-------");
        System.out.println("正在操作的位置 "+buf.position());
        System.out.println("缓冲区中可操作数据的大小 "+buf.limit());
        System.out.println("容量 "+buf.capacity());
        //3.切换成读取数据的模式,利用flip()方法来进行读取数据
        buf.flip();
        System.out.println("-------flip()-------");
        System.out.println("正在操作的位置 "+buf.position());
        System.out.println("缓冲区中可操作数据的大小 "+buf.limit());
        System.out.println("容量 "+buf.capacity());
        //4.利用get()读取缓冲区中的数据
        byte[] dst = new byte[buf.limit()];
        buf.get(dst);
        System.out.println(new String(dst,0,dst.length));
        System.out.println("-------get()-------");
        System.out.println("正在操作的位置 "+buf.position());
        System.out.println("缓冲区中可操作数据的大小 "+buf.limit());
        System.out.println("容量 "+buf.capacity());
        //5.rewind():表示可以重复读取
        buf.rewind();
        System.out.println("-------rewind()-------");
        System.out.println("正在操作的位置 "+buf.position());
        System.out.println("缓冲区中可操作数据的大小 "+buf.limit());
        System.out.println("容量 "+buf.capacity());
        //6.清空缓冲区,但是缓冲区中的数据依然存在,只不过数据是处于被遗望的状态
        buf.clear();
        System.out.println("-------clear()-------");
        System.out.println("正在操作的位置 "+buf.position());
        System.out.println("缓冲区中可操作数据的大小 "+buf.limit());
        System.out.println("容量 "+buf.capacity());

        System.out.println((char)buf.get());
    }
}

原文链接:https://blog.csdn.net/weixin_37778801/article/details/86699341
一、通道(Channel):用于源节点和目标节点的连接。在Java nio中负责缓冲区中数据的传输。
Channel本身不存储数据,因此需要配合缓冲区进行传输。
二、通道的主要实现类
java.nio.channels.Channel 接口
|--FileChannel
|--SocketChannel
|--ServerSocketChannel
|--DatagramChannel
三、获取通道
1.Java针对支持通道的类提供了getChannel()方法
本地IO:
FileInputStream、FileOutputStream
RandomAccessFile
网络IO:
Socket
ServerSocket
DatagramSocket
2、在JDK1.7中的NIO.2针对各个通道提供了静态方法open()
3、在JDK1.7中的NIO.2的File工具类的newByteChannel()
public class TestChannel {
    //1.利用通道来完成文件的复制
    @Test
    public void test1() {
        FileInputStream fis = null;
        FileOutputStream fos = null;
        FileChannel inChannel = null;
        FileChannel outChannel = null;
        try {
            fis = new FileInputStream("1.jpg");
            fos = new FileOutputStream("3.jpg");
            //2.获取通道
            inChannel = fis.getChannel();
            outChannel = fos.getChannel();
            //3.分配一个指定大小的缓冲区
            ByteBuffer buf = ByteBuffer.allocate(1024);

            //4.将通道中的数据存入缓冲区中读取数据
            while (inChannel.read(buf) != -1) {
                buf.flip();//切换成读取数据的模式
                //5.将缓冲区中的数据再写入到通道
                outChannel.write(buf);
                //清空缓冲区
                buf.clear();
            }
        } catch (IOException e) {
            e.printStackTrace();
        }finally {
            if ( outChannel != null) {
                try {
                    outChannel.close();
                } catch (IOException e) {
                    e.printStackTrace();
                }
            }
            if (inChannel!=null) {
                try {
                    inChannel.close();
                } catch (IOException e) {
                    e.printStackTrace();
                }
            }
            if (fos!=null) {
                try {
                    fos.close();
                } catch (IOException e) {
                    e.printStackTrace();
                }
            }
            if (fis!=null) {
                try {
                    fis.close();
                } catch (IOException e) {
                    e.printStackTrace();
                }
            }
        }
    }
}

原文链接:https://blog.csdn.net/weixin_37778801/article/details/86699341
//2.使用直接缓冲区完成文件的复制(内存映射文件的方式)
    @Test
    public void test2() throws IOException {
        long start = System.currentTimeMillis();
        FileChannel inChannel = FileChannel.open(Paths.get("1.jpg"), StandardOpenOption.READ);
        FileChannel outChannel = FileChannel.open(Paths.get("8.jpg"), StandardOpenOption.WRITE,StandardOpenOption.READ,StandardOpenOption.CREATE_NEW);

        //内存映射文件
        MappedByteBuffer inMappedBuf = inChannel.map(MapMode.READ_ONLY, 0, inChannel.size());
        MappedByteBuffer outMappedBuf = outChannel.map(MapMode.READ_WRITE, 0, inChannel.size());

        //直接对缓冲区进行数据的读写操作
        byte[] dst = new byte[inMappedBuf.limit()];
        inMappedBuf.get(dst);
        outMappedBuf.put(dst);

        inChannel.close();
        outChannel.close();
        long end = System.currentTimeMillis();
        System.out.println("内存映射文件所花时间:"+(end-start));
    }

 浙公网安备 33010602011771号