
UVM宏解释+odt文件转doc+merge命令和difflib+python调用命令+clog2和系统函数+java添加classpath++ ${1+$@}的用法+uvm1.1和uvm1.2的starting_phase+add_reg和configuration的属性控制
UVM宏解释
UVM_DISABLE_AUTO_ITEM_RECORDING
https://blog.csdn.net/MGoop/article/details/127295965
item record的方法主要是用于记录事务信息的,原理是调用accept_tr, begin_tr, end_tr。似乎和波形上显示出各个事务相关。
默认情况下,在调用get_next_item()和item_done()时自动执行项目记录。然而,这只适用于简单的、按顺序的阻塞事务执行。对于流水线和乱序事务执行,驱动程序必须关闭此自动记录,并在适当的时间点显式调用uvm_transaction::accept_tr、uvm_transaction::begin_tr和uvm_transaction::end_tr。该方法在run_phase()方法的开头调用。一旦禁用,将无法重新启用。为了向前兼容,可以通过定义UVM_DISABLE_AUTO_ITEM_RECORDING来全局关闭记录。
UVM_PACKER_MAX_BYTES
在UVM的源码中:uvm-1.2\src\macros\uvm_global_defines.svh
大小4k
//------------------------
//
// MACRO: `UVM_MAX_STREAMBITS
//
// Defines the maximum bit vector size for integral types.
// Used to set uvm_bitstream_t

`ifndef UVM_MAX_STREAMBITS
 `define UVM_MAX_STREAMBITS 4096
`endif


// MACRO: `UVM_PACKER_MAX_BYTES
//
// Defines the maximum bytes to allocate for packing an object using
// the <uvm_packer>. Default is <`UVM_MAX_STREAMBITS>, in ~bytes~.

`ifndef UVM_PACKER_MAX_BYTES
 `define UVM_PACKER_MAX_BYTES `UVM_MAX_STREAMBITS
`endif
odt文件转doc
https://blog.csdn.net/weixin_41712499/article/details/107656792
使用libreoffice的软件:
libreoffice --headless --convert-to doc path-to-your-doc.doc
merge命令和difflib
https://www.uc23.net/command/337.html
merge命令是三个操作数的命令,操作参数分别是:mod1.txt orig.txt mod2.txt,合并结果存入mod1.txt文件中。如果是使用python脚本,则使用difflib库实现合并,后者的合并只需要mod1.txt和mod2.txt。
merge 例子
假设我们有一个名为orig.txt的文件,其中包含以下内容。
Apples are red.
Oranges are orange.
Blueberries are delicious.
新建一个文件mod1.txt,是修改后的版本orig.txt:
Apples are obviously red.
Oranges are blue.
Blueberries are delicious.
新建mod2.txt的文件,也是orig.txt的修改版本:
Apples are obviously red.
Oranges are NOT blue.
Blueberries are delicious.
然后运行合并,如下所示:
merge mod1.txt orig.txt mod2.txt
它将分析所有三个文件,写入mod1.txt,并显示以下警告:
merge: warning: conflicts during merge
这意味着合并成功,但是我们应该意识到存在冲突。如果打开mod1.txt(默认情况下是写入合并的文件),则会发现它现在包含以下文本:
<<<<<<< mod1.txt
Apples are obviously red.
Oranges are blue.
=======
Apples are obviously red.
Oranges are NOT blue.
>>>>>>> mod2.txt
Blueberries are delicious.
由我们决定保留哪个,然后手动对文件进行编辑。
difflib的例子
由gpt生成,原理大体可用。
import difflib

def merge_files(file1_content, file2_content):
    differ = difflib.Differ()
    diff = list(differ.compare(file1_content.splitlines(), file2_content.splitlines()))

    merged_content = []
    for line in diff:
        if line.startswith('? '):  # Lines that are common to both files
            merged_content.append(line[2:])
        elif line.startswith('- '):  # Lines unique to file1
            merged_content.append(line[2:])
        elif line.startswith('+ '):  # Lines unique to file2
            merged_content.append(line[2:])
        else:  # Lines common to both files
            merged_content.append(line[2:])

    return '\n'.join(merged_content)

# 读取两个文件的内容
with open('file1.txt', 'r') as file1:
    file1_content = file1.read()

with open('file2.txt', 'r') as file2:
    file2_content = file2.read()

# 合并文件内容并显示
merged_content = merge_files(file1_content, file2_content)
print(merged_content)
python调用命令
python调用命令的标准写法popen
subprocess.Popen(command, shell=True, stdout=subprocess.PIPE, stderr=subprocess.PIPE, text=True)中的shell=True必须
import subprocess

# 示例1: 执行一个简单的命令
command = "echo Hello, World!"
process = subprocess.Popen(command, shell=True, stdout=subprocess.PIPE, stderr=subprocess.PIPE, text=True)

# 等待子进程执行完毕
return_code = process.wait()

# 获取标准输出和标准错误
stdout, stderr = process.communicate()

print(f"返回码: {return_code}")
print(f"标准输出: {stdout}")
print(f"标准错误: {stderr}")

# 示例2: 执行带参数的命令
command_with_args = ["echo", "Hello, World!"]
process_with_args = subprocess.Popen(command_with_args, stdout=subprocess.PIPE, stderr=subprocess.PIPE, text=True)

# 等待子进程执行完毕
return_code_with_args = process_with_args.wait()

# 获取标准输出和标准错误
stdout_with_args, stderr_with_args = process_with_args.communicate()

print(f"返回码(带参数): {return_code_with_args}")
print(f"标准输出(带参数): {stdout_with_args}")
print(f"标准错误(带参数): {stderr_with_args}")
python调用process的实时输出
import subprocess
def run_shell(shell):
    cmd = subprocess.Popen(shell, stdin=subprocess.PIPE, stderr=subprocess.PIPE,
                           stdout=subprocess.PIPE, universal_newlines=True, shell=True, bufsize=1)
    # 实时输出
    while True:
        line = cmd.stdout.readline()
        print(line, end='')
        if subprocess.Popen.poll(cmd) == 0:  # 判断子进程是否结束
            break
    return cmd.returncode
if __name__ == '__main__':
    print(run_shell("ping www.baidu.com"))
clog2和系统函数
https://blog.csdn.net/wuzhikaidetb/article/details/121853295
\(clog2是Verilog--2005标准新增的一个系统函数,功能就是对输入整数实现以2为底取对数,其结果向上取整(如5.5取6)。
\)clog2系统函数在Vivado实现的是以e为底取对数,而不是2。
java添加classpath
类似:
/usr/shared:/usr/local/bin:/home/liaoxuefeng/bin
https://www.liaoxuefeng.com/wiki/1252599548343744/1260466914339296
https://en.wikipedia.org/wiki/Java_class_file#General_layout
${1+$@}的用法
\({1+"\)@"}语法首先测试是否设置了\(1,也就是说,是否存在参数。
如果是,那么这个表达式将被替换为整个“\)@”参数列表。
如果不是,那么它将坍缩成空而不是空参数。
其实就是一个普通的字符串替换语法,没有什么神奇的地方。用处其实也不多。之前是为了检查空参数,防止循环中出现打印空参数,但是现在都不需要这种了。
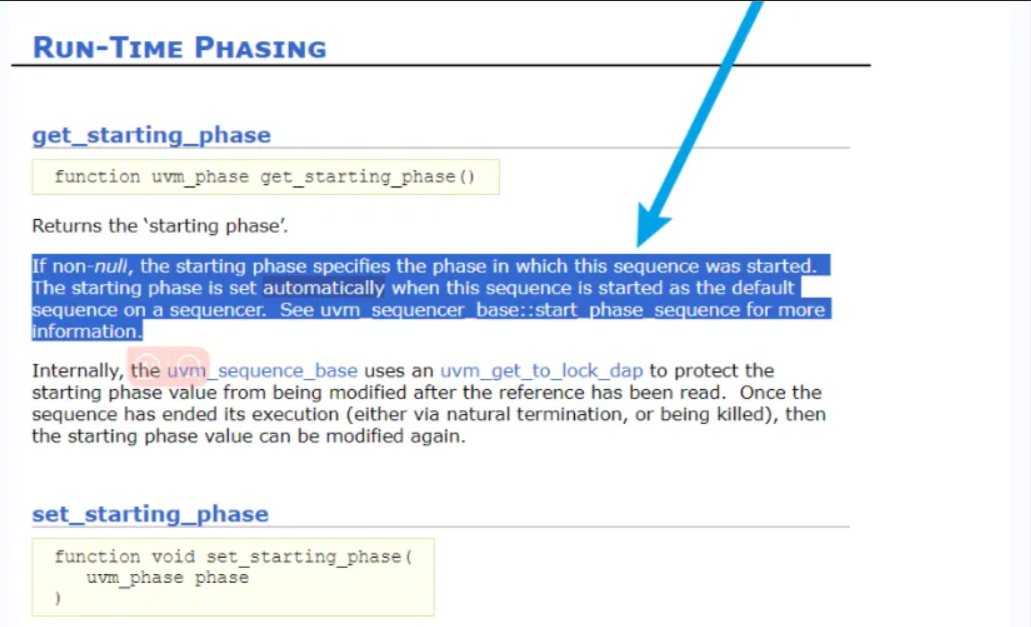
uvm1.1和uvm1.2的starting_phase
uvm1.2应该也有default sequence的方法启动sequence,但是uvm1.2通过get_starting_phase的方式取得。可以从vip的sequence代码中发现这样。
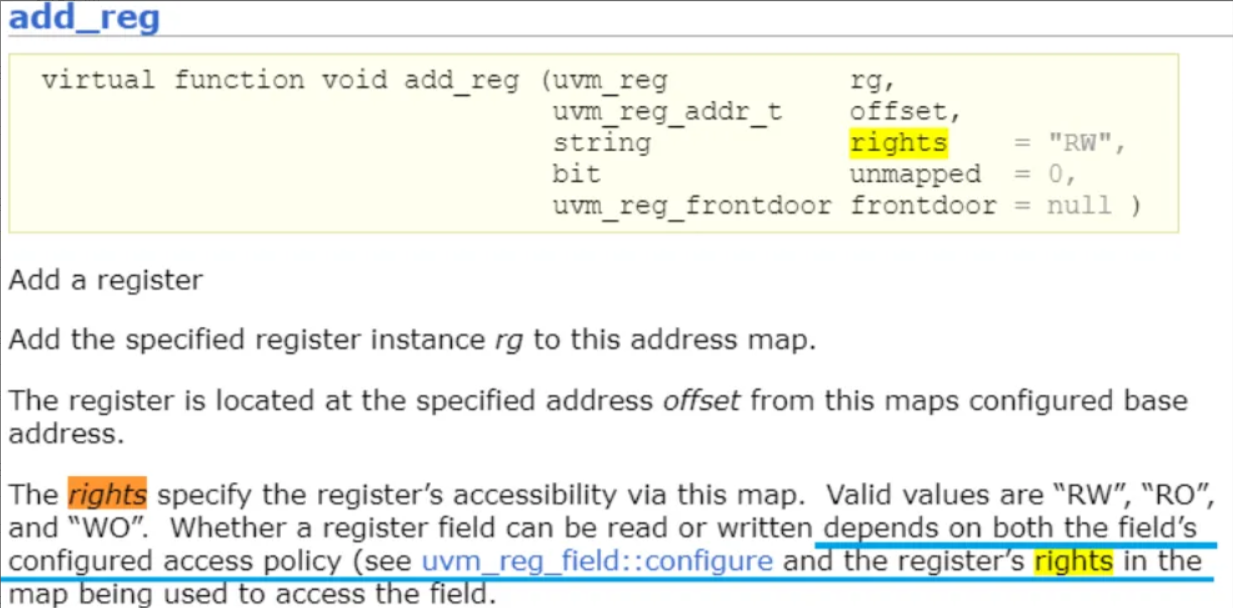
add_reg和configuration的属性控制
共同控制。
Le vent se lève! . . . il faut tenter de vivre!
Le vent se lève! . . . il faut tenter de vivre!

 浙公网安备 33010602011771号