WEB服务-Nginx之8-七层负载均衡
WEB服务-Nginx之8-七层负载均衡
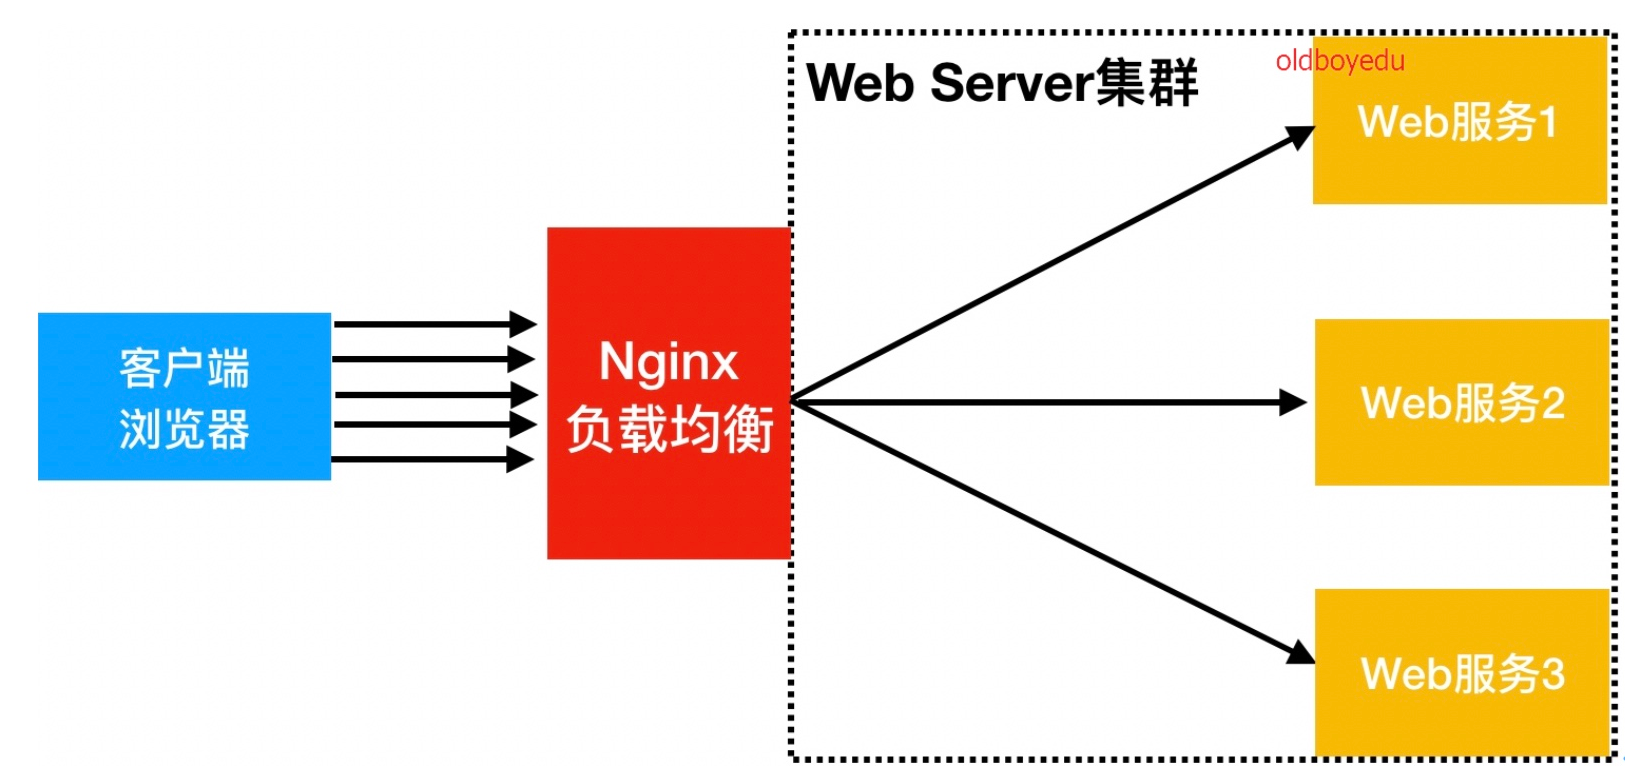
Nginx负载均衡基本概述
为什么要使用负载均衡?
当Web服务器直接面向用户,往往要承载大量并发请求,单台服务器难以负荷。因此使用多台Web服务器组成集群,前端使用Nginx负载均衡,将请求分散到后端服务器集群中,实现负载分发。那么会大大提升系统的吞吐率、请求性能、高容灾性。
SLB(Server Load Balance)负载均衡最常用,SLB的调度节点和服务节点通常是在一个地域里面。它在这个小的逻辑地域里面决定了它对部分服务的实时性、响应性是非常好的。
当海量用户请求过来,首先请求调度节点,调度节点将用户的请求转发给后端对应的服务节点,服务节点处理完请求后在转发给调度节点,调度节点最后响应给用户节点。
负载均衡又叫负载、Load Balance或LB,在公有云中叫:
- SLB 阿里云负载均衡
- QLB 青云负载均衡
- CLB 腾讯云负载均衡
- ULB ucloud负载均衡
常见的负载均衡的软件有:Nginx、Haproxy和LVS(仅四层)

负载均衡能实现的应用场景一:四层负载均衡
四层负载均衡指的是OSI七层模型中的传输层,那么传输层Nginx已经能支持TCP/IP的控制,所以只需要对客户端的请求进行TCP/IP协议的包转发就可以实现负载均衡。它的好处是性能非常快、只需要底层进行应用处理,而不需要进行一些复杂的逻辑。

负载均衡能实现的应用场景二:七层负载均衡
七层负载均衡指的是OSI七层模型中的应用层,它可以完成很多应用方面的协议请求,比如http应用的负载均衡,它可以实现http信息的改写、头信息的改写、安全应用规则控制、URL匹配规则控制、以及转发、rewrite等等的规则。

四层负载均衡与七层负载均衡区别
四层负载均衡数据包在底层就进行了分发,而七层负载均衡数据包则是在最顶层进行分发、由此可以看出,七层负载均衡效率没有四负载均衡高。
但七层负载均衡更贴近于服务,例如:七层协议http协议,可以作会话保持,URL路径规则匹配、head头改写等等,这些是四层负载均衡无法实现的。
注意:四层负载均衡不识别域名,七层负载均衡识别域名
Nginx负载均衡配置实现
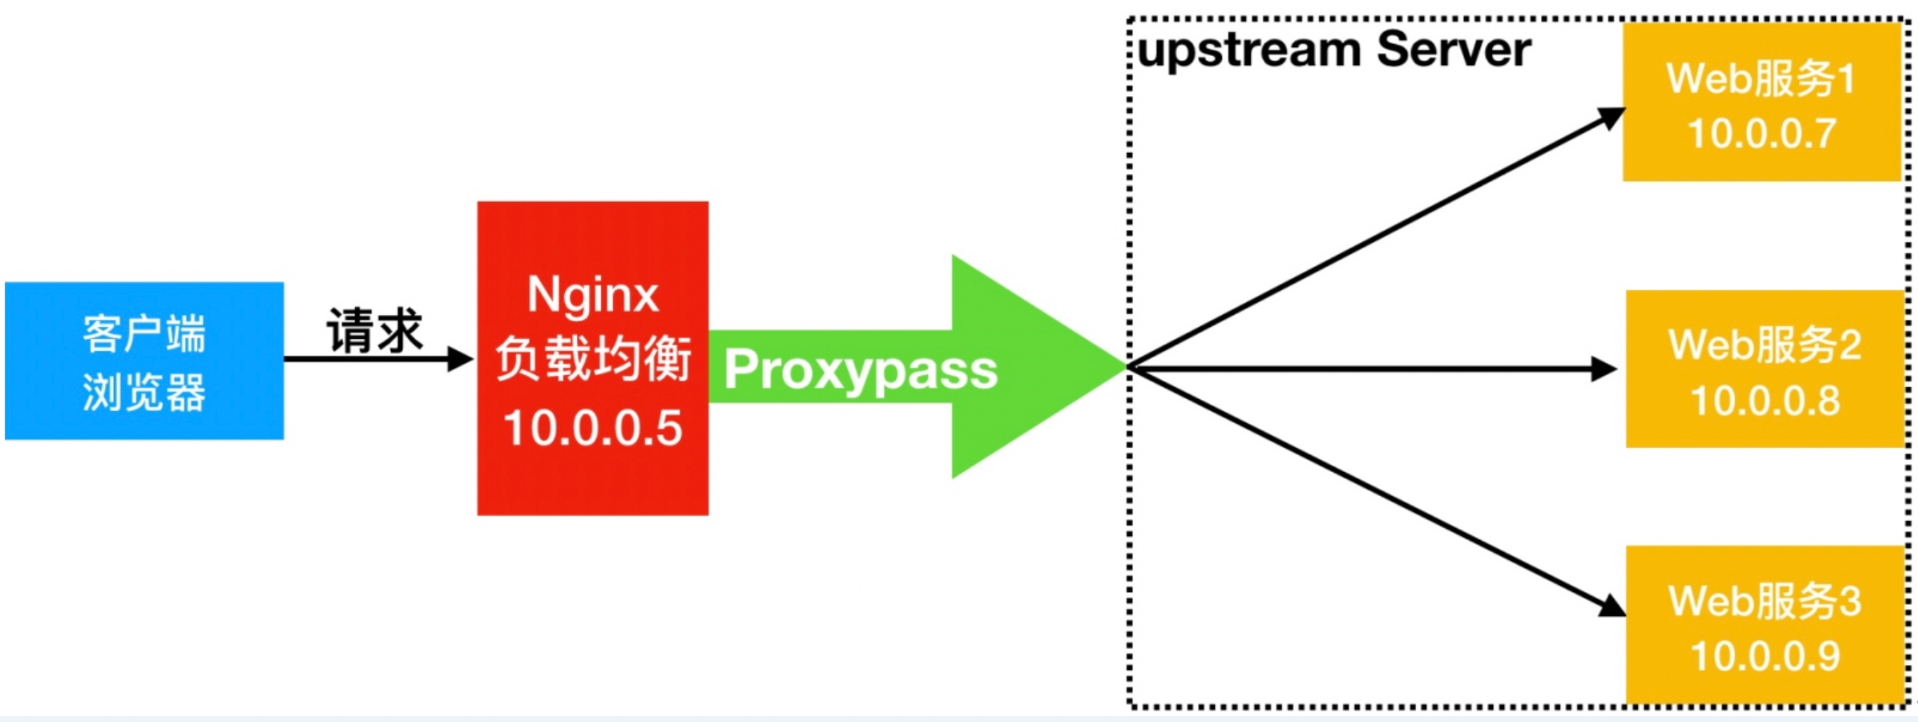
Nginx要实现负载均衡需要用到proxy_pass代理模块配置.
Nginx负载均衡与Nginx代理不同地方在于,Nginx的一个location仅能代理一台服务器,而Nginx负载均衡则是将客户端请求代理转发至一组upstream虚拟服务池.
模块总结
ngx_http_upstream_module模块用于定义可以由proxy_pass,fastcgi_pass,uwsgi_pass,scgi_pass,memcached_pass和grpc_pass指令引用的服务器组。
# 定义一组服务器。服务器可以在不同的端口上侦听。可以混合使用监听TCP和UNIX-domain套接字。
Syntax: upstream name { ... }
Default: -
Context: http
示例:
resolver 10.0.0.1;

upstream dynamic {
    zone upstream_dynamic 64k;
    hash $remote_addr consistent;

    server backend1.example.com      weight=5;
    server backend2.example.com:8080 fail_timeout=5s slow_start=30s;
    server 192.0.2.1                 max_fails=3;
    server backend3.example.com      resolve;
    server backend4.example.com      service=http resolve;

    server backup5.example.com:8080  backup;
    server unix:/tmp/backend6;
}

server {
    listen 80;
    location / {
        proxy_pass http://dynamic;
        health_check;
    }
}
-
weight=number设置服务器的权重,默认情况下为1。 -
max_conns=number限制代理服务器的同时活动连接的最大数量。默认值为零,表示没有限制。如果服务器组未驻留在共享内存zone,则此限制在每个工作进程中均有效。注意:如果启用了
keepalive连接,多个worker进程和共享内存zone,则到代理服务器的活动和空闲连接总数可能会超过该max_conns值。 -
max_fails=numberfail_timeout参数设置的时间内与服务器通信失败的尝试次数。默认1。禁用0。认为失败的尝试是由 proxy_next_upstream, fastcgi_next_upstream, uwsgi_next_upstream, scgi_next_upstream, memcached_next_upstream和 grpc_next_upstream 指令定义的。 -
fail_timeout=time尝试与服务器通信一直失败的超时时间。默认10秒。 -
backup将服务器标记为备份服务器。在主服务器不可用时,传递请求。该参数不能与hash,ip_hash和random负载平衡方法一起使用。 -
resolve监视指定域名对应的IP地址(A记录)的更改,并自动修改上游配置,不需要重启nginx。服务器组必须驻留在共享内存zone。resolver必须在http块或相应的上游块中指定 。 -
service=name启用DNS
SRV记录的解析并设置服务name。必须指定resolve参数,并指定不带端口号的主机名。最高优先级的SRV记录(具有相同的最低优先级值的记录)被解析为主服务器,其余的SRV记录被解析为备用服务器。如果为服务器指定了backup参数,则将高优先级SRV记录解析为备份服务器,其余的SRV记录将被忽略。 -
health_check;由ngx_http_upstream_hc_module或ngx_stream_upstream_hc_module模块提供
Syntax: 	zone name [size];
Default:	—
Context:	upstream
定义共享内存区域的name和size,以保留在工作进程之间共享的组配置和运行时状态。几个组可以共享同一区域。在这种情况下,size仅指定一次就足够了。允许更改组成员身份或修改特定服务器的设置,而无需重启nginx。
ngx_http_proxy_module模块允许将请求传递到另一台服务器。
Syntax:	    proxy_next_upstream error | timeout | invalid_header | http_500 | http_502 | http_503 | http_504 | http_403 | http_404 | http_429 | non_idempotent | off ...;
Default:	proxy_next_upstream error timeout;
Context:	http, server, location
proxy_next_upstream指定在哪种情况下将请求传递到下一个服务器
error与服务器建立连接,向服务器传递请求或读取响应头时发生错误;timeout与服务器建立连接,向服务器传递请求或读取响应标头时发生超时;invalid_header服务器返回了空的或无效的响应;http_500|http_502|http_503|http_504|http_403|http_404|http_429non_idempotent允许重试具有请求 非幂等 方法(POST,LOCK,PATCH)的请求;off禁用将请求传递到下一个服务器。
只有在还没有任何内容发送给客户端的情况下,才有可能将请求传递给下一台服务器。如果在响应的传输过程中发生错误或超时,无法解决。
环境准备:
| 角色 | 外网IP(NAT) | 内网IP(LAN) | 主机名 |
|---|---|---|---|
| lb01 | eth0:10.0.0.5 | eth1:172.16.1.5 | lb01 |
| web01 | eth0:10.0.0.7 | eth1:172.16.1.7 | web01 |
| web02 | eth0:10.0.0.8 | eth1:172.16.1.8 | web02 |
web01配置:
[root@web01 ~]# cat > /etc/nginx/conf.d/node.conf <<EOF
server {
    listen 80;
    server_name node.oldboy.com;
    location / {
        root /node;
        index index.html;
    }
}
EOF
[root@web01 ~]# mkdir /node
[root@web01 ~]# echo "Web01..." > /node/index.html
[root@web01 ~]# systemctl reload nginx
web02配置:
[root@web02 ~]# cat > /etc/nginx/conf.d/node.conf <<EOF
server {
    listen 80;
    server_name node.oldboy.com;
    location / {
        root /node;
        index index.html;
    }
}
EOF
[root@web02 ~]# mkdir /node
[root@web02 ~]# echo "Web02..." > /node/index.html
[root@web02 ~]# systemctl reload nginx
lb01配置:
[root@lb01 ~]# cat > /etc/nginx/conf.d/proxy_node.conf <<EOF
upstream node {
    server 172.16.1.7:80;
    server 172.16.1.8:80;
}
server {
    listen 80;
    server_name node.oldboy.com;

    location / {
        proxy_pass http://node;
        include proxy_params;
    }
}
EOF

[root@lb01 ~]# vim /etc/nginx/proxy_params
proxy_http_version 1.1;
proxy_set_header Host $http_host;
proxy_set_header X-Real-IP $remote_addr;
proxy_set_header X-Forwarded-For $proxy_add_x_forwarded_for;

proxy_connect_timeout 30;
proxy_send_timeout 60;
proxy_read_timeout 60;

proxy_buffering on;
proxy_buffer_size 32k;
proxy_buffers 4 128k;

[root@lb01 ~]# systemctl reload nginx
windows配置:
在C:\Windows\System32\drivers\etc\hosts文件中添加一行10.0.0.5 node.oldboy.com
浏览器访问测试:http://node.oldboy.com
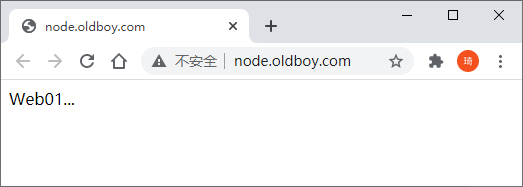
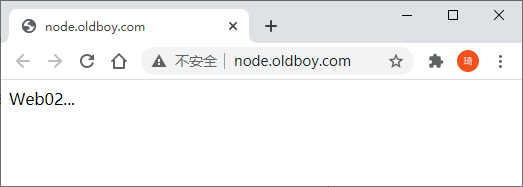
快速刷新可以看到在web01和web02直接切换
添加hosts解析:
[root@lb01 ~]# echo 10.0.0.5 node.oldboy.com >> /etc/hosts
[root@lb01 ~]# while true;do curl node.oldboy.com;sleep 0.5;done
Web01...
Web02...
Web01...
Web02...
Web01...
Web02...
注意:
- 如果后台服务连接超时,也就是一个节点down掉,Nginx会更据负载均衡的具体设置,将请求转移到其他的节点上。
- 如果后台服务连接没有down掉,但是返回错误异常码(如:504、502、500)。此时需要设置负载均衡
proxy_next_upstream才能将请求转移到其他的节点上继续处理,提高平台访问成功率。server { listen 80; server_name www.oldboy.com; location / { proxy_pass http://node; proxy_next_upstream error timeout http_500 http_502 http_503 http_504; } }
lb01配置负载均衡:web01和web02的wordpress和wecenter
[root@lb01 ~]# cat > /etc/nginx/conf.d/proxy_web.conf <<EOF
upstream web {
    server 172.16.1.7:80;
    server 172.16.1.8:80;
}
server {
    listen 80;
    server_name blog.oldboy.com;

    location / {
        proxy_pass http://web;
        include proxy_params;
    }
}
server {
    listen 80;
    server_name zh.oldboy.com;

    location / {
        proxy_pass http://web;
        include proxy_params;
    }
}
EOF

[root@lb01 ~]# vim /etc/nginx/proxy_params
proxy_http_version 1.1;
proxy_set_header Host $http_host;
proxy_set_header X-Real-IP $remote_addr;
proxy_set_header X-Forwarded-For $proxy_add_x_forwarded_for;

proxy_connect_timeout 30;
proxy_send_timeout 60;
proxy_read_timeout 60;

proxy_buffering on;
proxy_buffer_size 32k;
proxy_buffers 4 128k;
重载nginx,添加hosts解析:
[root@lb01 ~]# systemctl reload nginx
[root@lb01 ~]# echo 10.0.0.5 blog.oldboy.com >> /etc/hosts
web01关闭php-fpm测试:
[root@web01 ~]# systemctl stop php-fpm.service
[root@lb01 ~]# curl -I blog.oldboy.com
HTTP/1.1 502 Bad Gateway
Server: nginx/1.16.1
Date: Mon, 21 Sep 2020 02:05:58 GMT
Content-Type: text/html
Content-Length: 157
Connection: keep-alive
[root@lb01 ~]# curl -I blog.oldboy.com
HTTP/1.1 200 OK
Server: nginx/1.16.1
Date: Mon, 21 Sep 2020 02:05:58 GMT
Content-Type: text/html
Content-Length: 4833
Connection: keep-alive
Last-Modified: Fri, 16 May 2014 15:12:48 GMT
ETag: "53762af0-12e1"
Accept-Ranges: bytes
修改lb01配置:
[root@lb01 ~]# cat > /etc/nginx/conf.d/proxy_web.conf <<EOF
upstream web {
    server 172.16.1.7:80;
    server 172.16.1.8:80;
}
server {
    listen 80;
    server_name blog.oldboy.com;

    location / {
        proxy_pass http://web;
        include proxy_params;
        proxy_next_upstream error timeout http_500 http_502 http_503 http_504;
    }
}
server {
    listen 80;
    server_name zh.oldboy.com;

    location / {
        proxy_pass http://web;
        include proxy_params;
    }
}
EOF
重载nginx测试:不会再访问web01,请求转移到其他的节点上
[root@lb01 ~]# systemctl reload nginx
[root@lb01 ~]# curl -I blog.oldboy.com
HTTP/1.1 200 OK
Server: nginx/1.16.1
Date: Mon, 21 Sep 2020 02:12:55 GMT
Content-Type: text/html
Content-Length: 4833
Connection: keep-alive
Last-Modified: Fri, 16 May 2014 15:12:48 GMT
ETag: "53762af0-12e1"
Accept-Ranges: bytes
Nginx负载均衡调度算法
| 调度算法 | 概述 |
|---|---|
| 轮询 | 按时间顺序逐一分配请求到不同的后端服务器(默认) |
| weight | 加权轮询,weight值越大,分配到请求的几率越高 |
| ip_hash | 按访问IP的hash结果来分配请求,使来自同一IP的固定访问一个后端服务器,以实现会话保持 |
| url_hash | 按访问URL的hash结果来分配请求,使每个URL定向到同一个后端服务器 |
| least_conn | 最少链接数,分配请求到链接数最少的后端服务器,适用于长连接,当server拥有不同的权重时其为wlc,当所有后端主机连接数相同时,则使用wrr |
| random | 随机分配请求,同时考虑服务器的权重。可以配合其他算法使用。 |
| hash | 使用指定key的hash结果来分配请求,常用一致性哈希算法,用于代理Cache服务器 |
Nginx负载均衡[rr]轮询配置
upstream load_pass {
    server 10.0.0.7:80;
    server 10.0.0.8:80;
}
Nginx负载均衡[wrr]权重轮询配置
upstream load_pass {
    server 10.0.0.7:80 weight=5;
    server 10.0.0.8:80;
}
Nginx负载均衡ip_hash配置
upstream load_pass {
    ip_hash;
    server 10.0.0.7:80 weight=5;
    server 10.0.0.8:80;
}
注意:ip_hash不能和weight一起使用,优先weight,然后ip_hash,导致所有连接都分配到一个服务器上。使用ip_hash时,如果客户端都走相同代理,会导致某一台服务器连接过多
Nginx负载均衡least_conn配置
upstream load_pass {
    least_conn;
    server 10.0.0.7:80 weight=5;
    server 10.0.0.8:80;
}
Nginx负载均衡random配置
Syntax: 	random [two [method]];
Default:	-
Context:	upstream
可选two参数指示nginx随机选择两个服务器,然后对这两个服务器使用指定method算法。method默认使用least_conn。
Nginx负载均衡hash配置
Syntax: 	hash key [consistent];
Default:	-
Context:	upstream
指定服务器组的负载平衡方法,基于指定的key的hash表(客户端-服务器映射)来实现对请求的调度。key可以包含文本,变量或二者组合。
作用:将请求分类,同一类请求将发往同一个upstream server,所谓取模运算,就是计算两个数相除之后的余数,比如10%7=3, 7%4=3
注意:从组中添加或删除服务器可能会导致将大多数密钥重新映射到其他服务器。该方法与
Cache :: MemcachedPerl库兼容 。
使用consistent参数,将使用ketama一致性哈希算法。该方法可确保在将服务器添加到组中或从组中删除服务器时,只有很少的键将被重新映射到不同的服务器。这有助于为缓存服务器实现更高的缓存命中率,适用于后端是Cache服务器(如varnish)时使用。该方法与 Cache :: Memcached :: Fast Perl库兼容,ketama_points参数设置为160。
示例:
hash $request_uri consistent;  # 基于用户请求的uri做hash,一致性hash算法
hash $remote_addr;
hash $cookie_name;             # key为name的cookie
lb01配置:
使用hash $cookie_sessionid;实现固定访问一个服务器
[root@lb01 ~]# cat > /etc/nginx/conf.d/proxy_node.conf <<EOF
upstream node {
    server 172.16.1.7:80;
    server 172.16.1.8:80;
    hash \$cookie_sessionid;
}
server {
    listen 80;
    server_name node.oldboy.com;

    location / {
        proxy_pass http://node;
        include proxy_params;
    }
}
EOF
测试:
对sessionid指定的值作hash运算后固定分配到一个服务器
带相同的sessionid永远只访问一个服务器
[root@lb01 ~]# curl -b sessionid=123 node.oldboy.com
Web01...
[root@lb01 ~]# curl -b sessionid=133 node.oldboy.com
Web02...
缓存长连接
Syntax: 	keepalive connections;
Default:	-
Context:	upstream
激活缓存以连接到上游服务器。
connections参数设置每个worker进程的缓存中保留的与上游服务器的空闲保持连接的最大数量。超过此数目时,将关闭最近最少使用的连接。可节约nginx端口,并减少连接管理的消耗。
注意:
keepalive指令不限制Nginx工作进程可以打开的与上游服务器的连接总数。connections参数应设置为足够小的数字,以使上游服务器也可以处理新的传入连接。
具有Keepalive连接的上游memcached的示例配置:
upstream memcached_backend {
    server 127.0.0.1:11211;
    server 10.0.0.2:11211;

    keepalive 32;
}

server {
    ...

    location /memcached/ {
        set $memcached_key $uri;
        memcached_pass memcached_backend;
    }
}
对于HTTP, 应设置proxy_http_version 1.1;,并清除“Connection”标头字段:
upstream http_backend {
    server 127.0.0.1:8080;

    keepalive 16;
}

server {
    ...

    location /http/ {
        proxy_pass http://http_backend;
        proxy_http_version 1.1;
        proxy_set_header Connection "";
        ...
    }
}
或者,可以通过将“ Connection:Keep-Alive”标头字段传递给上游服务器来使用HTTP / 1.0持久连接,不建议使用此方法。
对于FastCGI服务器,应设置fastcgi_keep_conn on;:
upstream fastcgi_backend {
    server 127.0.0.1:9000;

    keepalive 8;
}

server {
    ...

    location /fastcgi/ {
        fastcgi_pass fastcgi_backend;
        fastcgi_keep_conn on;
        ...
    }
}
注意:
- 当使用默认循环方法以外的负载平衡器方法时,请在
keepalive指令之前将其激活。- SCGI和uwsgi协议没有保持连接的概念。
Nginx负载均衡后端状态
后端Web服务器在前端Nginx负载均衡调度中的状态
| 状态 | 概述 | |
|---|---|---|
| down | 当前的server暂时不参与负载均衡,一般用于停机维护 | 宕机功能 |
| backup | 预留的备份服务器 | 道歉功能 |
| max_fails | 允许请求失败的次数 | |
| fail_timeout | 失败max_fails次后,标记down,服务暂停时间 | |
| max_conns | 限制最大的TCP接收连接数 |
lb01配置:
[root@lb01 ~]# echo 10.0.0.5 node.oldboy.com >> /etc/hosts
[root@lb01 ~]# cat /etc/nginx/conf.d/proxy_node.conf
upstream node {
    server 172.16.1.7:80;
    server 172.16.1.8:80;
}
server {
    listen 80;
    server_name node.oldboy.com;

    location / {
        proxy_pass http://node;
        include proxy_params;
    }
}
[root@lb01 ~]# curl node.oldboy.com
Web01...
[root@lb01 ~]# curl node.oldboy.com
Web02...
修改lb01配置测试:
down状态测试结果:172.16.1.8不参与负载均衡,curl多少次也只有Web01...
[root@lb01 ~]# cat > /etc/nginx/conf.d/proxy_node.conf <<EOF
upstream node {
    server 172.16.1.7:80;
    server 172.16.1.8:80 down;
}
server {
    listen 80;
    server_name node.oldboy.com;

    location / {
        proxy_pass http://node;
        include proxy_params;
    }
}
EOF
[root@lb01 ~]# systemctl reload nginx
[root@lb01 ~]# curl node.oldboy.com
Web01...
backup,max_fails,fail_timeout状态测试结果:
172.16.1.8充当备份服务器,在172.16.1.7服务器正常访问时不参与负载均衡,curl多少次也只返回Web01...
当172.16.1.7掉线后:
- 连接1次,等待,失败返回Web02...
- 连接2次,等待,失败返回Web02...,并且给172.16.1.7标记为down,暂停服务5秒,之后5秒内curl多少次也只返回Web02...,5秒后再次尝试和172.16.1.7建立连接
[root@lb01 ~]# cat > /etc/nginx/conf.d/proxy_node.conf <<EOF
upstream node {
    server 172.16.1.7:80 max_fails=2 fail_timeout=5s;
    server 172.16.1.8:80 backup;
}
server {
    listen 80;
    server_name node.oldboy.com;

    location / {
        proxy_pass http://node;
        include proxy_params;
    }
}
EOF
[root@lb01 ~]# systemctl reload nginx
[root@lb01 ~]# curl node.oldboy.com
Web01...
[root@web01 ~]# ifdown eth1
[root@lb01 ~]# curl node.oldboy.com
Web02...
max_conns状态测试结果:TCP连接数,同时最多有1个,超出的不能访问
[root@lb01 ~]# cat > /etc/nginx/conf.d/proxy_node.conf <<EOF
upstream node {
    server 172.16.1.8:80 max_conns=1;
}
server {
    listen 80;
    server_name node.oldboy.com;

    location / {
        proxy_pass http://node;
        include proxy_params;
    }
}
EOF
[root@lb01 ~]# systemctl reload nginx
Nginx负载均衡健康检查
可以使用第三方模块nginx_upstream_check_module来检测后端服务的健康状态。
- 安装依赖包
[root@lb01 ~]# yum install -y gcc gcc-c++ pcre-devel openssl-devel glibc patch
- 下载nginx源码包和nginx_upstream_check第三方模块,并解压
[root@lb01 ~]# cd /opt
[root@lb01 opt]# wget http://nginx.org/download/nginx-1.16.1.tar.gz
[root@lb01 opt]# wget https://github.com/yaoweibin/nginx_upstream_check_module/archive/master.zip
[root@lb01 opt]# tar xf nginx-1.16.1.tar.gz
[root@lb01 opt]# unzip master.zip
- 进入nginx目录,打补丁(nginx的版本是1.16补丁就选择1.16的,p1代表在nginx目录,p0是不在nginx目录)
[root@lb01 opt]# cd nginx-1.16.1/
[root@lb01 nginx-1.16.1]# patch -p1 <../nginx_upstream_check_module-master/check_1.16.1+.patch
patching file src/http/modules/ngx_http_upstream_hash_module.c
patching file src/http/modules/ngx_http_upstream_ip_hash_module.c
patching file src/http/modules/ngx_http_upstream_least_conn_module.c
patching file src/http/ngx_http_upstream_round_robin.c
patching file src/http/ngx_http_upstream_round_robin.h
- 检验环境,编译安装,创建缓存目录
[root@lb01 nginx-1.16.1]# ./configure --prefix=/etc/nginx --sbin-path=/usr/sbin/nginx --modules-path=/usr/lib64/nginx/modules --conf-path=/etc/nginx/nginx.conf --error-log-path=/var/log/nginx/error.log --http-log-path=/var/log/nginx/access.log --pid-path=/var/run/nginx.pid --lock-path=/var/run/nginx.lock --http-client-body-temp-path=/var/cache/nginx/client_temp --http-proxy-temp-path=/var/cache/nginx/proxy_temp --http-fastcgi-temp-path=/var/cache/nginx/fastcgi_temp --http-uwsgi-temp-path=/var/cache/nginx/uwsgi_temp --http-scgi-temp-path=/var/cache/nginx/scgi_temp --user=nginx --group=nginx --with-compat --with-file-aio --with-threads --with-http_addition_module --with-http_auth_request_module --with-http_dav_module --with-http_flv_module --with-http_gunzip_module --with-http_gzip_static_module --with-http_mp4_module --with-http_random_index_module --with-http_realip_module --with-http_secure_link_module --with-http_slice_module --with-http_ssl_module --with-http_stub_status_module --with-http_sub_module --with-http_v2_module --with-mail --with-mail_ssl_module --with-stream --with-stream_realip_module --with-stream_ssl_module --with-stream_ssl_preread_module --add-module=/opt/nginx_upstream_check_module-master --with-cc-opt='-O2 -g -pipe -Wall -Wp,-D_FORTIFY_SOURCE=2 -fexceptions -fstack-protector-strong --param=ssp-buffer-size=4 -grecord-gcc-switches -m64 -mtune=generic -fPIC' --with-ld-opt='-Wl,-z,relro -Wl,-z,now -pie'
...
  nginx path prefix: "/etc/nginx"
  nginx binary file: "/usr/sbin/nginx"
  nginx modules path: "/usr/lib64/nginx/modules"
  nginx configuration prefix: "/etc/nginx"
  nginx configuration file: "/etc/nginx/nginx.conf"
  nginx pid file: "/var/run/nginx.pid"
  nginx error log file: "/var/log/nginx/error.log"
  nginx http access log file: "/var/log/nginx/access.log"
  nginx http client request body temporary files: "/var/cache/nginx/client_temp"
  nginx http proxy temporary files: "/var/cache/nginx/proxy_temp"
  nginx http fastcgi temporary files: "/var/cache/nginx/fastcgi_temp"
  nginx http uwsgi temporary files: "/var/cache/nginx/uwsgi_temp"
  nginx http scgi temporary files: "/var/cache/nginx/scgi_temp"
[root@lb01 nginx-1.16.1]# make -j 2 && make install && mkdir /var/cache/nginx/
- 在已有的负载均衡上增加健康检查的功能,启动nginx
[root@lb01 ~]# sed -i '117i include /etc/nginx/conf.d/*.conf;' /etc/nginx/nginx.conf
[root@lb01 ~]# cat > /etc/nginx/conf.d/proxy_node.conf <<EOF
upstream node {
server 172.16.1.7:80 max_fails=2 fail_timeout=10s;
server 172.16.1.8:80 max_fails=2 fail_timeout=10s;
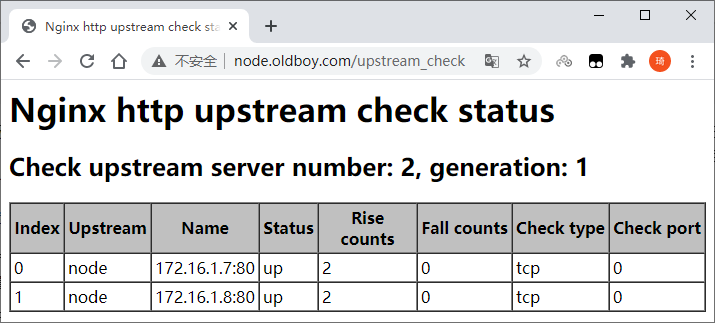
check interval=3000 rise=2 fall=3 timeout=1000 type=tcp;
#interval 检测间隔时间,单位为毫秒
#rise 表示请求2次正常,标记此后端的状态为up
#fall 表示请求3次失败,标记此后端的状态为down
#timeout 超时时间,单位为毫秒
#type 类型为tcp
}
server {
listen 80;
server_name node.oldboy.com;
location / {
proxy_pass http://node;
include proxy_params;
}
location /upstream_check {
check_status;
}
}
EOF
[root@lb01 ~]# nginx
- 浏览器访问http://node.oldboy.com/upstream_check
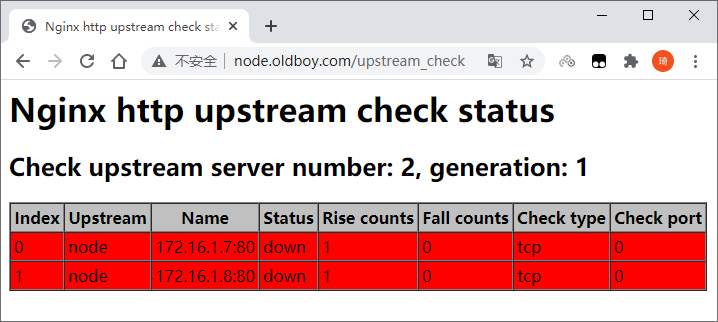
- 浏览器访问http://node.oldboy.com/刷新几次,再查看http://node.oldboy.com/upstream_check
Nginx负载均衡会话保持
在使用负载均衡的时候会遇到会话保持的问题,可通过如下方式进行解决。
- 使用nginx的ip_hash,使来自同一IP的请求固定访问一个后端服务器
- 建立服务端的
session共享(NFS,MySQL,memcache,redis,file)
session和cookie:
用户登录后,服务器创建一个键值对cookie:session(key:value)储存在共享存储服务中,并发送cookie给客户端保存在浏览器中。之后浏览器每次请求时,请求报文头部会携带cookie。服务端会拿用户的cookie作为key去共享存储服务里查询对应的value(session),以此来确认用户身份,保持会话。
一个用户在同一域名下网站的cookie都是一样的,所以无论几台服务器,无论请求分配到哪一台服务器上,同一用户的cookie是不变的。也就是说cookie对应的session也是唯一的。所以,这里只要保证多台业务服务器访问同一个共享存储服务器(NFS,MySQL,memcache,redis,file)就行了。
安装配置phpmyadmin
- web01配置
[root@web01 ~]# vim /etc/nginx/conf.d/php.conf
server {
	listen 80;
	server_name php.oldboy.com;
	root /code/phpMyAdmin-4.8.4-all-languages;

	location / {
		index index.php index.html;
	}

	location ~ \.php$ {
		fastcgi_pass 127.0.0.1:9000;
		fastcgi_param SCRIPT_FILENAME $document_root$fastcgi_script_name;
		include fastcgi_params;
	}
}

[root@web01 ~]# systemctl reload nginx
- phpmyadmin安装
[root@web01 ~]# cd /code
[root@web01 code]# wget https://files.phpmyadmin.net/phpMyAdmin/4.8.4/phpMyAdmin-4.8.4-all-languages.zip
[root@web01 code]# unzip phpMyAdmin-4.8.4-all-languages.zip
- 拷贝phpmyadmin的示例文件作为配置文件,修改连接的远程数据库地址,并统一用户授权
[root@web01 code]# cp /code/phpMyAdmin-4.8.4-all-languages/config.sample.inc.php /code/phpMyAdmin-4.8.4-all-languages/config.inc.php
[root@web01 code]# sed -i "/.*'localhost';$/c \$cfg['Servers'][\$i]['host'] = '172.16.1.51';" /code/phpMyAdmin-4.8.4-all-languages/config.inc.php
[root@web01 code]# chown -R www.www /var/lib/php/
-
windows配置:
在
C:\Windows\System32\drivers\etc\hosts文件中添加一行10.0.0.7 php.oldboy.com -
使用浏览器访问页面,获取cookie信息
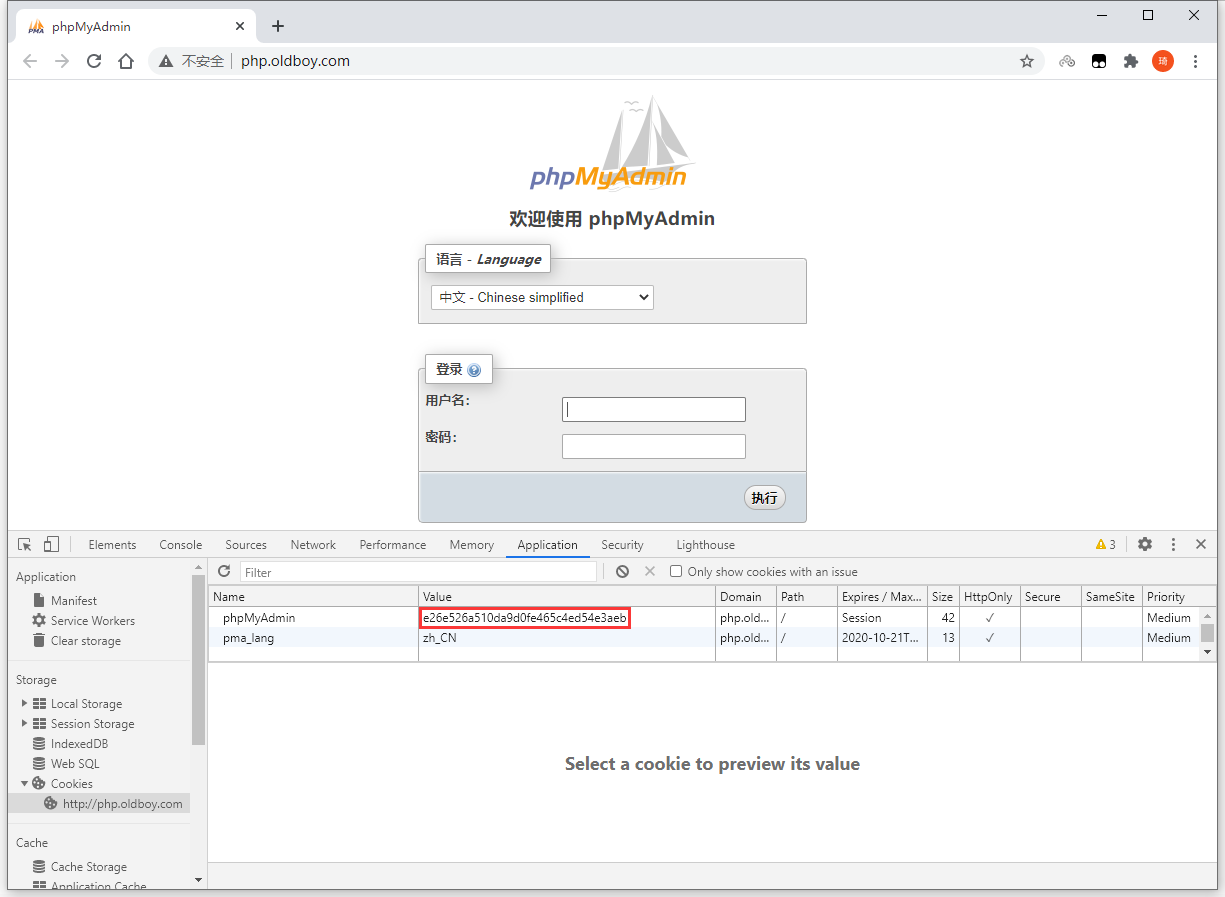
- 在web01服务器查看对比
[root@web01 ~]# ll /var/lib/php/session/
total 4
-rw------- 1 www www 49 Sep 21 13:12 sess_e26e526a510da9d0fe465c4ed54e3aeb
- 将web01上配置好的phpmyadmin和nginx配置文件推送到web02上
[root@web01 code]# scp -rp /code/phpMyAdmin-4.8.4-all-languages/ root@172.16.1.8:/code
[root@web01 code]# scp /etc/nginx/conf.d/php.conf root@172.16.1.8:/etc/nginx/conf.d/
- web02重载Nginx并统一用户授权
[root@web02 code]# systemctl reload nginx
[root@web02 code]# chown -R www.www /var/lib/php/
-
windows配置:在
C:\Windows\System32\drivers\etc\hosts文件中修改刚才那行为10.0.0.8 php.oldboy.com使用浏览器访问页面测试
-
加入负载均衡
[root@lb01 ~]# cat >/etc/nginx/conf.d/proxy_php.conf << EOF
upstream php {
        server 172.16.1.7:80;
        server 172.16.1.8:80;
}
server {
        listen 80;
        server_name php.oldboy.com;
        location / {
                proxy_pass http://php;
                include proxy_params;
        }
}
EOF
[root@lb01 ~]# systemctl reload nginx
- windows配置:
在C:\Windows\System32\drivers\etc\hosts文件中修改刚才那行为10.0.0.5 php.oldboy.com
- 测试发现:永远都登录不上去
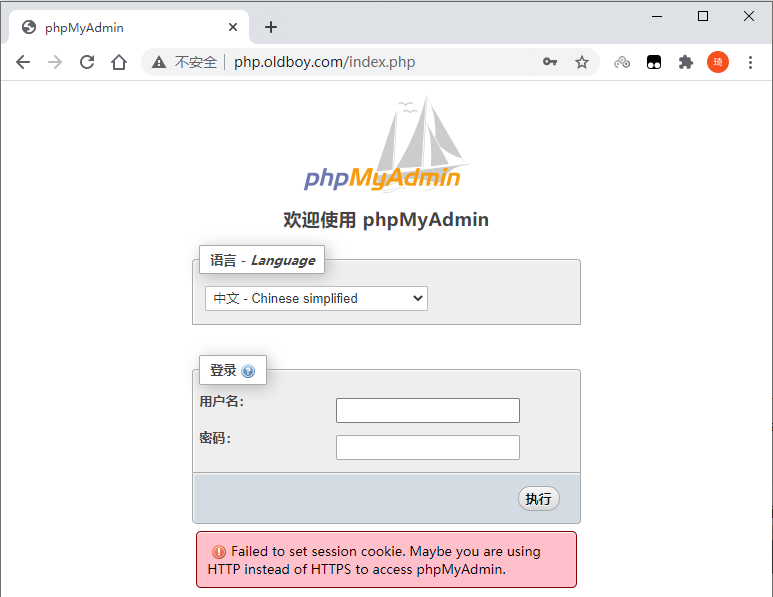
服务器每次建立连接都会创建新的cookie,登录成功后php默认将cookie:session保存在本地文件。发送登录请求,会轮询到下一个服务器,而下一个服务器会创建新的cookie却没有之前的session,因此登录失败。继续登录,发送登录请求后,会轮询到下一个服务器,而下一个服务器会创建新的cookie却没有之前的session,因此登录失败。无限循环... ...
使用redis建立会话保持
- 安装redis
[root@db01 ~]# yum -y install redis
- 配置redis监听172.16.1.51
[root@db01 ~]# sed -i '/^bind/c bind 127.0.0.1 172.16.1.51' /etc/redis.conf
- 启动redis并加入开机启动
[root@db01 ~]# systemctl start redis
[root@db01 ~]# systemctl enable redis
- 修改php配置session连接redis
[root@web01 ~]# sed -i '/session.save_handler/c session.save_handler = redis' /etc/php.ini
[root@web01 ~]# sed -i '/;session.save_path/c session.save_path = "tcp://172.16.1.51:6379"' /etc/php.ini
[root@web01 ~]# sed -i '/session.auto_start/c session.auto_start = 1' /etc/php.ini
;session.save_path = "tcp://172.16.1.51:6379?auth=123" # redis带密码
- 修改php-fpm配置
# /etc/php-fpm.d/www.conf里注释下面两条内容,否则session还会一直写入/var/lib/php/session目录中
[root@web01 ~]# sed -i 's/^php_value\[session.save_handler\].*/;&/' /etc/php-fpm.d/www.conf
[root@web01 ~]# sed -i 's/^php_value\[session.save_path\].*/;&/' /etc/php-fpm.d/www.conf
- 将web01上配置好的
/etc/php.ini和/etc/php-fpm.d/www.conf推送到web02
[root@web01 code]# scp /etc/php.ini root@172.16.1.8:/etc/php.ini
[root@web01 code]# scp /etc/php-fpm.d/www.conf root@172.16.1.8:/etc/php-fpm.d/www.conf
- 重载php-fpm
[root@web01 ~]# systemctl reload php-fpm
[root@web02 ~]# systemctl reload php-fpm
- redis查看cookie和页面对比
[root@db01 ~]# redis-cli
127.0.0.1:6379> keys *
1) "PHPREDIS_SESSION:ad8969151cb715a66b001d2f93a58a2b"

- 多次刷新cookie保持不变

 浙公网安备 33010602011771号