树莓派3b 移植RT-Thread 64位操作系统
树莓派3b 移植RT-Thread 64位操作系统
一、资源准备
1、系统要求
本方法使用的是Linux (Ubuntu16.04) 系统。
2、硬件资源
- 树莓派3b
- sd卡
- ttl转usb模块
3、软件资源
-
树莓派原生系统镜像
[[Raspberry Pi Imager for Windows]:https://downloads.raspberrypi.org/raspios_armhf_latest
-
RT-Thread源码
-
gcc-arm-8.3-2019.03-x86_64-aarch64-elf 交叉编译工具
二、烧录树莓派原生系统
1、格式化SD卡
有时使用windows进行格式化可能会导致后续的烧录操作失败,推荐使用SD Card Formatter进行格式化。
2、烧录系统镜像
将下载的系统镜像压缩包进行解压得到img文件,使用balenaEtcher将镜像烧录到sd卡中,显示如下画面即为烧录成功。

三、移植RT-Thread
1、工具链及源代码准备
将下载下来的 gcc-arm-8.3-2019.03-x86_64-aarch64-elf.tar.xz 文件放在系统opt/目录下进行解压
若官网下载速度过慢可通过下方链接进行下载
链接:https://pan.baidu.com/s/1rroD0IqHPnBOXcE_NeVQ6g

提取码:hv3i
使用如下指令下载RTT源码:
git clone git@github.com:RT-Thread/rt-thread.git
注:使用git指令进行下载需要先在系统中使用sudo apt-get install git指令来安装git,并对github进行配置,配置过程可参考下方链接博文。
[[Ubuntu Github基本使用方法]: https://blog.csdn.net/weixin_43793181/article/details/103111290
或可直接从github下载源码并解压到系统某处。
2、下载scons
scons为Python编写的自动化构建工具,我们使用此工具编译RTT源代码并生成系统镜像。使用如下指令安装scons:
sudo apt-get install scons
3、编译源码
打开Terminal进入RTT源码rt-thread-master\bsp\raspberry-pi\raspi3-64目录下,输入指令scons进行编译,并得到系统镜像文件 kernal8.img,将此文件拷入sd卡,完成移植。
【注1】:若在输入scons指令后出现 scons sh: 1: aarch64-elf-gcc: not found报错,请检查 gcc-arm-8.3-2019.03-x86_64-aarch64-elf 是否在opt/目录下,或将rt-thread-master\bsp\raspberry-pi\raspi3-64下的rtconfig.py文件中
EXEC_PATH = r'/opt/gcc-arm-8.3-2019.03-x86_64-aarch64-elf/bin/'
/bin/之前的部分改为编译工具的实际路径。
【注2】:若在输入scons指令后出现形如以下的错误
In file included from /home/matassos/Desktop/rt-thread-master/include/libc/libc_signal.h:71,
from /home/matassos/Desktop/rt-thread-master/include/rtlibc.h:21,
from /home/matassos/Desktop/rt-thread-master/include/rtdef.h:1024,
from /home/matassos/Desktop/rt-thread-master/include/rtthread.h:23,
from applications/main.c:27:
/opt/riscv/riscv64-unknown-elf/include/sys/signal.h:42:7: error: redefinition of 'union sigval'
union sigval {
^~~~~~
In file included from /home/matassos/Desktop/rt-thread-master/include/rtlibc.h:21,
from /home/matassos/Desktop/rt-thread-master/include/rtdef.h:1024,
from /home/matassos/Desktop/rt-thread-master/include/rtthread.h:23,
from applications/main.c:27:
/home/matassos/Desktop/rt-thread-master/include/libc/libc_signal.h:31:7: note: originally defined here
union sigval
^~~~~~
In file included from /home/matassos/Desktop/rt-thread-master/include/rtlibc.h:21,
from /home/matassos/Desktop/rt-thread-master/include/rtdef.h:1024,
from /home/matassos/Desktop/rt-thread-master/include/rtthread.h:23,
from applications/main.c:27:
/home/matassos/Desktop/rt-thread-master/include/libc/libc_signal.h:39:8: note: originally defined here
struct sigevent
^~~~~~~~
In file included from /home/matassos/Desktop/rt-thread-master/include/libc/libc_signal.h:71,
from /home/matassos/Desktop/rt-thread-master/include/rtlibc.h:21,
from /home/matassos/Desktop/rt-thread-master/include/rtdef.h:1024,
from /home/matassos/Desktop/rt-thread-master/include/rtthread.h:23,
from applications/main.c:27:
/opt/riscv/riscv64-unknown-elf/include/sys/signal.h:72:3: error: conflicting types for 'siginfo_t'
} siginfo_t;
^~~~~~~~~
请使用指令scons -c之后再次进行尝试。
四、验证
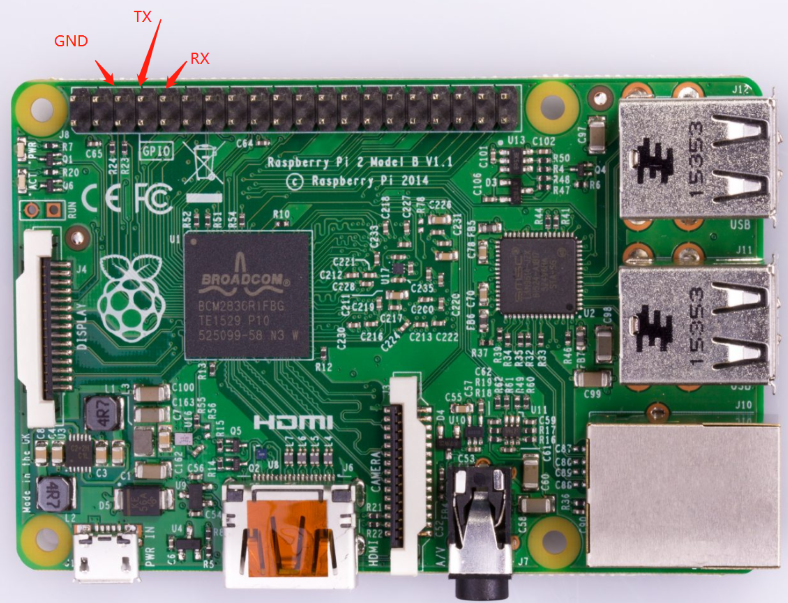
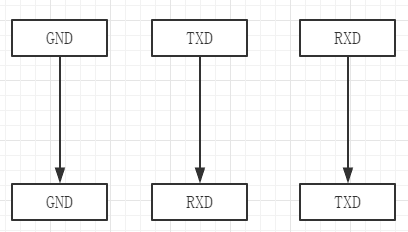
使用杜邦线将ttl转usb模块连接树莓派,接线方式如图所示。
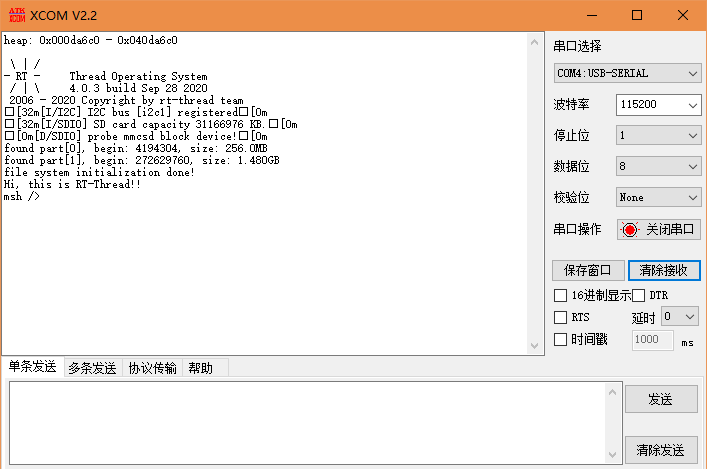
连接电脑后,打开串口工具连接串口,波特率115200,停止位1,数据位8,树莓派上电后串口打印如下信息即为移植成功。

 浙公网安备 33010602011771号