Spring Boot 启动流程源码分析
学习过springboot的都知道,在Springboot的main入口函数中调用SpringApplication.run(DemoApplication.class,args)函数便可以启用SpringBoot应用程序,跟踪一下SpringApplication源码可以发现,最终还是调用了SpringApplication的动态run函数。
下面以SpringBoot2.0.3.RELEASE为例简单分析一下运行过程。
SpringApplicatiton部分源码:
1 public static ConfigurableApplicationContext run(Class<?>[] primarySources,
2       String[] args) {
3   //创建springapplication对象,调用函数run(args)
4    return new SpringApplication(primarySources).run(args);
5 }
上面的源码可以发现还是先创建SpringApplication实例,再调用run方法
第一步 分析 SpringApplication构造函数
SpringApplication构造函数代码如下:
 1  public SpringApplication(ResourceLoader resourceLoader, Class<?>... primarySources) {
 2    this.resourceLoader = resourceLoader;
 3    Assert.notNull(primarySources, "PrimarySources must not be null");
 4    this.primarySources = new LinkedHashSet<>(Arrays.asList(primarySources));
 5
 6   //1:判断web环境
 7    this.webApplicationType = deduceWebApplicationType();
 8
 9   //2:加载classpath下META-INF/spring.factories中配置的ApplicationContextInitializer
10    setInitializers((Collection) getSpringFactoriesInstances(
11          ApplicationContextInitializer.class));
12   //3:加载classpath下META-INF/spring.factories中配置的ApplicationListener
13
14    setListeners((Collection) getSpringFactoriesInstances(ApplicationListener.class));
15   //4:推断main方法所在的类
16    this.mainApplicationClass = deduceMainApplicationClass();
17 }
具体逻辑分析:
- deduceWebApplicationType(), SpringApplication构造函数中首先初始化应用类型,根据加载相关类路径判断应用类型,具体逻辑如下:
 1   private static final String REACTIVE_WEB_ENVIRONMENT_CLASS = "org.springframework."
 2       + "web.reactive.DispatcherHandler";
 3
 4   private static final String MVC_WEB_ENVIRONMENT_CLASS = "org.springframework."
 5       + "web.servlet.DispatcherServlet";
 6
 7   private static final String[] WEB_ENVIRONMENT_CLASSES = { "javax.servlet.Servlet",
 8       "org.springframework.web.context.ConfigurableWebApplicationContext" };
 9
10
11
12    private WebApplicationType deduceWebApplicationType() {
13   //当类路径中存在REACTIVE_WEB_ENVIRONMENT_CLASS并且不存在MVC_WEB_ENVIRONMENT_CLASS时
14    if (ClassUtils.isPresent(REACTIVE_WEB_ENVIRONMENT_CLASS, null)
15          && !ClassUtils.isPresent(MVC_WEB_ENVIRONMENT_CLASS, null)) {
16       return WebApplicationType.REACTIVE;
17    }
18   //当加载的类路径中不包含WEB_ENVIRONMENT_CLASSES中定义的任何一个类时,返回标准应用()
19    for (String className : WEB_ENVIRONMENT_CLASSES) {
20       if (!ClassUtils.isPresent(className, null)) {
22          return WebApplicationType.NONE;
23       }
24    }
25   //加载的类路径中包含了WEB_ENVIRONMENT_CLASSES中定义的所有类型则判断为servlet的web应用
26    return WebApplicationType.SERVLET;
27 }
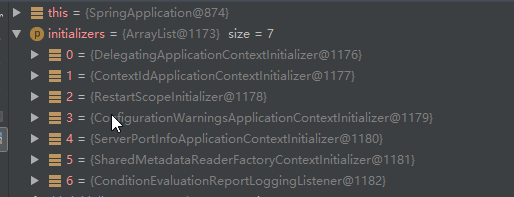
2. setInitializers初始化属性initializers,加载classpath下META-INF/spring.factories中配置的ApplicationContextInitializer,此处getSpringFactoriesInstances方法入参type=ApplicationContextInitializer.class
 1   private <T> Collection<T> getSpringFactoriesInstances(Class<T> type,
 2         Class<?>[] parameterTypes, Object... args) {
 3      ClassLoader classLoader = Thread.currentThread().getContextClassLoader();
 4      // Use names and ensure unique to protect against duplicates
 5     // SpringFactoriesLoader.loadFactoryNames()方法将会从calssptah下的META-INF/spring.factories中读取key为//org.springframework.context.ApplicationContextInitializer的值,并以集合形式返回
 6      Set<String> names = new LinkedHashSet<>(
 7            SpringFactoriesLoader.loadFactoryNames(type, classLoader));
 8      //根据返回names集合逐个实例化,也就是初始化各种ApplicationContextInitializer,这些Initializer实际是在Spring上下文ApplicationContext执行refresh前调用
 9      List<T> instances = createSpringFactoriesInstances(type, parameterTypes,
10          classLoader, args, names);
11      AnnotationAwareOrderComparator.sort(instances); //对instance排序
12      return instances;
13   }
以我的demo为例,实际debug时得到的initializers如下,其中数据来源于spring-boot,spring-boot-autoconfiguration和spring-boot-devtolls三个jar包下的classpath中,ApplicationContextInitializer接口是Spring框架提供地的,其主要作用是在Spring容器初始化过程中prepareContext()这一步进行回调,具体可参考:Spring Boot(七)扩展分析
3. setListeners 初始化属性listeners,加载classpath下META-INF/spring.factories中配置的ApplicationListener,此处入参为getSpringFactoriesInstances方法入参type= ApplicationListener.class
 1    private <T> Collection<T> getSpringFactoriesInstances(Class<T> type,
 2         Class<?>[] parameterTypes, Object... args) {
 3      ClassLoader classLoader = Thread.currentThread().getContextClassLoader();
 4      // Use names and ensure unique to protect against duplicates
 5     // SpringFactoriesLoader.loadFactoryNames()方法将会从calssptah下的META-INF/spring.factories中读取key为//org.springframework.context.ApplicationListener的值,并以集合形式返回
 6      Set<String> names = new LinkedHashSet<>(
 7          SpringFactoriesLoader.loadFactoryNames(type, classLoader));
 8     //根据配置,初始化各种ApplicationListener,作用是用来监听ApplicationEvent
 9      List<T> instances = createSpringFactoriesInstances(type, parameterTypes,
10          classLoader, args, names);
11      AnnotationAwareOrderComparator.sort(instances);
12      return instances;
13   }
第二步 分析 SpringApplication中 run方法
SpringApplication的run方法代码如下:
 1 public ConfigurableApplicationContext run(String... args) {
 2    StopWatch stopWatch = new StopWatch();
 3    stopWatch.start();
 4    ConfigurableApplicationContext context = null;
 5    Collection<SpringBootExceptionReporter> exceptionReporters = new ArrayList<>();
 6     //设置系统变量java.awt.headless
 7    configureHeadlessProperty();
 8     //1:获取监听器:加载classpath下面的META-INF/spring.factories配置的监听器SpringApplicationRunListener
 9    SpringApplicationRunListeners listeners = getRunListeners(args);
10     //2:启动监听器:执行所有runlistener的starting方法,实际上发布一个【ApplicationStartingEvent】事件
11    listeners.starting();
12    try {
13       //3:实例化ApplicationArguments对象
14       ApplicationArguments applicationArguments = new DefaultApplicationArguments(
15             args);
16       //4: 准备应用上下文环境Environment (web环境 or 标准环境)+配置Environment,主要是把run方法的参数配置到Environment  发布【ApplicationEnvironmentPreparedEvent】事件
17       ConfigurableEnvironment environment = prepareEnvironment(listeners,
18             applicationArguments);
19           configureIgnoreBeanInfo(environment);
20     //打印banner,SpringBoot启动时,控制台输出的一个歪歪扭扭的很不清楚的Spring几个大字母,也可以自定义
21       Banner printedBanner = printBanner(environment);
22     //5: 根据不同environment实例化上下文 context
23       context = createApplicationContext();
24     // 异常处理,实例化一个SpringBootExceptionReporter.class 用于处理启动过程中的错误
25       exceptionReporters = getSpringFactoriesInstances(
26             SpringBootExceptionReporter.class,
27             new Class[] { ConfigurableApplicationContext.class }, context);
28     //6: 上下文相关预处理                  发布【ApplicationPreparedEvent】事件
29       prepareContext(context, environment, listeners, applicationArguments,
30             printedBanner);
31     //7: 【刷新应用上线文】执行spring容器(context)的refresh方法,并且调用context的registerShutdownHook方法
32       refreshContext(context);
33     //8:空方法,用于扩展
34       afterRefresh(context, applicationArguments);
35       stopWatch.stop();
36       if (this.logStartupInfo) {
37          new StartupInfoLogger(this.mainApplicationClass)
38                .logStarted(getApplicationLog(), stopWatch);
39       }
40      //9:执行所有runlisteners的started方法,发布【ApplicationStartedEvent】事件
41       listeners.started(context);
42      //10: 遍历执行CommandLineRunner和ApplicationRunner
43      //如果需要在SpringBoot应用启动后运行一些特殊的逻辑,可以通过实现ApplicationRunner或CommandLineRunner接口中的run方法,该自定义类的run方法会在此处统一调用
44       callRunners(context, applicationArguments);
45    }
46    catch (Throwable ex) {
47       handleRunFailure(context, ex, exceptionReporters, listeners);
48       throw new IllegalStateException(ex);
49    }
50
51    try {
52       listeners.running(context);
53    }
54    catch (Throwable ex) {
55       handleRunFailure(context, ex, exceptionReporters, null);
56       throw new IllegalStateException(ex);
57    }
58    return context;
59 }
具体分析:
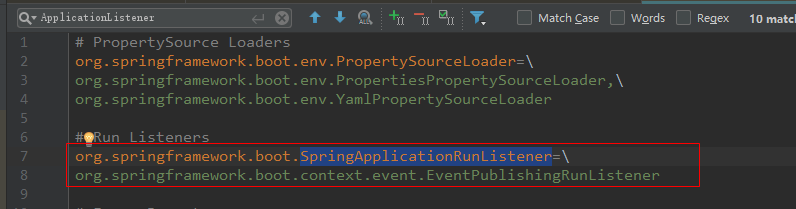
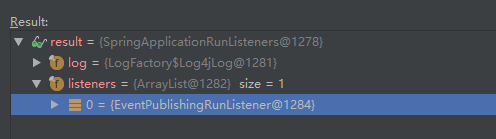
1. 获取监听器:getRunListeners(args) 加载各种SpringApplicationRunListener实例,内部实现也还是通过SpringFactoriesLoader.loadFactoryNames(type, classLoader))实现,加载META-INF/spring.factories中key为org.springframework.boot.SpringApplicationRunListener的值,生成对应实例,SpringBoot实际加载了一个EventPublishingRunListener监听器,该监听器继承SpringApplicationRunListener接口,SpringApplicationRunListener规定了SpringBoot的生命周期,在各个生命周期广播相应的事件,调用实际的ApplicationListener类。
2. 启动监听器: listeners.starting() 执行所有SpringApplicationRunListener的stating方法,发布ApplicationStartedEvent事件,该事件被ApplicationListener类型的listener监听
3. 实例化ApplicationArguments对象
4 . 准备应用上下文环境 并发布ApplicationEnvironmentPreparedEvent事件
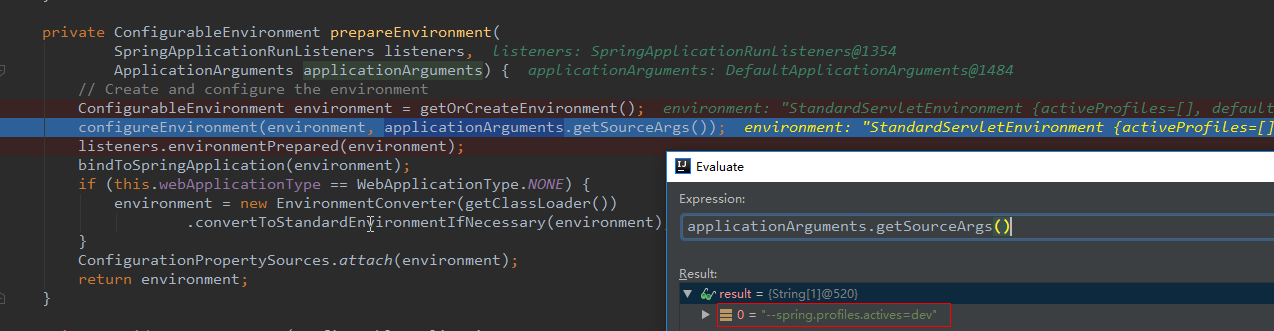
 1    private ConfigurableEnvironment prepareEnvironment(
 2       SpringApplicationRunListeners listeners,
 3       ApplicationArguments applicationArguments) {
 4      // Create and configure the environment
 5    ConfigurableEnvironment environment = getOrCreateEnvironment();
 6   //根据properties和profiles配置环境
 7    configureEnvironment(environment, applicationArguments.getSourceArgs());
 8   // 执行EventPublishingRunListener发布ApplicationEnvironmentPreparedEvent事件,将会被ApplicationListener监听到
 9    listeners.environmentPrepared(environment);
10   //
11    bindToSpringApplication(environment);
12    if (this.webApplicationType == WebApplicationType.NONE) {
13       environment = new EnvironmentConverter(getClassLoader())
14             .convertToStandardEnvironmentIfNecessary(environment);
15    }
16    ConfigurationPropertySources.attach(environment);
17    return environment;
18 }
备注:实际上载spring-boot-2.0.3.RELEASE.jar包中,可以发现spring.factories中只配置了一个RunListener: org.springframework.boot.context.event.EventPublishingRunListener
截取EventPublishingRunListener.java部分代码:
 1 public class EventPublishingRunListener implements SpringApplicationRunListener, Ordered {
 2
 3
 4      public EventPublishingRunListener(SpringApplication application, String[] args) {
 5        this.application = application;
 6        this.args = args;
 7        this.initialMulticaster = new SimpleApplicationEventMulticaster();
 8       //将SpringApplication实例中的ApplicationListener类型的listeners添加到initialMulticaster,后续执行监听
 9      for (ApplicationListener<?> listener : application.getListeners()) {
10         this.initialMulticaster.addApplicationListener(listener);
11      }
12   }
13
14   // 发布一个ApplicationEnvironmentPreparedEvent事件
15     @Override
16     public void environmentPrepared(ConfigurableEnvironment environment) {
17         //所有被添加到initialMulticaster中的listener都将监听ApplicationEnvironmentPreparedEvent事件
18         this.initialMulticaster.multicastEvent(new ApplicationEnvironmentPreparedEvent(
19                 this.application, this.args, environment));
20     }
21
22 }
4.1 根据properties和profiles配置环境:configureEnvironment(environment, applicationArguments.getSourceArgs());
以下假设指定配文件application-dev.properties,跟踪一下源码,可以发现:
    protected void configureEnvironment(ConfigurableEnvironment environment,
            String[] args) {
        configurePropertySources(environment, args);
        configureProfiles(environment, args);
    }
configureEnvironment方法内部比较简洁,直接调用两个方法完事,
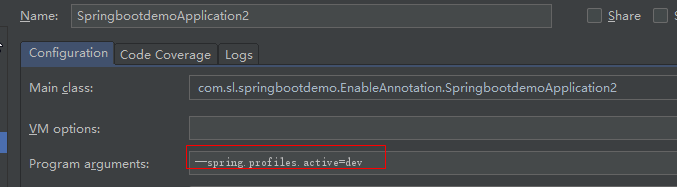
configurePropertySources(environment, args)方法的作用是将args封装成了SimpleCommandLinePropertySource并加入到了environment中,其中arg中含有启动参数:--spring.profiles.active=dev
configureProfiles(environment, args)作用是将启动参数中指定的配置文件激活。
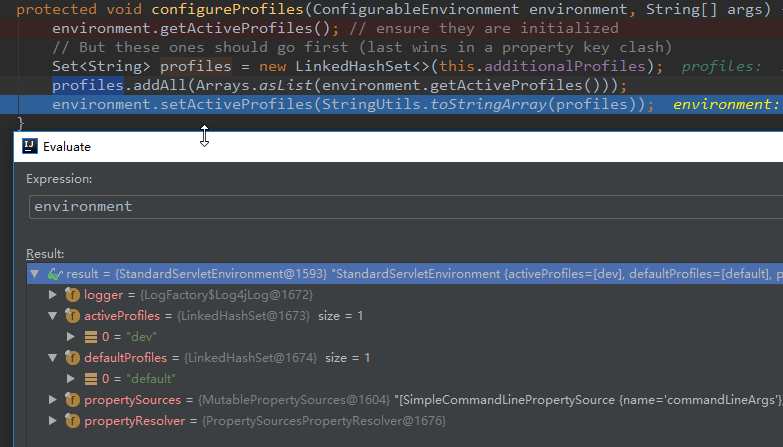
configureProfiles中执行enviroment.getActiveProfiles():强制读取启动命令中指定的配置文件
    protected Set<String> doGetActiveProfiles() {
        synchronized (this.activeProfiles) {
            if (this.activeProfiles.isEmpty()) {
                String profiles = getProperty(ACTIVE_PROFILES_PROPERTY_NAME);
                if (StringUtils.hasText(profiles)) {
                    setActiveProfiles(StringUtils.commaDelimitedListToStringArray(
                            StringUtils.trimAllWhitespace(profiles)));
                }
            }
            return this.activeProfiles;
        }
    }
5. 根据environment类型创建ApplicationContext,通常情况下,我们启动的是一个Servlet应用,debug进createApplicationContext()源码,可以看到内部初始化了AnnotationConfigServletWebServerApplicationContext类,也就是我们的上下文context
6. 上下文相关预处理,prepareContext()方法
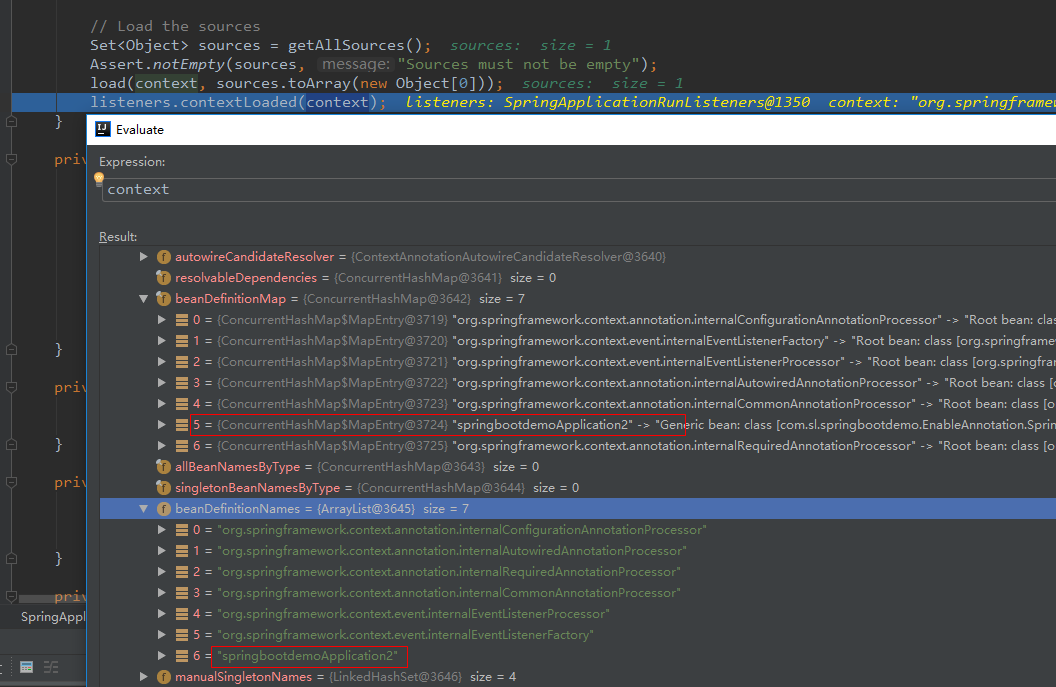
 1 private void prepareContext(ConfigurableApplicationContext context,
 2       ConfigurableEnvironment environment, SpringApplicationRunListeners listeners,
 3       ApplicationArguments applicationArguments, Banner printedBanner) {
 4    context.setEnvironment(environment); //设置容器环境,environment前面已经准备好
 5   //配置beanNameGenerator和资源加载器
 6    postProcessApplicationContext(context);
 7   //回调所有的ApplicationContextInitializer初始化器
 8    applyInitializers(context);
 9   //发布容器以准备好的事件:执行所有SpringApplicationRunListener的contextPrepared方法,触发事件,实际上EventPublishingRunListener中contextPrepared是一个空方法,什么都没执行
10    listeners.contextPrepared(context);
11    if (this.logStartupInfo) {
12       logStartupInfo(context.getParent() == null);
13       logStartupProfileInfo(context);
14    }
15
16   //向Spring容器注入springApplicationArguments和springBootBanner,实际执行是将main函数的参数args和printedBanner分别封装成单例bean注册到容器中。
17    // Add boot specific singleton beans
18    context.getBeanFactory().registerSingleton("springApplicationArguments",
19          applicationArguments);
20    if (printedBanner != null) {
21       context.getBeanFactory().registerSingleton("springBootBanner", printedBanner);
22    }
23
24    // Load the sources
25    Set<Object> sources = getAllSources();
26    Assert.notEmpty(sources, "Sources must not be empty");
      //加载启动类,将启动类也注入容器
27    load(context, sources.toArray(new Object[0]));
28   //发布容器已加载事件:执行所有SpringApplicationRunListener的contextLoaded方法,下面是EventPublishingRunListener中的contextLoaded
29    listeners.contextLoaded(context);
30 }
具体load方法实现, load方法的作用其注释写的也很清楚,"Load beans into the application context",实际执行时可以发现主要是将我们的SpringBoot应用的启动类(此处SpringbootdemoApplication2)注册到容器中!前面if条件都为false,不执行,具体分析loader.loader()。
protected void load(ApplicationContext context, Object[] sources) {
        if (logger.isDebugEnabled()) {
            logger.debug(
                    "Loading source " + StringUtils.arrayToCommaDelimitedString(sources));
        }
        BeanDefinitionLoader loader = createBeanDefinitionLoader(
                getBeanDefinitionRegistry(context), sources);
        if (this.beanNameGenerator != null) {
            loader.setBeanNameGenerator(this.beanNameGenerator);
        }
        if (this.resourceLoader != null) {
            loader.setResourceLoader(this.resourceLoader);
        }
        if (this.environment != null) {
            loader.setEnvironment(this.environment);
        }
        loader.load();
    }
loader.load()源码:
public int load() {
        int count = 0;
        for (Object source : this.sources) {
            count += load(source);
        }
        return count;
    }

    private int load(Object source) {
        Assert.notNull(source, "Source must not be null");
        if (source instanceof Class<?>) {
            return load((Class<?>) source);  //执行
        }
        if (source instanceof Resource) {
            return load((Resource) source);
        }
        if (source instanceof Package) {
            return load((Package) source);
        }
        if (source instanceof CharSequence) {
            return load((CharSequence) source);
        }
        throw new IllegalArgumentException("Invalid source type " + source.getClass());
    }

    private int load(Class<?> source) {
        if (isGroovyPresent()
                && GroovyBeanDefinitionSource.class.isAssignableFrom(source)) {
            // Any GroovyLoaders added in beans{} DSL can contribute beans here
            GroovyBeanDefinitionSource loader = BeanUtils.instantiateClass(source,
                    GroovyBeanDefinitionSource.class);
            load(loader);
        }
        if (isComponent(source)) {
            this.annotatedReader.register(source);
            return 1;
        }
        return 0;
    }
isComponent(source)方法判断当前类是不是有@Component注解,显然启动类的@SpringBootApplication这个组合注解是包含Component注解的。
this.annotatedReader.register(source)方法内部调用Spring框架底层提供的AnnotatedBeanDefinitionReader.doRegisterBean(xxx)方法,最终将SpringBoot应用的启动类注册到容器中。
7. 执行context的refresh,并且调用context的registerShutdownHook方法,refresh方法的具体逻辑分析可以参考:
Spring源码解析 – AnnotationConfigApplicationContext容器创建过程
8. afterRefresh空方法
9. 执行所有runlisteners的started方法,发布ApplicationStartedEvent事件
10. 遍历执行CommandLineRunner和ApplicationRunner
以上。

 浙公网安备 33010602011771号