Linux pwm子系统概述
关键词:pwm,period,duty_cycle,polarity,enable等。
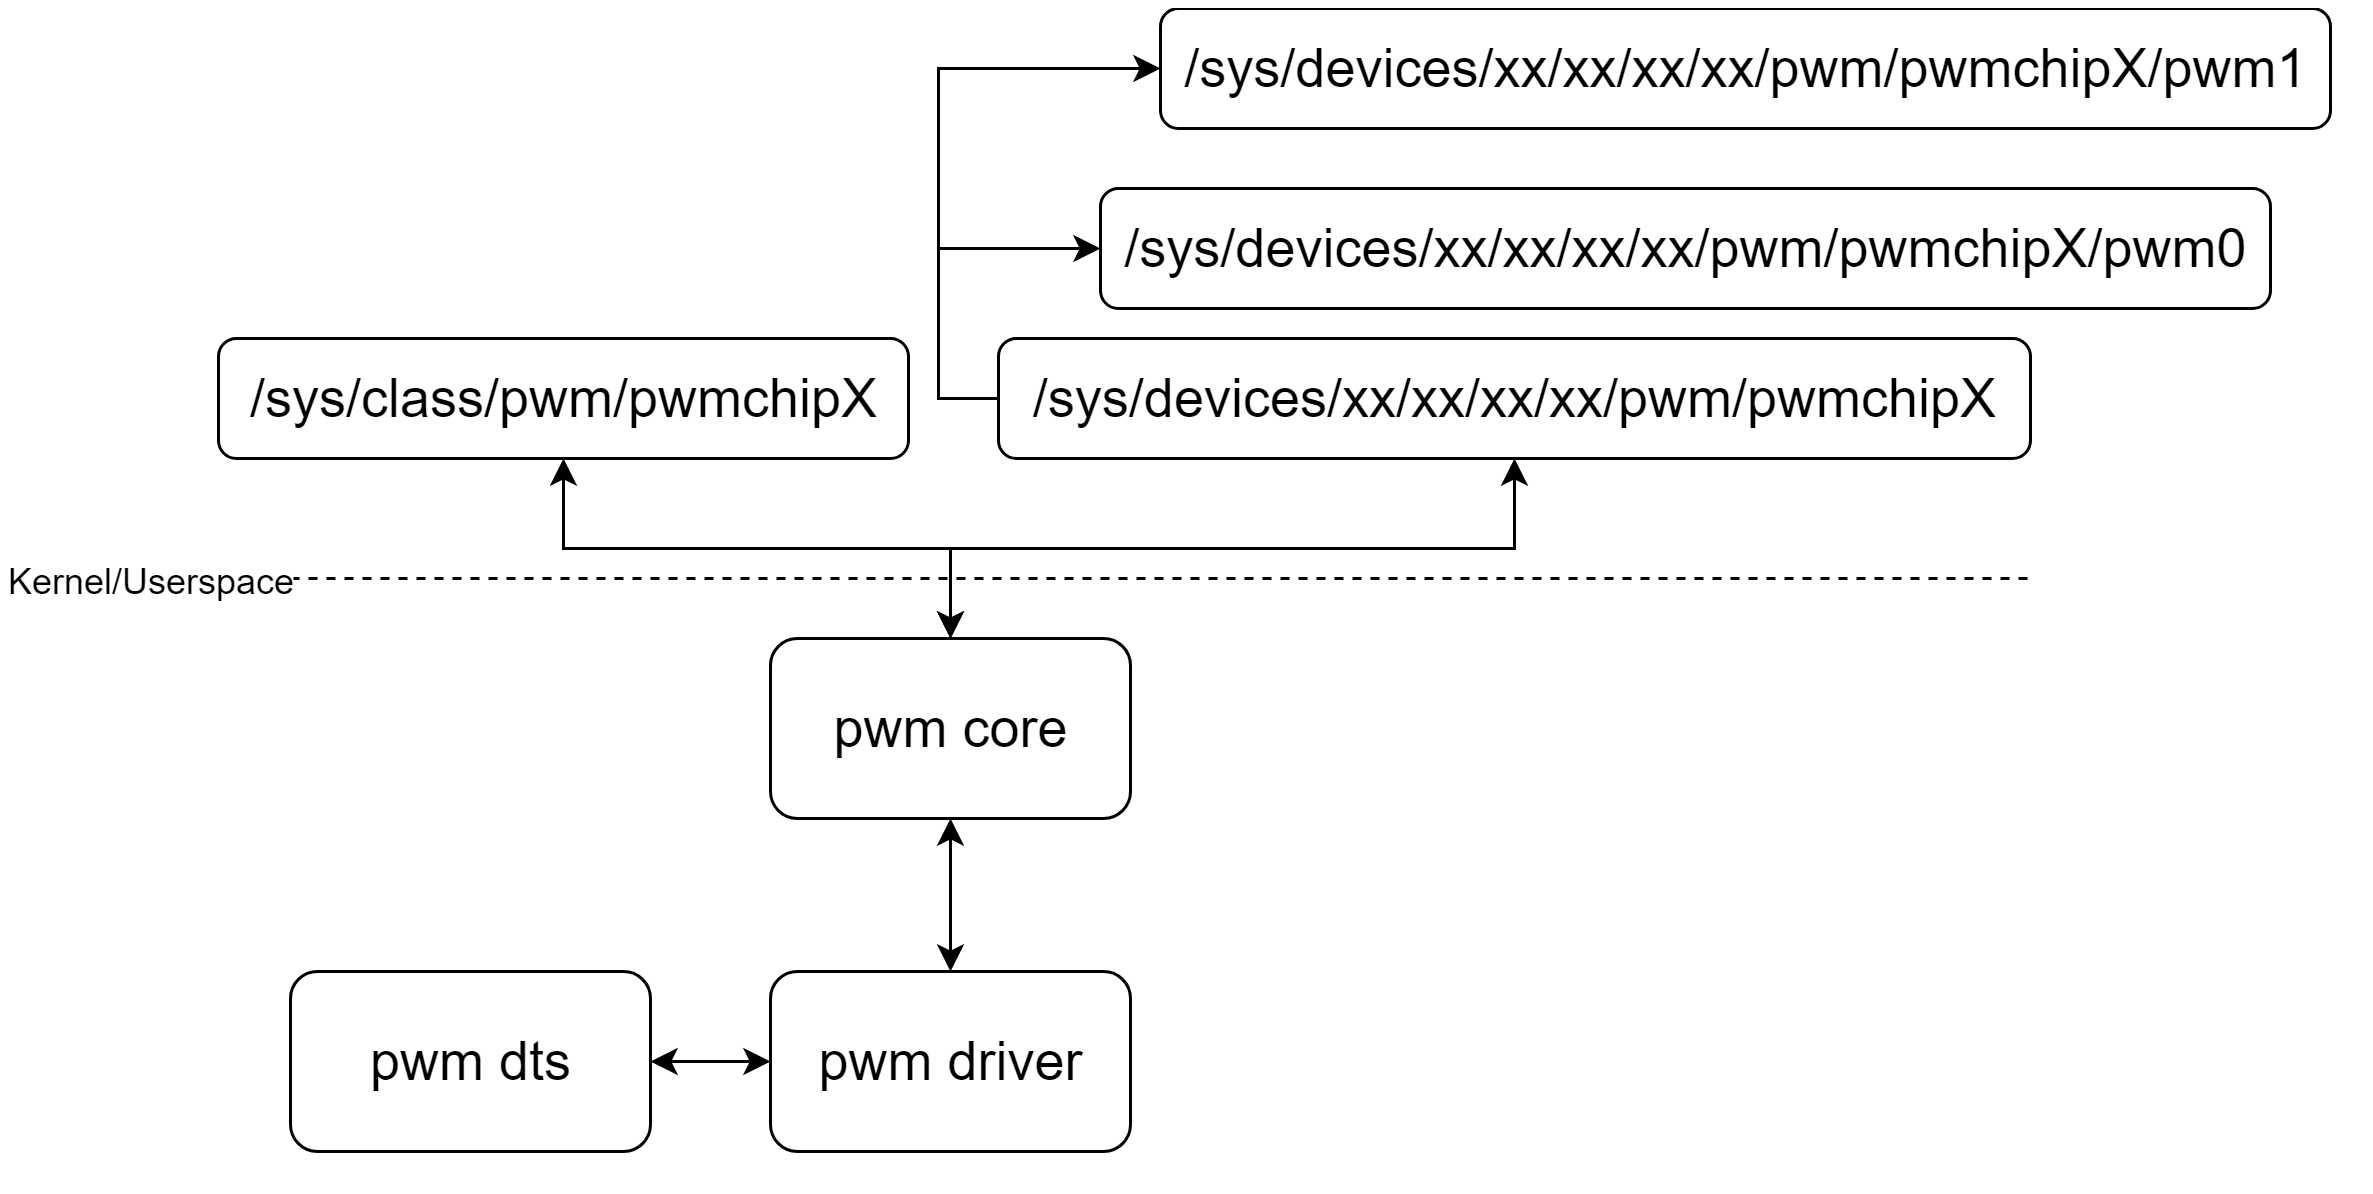
1 pwm子系统框架
pwm子系统比较简单:
- pwm core:提供pwm_chip的添加删除,pwm_class类pwm_chip/pwm_device的sysfs创建。
- pwm driver:根据pwm controller初始化pwm_chip结构体,然后添加到pwm core。即可通过用户空间访问设置pwm controller输出所需pwm信号。
pwm_chip可以包含一个或多个pwm_device,每个pwm_device通过设置不同pwm_state来达到目的。
2 pwm配置
pwm的配置如下:
Device Drivers
  Pulse-Width Modulation (PWM) Support
    STMicroelectronics STM32 PWM
涉及到的主要文件有:
drivers/pwm/
├── core.c--pwm子系统核心。
├── pwm-stm32.c--STMMP157的pwm_chip驱动。
└── sysfs.c--pwm子系统的pwm_class注册,pwm_chip属性,pwm_device属性等定义。
3 pwm子系统初始化
pwm子系统初始化,主要是注册pwm_class类。pwm_class类在pwm_chip和pwm_device创建的时候会同时创建一系列sysfs。
pwm_sysfs_init
  class_register--注册pwm_class类。
pwm_class定义一系列属性:
static struct class pwm_class = {
    .name = "pwm",
    .owner = THIS_MODULE,
    .dev_groups = pwm_chip_groups,
    .pm = &pwm_class_pm_ops,
};

static struct attribute *pwm_chip_attrs[] = {
    &dev_attr_export.attr,
    &dev_attr_unexport.attr,
    &dev_attr_npwm.attr,
    NULL,
};
为每个pwmchip创建export/unexport/npwm节点:
export_store
  pwm_request_from_chip
    pwm_device_request
  pwm_export_child
    dev_set_name--创建pwmX子目录名称。
    device_register--创建pwmX子目录,以及根据pwm_groups创建子目录sysfs。
    kobject_uevent_env--发送KOBJ_CHANGE uevent消息。
pwm_attrs包含如下sysfs:period/duty_cycle/enable/polarity/capture。
period_store/duty_cycle_store/pwm_get_state/polarity_store
  ->pwm_get_state--获取struct pwm_state。
  ->根据需要改变period/duty_period/enabled/polarity。
  ->pwm_apply_state--设置struct pwm_state。
4 pwm数据结构和API
4.1 pwm数据结构
struct pwm_chip是pwm子系统核心,是对一个pwm控制器的抽象:
struct pwm_chip {
    struct device *dev;
    const struct pwm_ops *ops;--pwm控制器回调函数。
    int base;
    unsigned int npwm;--pwm控制器的pwm数量。

    struct pwm_device * (*of_xlate)(struct pwm_chip *pc,
                    const struct of_phandle_args *args);
    unsigned int of_pwm_n_cells;

    /* only used internally by the PWM framework */
    struct list_head list;
    struct pwm_device *pwms;
};
对pwm控制器的操作,通过struct pwm_ops进行:
struct pwm_ops {
    int (*request)(struct pwm_chip *chip, struct pwm_device *pwm);--向pwm控制器申请一个pwm设备。
    void (*free)(struct pwm_chip *chip, struct pwm_device *pwm);
    int (*capture)(struct pwm_chip *chip, struct pwm_device *pwm,
               struct pwm_capture *result, unsigned long timeout);
    int (*apply)(struct pwm_chip *chip, struct pwm_device *pwm,
             const struct pwm_state *state);--配置一个pwm_state到pwm_chip的pwm_device。
    void (*get_state)(struct pwm_chip *chip, struct pwm_device *pwm,
              struct pwm_state *state);--从一个pwm_chip的pwm_device获取pwm_state。
    struct module *owner;
...
};
struct pwm_state是对每个pwm进行配置的数据结构:
struct pwm_state {
    unsigned int period;--pwm的周期,单位ns。
    unsigned int duty_cycle;--pwm的duty_cycle,单位ns。
    enum pwm_polarity polarity;--PWM_POLARITY_NORMAL表示高电平持续duty_cycle,然后是低电平持续剩余时间。PWM_POLARITY_INVERSED表示低电平持续duty_cycle,然后是高电平持续剩余时间。
    bool enabled;--是否使能。
};
4.2 pwm APIs
通过 pwmchip_add()向pwm子系统注册一个pwm_chip:
pwmchip_add
  ->pwmchip_add_with_polarity
    ->pwm_ops_check--检查pwm_ops是否支持apply等。
    ->alloc_pwms--为pwm_chip的pwm_device分配allocated_pwms。
    ->初始化每个pwm_device,并加入pwm_tree。
    ->pwmchip_sysfs_export
      ->pwmchip_sysfs_export--创建pwm_class类设备pwmchpX,位于/sys/class/pwm/pwmchipX。
5 stm pwm芯片驱动
5.1 stm pwm dts
stm pwm是stm32-timers的子功能:
        timers1: timer@44000000 {
            #address-cells = <1>;
            #size-cells = <0>;
            compatible = "st,stm32-timers";
            reg = <0x44000000 0x400>;
            clocks = <&rcc TIM1_K>;
            clock-names = "int";
            dmas = <&dmamux1 11 0x400 0x80000001>,
                   <&dmamux1 12 0x400 0x80000001>,
                   <&dmamux1 13 0x400 0x80000001>,
                   <&dmamux1 14 0x400 0x80000001>,
                   <&dmamux1 15 0x400 0x80000001>,
                   <&dmamux1 16 0x400 0x80000001>,
                   <&dmamux1 17 0x400 0x80000001>;
            dma-names = "ch1", "ch2", "ch3", "ch4",
                    "up", "trig", "com";
            status = "disabled";

            pwm {
                compatible = "st,stm32-pwm";
                #pwm-cells = <3>;
                status = "disabled";
            };
        };
5.2 stm pwm驱动
stm32_pwm_probe
  ->初始化struct pwm_chip。
  ->pwmchip_add--将pwm_chip注册到pwm子系统中。
stm32pwm_ops的核心函数时apply:
static const struct pwm_ops stm32pwm_ops = {
    .owner = THIS_MODULE,
    .apply = stm32_pwm_apply_locked,
    .capture = IS_ENABLED(CONFIG_DMA_ENGINE) ? stm32_pwm_capture : NULL,
};

stm32_pwm_apply_locked
  ->stm32_pwm_apply
    ->stm32_pwm_set_polarity--设置polarity。
    ->stm32_pwm_config
      ->配置duty_cycle和period。
    ->stm32_pwm_enable--使能或关闭pwm_device。
6 pwm sysfs
作为pwm_class类设备,所有pwm_chip如下:
tree /sys/class/pwm/
/sys/class/pwm/
|-- pwmchip0 -> ../../devices/platform/soc/40002000.timer/40002000.timer:pwm/pwm/pwmchip0
`-- pwmchip4 -> ../../devices/platform/soc/44000000.timer/44000000.timer:pwm/pwm/pwmchip4
进入pwmchip0,然后export一个pwm_device:
/sys/devices/platform/soc/44000000.timer/44000000.timer:pwm/pwm/pwmchip4
|-- device -> ../../../44000000.timer:pwm
|-- export
|-- npwm
|-- power
|   |-- autosuspend_delay_ms
|   |-- control
|   |-- runtime_active_time
|   |-- runtime_status
|   `-- runtime_suspended_time
|-- pwm2
|   |-- capture
|   |-- duty_cycle--设置duty持续时间。
|   |-- enable--0关闭,1打开。
|   |-- period--设置周期。
|   |-- polarity--支持inversed/normal两钟。
|   |-- power
|   |   |-- autosuspend_delay_ms
|   |   |-- control
|   |   |-- runtime_active_time
|   |   |-- runtime_status
|   |   `-- runtime_suspended_time
|   `-- uevent
|-- subsystem -> ../../../../../../../class/pwm
|-- uevent
`-- unexport
通过配置period/duty_cycle/polarity/enable观察示波器或者LED灯或者马达查看效果。
联系方式:arnoldlu@qq.com


 浙公网安备 33010602011771号