
SpringBoot3
工具
IDEA2021+、JDK17+、maven3.5+vscode
概述
Spring Boot是Spring提供的一个子项目,用于快速构建Spring应用程序
传统方式构建项目的弊端
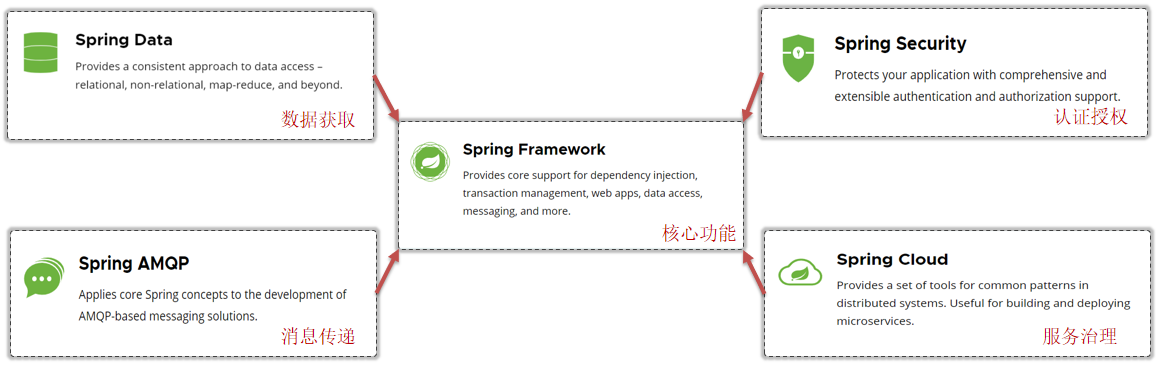
传统方式是通过核心子项目,按需求整合其他功能模块。
存在的问题【感同身受】
- 导入依赖繁琐
- 项目配置繁琐
SpringBoot方式
因为传统的繁琐,spring官方提供了一个子项目spring boot来构建spring程序
SpringBoot特性
-
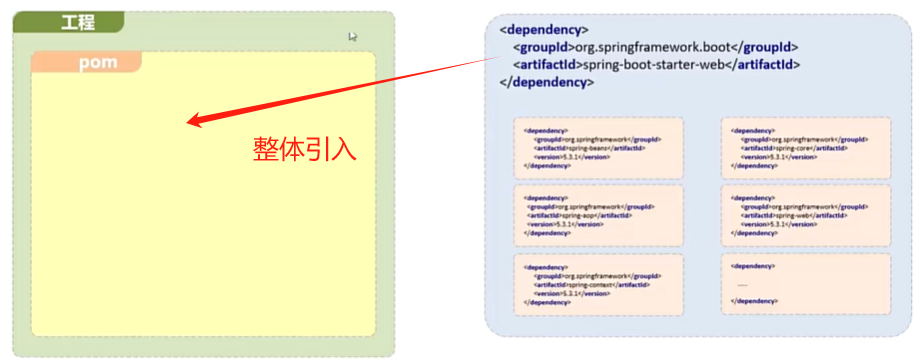
起步依赖
本质上就是一个Maven坐标,整合了完成一个功能需要的所有坐标
-
自动配置
遵循约定大约配置的原则,在boot程序启动后,一些bean对象会自动注入到ioc容器,不需要手动声明,简化开发
-
其他特性
-
内嵌的Tomcat、Jetty(无需部署WAR文件)
不用打war包了,打jar包就行,因为内置tomcat了,spring启动时,内置tomcat自动启动
-
外部化配置
打成jar包以后如果配置文件需要修改,不用再重新编译打包部署了,只需修改外部配置文件即可
-
不需要XML配置(properties/yml)
-
SpringBoot入门
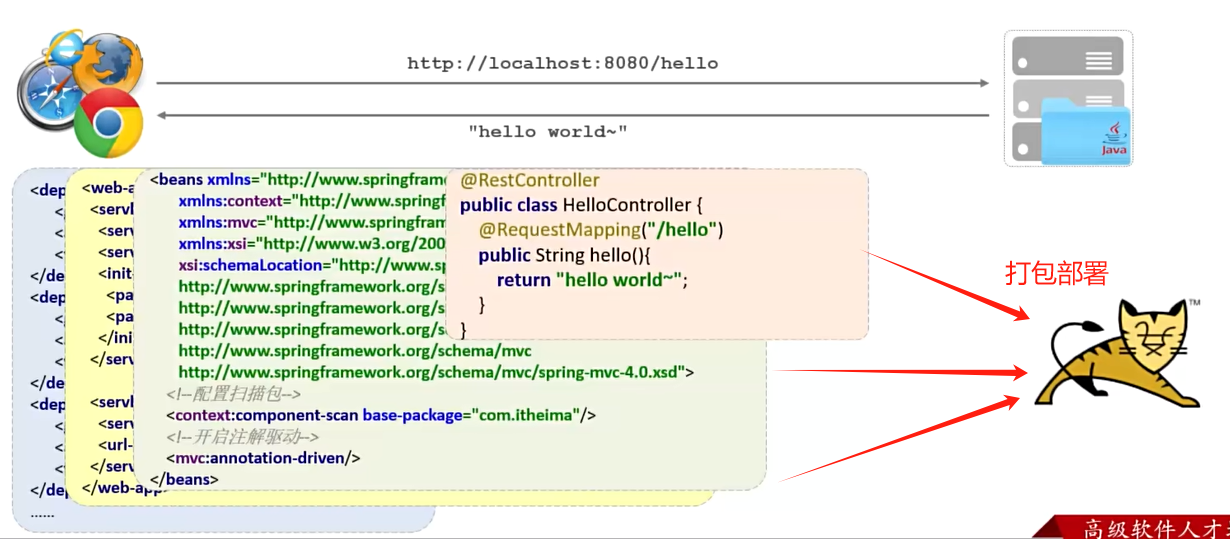
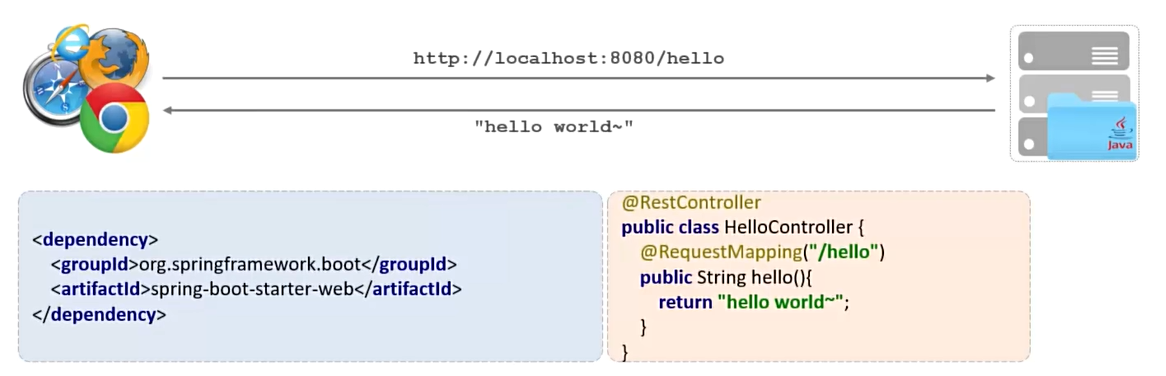
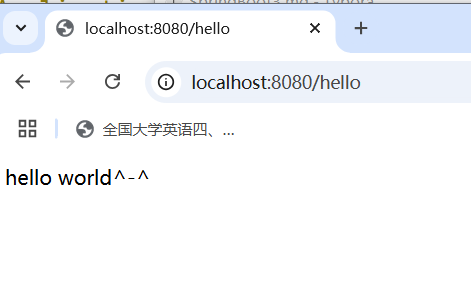
使用 SpringBoot 开发一个web应用,浏览器发起请求 /hello后,给浏览器返回字符串 “hello world ~"
传统方式:
用SpringBoot:
用现有框架创建
-
创建Maven工程
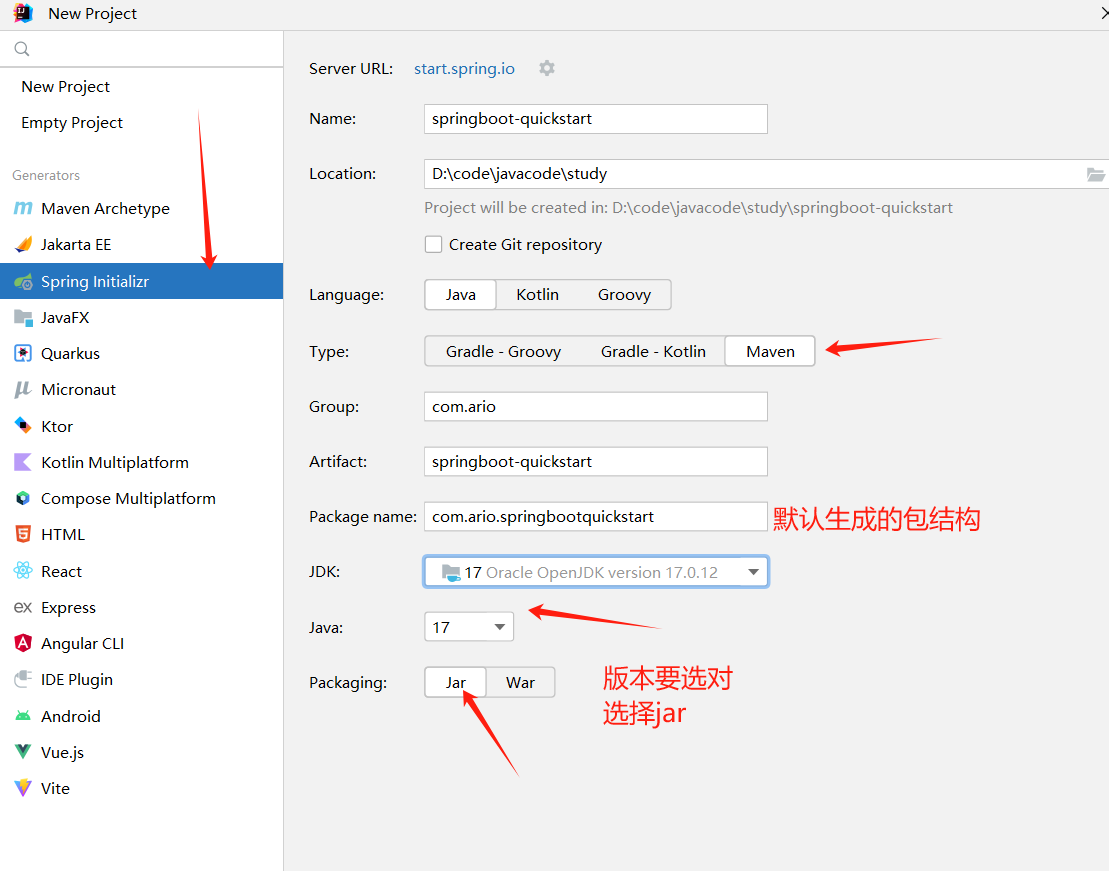
-
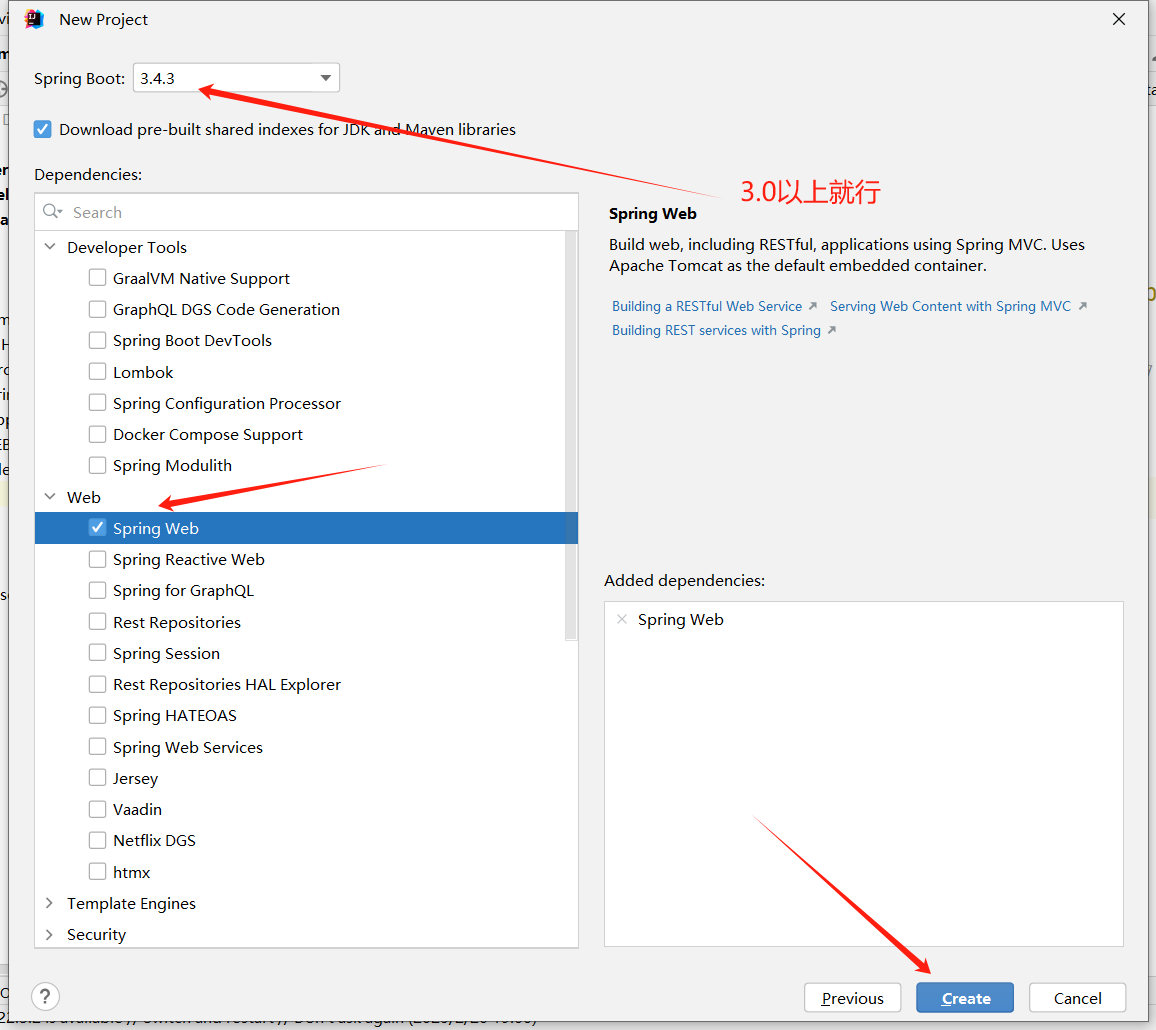
导入spring-boot-stater-web起步依赖

这里已经自动生成了
<!-- boot工程的父工程,用于管理起步依赖的版本--> <parent> <groupId>org.springframework.boot</groupId> <artifactId>spring-boot-starter-parent</artifactId> <version>3.4.3</version> <relativePath/> <!-- lookup parent from repository --> </parent> .... <!-- web起步依赖,这里不需要写版本号--> <dependency> <groupId>org.springframework.boot</groupId> <artifactId>spring-boot-starter-web</artifactId> </dependency> -
编写Controller ,和之前一样
package com.ario.springbootquickstart.controller; import org.springframework.web.bind.annotation.RequestMapping; import org.springframework.web.bind.annotation.RestController; @RestController public class HelloController { @RequestMapping("/hello") public String hello(){ return "hello world^-^"; } } -
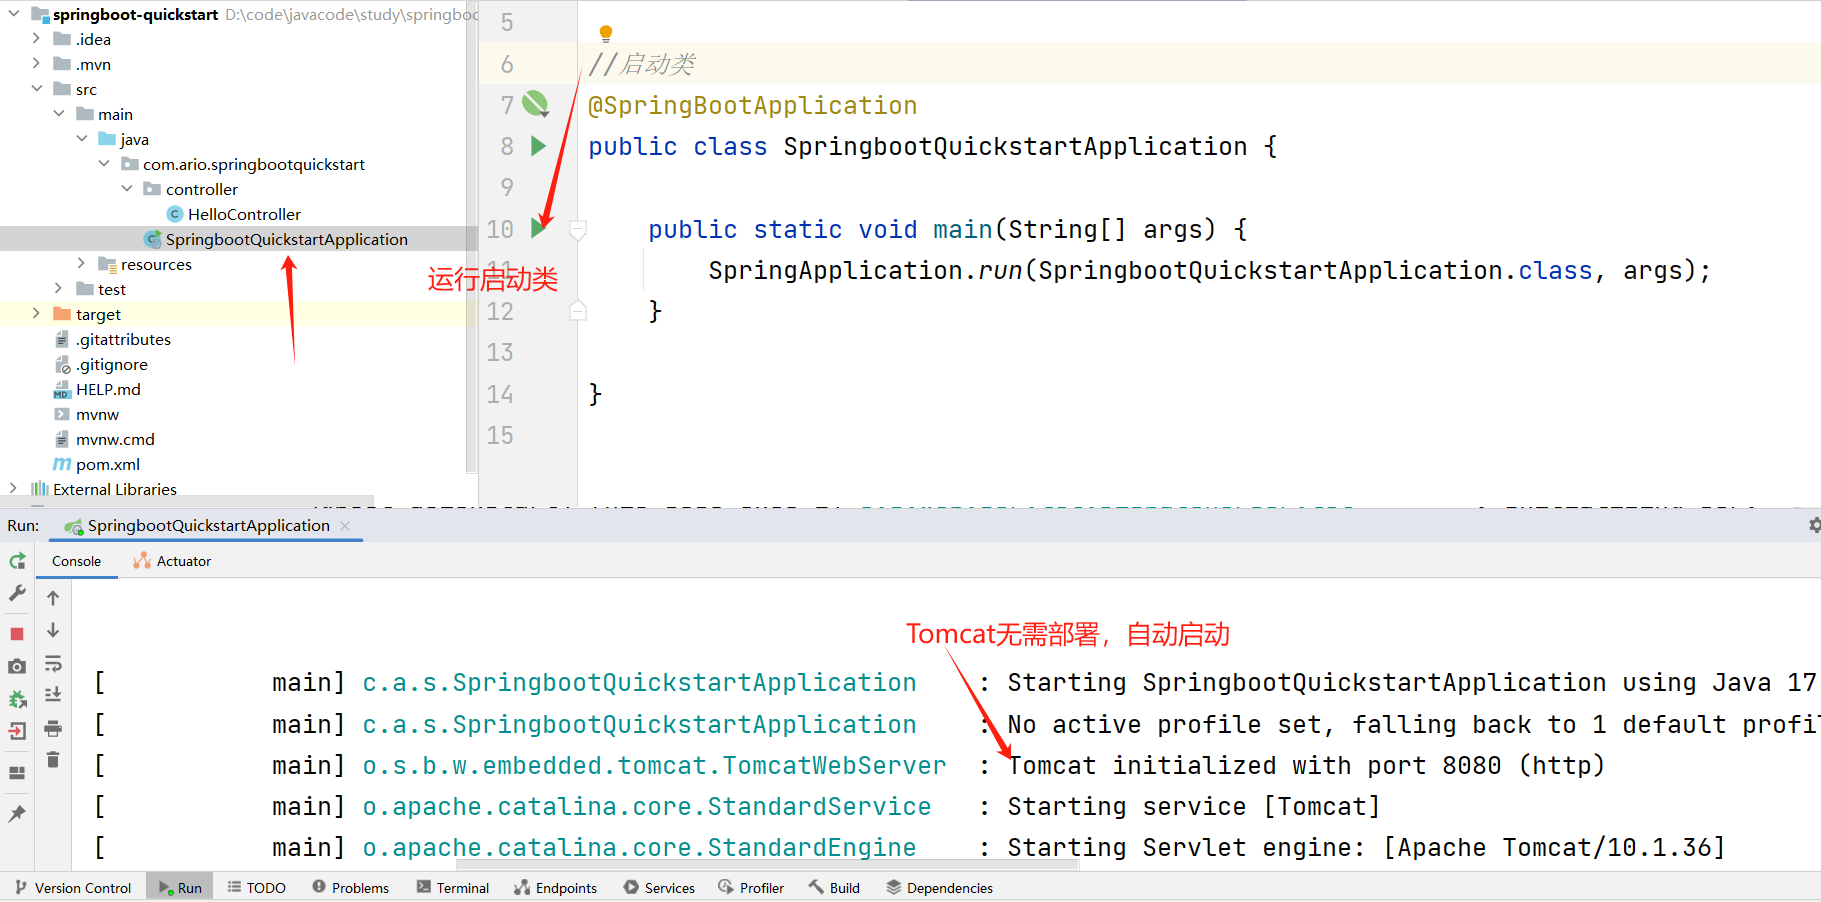
提供启动类
//启动类
@SpringBootApplication
public class SpringbootQuickstartApplication {

    public static void main(String[] args) {
        SpringApplication.run(SpringbootQuickstartApplication.class, args);
    }
}
这里自动生成了
-
点击运行
手动创建
-

-
手动配置pom文件
<project xmlns="http://maven.apache.org/POM/4.0.0" xmlns:xsi="http://www.w3.org/2001/XMLSchema-instance" xsi:schemaLocation="http://maven.apache.org/POM/4.0.0 http://maven.apache.org/xsd/maven-4.0.0.xsd"> <modelVersion>4.0.0</modelVersion> <parent> <groupId>org.springframework.boot</groupId> <artifactId>spring-boot-starter-parent</artifactId> <version>3.4.3</version> <relativePath/> <!-- lookup parent from repository --> </parent> <artifactId>springboot-manualstart</artifactId> <packaging>jar</packaging> <name>springboot-manualstart</name> <url>http://maven.apache.org</url> <properties> <project.build.sourceEncoding>UTF-8</project.build.sourceEncoding> </properties> <dependencies> <dependency> <groupId>org.springframework.boot</groupId> <artifactId>spring-boot-starter-web</artifactId> </dependency> <dependency> <groupId>junit</groupId> <artifactId>junit</artifactId> <version>3.8.1</version> <scope>test</scope> </dependency> </dependencies> </project> -
启动类
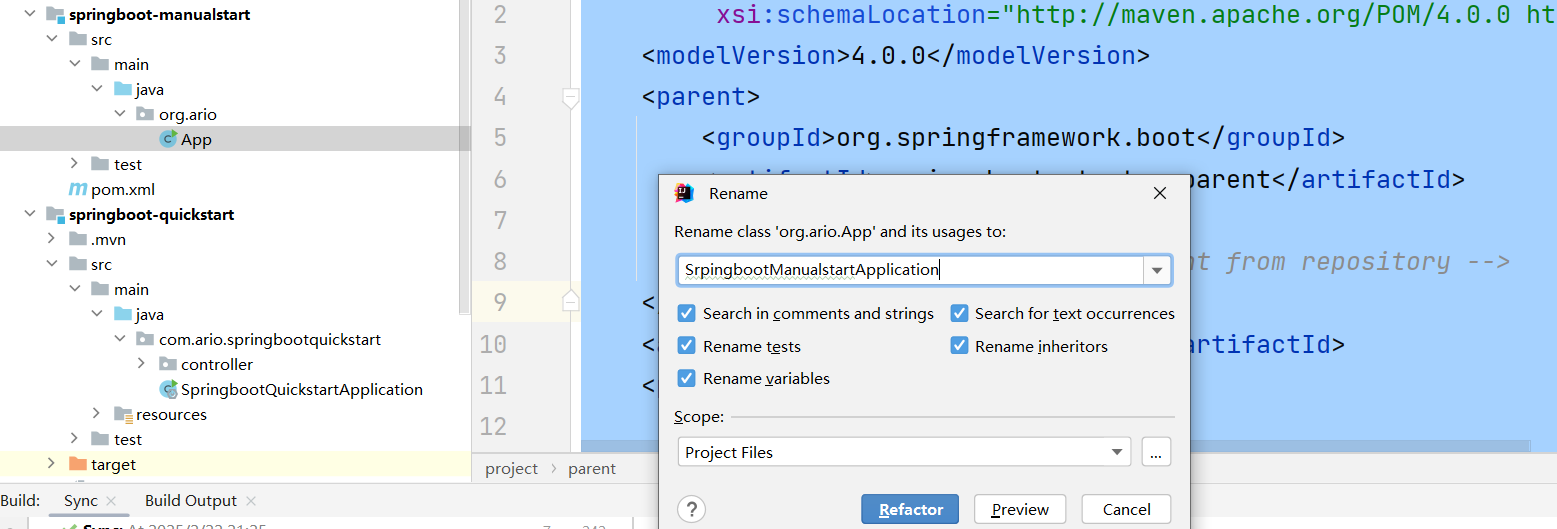
@SpringBootApplication public class SpringbootManualstartApplication { public static void main( String[] args ) { //固定代码,启动类的字节码文件和main的参数 SpringApplication.run(SpringbootManualstartApplication.class, args); } } -
再把上面的controller复制过来就行,测试完成
-
当然可以手动添加resource,添加application.properties文件
配置文件
各种配置在官方网站都有
properties配置文件
以配合端口号和虚拟路径为例
application.properties
server.port=9090
server.servlet.context-path=/start

yaml配置文件【推荐】
可以把上面文件加.bak后缀名,使其失效
application.yml或application.yaml。常用前者
server:
  port: 9191
  servlet:
    context-path: /test
优点
- 层次清晰
- 关注数据
yml配置信息书写与获取
三方技术配置信息
在maven中导入对应jar包以后,直接写配置信息即可,不用手动获取,自动就完成了
自定义配置信息
通过配合可以减少硬编码,避免改变配置时重新对项目编译测试打包部署,减少损失。
-
信息书写
值前边必须有空格,作为分隔符
使用空格作为缩进表示层级关系,相同的层级左侧对齐application.yml文件
#发件人相关的信息 email: user: 111@qq.com code: ddfdf host: stmp.qq.com auth: true #学生爱好,这里用来展示数组的赋值 hobbie: - 唱 - 跳 - rap - 打篮球 -
信息获取
-
@Value(“${键名}”)方式
controller文件
@Value("${email.user}") public String user; @Value("${email.code}") public String code; @Value("${email.host}") public String host; @Value("${email.auth}") private String auth; -
@ConfigurationProperties(prefix=“前缀”)
可以看出@Value(“${键名}”)方式的繁琐,可以用这种方式
注意:实体类的成员变量名与配置文件中的键名保持一致
@RestController
@ConfigurationProperties(prefix = "email")
public class HelloController {

    public String user;
    public String code;
    public String host;
    private String auth;

    @RequestMapping("/hello")
    public String hello(){
        return "hello world^--^";
    }
}
-
整合mybatis
之前mybatis的使用
- 导入jar包
- 配置文件
- SqlSessionFactoryBean
- MapperScannerConfigurer
- Datasource
在SpringBoot中
-
导入起步依赖
<!--mysql驱动依赖--> <dependency> <groupId>com.mysql</groupId> <artifactId>mysql-connector-j</artifactId> </dependency> <!--mybatis的起步依赖--> <dependency> <groupId>org.mybatis.spring.boot</groupId> <artifactId>mybatis-spring-boot-starter</artifactId> <version>3.0.0</version> </dependency> -
在application.yml中配置datasource
spring:
  datasource:
    driver-class-name: com.mysql.cj.jdbc.Driver
    url: jdbc:mysql://localhost:3306/mybatis
    username: root
    password: 1234
接下来就可以直接使用了,照常编写controller,service,mapper去进行对数据库操作。
简洁了很多
Bean管理
Bean扫描
之前是两种方式
- 标签:<context:component-scan base-package="com.ario"/>
- 注解:@ComponentScan(basePackages = "com.ario")
现在是通过注解自动扫描
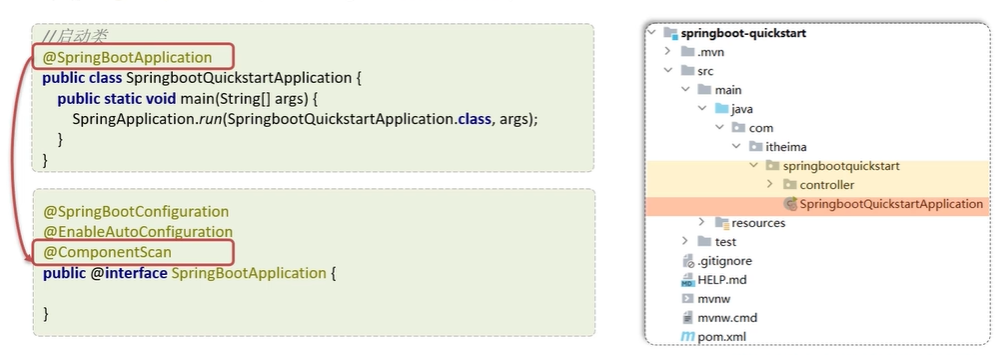
注意:SpringBoot默认扫描启动类所在的包及其所在包的子包【如图所示】。如果controller在这个范围外,这需要用之前方式显示配置
Bean注册
在Spring中一下注解可以进行Bean注册
| 注解 | 说明 | 位置 |
|---|---|---|
| @Component | 声明 bean 的基础注解 | 不属于以下三类时,用此注解 |
| @Controller | @Component 的衍生注解 | 标注在控制器类上 |
| @Service | @Component 的衍生注解 | 标注在业务类上 |
| @Repository | @Component 的衍生注解 | 标注在数据访问类上(由于与 mybatis 整合,用的少) |
如果要注册的bean对象来自于第三方(不是自定义的),是无法用 @Component 及衍生注解声明bean的,因为包中是只读的形式。
可以用以下两个注解解决问题【假设已导入一个包括Country和Province的三方包】
-
@Bean
-
在启动类中【不建议,启动类就干启动的活】
@SpringBootApplication
public class SpringBootRegisterApplication {
    @Bean //将方法返回值交给IOC容器管理,成为IOC容器的bean对象
    public Resolver resolver(){
		return new Resolver();
	}
}
测试
@SpringBootApplication public class SpringBootRegisterApplication { public static void main(String[] args) { //可以测试时候注册 ApplicationContext context = SpringApplication.run(SpringbootRegisterApplication.class, args); Country country = context.getBean(Country.class); System.out.println(country); } @Bean //将方法返回值交给IOC容器管理,成为IOC容器的bean对象 public Country country(){ return new Country(); } } -
如果要注册第三方bean,建议在配置类中集中注册
在启动类所在包【跟默认扫描一个道理,可以建层包】中建立配置类
package com.ario.config;
@Configuration
public class CommonConfig {
    //对象默认的名字是: 方法名
    //@Bean("aa"),这里可以指定名字
    //如果方法的内部需要使用到ioc容器中已经存在的bean对象,那么只需要在方法上声明即可,spring会自动的注入
    @Bean
    public Province province(Country country){
        System.out.println("province: "+country);
        return new Province();
    }
}
测试
@SpringBootApplication
public class SpringbootRegisterApplication {

    public static void main(String[] args) {
        ApplicationContext context = SpringApplication.run(SpringbootRegisterApplication.class, args);

    System.out.println(context.getBean("province"));
    }
}
-
-
@Import
在启动类上加@Import(XXX.class)即可
-
导入配置类
如果配置类没在默认扫描范围内,手动扫描,以上面为例,启动类要写成
@SpringBootApplication
@Import(CommonConfig.class)
public class SpringbootRegisterApplication {

    public static void main(String[] args) {
        ApplicationContext context = SpringApplication.run(SpringbootRegisterApplication.class, args);

        //Country country = context.getBean(Country.class);
        //System.out.println(country);

        System.out.println(context.getBean("province"));
    }

}
当配置类有多个是要写成@Import({CommonConfig.class,CommonConfig.class,CommonConfig.class,.......})。以数组方式注入。显得很麻烦,用小面方法
-
导入 ImportSelector 接口实现类
接口实现类
public class CommonImportSelector implements ImportSelector {
    @Override
    public String[] selectImports(AnnotationMetadata importingClassMetadata) {
       //返回配置类
        return new String[]{"com.ario.config.CommonConfig"};
    }
}
启动类
@SpringBootApplication
@Import(CommonImportSelector.class)
public class SpringbootRegisterApplication {

    public static void main(String[] args) {
        ApplicationContext context = SpringApplication.run(SpringbootRegisterApplication.class, args); System.out.println(context.getBean("province"));
    }
}
配置类不变
上面字符串写死了,可以用下面这种方式根据灵活
在resources下建common.imports文件
com.itheima.config.CommonConfig
com.itheima.config.CommonConfig12
com.itheima.config.CommonConfig2
接口实现类
public class CommonImportSelector implements ImportSelector {
    @Override
    public String[] selectImports(AnnotationMetadata importingClassMetadata) {
        //读取配置文件的内容
        List<String> imports = new ArrayList<>();
        InputStream is = CommonImportSelector.class.getClassLoader().getResourceAsStream("common.imports");
        BufferedReader br = new BufferedReader(new InputStreamReader(is));
        String line = null;
        try {
            while((line = br.readLine())!=null){
                imports.add(line);
            }

        } catch (IOException e) {
            throw new RuntimeException(e);
        } finally {
            if (br!=null){
                try {
                    br.close();
                } catch (IOException e) {
                    throw new RuntimeException(e);
                }
            }
        }
        return imports.toArray(new String[0]);
    }
}
配置类和启动类同上。
上面启动类注解还有参数,可以更优雅,自定义组合注解
在com.ario.anno包下建个注解
@Target(ElementType.TYPE)
@Retention(RetentionPolicy.RUNTIME)
@Import(CommonImportSelector.class)
public @interface EnableCommonConfig {
}
这样启动类中
@Import(CommonImportSelector.class)可以替换成@EnableCommonConfig -
注册条件
有时我们不想或不需要注入某些类时,可以用注解条件完成
SpringBoot提供了设置注册生效条件的注解 @Conditional。为了简化使用spring给我们提供了一些衍生注解,这里说三个常用的。
| 注解 | 说明 |
|---|---|
| @ConditionalOnProperty | 配置文件中存在对应的属性,才声明该 bean |
| @ConditionalOnMissingBean | 当不存在当前类型的 bean 时,才声明该 bean |
| @ConditionalOnClass | 当前环境存在指定的这个类时,才声明该 bean |
-
@ConditionalOnProperty
//注入Country对象
//如果配置文件中配置了指定的信息,则注入,否则不注入
@ConditionalOnProperty(prefix = "country",name = {"name","system"})
@Bean
//@Value也可以用在参数前面
public Country country(@Value("${country.name}") String name,@Value("${country.system}") String system){
    Country country = new Country();
    country.setName(name);
    country.setSystem(system);
    return country ;
}
配置文件,注解以后spring中将没有Country,用的话会报错。
#country: # name: china # system: socialism -
@ConditionalOnMissingBean
//如果ioc容器中不存在Country,则注入Province,否则不注入 @Bean @ConditionalOnMissingBean(Country.class) public Province province(){ return new Province(); } -
@ConditionalOnClass
@Bean
//如果当前环境中存在DispatcherServlet类,则注入Province,否则不注入
//如果当前引入了web起步依赖,则环境中有DispatcherServlet,否则没有
@ConditionalOnClass(name = "org.springframework.web.servlet.DispatcherServlet")
public Province province(){
    return new Province();
}
不用web时注入核心依赖就行,不用非要注入web起步依赖
<!--springboot核心依赖-->
<dependency>
    <groupId>org.springframework.boot</groupId>
    <artifactId>spring-boot-starter</artifactId>
</dependency>
自动配置原理
自动配置
遵循约定大约配置的原则,在boot程序启动后,起步依赖中的一些bean对象会自动注入到ioc容器。
相对于整合mybatis时的自动配置,在Bean管理中的例子显然不是自动配置的。不仅要导入jar包和编写配置文件,还要手动注册。
那三方包中是如何实现自动配置的呢,下面探究一下源码。
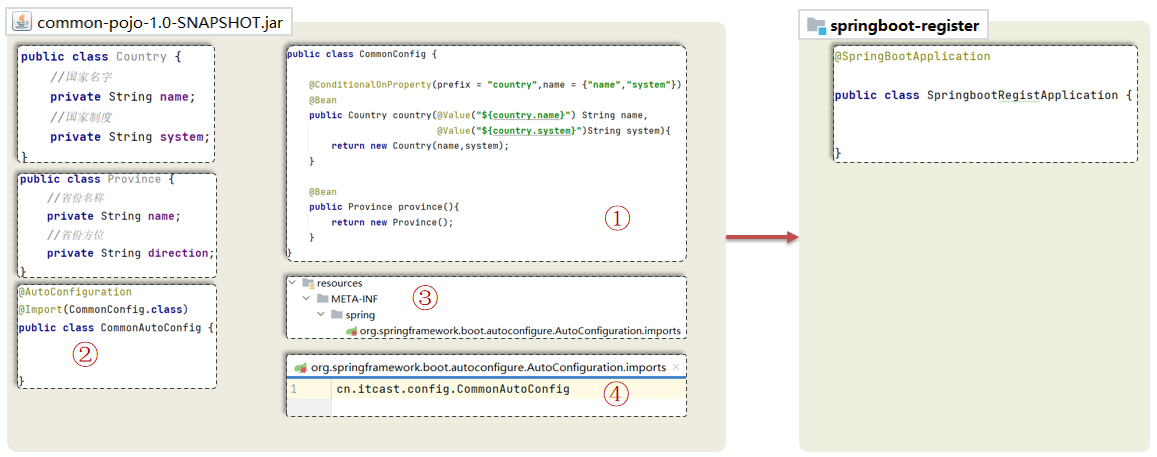
以程序引入spring-boot-starter-web 起步依赖,启动后,会自动往ioc容器中注入DispatcherServlet为例:

在springboot核心依赖中spring-boot-autoconfigure中找到imports文件,其中和Bean管理中那样作用的配置文件,有全类名,对应了配置类。探索完毕

在理解的基础上可以改造之前的jar包实现自动配置
改造前

改造后
面试
说一说SpringBoot自动配置原理?
- 在主启动类上添加了SpringBootApplication注解,这个注解组合了EnableAutoConfiguration注解
- EnableAutoConfiguration注解又组合了Import注解,导入了AutoConfigurationImportSelector类
- 实现AutoConfigurationImportSelector类的selectImports方法,这个方法经过层层调用,最终会读取META-INF 目录下的 后缀名 为imports的文件,当然了,boot2.7以前的版本,读取的是spring.factories文件
- 读取到全类名了之后,会解析注册条件,也就是@Conditional及其衍生注解,把满足注册条件的Bean对象自动注入到IOC容器中
自定义starter
在实际开发中,经常会定义一些公共组件,提供给各个项目团队使用。而在SpringBoot的项目中,一般会将这些公共组件封装为SpringBoot 的 starter。
这里以mybatis起步依赖为例
一般情况下起步依赖由两个工程组成
- 自动配置功能
- 依赖管理功能【常引入自动配置工程】

实例
需求:自定义mybatis的starter
步骤【照葫芦画瓢】:
总目录
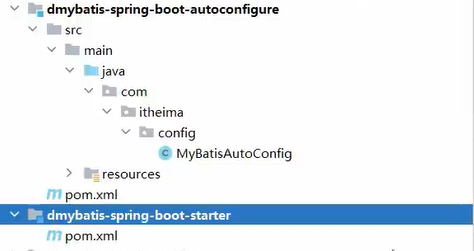
自留有用的文件夹就行,这样结构清晰
-
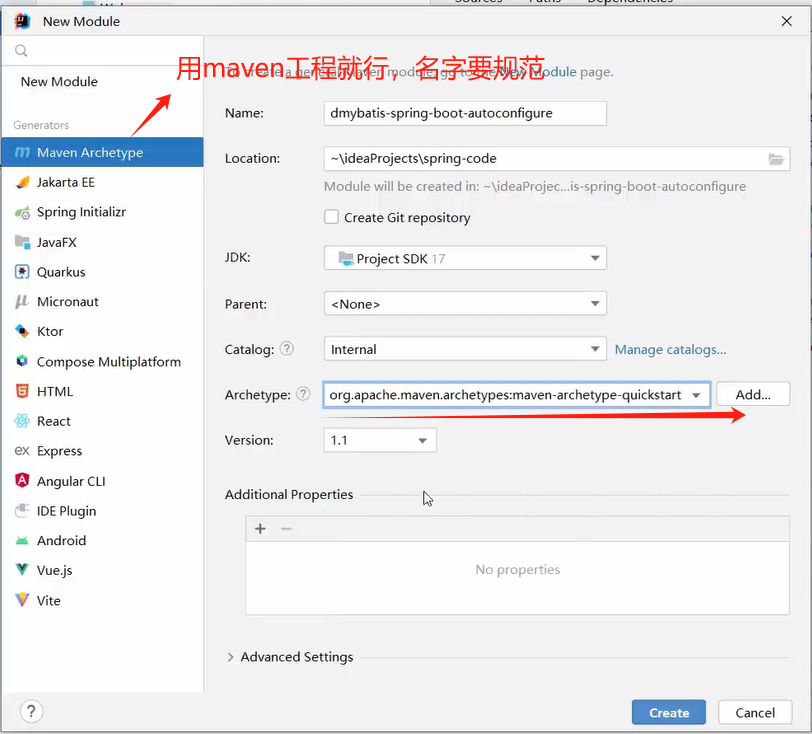
创建 dmybatis-spring-boot-autoconfigure 模块,提供自动配置功能,并自定义配置文件 META-INF/spring/xxx.imports
-
新建maven工程
-
引入其他依赖
可以从现有的mybatis相关jar包可以看出还有一些包要引入
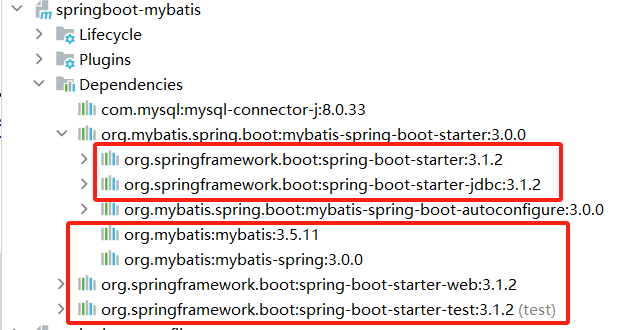
<dependency> <groupId>org.springframework.boot</groupId> <artifactId>spring-boot-starter</artifactId> <version>3.1.2</version> </dependency> <dependency> <groupId>org.springframework.boot</groupId> <artifactId>spring-boot-starter-data-jdbc</artifactId> <version>3.0.0</version> </dependency> <dependency> <groupId>org.mybatis</groupId> <artifactId>mybatis</artifactId> <version>3.5.13</version> </dependency> <dependency> <groupId>org.mybatis</groupId> <artifactId>mybatis-spring</artifactId> <version>3.0.0</version> </dependency> <dependency> <groupId>junit</groupId> <artifactId>junit</artifactId> <version>3.8.1</version> <scope>test</scope> </dependency> -
编写配置类
@AutoConfiguration//表示当前类是一个自动配置类 public class MyBatisAutoConfig { //SqlSessionFactoryBean @Bean //因为已经引入了jdbc的依赖,它会把DataSource,这里直接在参数中声明即可 public SqlSessionFactoryBean sqlSessionFactoryBean(DataSource dataSource){ SqlSessionFactoryBean sqlSessionFactoryBean = new SqlSessionFactoryBean(); //给sqlSessionFactoryBean配置数据库信息 sqlSessionFactoryBean.setDataSource(dataSource); return sqlSessionFactoryBean; } //MapperScannerConfigure @Bean //总之,在方法中要用那些对象,在方法的参数列表中声明即可,将来SpringBoot会自动注入 public MapperScannerConfigurer mapperScannerConfigurer(BeanFactory beanFactory){ MapperScannerConfigurer mapperScannerConfigurer = new MapperScannerConfigurer(); //扫描的包:启动类所在的包及其子包 //通过SpringBoot的起步依赖提供的API【这里是AutoConfigurationPackages类】找到启动类所在包。 List<String> packages = AutoConfigurationPackages.get(beanFactory); //所在包只会是一个,去数组第一个元素即可。 String p = packages.get(0); mapperScannerConfigurer.setBasePackage(p); //扫描的注解,就是Mapper的注解 mapperScannerConfigurer.setAnnotationClass(Mapper.class); return mapperScannerConfigurer; } } -
书写配置文件,使其找到配置类
在resources/META-INF/spring包下创建org.springframework.boot.autoconfigure.AutoConfiguration.imports文件【名字要对】
com.itheima.config.MyBatisAutoConfig
到处已经具备了自动配置功能
-
-
创建 dmybatis-spring-boot-starter 模块,在starter中引入自动配置模块
-
引入自动配置工程的依赖及其所包含的依赖【官方规范,方便分析依赖】
<dependency>
  <groupId>com.itheima</groupId>
  <artifactId>dmybatis-spring-boot-autoconfigure</artifactId>
  <version>1.0-SNAPSHOT</version>
</dependency>
<dependency>
  <groupId>org.springframework.boot</groupId>
  <artifactId>spring-boot-starter</artifactId>
  <version>3.1.2</version>
</dependency>

<dependency>
  <groupId>org.springframework.boot</groupId>
  <artifactId>spring-boot-starter-data-jdbc</artifactId>
  <version>3.0.0</version>
</dependency>

<dependency>
  <groupId>org.mybatis</groupId>
  <artifactId>mybatis</artifactId>
  <version>3.5.13</version>
</dependency>

<dependency>
  <groupId>org.mybatis</groupId>
  <artifactId>mybatis-spring</artifactId>
  <version>3.0.0</version>
</dependency>
<dependency>
  <groupId>junit</groupId>
  <artifactId>junit</artifactId>
  <version>3.8.1</version>
  <scope>test</scope>
</dependency>
-
问题
maven工程中默认的jdk版本是5,这里要在两个工程中都指定一些jdk版本
<build>
    <plugins>
        <plugin>
            <groupId>org.apache.maven.plugins</groupId>
            <artifactId>maven-compiler-plugin</artifactId>
            <version>3.11.0</version>
            <configuration>
                <source>17</source>
                <target>17</target>
            </configuration>
        </plugin>
    </plugins>
</build>

 浙公网安备 33010602011771号