Java 简单操作 RabbitMq
Java项目的开发过程中使用到了 RabbitMq,这里记录一下Mq的基础操作
pom.xml 文件引入 rabbitMq 依赖。 当然也可自行查找合适的版本:spring-boot-starter-amqp
<dependencies>
  ...
    <dependency>
        <groupId>org.springframework.boot</groupId>
        <artifactId>spring-boot-starter-amqp</artifactId>
    </dependency>
  ...
</dependencies>
在 application.yml 或 application.properties 文件配置 rabbitMq的数据源,以 yml 文件举例:
spring:
  rabbitmq:
    #账号
    username: guest
    #密码
    password: guest
    #地址
    addresses: localhost:5672
    #连接超时时间(秒)
    connection-timeout: 3
定义三个常量:交换机,路由key,队列名
package com.demo.www.constant;

/**
 * rabbitMq 常量配置
 * @author AnYuan
 */

public interface RabbitMqConstant {

    String USER_EXCHANGE = "user_exchange";
    String USER_ROUTING_KEY = "user_routing_key";
    String USER_QUEUE = "user_queue";
}
创建一个队列配置初始化类: UserQueueConfig 。项目启动时会同时创建 交换机和队列
package com.demo.www.rabbitmq.config;

import com.demo.www.constant.RabbitMqConstant;
import lombok.extern.slf4j.Slf4j;
import org.springframework.amqp.core.*;
import org.springframework.context.annotation.Bean;
import org.springframework.context.annotation.Configuration;

/**
 * 初始化 交换机和队列,并将队列绑定在交换机上
 * @author AnYuan
 */

@Configuration
@Slf4j
public class UserQueueConfig {

    @Bean
    public Queue userMassageQueue() {
        log.info("userMassageQueue init");
        return new Queue(RabbitMqConstant.USER_QUEUE);
    }

    @Bean
    public DirectExchange userMassageExchange() {
        log.info("userMassageExchange init");
        return new DirectExchange(RabbitMqConstant.USER_EXCHANGE);
    }

    @Bean
    public Binding queueBindingExchange() {
        log.info("queueBindingExchange init");
        return BindingBuilder.bind(userMassageQueue())
                .to(userMassageExchange())
                .with(RabbitMqConstant.USER_ROUTING_KEY);
  }
}
一个接口类 RabbitMqService:
package com.demo.www.service;

/**
 * rabbiMq 服务接口
 * @author AnYuan
 */
public interface RabbitMqService {

    /**
     * 统一发送mq
     *
     * @param exchange   交换机
     * @param routingKey 路由key
     * @param data       数据
     */
    void send(String exchange, String routingKey, Object data);
}
一个实现类 RabbitMqServiceImpl:
package com.demo.www.service.impl;

import com.alibaba.fastjson.JSONObject;
import com.demo.www.service.RabbitMqService;
import org.springframework.amqp.rabbit.core.RabbitTemplate;
import org.springframework.beans.factory.annotation.Autowired;
import org.springframework.stereotype.Service;

/**
 * rabbitmq服务
 * @author AnYuan
 */

@Service
public class RabbitMqServiceImpl implements RabbitMqService {

    @Autowired
    private RabbitTemplate rabbitTemplate;

    @Override
    public void send(String exchange, String routingKey, Object data) {
        rabbitTemplate.convertAndSend(exchange, routingKey, JSONObject.toJSONString(data));
    }
}
一个单元测试类: RabbitMqServiceImplTest
package com.demo.www.service.impl;

import com.demo.www.constant.RabbitMqConstant;
import com.demo.www.service.RabbitMqService;
import org.junit.jupiter.api.Test;
import org.springframework.beans.factory.annotation.Autowired;
import org.springframework.boot.test.context.SpringBootTest;

import java.util.HashMap;
import java.util.Map;

@SpringBootTest
class RabbitMqServiceImplTest {

    @Autowired
    private RabbitMqService rabbitMqService;

    @Test
    public void sendTest() {

        Map<String,Object> user = new HashMap<>();
        user.put("name", "张三");
        user.put("age", 18);
        user.put("course", "Java RabbitMq");

        rabbitMqService.send(RabbitMqConstant.USER_EXCHANGE, RabbitMqConstant.USER_ROUTING_KEY, user);
    }
}
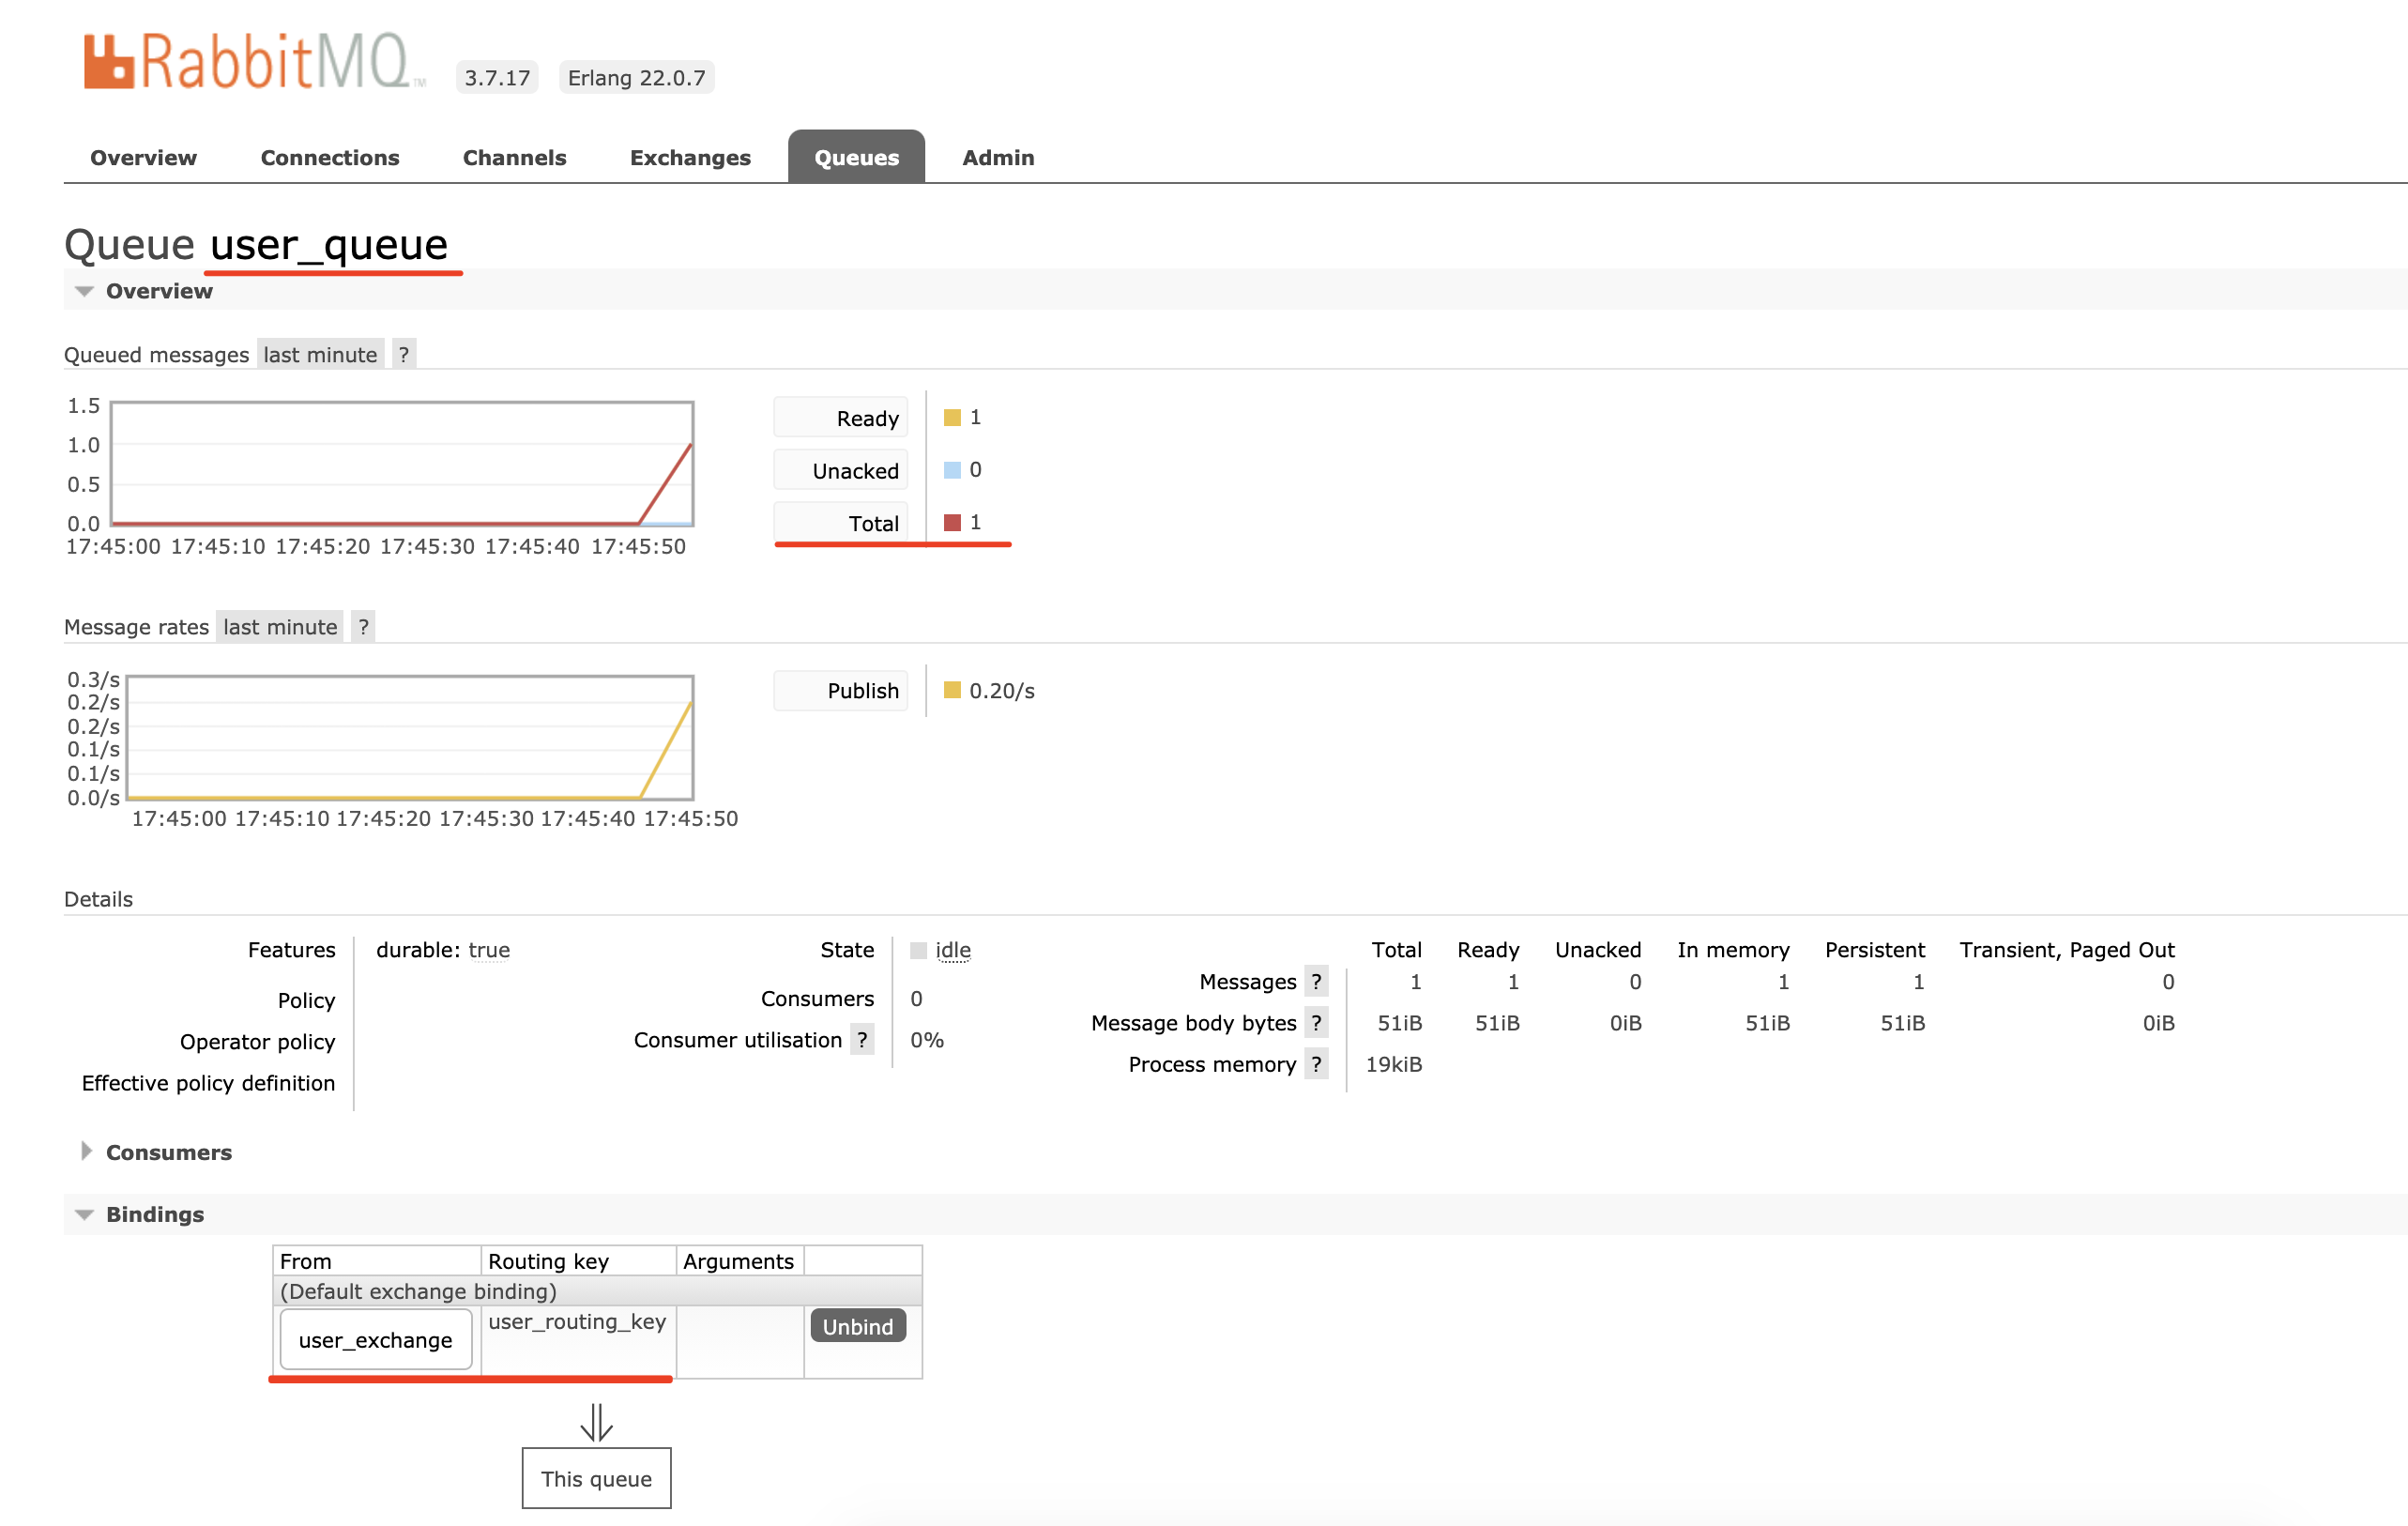
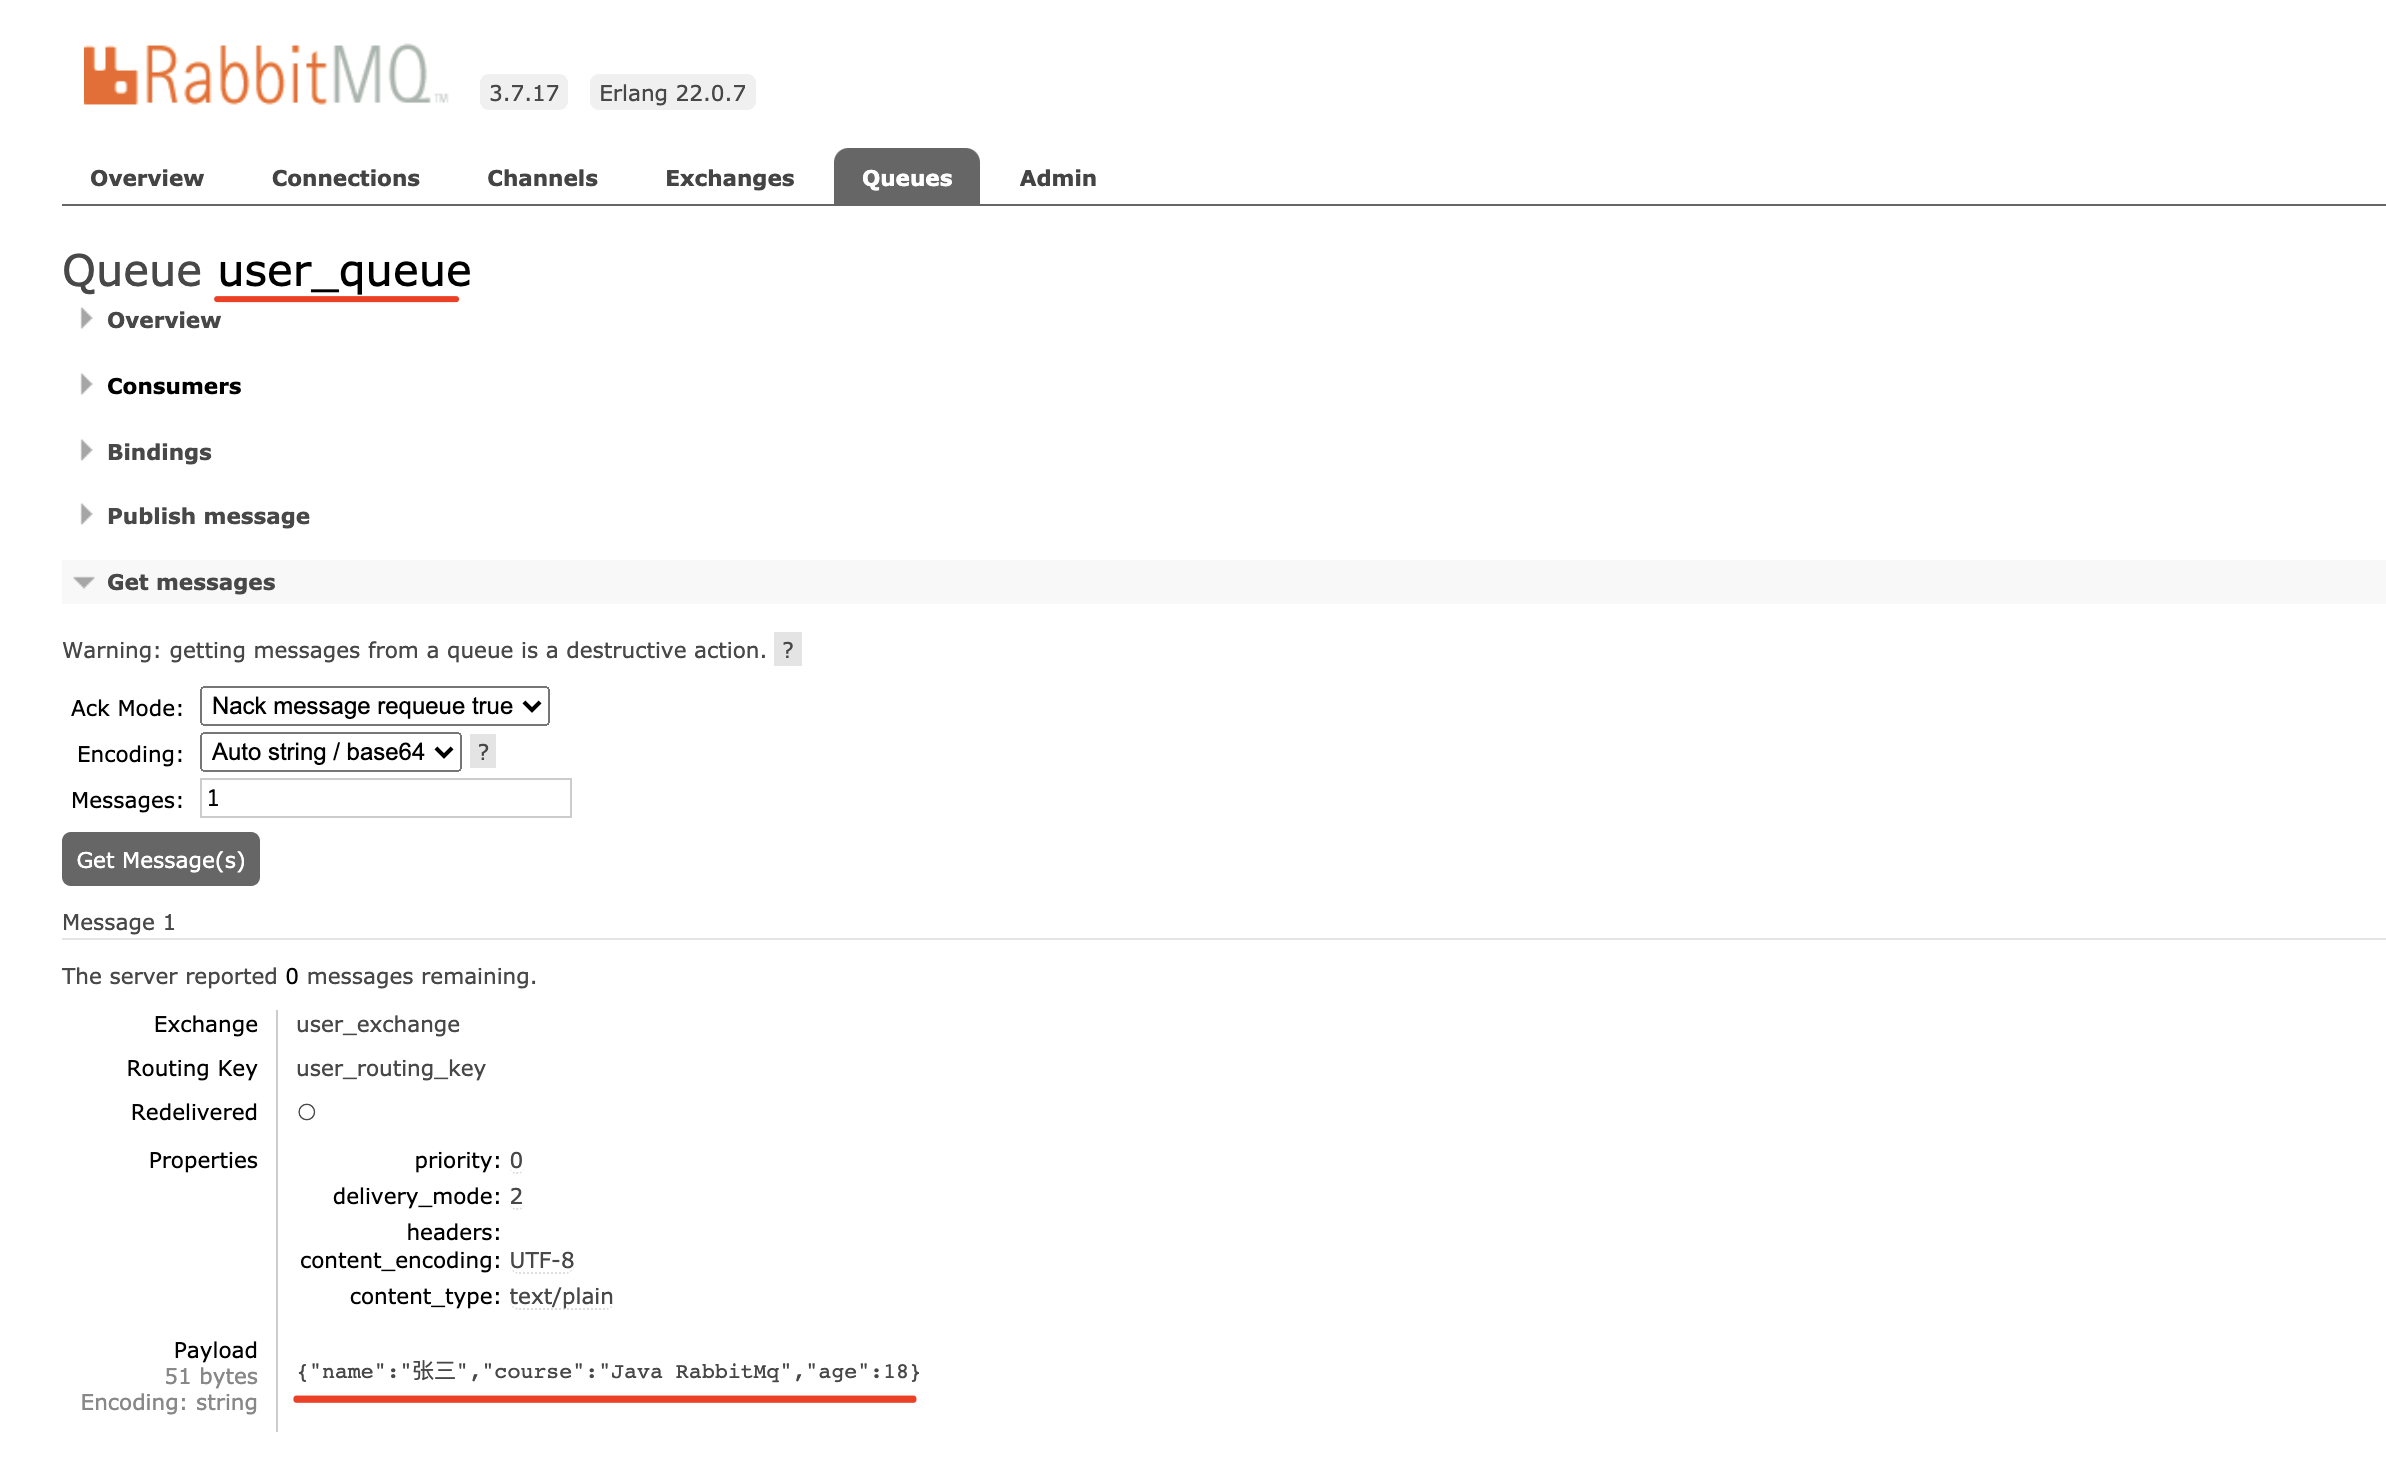
运行单元测试后,在 RabbitMq 后台可以看到已经创建了:user_exchange 和 user_queue ,且两者有绑定关系,队列里面也接收到的 json 数据。
最后写一个消费者 UserConsumer, 加入 Component 注释后,项目启动时即可自动开始消费。
消息可在发送时,使用构建好的实体类或DTO,消费时直接解析成生产时的实体类或DTO更加方便,再做相应的逻辑操作。
package com.demo.www.rabbitmq.consumers;

import com.alibaba.fastjson.JSONObject;
import com.demo.www.constant.RabbitMqConstant;
import lombok.extern.slf4j.Slf4j;
import org.springframework.amqp.core.Message;
import org.springframework.amqp.rabbit.annotation.Exchange;
import org.springframework.amqp.rabbit.annotation.Queue;
import org.springframework.amqp.rabbit.annotation.QueueBinding;
import org.springframework.amqp.rabbit.annotation.RabbitListener;
import org.springframework.stereotype.Component;

import java.util.Map;

/**
 * rabbitMq 消费者
 * @author AnYuan
 */

@Component
@Slf4j
public class UserConsumer {

    @RabbitListener(bindings = @QueueBinding(
            value = @Queue(value = RabbitMqConstant.USER_QUEUE, durable = "true"),
            exchange = @Exchange(value = RabbitMqConstant.USER_EXCHANGE)
    ))
    public void onMassageUser(Message message) {
        log.info("-------开始消费-------");
        Map map = JSONObject.parseObject(new String(message.getBody()), Map.class);
        log.info("姓名:{},年龄:{}, 课程:{}", map.get("name"), map.get("age"), map.get("course"));
        log.info("-------消费完成-------");
    }
}
项目启动后,可以看到在控制台输出


 浙公网安备 33010602011771号