Spring 学习日记(1)
Spring 框架概述
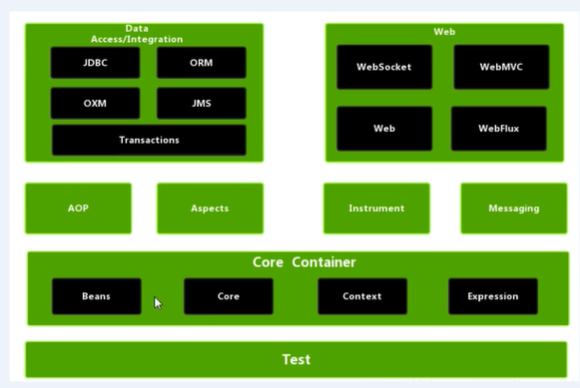
1、Spring 是一个轻量级的开源的 JavaEE 框架
2、Spring 可以解决企业应用开发的复杂性
3、Spring 有两个核心部分: IOC AOP
1) IOC: 控制反转, 把创建对象的过程交给 Spring 进行管理。
2) AOP: 面向切面, 不修改源代码进行功能增强
4、Spring 特点
1) 方便解耦,简化开发
2) AOP 编程支持
3) 方便编程测试
4) 可以方便和其他框架整合
5) 方便进行事务操作
6) 降低 API 开发难度
资料
https://pan.baidu.com/s/1BPdI_vDWW2M-1A0okF3Pww#list/path=%2F
提取码 2333
Spring 入门
1、下载 Spring5
官网
https://spring.io/projects/spring-framework#learn
下载地址
https://repo.spring.io/release/org/springframework/spring/
选择好版本后下载第一个 dist 即可。
解压
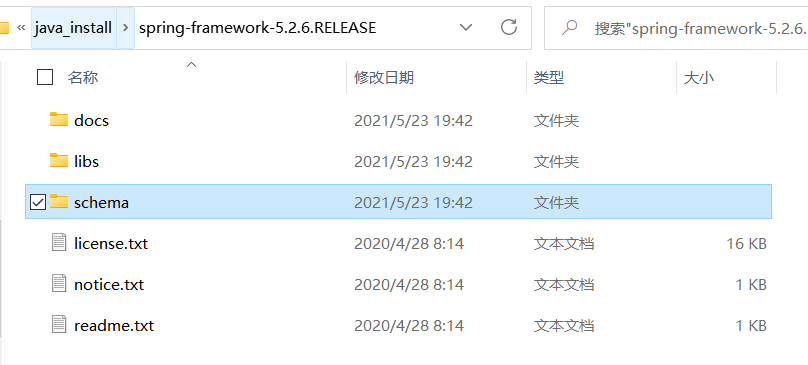
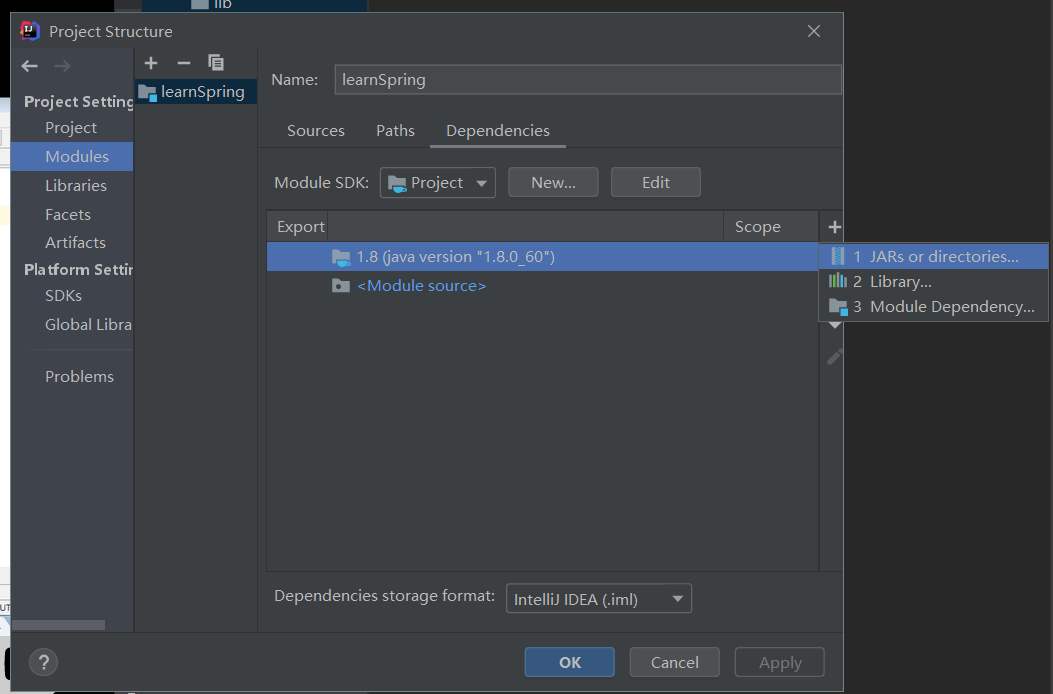
2、打开 idea,创建普通 java 工程
3、导入 Spring5 jar 包
导入 libs 目录下如下 jar 包
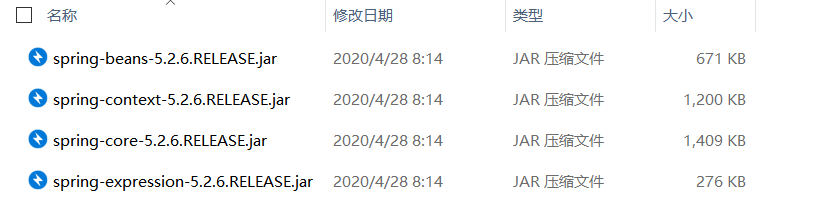
需要导入的所有 jar 包,在资料下:

4、创建普通类,在这个类中创建普通方法
package com.an.spring5;

/**
 * @author an
 * @create 2021-05-23-20:00
 */
public class User {
	public void add() {
		System.out.println("add......");
	}
}
5、创建 Spring 配置文件,在配置文件配置创建的对象
(1) Spring 配置文件使用 xml 格式
<?xml version="1.0" encoding="UTF-8"?>
<beans xmlns="http://www.springframework.org/schema/beans"
       xmlns:xsi="http://www.w3.org/2001/XMLSchema-instance"
       xsi:schemaLocation="http://www.springframework.org/schema/beans http://www.springframework.org/schema/beans/spring-beans.xsd">

    <!-- 配置 User 对象 -->
    <bean id="uesr" class="com.an.spring5.User"></bean>
</beans>
6、进行测试代码的编写
package com.an.spring5.testdemo;


import com.an.spring5.User;
import org.junit.Test;
import org.springframework.context.ApplicationContext;
import org.springframework.context.support.ClassPathXmlApplicationContext;

/**
 * @author an
 * @create 2021-05-23-20:04
 */
public class TestSpring5 {

	@Test
	public void testAdd() {
		// 1、加载 Spring 配置文件
		ApplicationContext context = new ClassPathXmlApplicationContext("bean1.xml");

		// 2、获取配置创建的对象
		User user = context.getBean("uesr", User.class);

		System.out.println(user);
		user.add();
	}
}
IOC 容器
IOC 什么是 IOC
(1) 控制反转,把对象创建和对象之间的调用操作,都交给 Spring 进行管理
(2) 使用 IOC 目的,为了耦合度降低
IOC 底层原理
(1) xml 解析、工厂模式、反射
画图理解


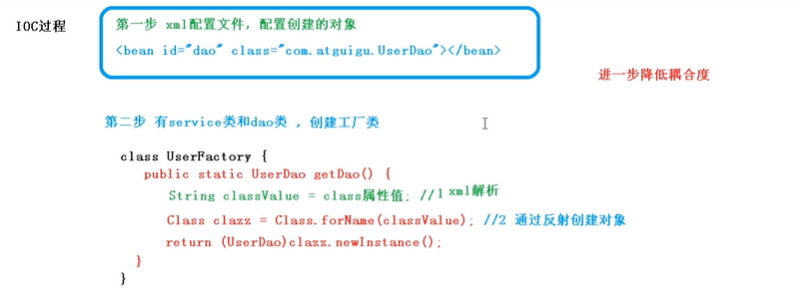
IOC 思想
1、IOC 思想基于 IOC 容器来实现,IOC容器底层就是对象工厂
2、Spring 提供 IOC 容器实现两种方式 (两个接口)
(1) BeanFactory, IOC 容器基本实现方式, 是 Spring 内部使用的接口, 不提倡开发人员使用, 加载配置文件是不会创建对象,而是在获取对象时才创建。
(2) ApplicationContext, 是 BeanFactory 接口的子接口,比 BeanFactory 提供了更强大的功能, 加载配置文件时立即创建。
3、ApplicationContext 接口有实现类
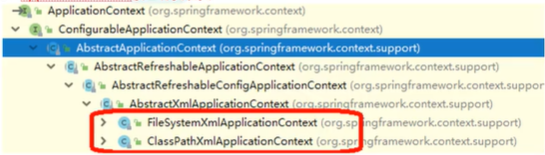
FileSystemXmlApplication: 是盘内的某个文件,给出文件的全路径
ClassPathXmlApplication: 是src下的某个路径
IOC 的具体操作 Bean 管理
1、什么是 Bean 管理
-
Bean 管理指的是两个操作
-
Spring 创建对象
-
Spring 注入属性
2、Bean 管理操作有两种操作
-
基于 xml 配置文件实现
-
基于注解方式实现
3、IOC 操作 Bean 管理 (基于 xml 方式)
- 基于 xml 方式创建对象
<bean id="uesr" class="com.an.spring5.User"></bean>
(1) 在 spring 配置文件中,使用 bean 标签,标签里面添加对应属性,就可以实现对象创建
(2) 在 bean 标签有很多属性,介绍常用的属性
id 属性: 唯一标识
class 属性: 类全路径(包/类 路径)
name 属性: 和 id 差不多,区别在于 name 可以加入特殊字符
(3) 创建对象的时候, 默认也是执行无参数的构造方法
- 基于 xml 方式注入属性
(1) DI: 依赖注入,就是注入属性
第一种注入的方式,使用 set 进行注入
- 创建类,定义属性和对应的 set 方法
package com.an.spring5;

/**
 * 演示使用 set 方法进行属性注入
 * @author an
 * @create 2021-05-24-18:45
 */
public class Book {

	// 创建属性
	private String bname;

	private String bauthor;

	// 创建属性对应的 set 方法
	public void setBname(String bname) {
		this.bname = bname;
	}

	public void setBauthor(String bauthor) {
		this.bauthor = bauthor;
	}

	public Book(String bname) {
		this.bname = bname;
	}

	public void testDemo() {
		System.out.println(bname+" "+bauthor);
	}

	public Book() {
	}
}
- 编写 xml 配置文件
    <!-- 配置对象 -->
    <bean id="book" class="com.an.spring5.Book" >
        <!-- 使用 property 完成属性注入
             name: 类里面属性名称
             value: 向属性注入的值
        -->
        <property name="bname" value="时间简史" ></property>
        <property name="bauthor" value="霍金" ></property>

    </bean>
简化代码 p 名称空间注入
第一步 添加 p 名称空间在配置中 xmlns:p
<beans xmlns="http://www.springframework.org/schema/beans"
       xmlns:xsi="http://www.w3.org/2001/XMLSchema-instance"
       xmlns:p="http://www.springframework.org/schema/p"
       xsi:schemaLocation="http://www.springframework.org/schema/beans http://www.springframework.org/schema/beans/spring-beans.xsd">
第二步 进行属性注入
    <bean id="book" class="com.an.spring5.Book" p:bname="史记" p:bauthor="司马迁">

    </bean>
	@Test
	public void testBook1() {
		// 1 加载 spring 配置文件
		ApplicationContext context = new ClassPathXmlApplicationContext("bean1.xml");

		// 2 获取配置创建的对象
		Book book = context.getBean("book", Book.class);

		book.testDemo();
	}
- 在 spring 配置文件中配置
第二种注入的方式,使用有参数的构造函数进行注入
- 创建类,定义属性,创建属性对应有参数构造方法
package com.an.spring5;

/**
 * 使用有参数构造注入
 * @author an
 * @create 2021-05-24-18:59
 */
public class Orders {

	private String oname;
	private String address;

	public Orders(String oname,String address) {
		this.oname = oname;
		this.address = address;
	}

	public void ordersTest() {
		System.out.println(oname+" "+address);
	}

}
- 在 spring 配置文件中进行配置
    <!-- 有参构造注入属性 -->
    <bean id="orders" class="com.an.spring5.Orders">
        <constructor-arg name="oname" value="abc"></constructor-arg>
        <constructor-arg name="address" value="china"></constructor-arg>
        <!-- 写法2 -->
        <!--
          <constructor-arg index="0" value="abc"></constructor-arg>
        -->
    </bean>
- 测试
	@Test
	public void testOrders() {
		// 1 加载 spring 配置文件
		ApplicationContext context = new ClassPathXmlApplicationContext("bean1.xml");

		// 2 获取配置创建的对象
		Orders order = context.getBean("orders", Orders.class);

		order.ordersTest();
	}
IOC 操作 Bean 管理 (xml 注入其他类型属性)
1、字面量
(1) null 值
    <bean id="book" class="com.an.spring5.Book" >
        <!-- 使用 property 完成属性注入
             name: 类里面属性名称
             value: 向属性注入的值
        -->
        <property name="bname" value="时间简史" ></property>
        <property name="bauthor" value="霍金" ></property>

        <!-- 设置一个空值 -->
        <property name="address">
            <null/>
        </property>

    </bean>
(2) 属性值包含特殊符号
<!-- 属性值中包含特殊符号 -->
<property name="address" value="< >"></property>
<property name="address">
<value> <![CDATA[<>]]]> </value>
</property>
2、注入属性-外部 bean
(1) 创建两个类 service 类和 DAO 类
public interface UserDao {
	public void update();
}
public class UserDaoImpl implements UserDao{

	@Override
	public void update() {
		System.out.println("dao update ......");
	}
}
public class UserService {

	// 创建 UserDao 类型属性,生成 set 方法

	private UserDao userDao;

	public void setUserDao(UserDao userDao) {
		this.userDao = userDao;
	}

	public void add() {
		System.out.println("service add ......");
		userDao.update();
	}
}
(2) 在 service 中调用 DAO 里的方法
(3) 在 spring 配置文件中进行配置
    <!-- 1 service 和 dao 对象进行创建 -->
    <bean id="userService" class="com.an.spring5.service.UserService">
        <!-- 注入 userDao 对象
             name 属性值: 类里面属性名称
             ref 属性值: 创建 userDao 对象 bean 标签 id 值
        -->
        <property name="userDao" ref="userDaoImpl"></property>
    </bean>

    <bean id="userDaoImpl" class="com.an.spring5.dao.UserDaoImpl"></bean>
(4) 测试
	@Test
	public void testAdd() {
		// 1 加载 spring 配置文件
		ApplicationContext context = new ClassPathXmlApplicationContext("bean1.xml");

		// 2 获取配置创建的对象
		UserService userService = context.getBean("userService", UserService.class);

		userService.add();

	}
3、注入属性-内部 bean
(1) 一对多: 部门和员工
一个部门有多个员工,一个员工输入一个部门。
部门是一,员工是多。
(2) 在实体类之间表示一对多关系,员工表示所属部门,使用对象类型属性进行表示。
package com.an.spring5.bean;

/**
 * @author an
 * @create 2021-05-24-19:52
 */
public class Department {
	private String dname;

	public void setDname(String dname) {
		this.dname = dname;
	}
}
// 员工类
public class Employee {
	private String ename;
	private String gender;
	private Department dept;

	// 员工属于某一个部门
	public void setEname(String ename) {
		this.ename = ename;
	}

	public void setGender(String gender) {
		this.gender = gender;
	}

	public void setDept(Department dept) {
		this.dept = dept;
	}
}
(3) 在 spring 配置文件中进行配置
    <!-- 内部 bean -->
    <bean id="emp" class="com.an.spring5.bean.Employee">
        <!-- 设置两个普通属性 -->
        <property name="ename" value="lucy"></property>
        <property name="gender" value="女"></property>
        <property name="dept">
            <bean id="dept" class="com.an.spring5.bean.Department">
                <property name="dname" value="财务"></property>
            </bean>
        </property>
    </bean>
(4) 测试
	@Test
	public void testBean() {
		// 1 加载 spring 配置文件
		ApplicationContext context = new ClassPathXmlApplicationContext("bean2.xml");

		// 2 获取配置创建的对象
		Employee emp = context.getBean("emp", Employee.class);

		emp.add();
	}
4、注入属性-级联赋值
(1) 写法1
    <!-- 级联赋值 -->
    <bean id="emp" class="com.an.spring5.bean.Employee">
        <property name="ename" value="lucy"></property>
        <property name="gender" value="女"></property>

        <!-- 级联赋值 -->
        <property name="dept" ref="dept"></property>
    </bean>
(2) 写法2
    <bean id="emp" class="com.an.spring5.bean.Employee">
        <property name="ename" value="lucy"></property>
        <property name="gender" value="女"></property>

        <!-- 级联赋值 -->
        <property name="dept" ref="dept"></property>

        <property name="dept.dname" value="技术"></property>
    </bean>
前置操作,需要在类中提供对象属性的 get 方法,否则报错。
	// 生成 Dept 对应的 get 方法


	public Department getDept() {
		return dept;
	}
Bean 管理 xml 注入 集合属性
1、注入数组、集合类型属性
(1) 创建类,定义数组、list、map、set 类型属性
public class Student {
	// 1 数组类型的属性
	private String[] courses;

	// 2 list 类型的属性
	private List<String> list;

	// 3 map 集合类型的属性
	private Map<String,String> maps;

	// 4 set 集合属性
	private Set<String> sets;

	public void setCourses(String[] courses) {
		this.courses = courses;
	}

	public void setList(List<String> list) {
		this.list = list;
	}

	public void setMaps(Map<String, String> maps) {
		this.maps = maps;
	}

	public void setSets(Set<String> sets) {
		this.sets = sets;
	}

	public void test() {
		System.out.println(Arrays.toString(courses));
		System.out.println(list);
		System.out.println(maps);
		System.out.println(sets);
	}
}
(2) 在 xml 文件中配置属性
    <!-- 1 集合类型属性注入 -->
    <bean id="stu" class="com.an.spring5.collectiontype.Student">
        <!-- 数组类型的属性注入 -->
        <property name="courses" >
            <array>
                <value>
                    java 课程
                </value>
                <value>
                    数据库课程
                </value>
            </array>
        </property>
        <!-- list 类型属性注入 -->
        <property name="list">
            <list>
                <value>
                    张三
                </value>
                <value>
                    李四
                </value>
            </list>
        </property>
        <!-- map 类型属性注入 -->
        <property name="maps">
            <map>
                <entry key="JAVA" value="java">

                </entry>
                <entry key="CPP" value="cpp">

                </entry>
            </map>
        </property>

        <property name="sets">
            <set>
                <value>
                    MySql
                </value>
                <value>
                    Redis
                </value>
            </set>
        </property>
    </bean>
(3) 测试
	@Test
	public void testCollection() {
		ApplicationContext context = new ClassPathXmlApplicationContext("bean4.xml");

		// 2 获取配置创建的对象
		Student stu = context.getBean("stu", Student.class);

		stu.test();
	}
2、在集合里面设置对象类型值
Student 类中添加
	private List<Course> courseList;

	public void setCourseList(List<Course> courseList) {
		this.courseList = courseList;
	}
Course 类
public class Course {
	private String cname;

	public void setCname(String cname) {
		this.cname = cname;
	}

	@Override
	public String toString() {
		return "Course{" +
				"cname='" + cname + '\'' +
				'}';
	}
}
配置文件
        <!-- 注入 list 集合类型,但它的值为对象 -->
        <property name="courseList">
            <list>
                <ref bean="course1"></ref>
                <ref bean="course2"></ref>

            </list>
        </property>

    <!-- 创建多个 course 对象 -->
    <bean id="course1" class="com.an.spring5.collectiontype.Course">
        <property name="cname" value="Spring5框架"></property>
    </bean>
    <bean id="course2" class="com.an.spring5.collectiontype.Course">
        <property name="cname" value="MyBatis框架"></property>
    </bean>
3、把集合注入的部分提取出来
(1) 在 spring 配置文件中引入名称空间 util
<?xml version="1.0" encoding="UTF-8"?>
<beans xmlns="http://www.springframework.org/schema/beans"
       xmlns:xsi="http://www.w3.org/2001/XMLSchema-instance"
       xmlns:util="http://www.springframework.org/schema/util"
       xsi:schemaLocation="http://www.springframework.org/schema/beans http://www.springframework.org/schema/beans/spring-beans.xsd
                            http://www.springframework.org/schema/util http://www.springframework.org/schema/util/spring-util.xsd">
(2) 使用 util 标签完成 list 集合注入提取
    <!-- 1 提取 list 集合类属性注入 -->
    <util:list id="bookList">
        <value>
            史记
        </value>
        <value>
            骆驼祥子
        </value>
        <value>
            时间简史
        </value>
    </util:list>

    <!-- 2 提取 list 集合类型属性注入使用 -->
    <bean id="book" class="com.an.spring5.collectiontype.Book">
        <property name="list" ref="bookList"></property>
    </bean>
public class Book {
	private List<String> list;

	public void setList(List<String> list) {
		this.list = list;
	}

	@Override
	public String toString() {
		return "Book{" +
				"list=" + list +
				'}';
	}
}
测试
	@Test
	public void testCollection2() {
		ApplicationContext context = new ClassPathXmlApplicationContext("bean5.xml");

		// 2 获取配置创建的对象
		Book book = context.getBean("book", Book.class);

		System.out.println(book);
	}
Bean管理(工厂Bean)
1、Spring 有两种类型的 Bean,一种普通 bean,另外一种工厂bean(FactoryBean)。
2、普通 Bean: 在配置文件中,定义的 Bean 类型就是返回类型
3、工厂 Bean: 在配置文件中,定义的 Bean 类型可以和返回类型不一样
(1) 创建类,让这个类作为工厂 Bean
(2) 实现接口里面的方法,在实现的方法中定义返回的 Bean 类型
public class MyBean implements FactoryBean<Course> {

	// 定义返回 Bean
	@Override
	public Course getObject() throws Exception {
		Course course = new Course();
		course.setCname("abc");
		return course;
	}

	@Override
	public Class<?> getObjectType() {
		return null;
	}
}
<bean id="myBean" class="com.an.spring5.factorybean.MyBean"></bean>
	@Test
	public void test3() {
		ApplicationContext context = new ClassPathXmlApplicationContext("bean6.xml");

		Course course = context.getBean("myBean", Course.class);
		System.out.println(course);
	}
Bean 的作用域
1、在 Spring 里面,设置创建 bean 实例是单实例还是多实例
2、在 Spring 里面,默认情况下,bean 是单实例对象
验证是单实例对象
	@Test
	public void testBook1() {
		// 1 加载 spring 配置文件
		ApplicationContext context = new ClassPathXmlApplicationContext("bean1.xml");

		// 2 获取配置创建的对象
		Book book1 = context.getBean("book", Book.class);

		Book book2 = context.getBean("book", Book.class);

		System.out.println(book1==book2);
	}
输出 true,说明是单实例。
3、如何设置是单实例还是多实例
(1) 在 spring 配置文件 bean 标签里面有属性(scope)用于设置单实例还是多实例
(2) scope 属性值
第一个值 默认值 singleton 表示单实例对象
第二个值 prototype 表示多实例对象
<bean id="book" class="com.an.spring5.Book" scope="prototype" p:bname="史记" p:bauthor="司马迁">
(3) singleton 和 prototype 区别
第一 singleton 单实例,prototype多实例
第二 设置 scope 值是 singleton 时候,加载 spring 配置文件的时候就会创建单实例对象
设置 scope 值是 prototype 时候,不是在加载 spring 配置文件的时候创建,而是在调用 getBean() 方法时创建。
Bean 生命周期
1、生命周期
(1) 从对象的创建到对象销毁的过程
2、Bean 生命周期
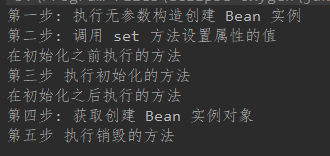
(1) 通过构造器创建 Bean 实例(无参数构造)。
(2) 为 Bean 的属性设置值和对其他 Bean 的引用(调用 set 方法)
(3) 调用 Bean 的初始化方法(需要进行配置)
(4) Bean 可以使用了(对象获取到了)
(5) 当容器关闭的时候,调用 Bean 的销毁的方法(需要进行配置销毁的方法)
3、演示 Bean 生命周期
public class Orders {
	private String oname;

	// 无参数构造


	public Orders() {
		System.out.println("第一步: 执行无参数构造创建 Bean 实例");
	}

	public void setOname(String oname) {
		this.oname = oname;
		System.out.println("第二步: 调用 set 方法设置属性的值");
	}

	// 创建一个执行的初始化的方法
	public void initMethod() {
		System.out.println("第三步 执行初始化的方法");
	}

	// 创建执行的销毁方法
	public void destroyMethod() {
		System.out.println("第五步 执行销毁的方法");
	}
}
    <bean id="orders" class="com.an.spring5.bean.Orders" init-method="initMethod" destroy-method="destroyMethod">
        <property name="oname" value="手机"></property>
    </bean>
	@Test
	public void test4() {
		ClassPathXmlApplicationContext context = new ClassPathXmlApplicationContext("bean7.xml");

		Orders course = context.getBean("orders", Orders.class);
		System.out.println("第四步: 获取创建 Bean 实例对象");

		// 手动让 Bean 实例销毁

		context.close();
	}
4、bean 的后置处理器,bean 的生命周期有 7 步
(1) 通过构造器创建 Bean 实例(无参数构造)。
(2) 为 Bean 的属性设置值和对其他 Bean 的引用(调用 set 方法)
(3) 把 Bean 实例传递给 bean 后置处理器的方法 postProcessBeforeInitialization
(4) 调用 Bean 的初始化方法(需要进行配置)
(5) 把 Bean 实例传递给 bean 后置处理器的方法 postProcessAfterInitialization
(6) Bean 可以使用了(对象获取到了)
(7) 当容器关闭的时候,调用 Bean 的销毁的方法(需要进行配置销毁的方法)
5、演示添加后置处理器的效果
(1) 创建类,实现接口 BeanPostProcessor,创建后置处理器
package com.an.spring5.bean;

import org.springframework.beans.BeansException;
import org.springframework.beans.factory.config.BeanPostProcessor;

/**
 * @author an
 * @create 2021-05-26-10:27
 */
public class MyBeanPost implements BeanPostProcessor {

	@Override
	public Object postProcessBeforeInitialization(Object bean, String beanName) throws BeansException {

		System.out.println("在初始化之前执行的方法");
		return bean;
	}

	@Override
	public Object postProcessAfterInitialization(Object bean, String beanName) throws BeansException {
		System.out.println("在初始化之后执行的方法");
		return bean;
	}
}
(2) 改写配置文件
后置处理器对配置文件的所有 Bean 都会执行相同的操作。
    <!-- 配置后置处理器 -->

    <bean id="myBeanPost" class="com.an.spring5.bean.MyBeanPost"></bean>
xml 自动装配
1、什么是自动装配
(1) 根据指定的装配规则(属性名称或属性类型),Spring 自动将匹配的属性值进行注入。
2、演示自动装配过程
package com.an.spring5.autowire;

/**
 * @author an
 * @create 2021-05-26-10:37
 */
public class Emp {

	private Dept dept;

	public void setDept(Dept dept) {
		this.dept = dept;
	}

	@Override
	public String toString() {
		return "Emp{" +
				"dept=" + dept +
				'}';
	}

	public void test() {
		System.out.println(dept);
	}
}
package com.an.spring5.autowire;

/**
 * @author an
 * @create 2021-05-26-10:37
 */
public class Dept {

	@Override
	public String toString() {
		return "Dept{}";
	}
}
    <bean id="emp" class="com.an.spring5.autowire.Emp" autowire="byName">
<!--        <property name="dept" ref="dept"></property>-->
    </bean>

    <bean id="dept" class="com.an.spring5.autowire.Dept">
	@Test
	public void test5() {
		ClassPathXmlApplicationContext context = new ClassPathXmlApplicationContext("bean8.xml");

		Emp emp = context.getBean("emp", Emp.class);
		System.out.println(emp);

	}
外部属性文件
1、直接配置数据库信息
(1) 配置德鲁伊连接池
(2) 引入德鲁伊连接池的 jar 包
    <bean id="dataSource" class="com.alibaba.druid.pool.DruidDataSource">
        <property name="driverClassName" value="com.mysql.jdbc.Driver"></property>
        <property name="url" value="jdbc:mysql://localhost:3306/test"></property>
        <property name="username" value="root"></property>
        <property name="password" value="2232116722ca"></property>
    </bean>
2、引入外部属性文件配置数据库连接池
(1) 创建外部属性文件
prop.driverClass=com.mysql.jdbc.Driver
prop.url=jdbc:mysql://localhost:3306/test
prop.userName=root
prop.password=2232116722ca
(2) 读取配置文件内容
引入 context 名称空间
<beans xmlns="http://www.springframework.org/schema/beans"
       xmlns:xsi="http://www.w3.org/2001/XMLSchema-instance"
       xmlns:context="http://www.springframework.org/schema/context"
       xsi:schemaLocation="http://www.springframework.org/schema/beans http://www.springframework.org/schema/beans/spring-beans.xsd
                           http://www.springframework.org/schema/context  http://www.springframework.org/schema/context/spring-context.xsd">
在spring配置文件使用标签引入外部属性文件
    <!-- 引人外部属性文件 -->
    <context:property-placeholder location="classpath:jdbc.properties"></context:property-placeholder>
    <bean id="dataSource2" class="com.alibaba.druid.pool.DruidDataSource">
        <property name="driverClassName" value="${prop.driverClass}"></property>
        <property name="url" value="${prop.url}"></property>
        <property name="username" value="${prop.username}"></property>
        <property name="password" value="${prop.password}"></property>
    </bean>
使用注解创建对象
1、什么是注解
(1) 注解是代码特殊标记,格式为 @注解名称(属性名称=属性值,...)
(2) 使用注解,注解作用在类上面,方法上面,属性上面
(3) 使用注解目的: 简化 xml 配置
2、Bean 管理中的注解
(1) @Component
(2) @Service
(3) @Controller
(4) @Repository
上面注解功能是一样的,都可以用来创建 Bean 实例。
3、基于注解方式实现对象创建
(1) 引入依赖 spring-aop-5.2.6.RELEASE.jar
(2) 开启组件扫描
<?xml version="1.0" encoding="UTF-8"?>
<beans xmlns="http://www.springframework.org/schema/beans"
       xmlns:xsi="http://www.w3.org/2001/XMLSchema-instance"
       xmlns:context="http://www.springframework.org/schema/context"
       xsi:schemaLocation="http://www.springframework.org/schema/beans http://www.springframework.org/schema/beans/spring-beans.xsd
                           http://www.springframework.org/schema/context  http://www.springframework.org/schema/context/spring-context.xsd">

    <!-- 开启组件扫描
         1 如果扫描多个包,多个包之间使用 , 隔开
         2 写扫描的包的上级目录
    -->
    <context:component-scan base-package="com.an2.spring5"></context:component-scan>
</beans>
(3) 创建类,在类上添加创建对象
// 在注解里面 value 属性值可以不写,默认值是类名称,首字母小写
// UserService -> userService
@Service(value="userService")  // <bean id="">
public class UserService {
	public void add() {
		System.out.println("add............");
	}
}
(4) 测试
	@Test
	public void test1() {
		ApplicationContext context = new ClassPathXmlApplicationContext("bean10.xml");
		UserService userService = context.getBean("userService",UserService.class);
		System.out.println(userService);
		userService.add();
	}
开启组件扫描的一些细节问题
    <!-- 示例 1
        use-default-filters = false 表示不使用默认 filter 使用默认规则
        context:include-filter, 设置扫描哪些内容(带特定注解的类)
    -->
    <context:component-scan base-package="com.an2" use-default-filters="false">
        <context:include-filter type="annotation" expression="org.springframework.stereotype.Service"/>
    </context:component-scan>

    <!-- 示例 2
       下面标记扫描所有内容
       context:exclude-filter: 设置哪些内容不被扫描
    -->
    <context:component-scan base-package="com.an2">
        <context:exclude-filter type="annotation" expression="org.springframework.stereotype.Service"/>
    </context:component-scan>
基于注解方式的属性注入
-
@AutoWired: 根据属性类型进行自动装配 -
@Qualifier: 根据属性名称进行注入 -
@Resource: 可以根据类型注入,也可以根据名称注入 -
@Value: 注入普通类型属性
以 @AutoWired 为例
(1) 把 Service 和 Dao 对象创建,在 Service 和 Dao 类添加创建对象注解。
@Service
public class UserDaoImpl implements UserDao {

	@Override
	public void add() {
		System.out.println("dao add.........");
	}
}
(2) 在 Service 注入 Dao 对象,在 Service 类添加 Dao 类型属性,在属性上面使用注解。
@Service(value="userService")  // <bean id="">
public class UserService {

	// 定义 Dao 类型属性
	// 不需要添加 set 方法
	// 添加注入属性的注解
	@Autowired
	private UserDao userDao;
	public void add() {
		userDao.add();
		System.out.println("add............");
	}
}
测试
	@Test
	public void test1() {
		ApplicationContext context = new ClassPathXmlApplicationContext("bean10.xml");
		UserService userService = context.getBean("userService",UserService.class);
		System.out.println(userService);
		userService.add();
	}
纯注解开发
完全不使用配置文件。
(1) 创建配置类,替代 xml 配置文件。
@Configuration // 作为配置类,替代 xml 文件
@ComponentScan(basePackages = {"com.an2"})
public class SpringConfig {

}
(2) 编写测试类
	@Test
	public void test3() {
		ApplicationContext context = new AnnotationConfigApplicationContext(SpringConfig.class);
		UserService userService = context.getBean("userService",UserService.class);
		System.out.println(userService);
		userService.add();
	}
AOP
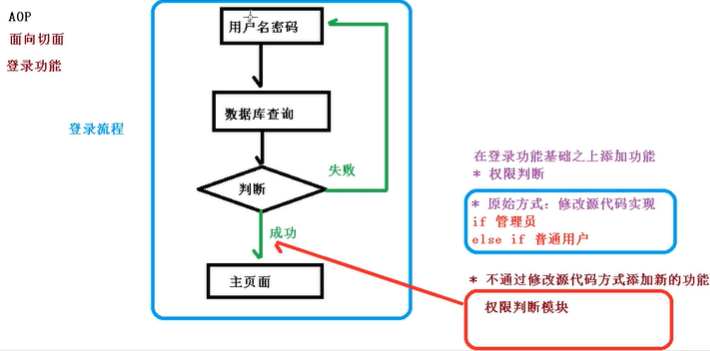
AOP 基本概念
(1) 面向切面编程(方面) ,利用 AOP 可以对业务逻辑的各个部分进行隔离,从而使得业务逻辑各部分之间的耦合度降低,提高程序的可重用性,同时提高了开发效率。
(2) 通俗描述:不通过修改源代码的方式,在主干功能里面添加功能。
AOP 底层原理
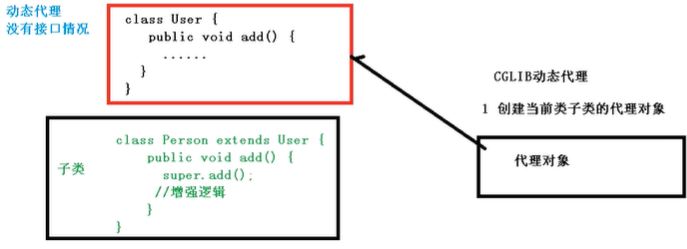
1、AOP 底层使用动态代理
(1) 有两种情况的动态代理
第一种 有接口的情况,使用 JDK 动态代理

创建接口实现类的代理对象,增强类的方法。
第二种 没有接口的情况,使用 CGLIB 动态代理
JDK 动态代理
1、使用 JDK 动态代理,使用 Proxy 类里的方法创建代理对象
(1) 调用 newProxyInstance 方法
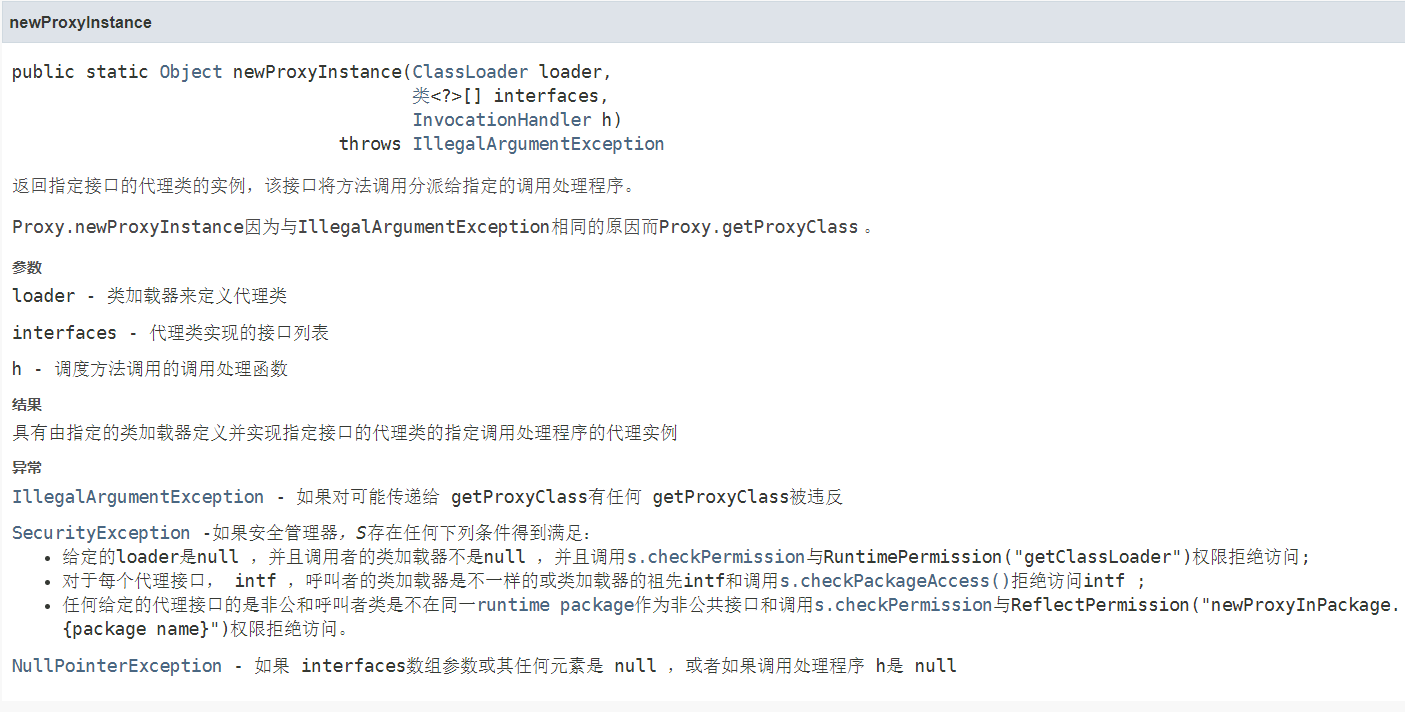
第一个参数: 类加载器
第二个参数: 增强方法所在的类,这个类实现的接口,支持多个接口
第三个参数: 实现这个接口 InvocationHandler,创建代理对象,写增强的方法
2、JDK 动态代理代码
(1) 创建接口,定义方法
public interface UserDao {
	public int add(int a,int b);
	public String update(String id);
}
public class UserDaoImpl implements UserDao {
	@Override
	public int add(int a, int b) {
		return a+b;
	}

	@Override
	public String update(String id) {
		return id;
	}
}
(3) 使用 Proxy 类创建接口增强对象
package com.an3.spring5.demo;

import java.lang.reflect.InvocationHandler;
import java.lang.reflect.Method;
import java.lang.reflect.Proxy;
import java.util.Arrays;

/**
 * @author an
 * @create 2021-05-27-10:36
 */
public class JDKProxy {

	public static void main(String[] args) {
		// 创建接口实现类的代理对象
		Class[] interfaces = {UserDao.class};
		UserDaoImpl userDao = new UserDaoImpl();
		UserDao dao = (UserDao)Proxy.newProxyInstance(JDKProxy.class.getClassLoader(), interfaces, new UserDaoProxy(userDao));
		int result = dao.add(1,2);
		System.out.println(result);
	}
}


// 创建代理对象代码

class UserDaoProxy implements InvocationHandler {

	// 1 把创建的是谁的代理对象,把谁传递过来
	// 有参数构造传递
	private Object obj;
	public UserDaoProxy(Object obj) {
		this.obj = obj;
	}


	// 增强的逻辑
	@Override
	public Object invoke(Object proxy, Method method, Object[] args) throws Throwable {
		// 方法之前处理

		System.out.println("方法之前执行..." + method.getName() + ": 传递的参数" + Arrays.toString(args));

		// 被增强的方法执行
		Object res = method.invoke(obj, args);

		// 方法之后处理
		System.out.println("方法之后执行..." +obj);

		return res;
	}


}
AOP 术语
1、连接点
可以被增强的方法
2、切入点
真正增强的方法
3、通知(增强)
(1) 实际增强的逻辑部分
(2) 通知有多种类型
1 前置通知
2 后置通知
3 环绕通知
4 异常通知
5 最终通知
4、切面
把通知应用到切入点的过程
AOP 操作准备
1、Spring 框架中基于 AspectJ 实现 AOP 操作
(1) 什么是 AspectJ
- AspectJ 不是 Spring 组成部分,是一个独立的 AOP 框架,一般把 AspectJ 和 Spring 框架一起使用,进行 AOP 操作。
2、基于 AspectJ 实现 AOP 操作
(1) 基于 XML 配置文件实现
(2) 基于注解方式实现(使用)
3、在项目工程中引入 AOP 相关依赖
spring-aspects-5.2.6.RELEASE.jar

4、切入点表达式
(1) 切入点表达式作用: 知道对哪个类里面的哪个方法进行增强
(2) 语法结构:
execution([权限修饰符][返回类型][类全路径][方法名称](参数列表))
举例1: 对 com.an3.dao.BookDao 类里的 add 方法进行增强
execution(* com.an3.dao.BookDao.add(..))
* 表示任意修饰符
举例2: 对 com.an3.dao.BookDao 类里的所有方法进行增强
execution(* com.an3.dao.BookDao.*(..))
举例3: 对 com.an3.dao 包里的所有类,类里的所有方法进行增强
execution(* com.an3.dao.*.*(..))
AspectJ 注解
1、创建类,在类里面定义方法
@Component
public class User {
	public void add() {
		System.out.println("add....");
	}
}
2、创建增强的类(编写增强的类)
(1) 在增强类里面,创建方法,让不同方法代表不同通知类型。
// 增强的类
@Component
public class UserProxy {
	// 前置通知
	public void before() {
		System.out.println("before");
	}
}
3、进行通知的配置
(1) 在 spring 配置文件中,开启注解扫描
<?xml version="1.0" encoding="UTF-8"?>
<beans xmlns="http://www.springframework.org/schema/beans"
       xmlns:xsi="http://www.w3.org/2001/XMLSchema-instance"
       xmlns:context="http://www.springframework.org/schema/context"
       xmlns:aop="http://www.springframework.org/schema/aop"
       xsi:schemaLocation="http://www.springframework.org/schema/beans http://www.springframework.org/schema/beans/spring-beans.xsd
                           http://www.springframework.org/schema/context  http://www.springframework.org/schema/context/spring-context.xsd
                           http://www.springframework.org/schema/aop  http://www.springframework.org/schema/aop/spring-aop.xsd">

    <!-- 开启注解扫描 -->
    <context:component-scan base-package="com.an3.spring5.aopanno"></context:component-scan>


</beans>
(2) 使用注解创建 User 和 UserProxy 对象
(3) 在增强类上面添加注解 @Aspect
@Component
@Aspect
public class UserProxy {
	// 前置通知
	public void before() {
		System.out.println("before");
	}
}
(4) 在 Spring 配置文件中开启生成代理对象
<aop:aspectj-autoproxy></aop:aspectj-autoproxy>
4、配置不同类型的通知
(1) 在增强类的里面,在作为通知方法上面添加通知类型注解,使用切入点表达式配置。
@Component
@Aspect
public class UserProxy {
// 前置通知
@Before(value="execution(* com.an3.spring5.aopanno.User.add(..))")
public void before() {
System.out.println("before");
}
// 最终通知
@After(value="execution(* com.an3.spring5.aopanno.User.add(..))")
public void after() {
System.out.println("after");
}
// 返回之后通知
@AfterReturning(value="execution(* com.an3.spring5.aopanno.User.add(..))")
public void afterReturning() {
System.out.println("after returning");
}
// 异常通知
@AfterThrowing(value="execution(* com.an3.spring5.aopanno.User.add(..))")
public void afterThrowing() {
System.out.println("after throwing");
}
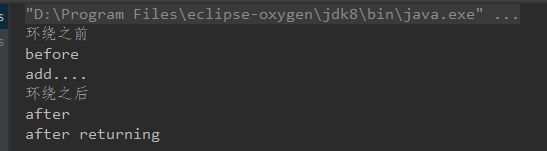
// 环绕通知
@Around(value="execution(* com.an3.spring5.aopanno.User.add(..))")
public void around(ProceedingJoinPoint proceedingJoinPoint) throws Throwable {
System.out.println("环绕之前");
// 被增强的方法
proceedingJoinPoint.proceed();
System.out.println("环绕之后");
}
}
(2) 测试
public class TestAop {

	@Test
	public void testAopAnno() {
		ApplicationContext context =
				new ClassPathXmlApplicationContext("bean11.xml");
		User user = context.getBean("user", User.class);
		user.add();
	}
}
输出
5、公共切入点抽取
@Component
@Aspect
public class UserProxy {

	// 相同切入点抽取
	@Pointcut(value = "execution(* com.an3.spring5.aopanno.User.add(..))")
	public void pointDemo() {

	}

	// 前置通知
	@Before(value="pointDemo()")
	public void before() {
		System.out.println("before");
	}

	// 后通知
	@After(value="pointDemo()")
	public void after() {
		System.out.println("after");
	}

	// 后通知
	@AfterReturning(value="pointDemo()")
	public void afterReturning() {
		System.out.println("after returning");
	}

	@AfterThrowing(value="pointDemo()")
	public void afterThrowing() {
		System.out.println("after throwing");
	}

	// 环绕通知
	@Around(value="pointDemo()")
	public void around(ProceedingJoinPoint proceedingJoinPoint) throws Throwable {
		System.out.println("环绕之前");
		// 被增强的方法
		proceedingJoinPoint.proceed();

		System.out.println("环绕之后");
	}
}
6、有多个增强类对同一个方法进行增强,设置增强优先级
(1) 在增强类上面添加注解 @Order(数字) ,数字值越小,优先级越高
@Component
@Aspect
@Order(1)
public class PersonProxy {
	// 相同切入点抽取
	@Pointcut(value = "execution(* com.an3.spring5.aopanno.User.add(..))")
	public void pointDemo() {

	}

	// 前置通知
	@Before(value="pointDemo()")
	public void before() {
		System.out.println("person proxy before");
	}
}
AspectJ 完全注解配置
@Configuration
@ComponentScan(basePackages = {"com.an3"})
@EnableAspectJAutoProxy(proxyTargetClass = true)
public class ConfigAop {

}

 浙公网安备 33010602011771号