Proxmox(PVE)部署Ubuntu Cloud Images
在PVE环境下使用Ubuntu Cloud Images镜像可以节省大量的时间,申去繁琐的ubuntu安装和配置过程,提升工作和研究效率。
本地参考文章:Cloud-Init_Support
1.下载Ubuntu Cloud Images
- ubuntu cloud Images下载的网站

- 选择下载的Ubuntu cloud Images的类型是amd64.img

- 在PVE中选择USI Images功能中的Download from URL选项进行下载
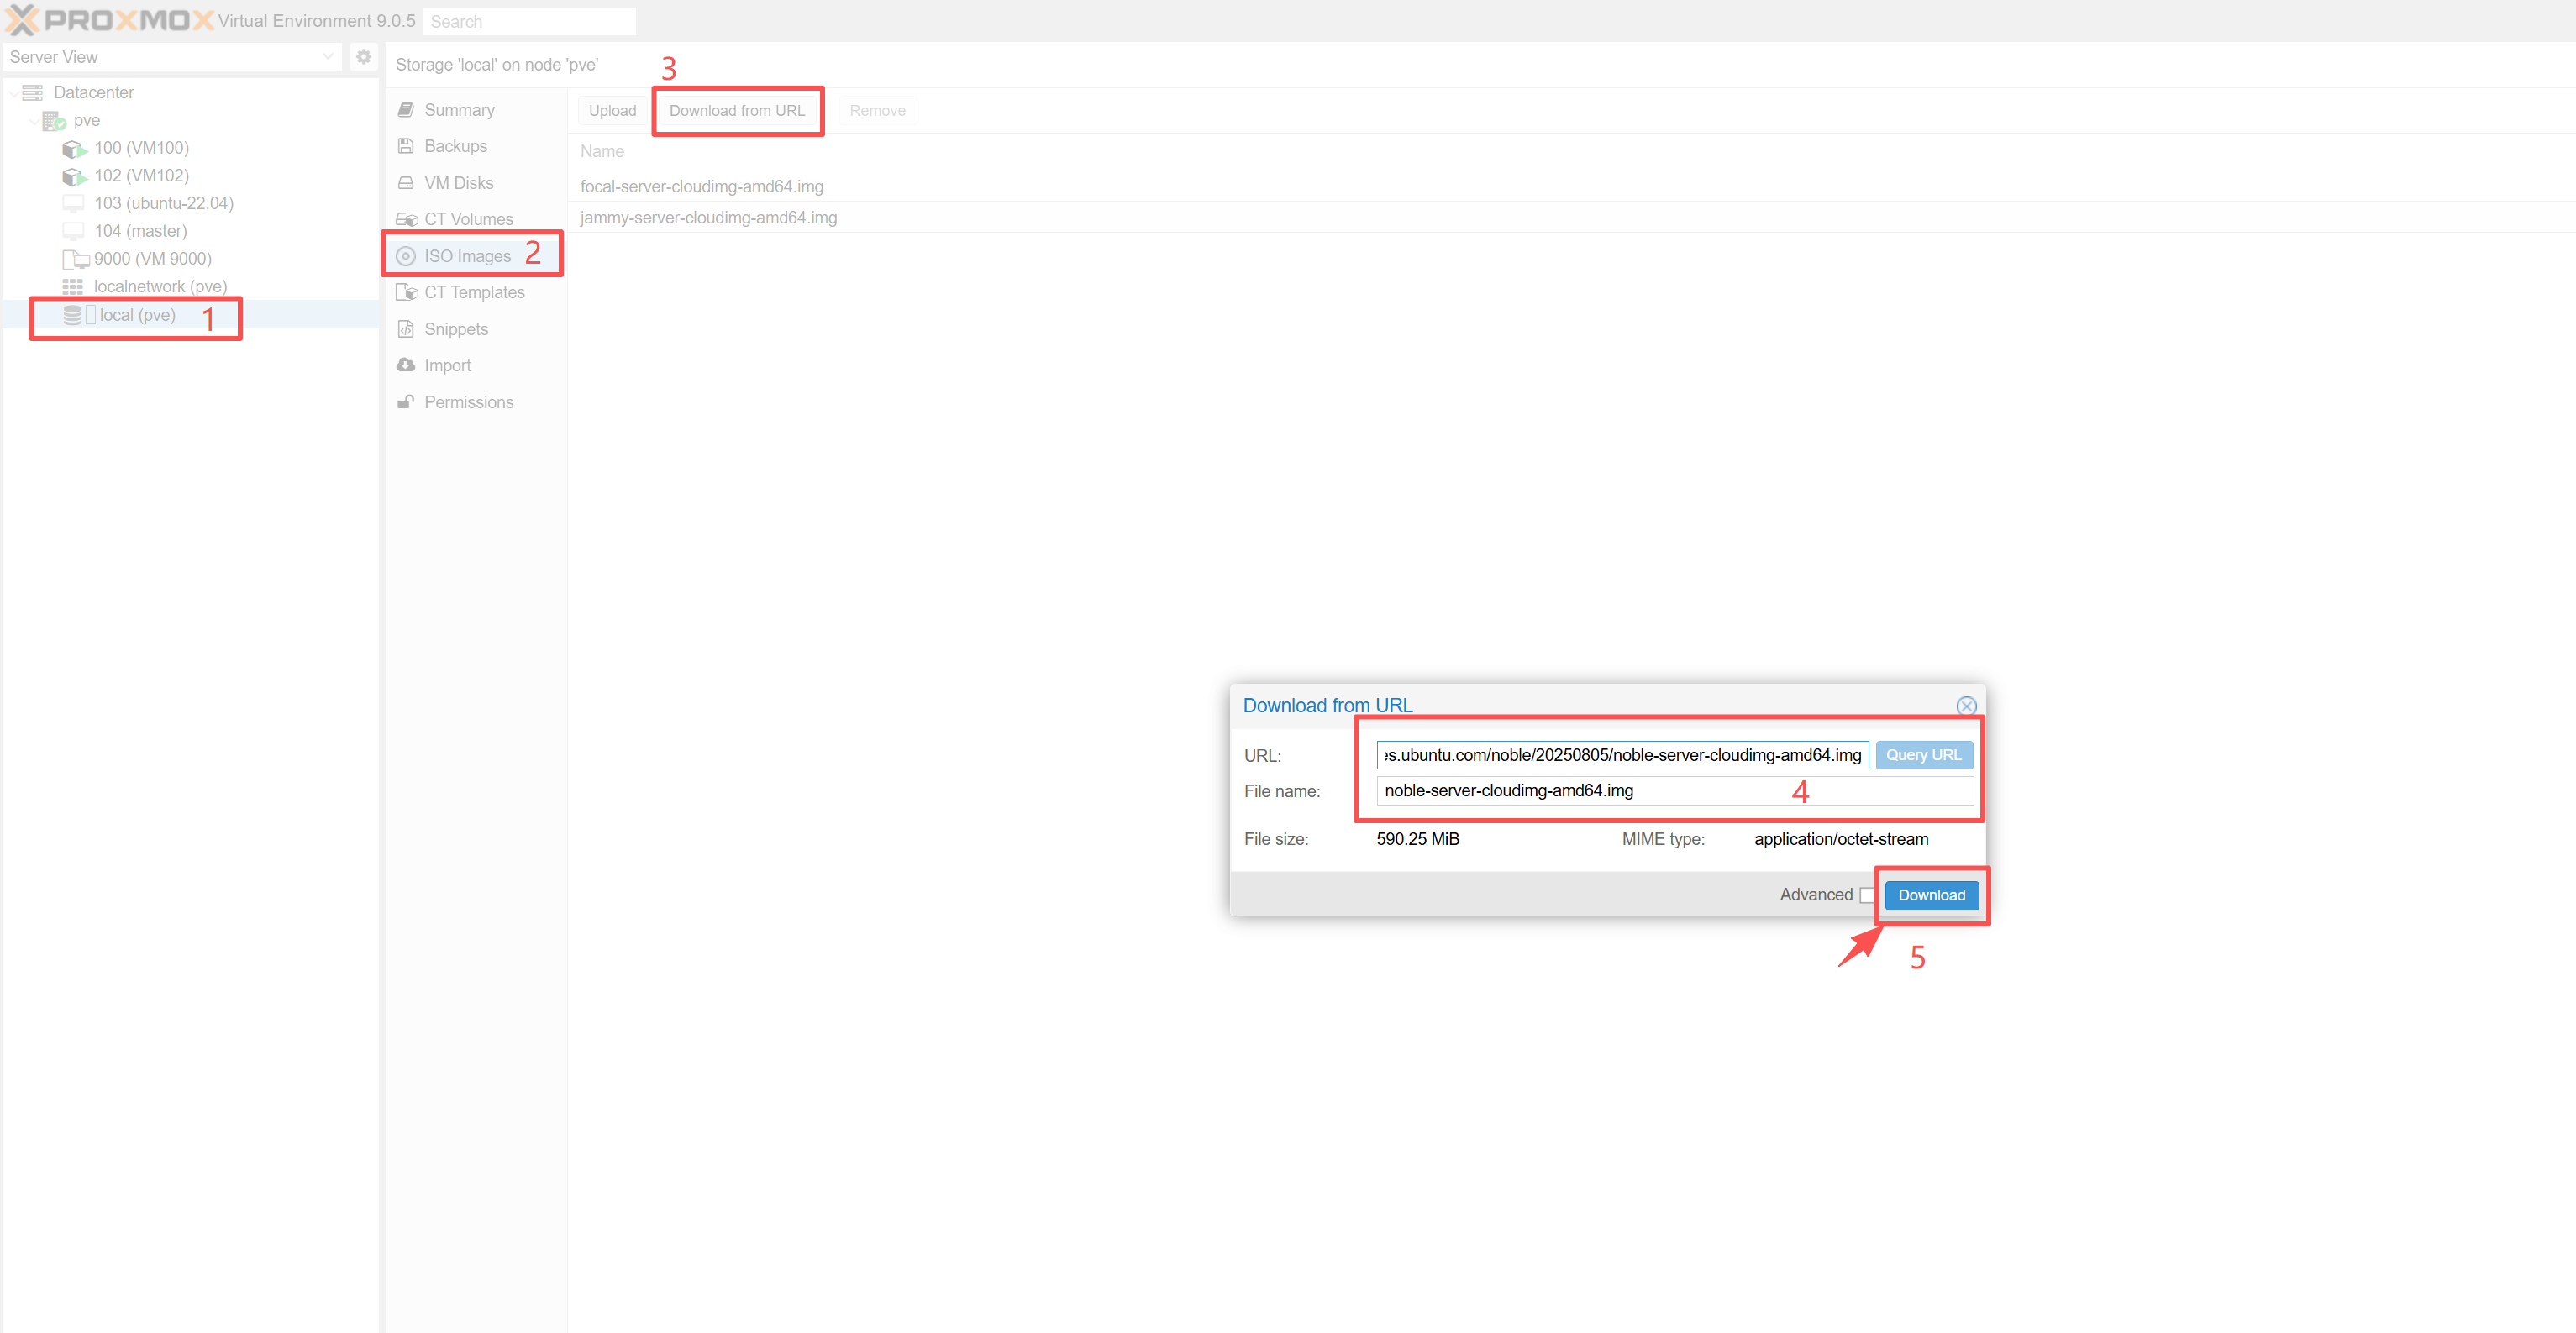
- img文件会被下载到/var/lib/vz/template/iso/目录内

2. 创建Ubuntu虚拟机模板
- 创建虚拟机 VirtIO SCSI controller
# create a new VM with VirtIO SCSI controller
qm create 9001 --memory 2048 --net0 virtio,bridge=vmbr1 --scsihw virtio-scsi-pci
- 导入cloudimg镜像
# import the downloaded disk to the local storage, attaching it as a SCSI drive
qm set 9001 --scsi0 local:0,import-from=/var/lib/vz/template/iso/noble-server-cloudimg-amd64.img
- 添加cloudinit CD-ROM
# Add Cloud-Init CD-ROM drive
qm set 9001 --ide2 local:cloudinit
- 设置启动项为虚拟机磁盘
# To be able to boot directly from the Cloud-Init image, set the boot parameter to order=scsi0 to restrict BIOS to boot from this disk only. This will speed up booting, because VM BIOS skips the testing for a bootable CD-ROM.
qm set 9001 --boot order=scsi0
- 设置虚拟机显示窗口
# For many Cloud-Init images, it is required to configure a serial console and use it as a display. If the configuration doesn’t work for a given image however, switch back to the default display instead.
qm set 9001 --serial0 socket --vga serial0
- 扩容虚拟机磁盘为60G
# Expand the disk capacity to 60GB
qm resize 9001 scsi0 +57.8G
- 将虚拟机设置成模板
# In a last step, it is helpful to convert the VM into a template
qm template 9001
3.部署虚拟机模板
3.1.创建cloud-init配置文件
- ssh-authorized-keys
root@pve:~# cat ~/.ssh/id_rsa.pub
ssh-rsa AAAAB3NzaC1yc2EAAAADAQABAAACAQCrxatJ1e7f7e28nU9EYjhN0kU1ront6yqoshU90k9vS30UoTExOMvN5OedRdp6R2tzCNztTc55tYX7FIwAkevIRrBxu/UR5slAo88DW5ZPkMMiKv/WGA0/eEytclc1hP0RM3Hv7/iLSWcpNeXgskXgHuimcPDWKAsxsjXznKX85/PV8qieHBkk4QNGHioP53Y72raQfNHk2iQFmJFET26P2v1dxj82XwHSSSUWiniYdJ7G9CkBKjSpA525hlsrRbbPikMxmgSZQPkxDtj4ai/eSuUstU/ok4m7qb2jKPBdWGbgJR0qfP00glAyijujdN0DIuV93MiIdA8v90Xt6GZvoiVvsQk35qC7u8d39mqZIIzMtsSHH7KQVfp0aI3149ifTBi4J/xGt5rY3GwFAqDaqDo2+wfYauKzx7nLOg/a7Nq4rN38dYROh3iKE+eYy2B0Hht+MrMsw7ijLQwU7W+88kuYJtCztGpnukHWwViiK9HoqLyWnC6Mp3b3py/YEbte2W8qbGQjUIYMpqAZgEdH3nwXaQ7v971790hgbQR6sYNHgtByr+kY/SJmez9EQShtBjT75dh7UCFf+pLP7iAHtoxwNnL0pJpUIy1jeyn5qP1FalZ7adKi7F/XqwNC87lQwYZ53CholleM1oUxaQ9enZ3aS6/t/KKmoA3+gQZIEQ== root@pve
root@pve:~#
- ubuntuconfig.yaml文件
root@pve:~# cat /var/lib/vz/snippets/ubuntuconfig.yaml
#cloud-config
users:
# 自定义登录用户名
  - name: ubuntu
    ssh-authorized-keys:
      - ssh-rsa AAAAB3NzaC1yc2EAAAADAQABAAACAQCrxatJ1e7f7e28nU9EYjhN0kU1ront6yqoshU90k9vS30UoTExOMvN5OedRdp6R2tzCNztTc55tYX7FIwAkevIRrBxu/UR5slAo88DW5ZPkMMiKv/WGA0/eEytclc1hP0RM3Hv7/iLSWcpNeXgskXgHuimcPDWKAsxsjXznKX85/PV8qieHBkk4QNGHioP53Y72raQfNHk2iQFmJFET26P2v1dxj82XwHSSSUWiniYdJ7G9CkBKjSpA525hlsrRbbPikMxmgSZQPkxDtj4ai/eSuUstU/ok4m7qb2jKPBdWGbgJR0qfP00glAyijujdN0DIuV93MiIdA8v90Xt6GZvoiVvsQk35qC7u8d39mqZIIzMtsSHH7KQVfp0aI3149ifTBi4J/xGt5rY3GwFAqDaqDo2+wfYauKzx7nLOg/a7Nq4rN38dYROh3iKE+eYy2B0Hht+MrMsw7ijLQwU7W+88kuYJtCztGpnukHWwViiK9HoqLyWnC6Mp3b3py/YEbte2W8qbGQjUIYMpqAZgEdH3nwXaQ7v971790hgbQR6sYNHgtByr+kY/SJmez9EQShtBjT75dh7UCFf+pLP7iAHtoxwNnL0pJpUIy1jeyn5qP1FalZ7adKi7F/XqwNC87lQwYZ53CholleM1oUxaQ9enZ3aS6/t/KKmoA3+gQZIEQ== root@pve
  # 授予免密 sudo 权限
    sudo: ["ALL=(ALL) NOPASSWD:ALL"]
    shell: /bin/bash
  # 配置root用户
  - name: root
    shell: /bin/bash
  # 配置用户密码
chpasswd:
  list: |
    ubuntu:password
    root:password
  expire: false
# 允许 SSH 密码登录(Ubuntu cloud image 默认可能禁用密码登录,需手动开启)
ssh_pwauth: true
# 允许root用户SSH登录
runcmd:
  - sed -i 's/#PermitRootLogin prohibit-password/PermitRootLogin yes/' /etc/ssh/sshd_config
  - systemctl restart sshd
root@pve:~#
3.2.通过cloud-init部署虚拟机
- 使用的命令
qm clone 9001 105 --name master
qm set 105 --net0 virtio,bridge=vmbr1
qm set 105 --ipconfig0 ip=10.22.10.32/24,gw=10.22.10.1
qm set 105 --cicustom "user=local:snippets/ubuntuconfig.yaml"
- 输出
root@pve:~# qm clone 9001 105 --name master
create full clone of drive ide2 (local:9001/vm-9001-cloudinit.qcow2)
Formatting '/var/lib/vz/images/105/vm-105-cloudinit.qcow2', fmt=qcow2 cluster_size=65536 extended_l2=off preallocation=metadata compression_type=zlib size=4194304 lazy_refcounts=off refcount_bits=16
create linked clone of drive scsi0 (local:9001/base-9001-disk-0.raw)
clone 9001/base-9001-disk-0.raw: images, vm-105-disk-0.qcow2, 105 to vm-105-disk-0.qcow2 (base=../9001/base-9001-disk-0.raw)
Formatting '/var/lib/vz/images/105/vm-105-disk-0.qcow2', fmt=qcow2 cluster_size=131072 extended_l2=on preallocation=off compression_type=zlib size=65820374016 backing_file=../9001/base-9001-disk-0.raw backing_fmt=raw lazy_refcounts=off refcount_bits=16
root@pve:~# qm set 105 --net0 virtio,bridge=vmbr1
update VM 105: -net0 virtio,bridge=vmbr1
root@pve:~# qm set 105 --ipconfig0 ip=10.22.10.32/24,gw=10.22.10.1
update VM 105: -ipconfig0 ip=10.22.10.32/24,gw=10.22.10.1
root@pve:~# qm set 105 --cicustom "user=local:snippets/ubuntuconfig.yaml"
update VM 105: -cicustom user=local:snippets/ubuntuconfig.yaml
root@pve:~#
3.3.启动虚拟机
root@pve:~# qm start 105
generating cloud-init ISO
root@pve:~#
root@pve:~# ssh root@10.22.10.32
The authenticity of host '10.22.10.32 (10.22.10.32)' can't be established.
ED25519 key fingerprint is SHA256:WtTJE4QE4daSKMM1MGePoaW8cyS4kNgaeNea1NyaPLc.
This key is not known by any other names.
Are you sure you want to continue connecting (yes/no/[fingerprint])? yes
Warning: Permanently added '10.22.10.32' (ED25519) to the list of known hosts.
Welcome to Ubuntu 24.04.3 LTS (GNU/Linux 6.8.0-71-generic x86_64)

 * Documentation:  https://help.ubuntu.com
 * Management:     https://landscape.canonical.com
 * Support:        https://ubuntu.com/pro

 System information as of Mon Aug 25 14:51:57 UTC 2025

  System load:  0.13              Processes:             98
  Usage of /:   2.7% of 58.33GB   Users logged in:       0
  Memory usage: 8%                IPv4 address for eth0: 10.22.10.32
  Swap usage:   0%

Expanded Security Maintenance for Applications is not enabled.

0 updates can be applied immediately.

Enable ESM Apps to receive additional future security updates.
See https://ubuntu.com/esm or run: sudo pro status


The list of available updates is more than a week old.
To check for new updates run: sudo apt update


The programs included with the Ubuntu system are free software;
the exact distribution terms for each program are described in the
individual files in /usr/share/doc/*/copyright.

Ubuntu comes with ABSOLUTELY NO WARRANTY, to the extent permitted by
applicable law.

ubuntu@ubuntu:~$

 浙公网安备 33010602011771号