How to Upload Unity WebGL Content
How to Upload Unity WebGL Content
Chrome killed NPAPI, meaning like 60% of your audience has no Unity web player… and Unity WebGL is still in “preview” mode. Oh well time to ship anyway!
But the process to upload unity webGL games is actually a bit tricky and no-one’s had any time to iron out the common issues. It’s super important that the release version uses the “Compressed” versions of the game data, both to reduce the game size by half or so and at least to save your server trouble compressing the files. After some mucking around, here’s the process that worked for me and my mod_rewrite-enabled hosting server:
- Delete release sub-folder.
- Upload the whole build folder.
Simple in theory, if nothing goes wrong.
If you’re uploading to someone else’s server, like itch.io or Kongregate, the .htaccess file will probably be ignored, so you can’t delete the release folder (but rather, you can probably delete the compressed folder).
Settings for a Release Build
To make sure things go smoothly and file sizes are super tidy and low, just make sure these things are sorted before you hit that trusty “Build and Run” button:
- Build Settings: Optimization Level set to “Fastest (very slow builds)”
- Player Settings: Other Settings: Stripping Level set to “Use micro mscorlib” (anything other than “Disabled” should have an equal effect I believe)
- Player Settings: Enable Exceptions: None
- Memory set to the lowest you need it (use a development build and connect the profiler to find the highest number it goes up to)
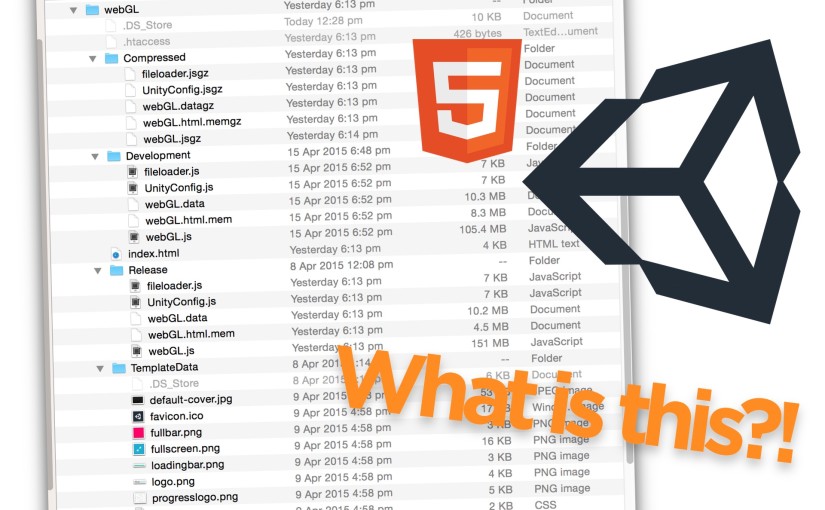
WebGL Build Folder Structure
When you build using the default template you get a thing that looks like:
.htaccess
- Compressed
index.html
- Release
- TemplateData
Let’s look at each of these files:
- .htaccess: tells the server to send the compressed files when a client asks for the release game files. This file is invisible, on OS X you can make it visible by either using the Desktop Utility menu or by a terminal command.
- Compressed: a folder of gzipped game data.
- index.html: the page in question.
- Release: the uncompressed game files.
- TemplateData: files related to the appearance and presentation of the page.
If your server is configured ideally, you should be able to upload the whole folder and delete the Release folder and have everything work.
Extra Tips and Pitfalls
- .htaccess works in every folder, not just the root. I made the mistake of trying to move the .htaccess file to the root – don’t do this! Keep the .htaccess unity generates together with the other files, don’t overwrite your root .htaccess file.
- That said, you can copy the contents of the unity-generated .htaccess file into your site’s root .htaccess and it should work fine.
- If your server does not allow the mod_rewrite used in the .htaccess file, then you must upload the release folder!
- WebGL has no access to system fonts, make sure every font you want to use is an asset!
- Also, don’t use Bold on fonts anywhere unless you also have the Bold variant asset included – webGL will horizontally scale every letter, wrecking your day.
- Your build will probably have a bunch of warnings in the browser’s console about mip-maps. What this is saying is that mip-maps don’t work in WebGL, but they do use up memory. So before you build, go through and switch off mip-maps on all of your textures.
Did something else go wrong? Send me an email or leave a comment and I’ll try to help you!

 浙公网安备 33010602011771号