Linux的NIS配置
快速命令
# Server和Client设置NIS域名
nisdomainname nis_server
echo 'NISDOMAIN=nis_server' >> /etc/sysconfig/network

# Server的ypserv固定端口
echo 'YPSERV_ARGS=-p 820' >> /etc/sysconfig/network
# Server写入/etc/ypserv.conf配置文件
echo -e '127.0.0.0/255.255.255.0:*:*:none\n192.168.2.0/255.255.255.0:*:*:none\n*:*:*:deny'>> /etc/ypserv.conf

# 数据库初始化
/usr/lib64/yp/ypinit -m

# Server涉及的服务
systemctl start rpcbind
systemctl start yppasswdd
systemctl start ypserv

# Clinet配置
authconfig-tui
# Client涉及的服务
systemctl start rpcbind
systemctl start ypbind
NIS
当我们拥有多台Linux服务器时,账号管理就成为一个比较头大的问题了,比如在全部的服务器上新建、删除账户和修改密码,一台一台ssh登录去操作显然不是个好主意,账户同步是个大问题。为此NIS诞生了。
NIS全称Network Information Service,主要功能是对主机账号系统等系统信息提供集中的管理。
Server和Client
NIS有两种角色,Server和Client
Server会将自己的以下文件作成为DBM数据库档案:
- /etc/passwd用户基本信息:用户名、UID、GID、$HOME、$SHELL
- /etc/group用户组信息:GID和群内成员
- /etc/hosts域名:域名和IP解析
- /etc/services守护进程所对应的端口
- /etc/protocolsTCP/IP封包协定
- /etc/rpc每种RPC服务所对应的程序号码
- /var/yp/ypserversNIS服务器所提供的数据库。
当这些文件发生改变时候,需要在Client中生效,要再重新生成DBM数据库。
Client在有用户登录时,会先验证本机保存的用户,如果没有记录,会再向Server搜寻数据库里面数据做为验证用。
- yp-tools :提供 NIS 相关的查寻指令功能
- ypbind :Client提供绑定设定套件,系统中获取 NIS 域名,并使用 RPC 连接到服务器上
- ypserv :为Server提供NIS响应
- rpcbind :NIS和NFS类似的,也需要rpc来作为中转
Slave和Server架构
一般情况下我们一台Server对应为若干台Client服务,当我们有大量的服务器需要为大量Client服务的时候,一台Server可能从响应的服务质量可能就不是那么美好了的。这个时候我们可以额外配置台Slave作为从服务器。Server和Slave之间会进行数据的同步,从而再为Client提供服务。
不过除非有超过一百台的Linux主机,不然其实一个Server也是没问题的。
NIS_Server
安装软件
Server需要安装的软件有rpcbind、ypserv、yp-tools。ypbind为Client使用的,可以选择性安装。
#rpm系列的linux
sudo yum -y install ypserv yp-tools rpcbind ypbind
# 这个方法是只下载,如果你的Server配置过nfs,可以很方便的为Clinent服务器安装吧哈哈
# yumdownloader --resolve --destdir=/newnfs/yum ypserv ypbind yp-tools rpcbind
# rpm -Uvh --force --nodeps /newnfs/yum/*rpm
# deb系列的linux
sudo apt -y install nis
设置NIS域
直接用nisdomainname命令来设置
# 后面nisdomainname+域名,设置域名
[root@server_197 ~]# nisdomainname nis_server
# 单纯nisdomainname为返回当前域名
[root@server_197 ~]# nisdomainname
系统重新启动后也生效需要/etc/sysconfig/network中追加NISDONAIN=<name>
随便固定一下端口YPSERV_ARGS="-p 820"
[root@server_197 ~]# echo -e 'NISDOMAIN=nis_server\nYPSERV_ARGS="-p 820"' >> /etc/sysconfig/network
[root@server_197 ~]# cat /etc/sysconfig/network
# Created by anaconda
NISDOMAIN=nis_server
添加NIS授权
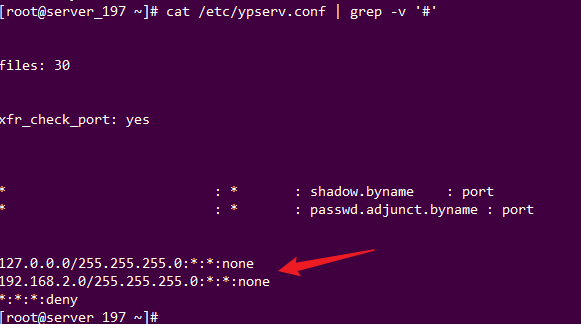
相关的权限配置文件在/etc/ypserv.conf。可以先看一下里面的内容。
[root@server_197 ~]# cat /etc/ypserv.conf | grep -v '#'
files: 30 #这里的代表会读到内存中的数据库数量,一般情况30个是足够
xfr_check_port: yes
# 与master/slave 有关,将同步更新的数据库比对所使用的端口,放置于<1024内

# Host(允许的主机或者ip)    : Domain(NIS域): Map(可用的数据库名字) : Security(安全限制)
*                          : *       : shadow.byname    : port
*                          : *       : passwd.adjunct.byname : port
重点介绍一下后面查询的权限格式,使用冒号隔成四部分:
Host:Domain:Map:Security
# Host                     : Domain  : Map              : Security
#
# *                        : *       : passwd.byname    : port
# *                        : *       : passwd.byuid     : port

# Not everybody should see the shadow passwords, not secure, since
# under MSDOG everbody is root and can access ports < 1024 !!!
*                          : *       : shadow.byname    : port
*                          : *       : passwd.adjunct.byname : port
- Host为Client的ip或者网段,用来划分服务对象的
- 127.0.0.0/255.255.255.0
- Domain为NIS域名
- 一般情况都直接写*号以用来代表全部
- Map为可用数据库
- 就是由NIS制作出来的数据库名称
- Security为权限限制
- 没有限制(none)、仅能使用<1024 (port)及拒绝(deny)
依据具体情况我们可以这样写。
# 本机可以访问全部domain、map(数据库)、none(没有限制)
127.0.0.0/255.255.255.0    :*      :*           :none
# 192.168.2.0/24可以访问全部domain、map(数据库)、none(没有限制)
192.168.2.0/255.255.255.0    :*     :*         :none
# 其他ip全部deny(拒绝),和防火墙规则,这条规则是至关重要的,相当于是默认规则吧
*     :*       :*         :deny
偷懒就echo加上去吧哈哈。
echo -e '127.0.0.0/255.255.255.0:*:*:none\n192.168.2.0/255.255.255.0:*:*:none\n*:*:*:deny'>> /etc/ypserv.conf
 启动服务
启动服务
需要启动rpcbind、yppasswd、ypserv,切记,先启动rpcbind。随便来个开机自启动啦
systemctl start rpcbind && systemctl enable rpcbind
systemctl start yppasswdd && systemctl enable yppasswdd
systemctl start  ypserv && systemctl enable ypserv
账户操作
既然NIS的初衷的共享用户的,在生成数据库之前,先要把新建用户删除用户之类的操作完成,再生成数据库。每一次操作都要重新生成数据库和重新启动服务。
[root@server_197 ~]# adduser -s /bin/bash -g test -d /home/test test2022
# 创建个用户随便复习一下adduser
# -s 指定shell路径
# -g 所在组
# -d 设置home目录位置
[root@server_197 ~]# passwd test2022
Changing password for user test2022.
New password:
Retype new password:
passwd: all authentication tokens updated successfully.
数据库生成
执行/usr/lib64/yp/ypinit -m初始化(如果你安装的软件包是32位,对应的应该是/usr/lib/yp/ypinit -m),其中会等待我们输入next host to add,直接Ctrl+D跳过即可,再y确认。如果有slava从属服务器,运行ypinit -s server_197。

[root@server_197 ~]# /usr/lib64/yp/ypinit -m
At this point, we have to construct a list of the hosts which will run NIS
servers.  server_197 is in the list of NIS server hosts.  Please continue to add
the names for the other hosts, one per line.  When you are done with the
list, type a <control D>.
        next host to add:  server_197
        next host to add:
The current list of NIS servers looks like this:

server_197

Is this correct?  [y/n: y]  y
We need a few minutes to build the databases...
Building /var/yp/nis_server/ypservers...
Running /var/yp/Makefile...
gmake[1]: Entering directory `/var/yp/nis_server'
Updating passwd.byname...
Updating passwd.byuid...
Updating group.byname...
Updating group.bygid...
Updating hosts.byname...
Updating hosts.byaddr...
Updating rpc.byname...
Updating rpc.bynumber...
Updating services.byname...
Updating services.byservicename...
Updating netid.byname...
Updating protocols.bynumber...
Updating protocols.byname...
Updating mail.aliases...
gmake[1]: Leaving directory `/var/yp/nis_server'

server_197 has been set up as a NIS master server.

Now you can run ypinit -s server_197 on all slave server.
确保目前的rpcbind、yppasswdd、ypserv服务已经在正常的工作了。没有就systemctl启动一下。
更新后再重新启动一次吧
systemctl start rpcbind
systemctl start yppasswdd
systemctl start ypserv
防火墙
之前我们在/etc/sysconfig/network固定为820端口,所以,除了rpc使用的111端口还需要放行820/tcp和udp。iptables同理。
firewall-cmd --permanent --add-service=rpc-bind
firewall-cmd --permanent --add-port=820/tcp
firewall-cmd --permanent --add-port=820/udp
firewall-cmd --reload
NIS_Client
现在来配置Client。
安装软件
和Server不相同,不需要安装ypserv。
安装rpcbind、yp-tools、ypbind
# rpm
yum -y install ypbind yp-tools  rpcbind

# 其实我没有在deb上跑过,不太确定是不是
apt -y install nis
设置NIS域
这里和Server配置一样,domain要一致,否则无法使用。
直接用nisdomainname命令来设置
# 后面nisdomainname+域名,设置域名
[root@server_149 ~]# nisdomainname nis_server
# 单纯nisdomainname为返回当前域名
[root@server_149 ~]# nisdomainname
系统重新启动后也生效需要/etc/sysconfig/network中追加NISDONAIN=<name>
[root@server_149 ~]# echo 'NISDOMAIN=nis_server' >> /etc/sysconfig/network
[root@server_149 ~]# cat /etc/sysconfig/network
# Created by anaconda
NISDOMAIN=nis_server
设置连接
在目录含中输入,可以进入半图形化的设置界面。
authconfig-tui
上下或tab键可以控制光标移动,在NIS位置选择,即按空格。
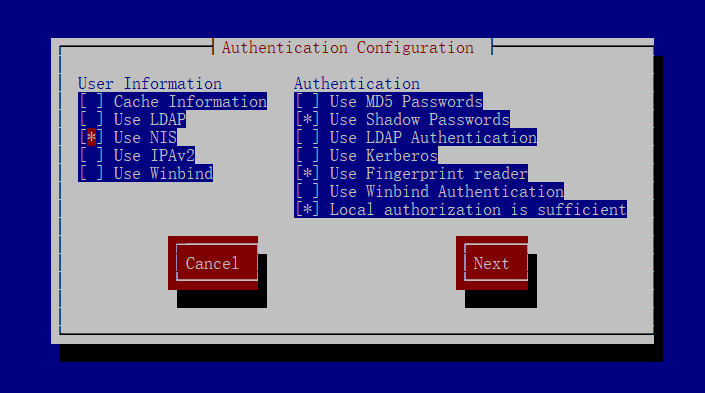
F12下一页,光标移动到Next选择也可以。
输入一下Domain和Server,即之前设置的nisdomainname和NIS_Server的IP地址。

完成配置后
重新启动一下服务即可。
systemctl start rpcbind
systemctl start ypbind
测试
在Client中尝试登录之前的新建的test2022用户
[root@client_149 ~]# su test2022
bash: /home/test/.bashrc: Permission denied
bash-4.2$
当然目前要注意HOME目录是Server自己的HOME目录,Client自然是没有啦,可以使用NFS来挂载,具体可以看我主页的另外一篇文章。
YPSERV_ARGS="-p 820"
 浙公网安备 33010602011771号