Django项目部署
一、打包文件传到服务器
参考博客:https://www.cnblogs.com/wupeiqi/articles/8591782.html
http://www.cnblogs.com/alex3714/p/6538374.html

二、服务器环境准备好
安装Python3:
(http://www.cnblogs.com/wupeiqi/articles/4906230.html)
http://www.cnblogs.com/alice-bj/articles/9277961.html
1、安装gcc,用于编译Python源码
yum install gcc
2、下载源码包,https://www.python.org/ftp/python/
3、解压并进入源码文件
4、编译安装
./configure
make all
make install
模式:/usr/local/bin/python3
安装django:
pip3 install django==1.11.7
报错:no module _sqlite3
所以应该先装:yum install sqlite-devel
重新编译安装py3
./configure
make
make install
三、运行
- 1.解压
- 2.配置:ALLOWED_HOSTS = ['*',] # 允许访问
- 3.配置:DEBUG = False
# 用户看不到错误信息,以及暴露出来的url;注意改完之后,样式没有了!!
# 为什么?因为django对静态文件上线时,需要特殊处理。
- 4.找到django程序中每一个app和全局的静态文件,统一放置到某处。
# python3 manage.py
# python3 manage.py collectstatic
# 报错:You're using the staticfiles app without having set the STATIC_ROOT setting to a filesystem path.
# 静态文件收集到哪里?STATIC_ROOT
# 需要在 settings中配置 STATIC_ROOT = "allstatic"
# 之后在 python3 manage.py collectstatic 这样所有的静态文件就都收集到了项目下的allstatic下面
# 因为django对静态文件处理特别次,所以选择用nginx专门处理静态文件。

- 5.python manage.py runserver 0.0.0.0:8001
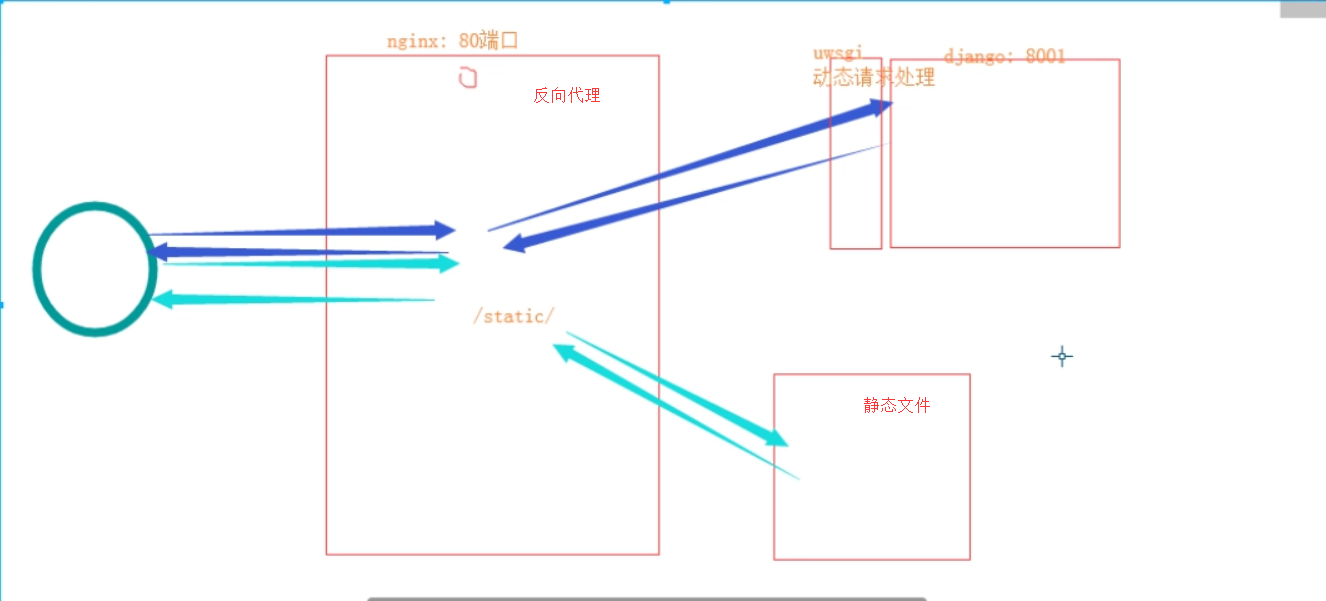
四、Nginx做反向代理(处理静态文件)
安装:
yum install nginx
# cat /etc/nginx/nginx.conf
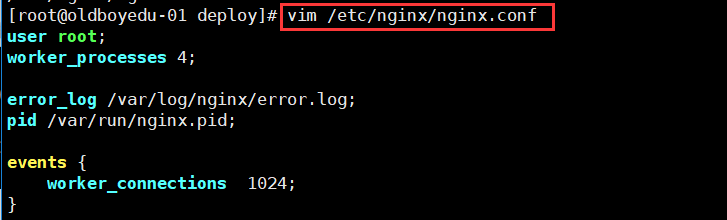
配置文件:
user root;
worker_processes 4;  #核数

error_log /var/log/nginx/error.log;
pid /var/run/nginx.pid;

events {
    worker_connections  1024; # IO多路复用,监听socket发生变化的,监听最多的连接数
}


http {
    log_format  main  '$remote_addr - $remote_user [$time_local] "$request" '
                      '$status $body_bytes_sent "$http_referer" '
                      '"$http_user_agent" "$http_x_forwarded_for"';

    access_log  /var/log/nginx/access.log  main;

    sendfile            on;
    tcp_nopush          on;
    tcp_nodelay         on;
    keepalive_timeout   65;

    include             /etc/nginx/mime.types;
    default_type        application/octet-stream;

    upstream django {
        server 127.0.0.1:8001;
    }
    server {
        listen      80;

        charset     utf-8;

        # max upload size
        client_max_body_size 75M;

        location /static {
            alias  /data/s9deploy/allstatic;
        }

        location / {
            uwsgi_pass  django;
            include     uwsgi_params;
        }
    }
}
运行起来:systemctl start nginx # 默认是80端口
service nginx start # Centos6.9用这个实现了
五、uwsgi替换原来的wsgiref
安装:
pip3 install uwsgi
使用:
uwsgi启动django : uwsgi --socket 127.0.0.1:8001 --chdir /data/s9deploy/ --wsgi-file s9deploy/wsgi.py
uwsgi --socket :8002 --chdir /data/deploy/ --wsgi-file deploy/wsgi.py
六、操作
1. 程序
DEBUG = False
ALLOWED_HOSTS = ['*',]
STATIC_ROOT = "allstatic"
2. 程序:s9deploy.zip 上传到服务器
yum install lrzsz
3. 解压:
yum install unzip
4. 安装uwsgi
pip3 install uwsgi
代替wsgi运行django:
不处理静态文件:
uwsgi --http 0.0.0.0:8001 --chdir /data/s9deploy/ --wsgi-file s9deploy/wsgi.py
处理静态文件:
python manage.py collectstatic # /data/s9deploy/allstatic
uwsgi --http 0.0.0.0:8001 --chdir /data/s9deploy/ --wsgi-file s9deploy/wsgi.py --static-map /static=/data/s9deploy/allstatic
简单运行方式:
vim uwsgi_s9deploy.ini
[uwsgi]
http = 0.0.0.0:8001 # scoket = 0.0.0.0:8001
chdir = /data/s9deploy/
wsgi-file = s9deploy/wsgi.py
processes = 4
static-map = /static=/data/s9deploy/allstatic
uwsgi --ini /data/s9deploy/uwsgi_s9deploy.ini
5. 安装nginx
yum install nginx
配置:
user root;
worker_processes 4;

error_log /var/log/nginx/error.log;
pid /var/run/nginx.pid;

events {
    worker_connections  1024;
}


http {
    log_format  main  '$remote_addr - $remote_user [$time_local] "$request" '
                      '$status $body_bytes_sent "$http_referer" '
                      '"$http_user_agent" "$http_x_forwarded_for"';

    access_log  /var/log/nginx/access.log  main;

    sendfile            on;
    tcp_nopush          on;
    tcp_nodelay         on;
    keepalive_timeout   65;

    include             /etc/nginx/mime.types;
    default_type        application/octet-stream;

    upstream django {
        server 127.0.0.1:8001;
        server 127.0.0.1:8002;
    }
    server {
        listen      80;

        charset     utf-8;

        # max upload size
        client_max_body_size 75M;

        location /static {
            alias  /data/s9deploy/allstatic;
        }

        location / {
            uwsgi_pass  django;
            include     uwsgi_params;
        }
    }
}
6. 安装supervisor,检测进程不要被关闭。
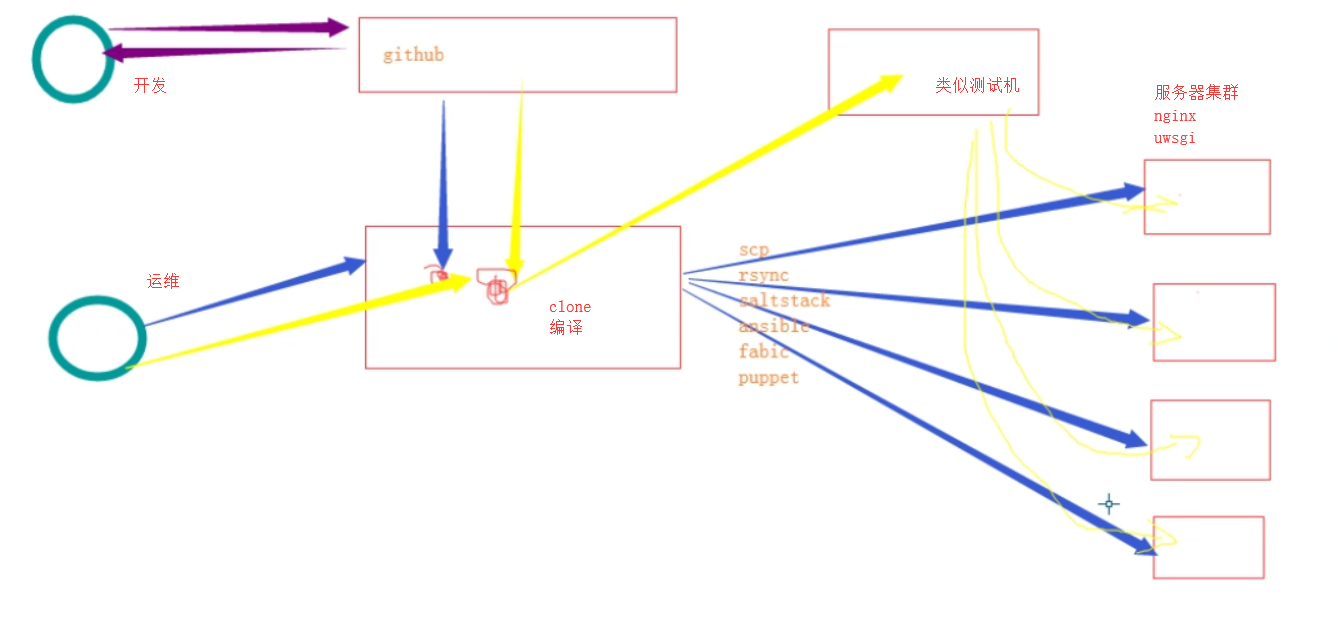
第二阶段:管理工具,ansible/fabric/puppet/saltstack
第三阶段:基于git + 管理工具
第四阶段:jekins web程序
七、总结
nginx 做了负载均衡, web集群,多个机器处理请求
uwsgi_deploy_8002.ini uwsgi_deploy_8003.ini
uwsgi --ini /data/s9deploy/uwsgi_s9deploy_8001.ini & # 后台运行
uwsgi --ini /data/s9deploy/uwsgi_s9deploy_8002.ini &
nginx 反向代理;请求制作转发 静态文件自己处理 动态文件 交给uwsgi
192.168.12.22:8001
192.168.12.23:8001
192.168.12.22: uwsgi:配置文件 + 代码
192.168.12.23: uwsgi: 配置文件 + 代码
运行: uwsgi --ini /data/s9deploy/uwsgi_s9deploy_8002.ini &
uwsgi 也可以 开进程; processes = 4
nginx接4个,后台接 4个 ,实现并发 (加一个& 后台运行 不卡住;)
uwsgi --ini uwsgi_deploy_8002.ini &
----------------------------
第二阶段: 批量上传 批量
----------------------------
项目部署方案:
supervisor 监测这三个进程 看谁的进程死掉了,会自动启动; 安装supervisor,检测进程不要被关闭。
如果关闭,立即重启;
ps -ef|grep uwsgi
kill -9 3101
假设:程序要做负载均衡;
两个uwsgi 一个nginx 有三个程序运行;
----------------------
八、code 配置

user root;
worker_processes 4;

error_log /var/log/nginx/error.log;
pid /var/run/nginx.pid;

events {
    worker_connections  1024;
}


http {
    log_format  main  '$remote_addr - $remote_user [$time_local] "$request" '
                      '$status $body_bytes_sent "$http_referer" '
                      '"$http_user_agent" "$http_x_forwarded_for"';

    access_log  /var/log/nginx/access.log  main;

    sendfile            on;
    tcp_nopush          on;
    tcp_nodelay         on;
    keepalive_timeout   65;

    include             /etc/nginx/mime.types;
    default_type        application/octet-stream;

    upstream django {
        server 127.0.0.1:8003;
        server 127.0.0.1:8004;
        # server 192.1.123.1;
    }
    server {
        listen      80;

        charset     utf-8;

        # max upload size
        client_max_body_size 75M;

        location /static {
            alias  /data/deploy/allstatic;
        }

        location / {
            uwsgi_pass  django;
            include     uwsgi_params;
        }
    }
}

"""
Django settings for deploy project.

Generated by 'django-admin startproject' using Django 1.11.11.

For more information on this file, see
https://docs.djangoproject.com/en/1.11/topics/settings/

For the full list of settings and their values, see
https://docs.djangoproject.com/en/1.11/ref/settings/
"""

import os

# Build paths inside the project like this: os.path.join(BASE_DIR, ...)
BASE_DIR = os.path.dirname(os.path.dirname(os.path.abspath(__file__)))


# Quick-start development settings - unsuitable for production
# See https://docs.djangoproject.com/en/1.11/howto/deployment/checklist/

# SECURITY WARNING: keep the secret key used in production secret!
SECRET_KEY = '&4r0zssdr8%(cph&+^nx#k)r+rpwpw)^_q)2f7()*a3ki8p^ju'

# SECURITY WARNING: don't run with debug turned on in production!
DEBUG = False

ALLOWED_HOSTS = ['*',]


# Application definition

INSTALLED_APPS = [
    'django.contrib.admin',
    'django.contrib.auth',
    'django.contrib.contenttypes',
    'django.contrib.sessions',
    'django.contrib.messages',
    'django.contrib.staticfiles',
    'app01.apps.App01Config',
]

MIDDLEWARE = [
    'django.middleware.security.SecurityMiddleware',
    'django.contrib.sessions.middleware.SessionMiddleware',
    'django.middleware.common.CommonMiddleware',
    'django.middleware.csrf.CsrfViewMiddleware',
    'django.contrib.auth.middleware.AuthenticationMiddleware',
    'django.contrib.messages.middleware.MessageMiddleware',
    'django.middleware.clickjacking.XFrameOptionsMiddleware',
]

ROOT_URLCONF = 'deploy.urls'

TEMPLATES = [
    {
        'BACKEND': 'django.template.backends.django.DjangoTemplates',
        'DIRS': [os.path.join(BASE_DIR, 'templates')]
        ,
        'APP_DIRS': True,
        'OPTIONS': {
            'context_processors': [
                'django.template.context_processors.debug',
                'django.template.context_processors.request',
                'django.contrib.auth.context_processors.auth',
                'django.contrib.messages.context_processors.messages',
            ],
        },
    },
]

WSGI_APPLICATION = 'deploy.wsgi.application'


# Database
# https://docs.djangoproject.com/en/1.11/ref/settings/#databases

DATABASES = {
    'default': {
        'ENGINE': 'django.db.backends.sqlite3',
        'NAME': os.path.join(BASE_DIR, 'db.sqlite3'),
    }
}


# Password validation
# https://docs.djangoproject.com/en/1.11/ref/settings/#auth-password-validators

AUTH_PASSWORD_VALIDATORS = [
    {
        'NAME': 'django.contrib.auth.password_validation.UserAttributeSimilarityValidator',
    },
    {
        'NAME': 'django.contrib.auth.password_validation.MinimumLengthValidator',
    },
    {
        'NAME': 'django.contrib.auth.password_validation.CommonPasswordValidator',
    },
    {
        'NAME': 'django.contrib.auth.password_validation.NumericPasswordValidator',
    },
]


# Internationalization
# https://docs.djangoproject.com/en/1.11/topics/i18n/

LANGUAGE_CODE = 'en-us'

TIME_ZONE = 'UTC'

USE_I18N = True

USE_L10N = True

USE_TZ = True


# Static files (CSS, JavaScript, Images)
# https://docs.djangoproject.com/en/1.11/howto/static-files/

STATIC_URL = '/static/'
STATICFILES_DIRS = [
    os.path.join(BASE_DIR, 'static')
]
STATIC_ROOT = os.path.join(BASE_DIR, "allstatic")
九、图片

十、补充
项目开发完毕后,需要将代码放到服务器上,这样用户才能访问。接下来我们一步一步来进行一波部署操作。
1. 简单粗暴
项目开发完毕,在部署之前需要再配置文件中将 ALLOWED_HOSTS配置设置为:当前服务器IP或*,如:
|
1
|
ALLOWED_HOSTS = ["*",] |
然后将源码上传至服务器指定目录,如:/data/ ,然后执行命令来运行:
注: 上传命令: scp /Users/wupeiqi/PycharmProjects/oldboy-1.zip root@192.168.10.33:/data/
解压,进入目录并执行以下命令:
|
1
|
python3 mange.py runserver 0.0.0.0:8000 |
类似这样的上线网站:
2. uwsgi
Django框架运行依赖wsgi(本质提供socket服务端),众多模块实现了wsgi规范,而django框架中默认使用wsigiref模块来实现,他由于性能比较低,所以用于本地开发和测试,而线上部署时需要使用uwsgi来代替。
a. 在服务器上安装uwsgi
|
1
|
pip3 install uwsgi |
需要先安装:yum install python-devel
b. 单文件使用uwsgi
在服务器上编写一个Python文件:
|
1
2
3
|
def application(env, start_response): start_response('200 OK', [('Content-Type','text/html')]) return [b"Hello World"] |
在服务器上执行命令启动Web服务器:
|
1
2
3
|
uwsgi --http :9001 --wsgi-file app.py# 或uwsgi --http :9002 --wsgi-file foobar.py --master --processes 4 |
PS: flask需要再加 --callable app
访问查看即可:

c. django程序使用uwsgi
将开发好的django程序拷贝到服务器目录【同示例一】,即:/data/oldboy ,执行命令启动:
|
1
|
uwsgi --http :9005 --chdir /data/oldboy/ --wsgi-file oldboy/wsgi.py --master --processes 4 |
1. 创建配置文件 oldboy.ini

[uwsgi]
http = 0.0.0.0:9005
chdir = /data/oldboy/
wsgi-file = oldboy/wsgi.py
processes = 4
static-map = /static=/data/oldboy/allstatic

2. 根据配置文件启动uwsgi

uwsigi --ini  oldboy.ini
PS: 如果有虚拟环境可以添加上虚拟环境路径配置: virtualenv = /env/oldboy_venv
此时访问时,会出现找不到静态文件的错误。
想要uwsgi处理静态文件,需要先将django的静态文件收集到制定目录,然后再设置对应关系。
- 收集django静态文件
- 在django的配置文件中添加:STATIC_ROOT = os.path.join(BASE_DIR,"allstatic")
- 执行 python3 manage.py collectstatic 命令,至此django项目所有相关静态文件都会收集到制定目录。
- 设置uwsgi静态文件对应关系
- uwsgi --http :9005 --chdir /data/oldboy/ --wsgi-file oldboy/wsgi.py --master --processes 4 --static-map /static=/data/oldboy/allstatic
访问地址,即可看到网站了....
3. nginx
利用Nginx做反向代理、负载均衡以及处理静态文件。
a. 安装Nginx
|
1
|
yum install nginx |
b. 配置nginx
user root;
worker_processes 4;

error_log /var/log/nginx/error.log;
pid /var/run/nginx.pid;

events {
    worker_connections  1024;
}


http {
    log_format  main  '$remote_addr - $remote_user [$time_local] "$request" '
                      '$status $body_bytes_sent "$http_referer" '
                      '"$http_user_agent" "$http_x_forwarded_for"';

    access_log  /var/log/nginx/access.log  main;

    sendfile            on;
    tcp_nopush          on;
    tcp_nodelay         on;
    keepalive_timeout   65;

    include             /etc/nginx/mime.types;
    default_type        application/octet-stream;

    upstream django {
        server 127.0.0.1:8001;
        # server 192.1.123.1;
    }
    server {
        listen      80;

        charset     utf-8;

        # max upload size
        client_max_body_size 75M;

        location /static {
            alias  /data/oldboy/allstatic;
        }

        location / {
            uwsgi_pass  django;
            include     uwsgi_params;
        }
    }
}
确保nginx配置文件目录下有uwsgi_params文件(默认)
c. 配置uwsgi
为了确保让所有请求均通过80端口来访问网站,将uwsgi的配置文件修改为:
|
1
2
3
4
5
6
|
[uwsgi]socket = 127.0.0.1:9005chdir = /data/oldboy/wsgi-file = oldboy/wsgi.pyprocesses = 4logto = /tmp/oldboy.log |
d. 启动uwsgi和nginx
|
1
2
3
|
uwsgi --ini /data/oldboy/oldboy.ini &/etc/init.d/nginx start |
4. supervisor
supervisor是一个对进程管理的软件,可以帮助我们启动uwsgi并维护(uwsgi进程关闭时,自动将其启动起来)。
a. 安装
|
1
|
yum install supervisor |
b. 配置 vim /etc/supervisor.conf
[supervisord]
http_port=/var/tmp/supervisor.sock ; (default is to run a UNIX domain socket server)
;http_port=127.0.0.1:9001  ; (alternately, ip_address:port specifies AF_INET)
;sockchmod=0700              ; AF_UNIX socketmode (AF_INET ignore, default 0700)
;sockchown=nobody.nogroup     ; AF_UNIX socket uid.gid owner (AF_INET ignores)
;umask=022                   ; (process file creation umask;default 022)
logfile=/var/log/supervisor/supervisord.log ; (main log file;default $CWD/supervisord.log)
logfile_maxbytes=50MB       ; (max main logfile bytes b4 rotation;default 50MB)
logfile_backups=10          ; (num of main logfile rotation backups;default 10)
loglevel=info               ; (logging level;default info; others: debug,warn)
pidfile=/var/run/supervisord.pid ; (supervisord pidfile;default supervisord.pid)
nodaemon=false              ; (start in foreground if true;default false)
minfds=1024                 ; (min. avail startup file descriptors;default 1024)
minprocs=200                ; (min. avail process descriptors;default 200)

;nocleanup=true              ; (don't clean up tempfiles at start;default false)
;http_username=user          ; (default is no username (open system))
;http_password=123           ; (default is no password (open system))
;childlogdir=/tmp            ; ('AUTO' child log dir, default $TEMP)
;user=chrism                 ; (default is current user, required if root)
;directory=/tmp              ; (default is not to cd during start)
;environment=KEY=value       ; (key value pairs to add to environment)

[supervisorctl]
serverurl=unix:///var/tmp/supervisor.sock ; use a unix:// URL  for a unix socket
;serverurl=http://127.0.0.1:9001 ; use an http:// url to specify an inet socket
;username=chris              ; should be same as http_username if set
;password=123                ; should be same as http_password if set
;prompt=mysupervisor         ; cmd line prompt (default "supervisor")

; The below sample program section shows all possible program subsection values,
; create one or more 'real' program: sections to be able to control them under
; supervisor.

;[program:theprogramname]
;command=/bin/cat            ; the program (relative uses PATH, can take args)
;priority=999                ; the relative start priority (default 999)
;autostart=true              ; start at supervisord start (default: true)
;autorestart=true            ; retstart at unexpected quit (default: true)
;startsecs=10                ; number of secs prog must stay running (def. 10)
;startretries=3              ; max # of serial start failures (default 3)
;exitcodes=0,2               ; 'expected' exit codes for process (default 0,2)
;stopsignal=QUIT             ; signal used to kill process (default TERM)
;stopwaitsecs=10             ; max num secs to wait before SIGKILL (default 10)
;user=chrism                 ; setuid to this UNIX account to run the program
;log_stdout=true             ; if true, log program stdout (default true)
;log_stderr=true             ; if true, log program stderr (def false)
;logfile=/var/log/cat.log    ; child log path, use NONE for none; default AUTO
;logfile_maxbytes=1MB        ; max # logfile bytes b4 rotation (default 50MB)
;logfile_backups=10          ; # of logfile backups (default 10)


[program:oldboy]
command=/usr/local/bin/uwsgi /data/oldboy/oldboy.ini ;命令
priority=999                ; 优先级(越小越优先)
autostart=true              ; supervisord启动时,该程序也启动
autorestart=true            ; 异常退出时,自动启动
startsecs=10                ; 启动后持续10s后未发生异常,才表示启动成功
startretries=3              ; 异常后,自动重启次数
exitcodes=0,2               ; exit异常抛出的是0、2时才认为是异常
stopsignal=QUIT             ; 杀进程的信号
stopwaitsecs=10             ; 向进程发出stopsignal后等待OS向supervisord返回SIGCHILD 的时间。若超时则supervisord将使用SIGKILL杀进程
user=chrism                 ; 设置启动该程序的用户
log_stdout=true             ; 如果为True,则记录程序日志
log_stderr=false            ; 如果为True,则记录程序错误日志
logfile=/var/log/cat.log    ; 程序日志路径
logfile_maxbytes=1MB        ; 日志文件最大大小
logfile_backups=10          ; 日志文件最大数量
c. 启动
|
1
2
3
|
supervisord /etc/supervisor.conf或/etc/init.d/supervisor start |
https://blog.csdn.net/lileihappy/article/details/79580291

 浙公网安备 33010602011771号