01 - nginx - 安装、配置文件、默认网站、虚拟主机
一、运维:
  1. 介绍服务器。
        服务器逻辑:
            服务器选择
            操作系统
            部署逻辑

        业务环境部署逻辑
            业务部署图
            软件部署文档
            日常维护文档

        测试
            开发上传代码到源码系统
            上线 - 测服务器,内测
            预发布测试,公测

        上线
            产品需求确认
            产品研发确认
            产品测试确认
            产品流程文档
            跟踪统计用户反馈情况

    2. 架构部署,自测环境,预生产环境,生产环境。
二、Nginx:
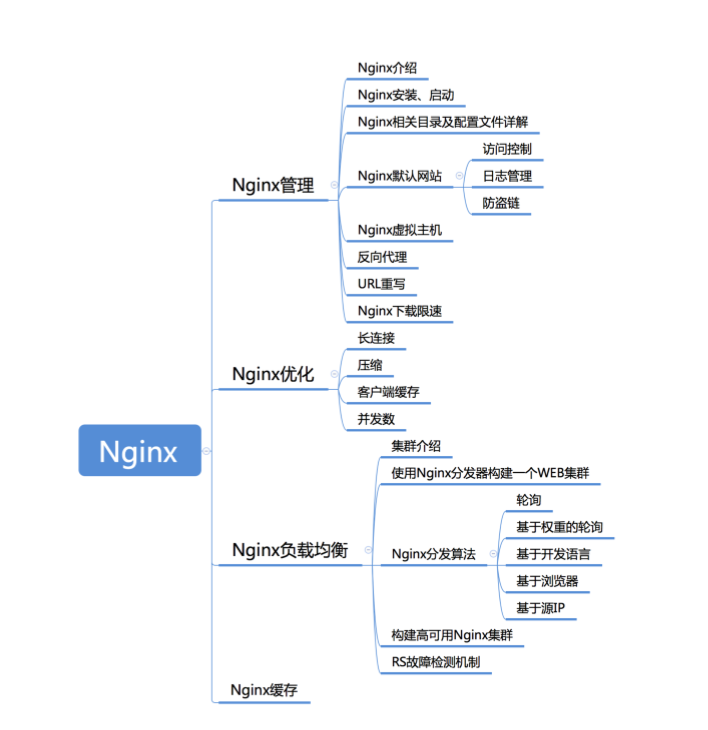
    Apache: 消耗资源
    Nginx介绍:
        轻量级的WEB服务器,和反向代理服务器
        延伸版本tengine(淘宝)、openresrt(章亦春)等
        官网:http://nginx.org
        中文文档:http://www.nginx.cn/doc/index.html

        Nginx管理
        Nginx优化
        Nginx负载均衡
        Nginx缓存

    环境:
        1. Vmware虚拟机 2核4G
        2. 网卡:桥接
        3. centos7.5
        4. 防火墙:关闭
        5. Selinux:关闭
        6. 网段:192.168.10.0/24

        主机名                  IP             角色
        Master.ayiltuan.com  192.168.10.40  主分发器
        Backup.aliltuan.com  192.168.10.41  备分发器
        Web01.ayituan.com    192.168.10.42  数据服务器1
        Web02.ayituan.com    192.168.10.43  数据服务器2

    Nginx目录:
        安装
        相关目录介绍
        启动
        验证测试
三、Nginx的安装:
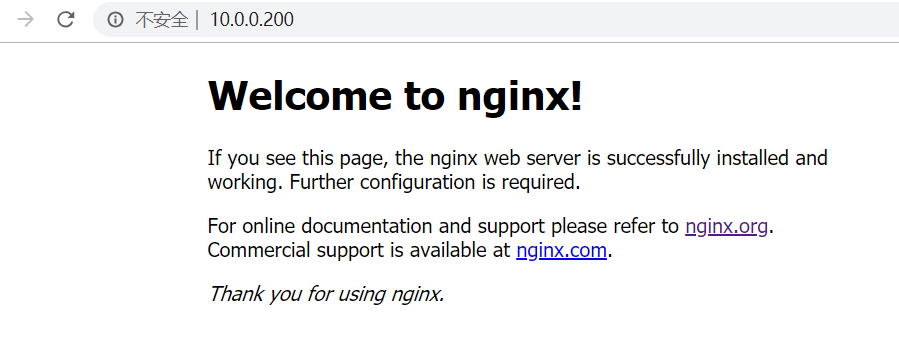
   http://nginx.org

    1、Nginx安装
        1.1)获得软件 wget http://nginx.org/download/nginx-1.15.5.tar.gz -P /usr/src
        1.2)安装前准备 cd /usr/src tar xf nginx-1.15.5.tar.gz
            cd nginx-1.15.5 yum -y install gcc pcre-devel zlib zlib-devel

        1.3)配置
            1)检查环境 是否 满足安装条件     依赖解决
            2)指定安装方式    配置文件   命令文件  各种文件放哪里   开启模块功能【内 置模块  三方模块】
            3)指定软件安装在那里

        ./configure --prefix=/usr/local/nginx

        1.4)编译   使用gcc将源码生成可执行程序
            make -j4

        1.5)安装
            make install

    2、相关目录
        nginx path prefix: "/usr/local/nginx"
        nginx binary file: "/usr/local/nginx/sbin/nginx"
        nginx modules path: "/usr/local/nginx/modules"
        nginx configuration prefix: "/usr/local/nginx/conf"
        nginx configuration file: "/usr/local/nginx/conf/nginx.conf"
        nginx pid file: "/usr/local/nginx/logs/nginx.pid"
        nginx error log file: "/usr/local/nginx/logs/error.log"
        nginx http access log file: "/usr/local/nginx/logs/access.log"

    3、Nginx启动
        /usr/local/nginx/sbin/nginx

    4、验证
        netstat –ntpl
        lsof -i :80
        yum -y install lsof

    5、浏览器测试
        elinks
        文本界面浏览器
        elinks http://192.168.10.42  --dump

    百度:(方法比技能更重要!)
四、Nginx的配置文件:
/usr/local/nginx/conf/nginx.conf
    #启动子进程程序默认用户
    #user  nobody;
    #一个主进程和多个工作进程。工作进程是单进程的,且不需要特殊授权即可运行;这里定义的是工作进程数量
    worker_processes  1;

    #全局错误日志的位置及日志格式
    #error_log  logs/error.log;
    #error_log  logs/error.log  notice;
    #error_log  logs/error.log  info;

    #pid        logs/nginx.pid;


    events {
        #每个工作进程最大的并发数
        worker_connections  1024;
    }


    #http服务器设置
    http {
        #设定mime类型,类型由mime.type文件定义
        include       mime.types;

        #
        default_type  application/octet-stream;

        #日志格式
        #log_format  main  '$remote_addr - $remote_user [$time_local] "$request" '
        #                  '$status $body_bytes_sent "$http_referer" '
        #                  '"$http_user_agent" "$http_x_forwarded_for"';
        #$remote_addr与$http_x_forwarded_for用以记录客户端的ip地址;
        #$remote_user:用来记录客户端用户名称;
        #$time_local: 用来记录访问时间与时区;
        #$request: 用来记录请求的url与http协议;
        #$status: 用来记录请求状态;成功是200,
        #$body_bytes_sent :记录发送给客户端文件主体内容大小;
        #$http_referer:用来记录从那个页面链接访问过来的;
        #$http_user_agent:记录客户浏览器的相关信息;

        #全局访问日志路径
        #access_log  logs/access.log  main;
        #sendfile指令指定 nginx 是否调用sendfile 函数(zero copy 方式)来输出文件,对于普通应用,必须设为on。如果用来进行下载等应用磁盘IO重负载应用,可设置为off,以平衡磁盘与网络IO处理速度,降低系统uptime。
        sendfile        on;

        #此选项允许或禁止使用socke的TCP_CORK的选项,此选项仅在使用sendfile的时候使用
        #tcp_nopush     on;

        #长连接超时时间
        #keepalive_timeout  0;
        keepalive_timeout  65;

        #开启压缩
        #gzip  on;

        #配置虚拟主机
        server {
            #虚拟主机使用的端口
            listen       80;
            #虚拟主机域名
            server_name  localhost;

            #虚拟主机支持的字符集
            #charset koi8-r;

            #虚拟主机的访问日志路径
            #access_log  logs/host.access.log  main;

            #定义web根路径
            location / {
                #根目录路径
                root   html;
                #索引页
                index  index.html index.htm;
            }

            #error_page  404              /404.html;

            # redirect server error pages to the static page /50x.html
            #

            #根据错误码 返回对应的页面
            error_page   500 502 503 504  /50x.html;

            #定义页面路径
            location = /50x.html {
                root   html;
            }

            #定义反向代理服务器 数据服务器是lamp模型
            # proxy the PHP scripts to Apache listening on 127.0.0.1:80
            #
            #location ~ \.php$ {
            #    proxy_pass   http://127.0.0.1;
            #}


            #定义PHP为本机服务的模型
            # pass the PHP scripts to FastCGI server listening on 127.0.0.1:9000
            #
            #location ~ \.php$ {
            #    root           html;
            #    fastcgi_pass   127.0.0.1:9000;
            #    fastcgi_index  index.php;
            #    fastcgi_param  SCRIPT_FILENAME  /scripts$fastcgi_script_name;
            #    include        fastcgi_params;
            #}

            # deny access to .htaccess files, if Apache's document root
            # concurs with nginx's one
            #
            #拒绝apache DR目录及子目录下的.htaccess文件访问
            #location ~ /\.ht {
            #    deny  all;
            #}
        }


        # another virtual host using mix of IP-, name-, and port-based configuration
        #
        #server {
        #    listen       8000;
        #    listen       somename:8080;
        #    server_name  somename  alias  another.alias;

        #    location / {
        #        root   html;
        #        index  index.html index.htm;
        #    }
        #}


        #https的配置方案
        # HTTPS server
        #
        #server {
        #    listen       443 ssl;
        #    server_name  localhost;

        #    ssl_certificate      cert.pem;
        #    ssl_certificate_key  cert.key;

        #    ssl_session_cache    shared:SSL:1m;
        #    ssl_session_timeout  5m;

        #    ssl_ciphers  HIGH:!aNULL:!MD5;
        #    ssl_prefer_server_ciphers  on;

        #    location / {
        #        root   html;
        #        index  index.html index.htm;
        #    }
        #}

    }
操作验证:
useradd -s /sbin/nologin -r www # 创建一个 www用户
#启动子进程程序默认用户
#user nobody; # www
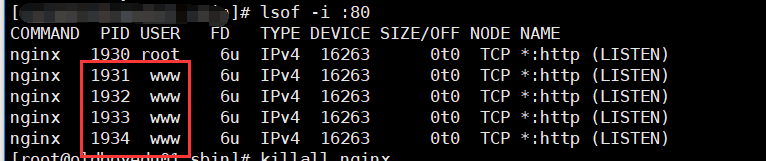
worker_processes 1; # 有几个核,就写几个 4
killall nginx
yum search killall
yum -y install psmisc
/usr/local/nginx/sbin/nginx
lsof -i :80
实现了负载均衡;每个工作进程下:最多1024个并发数;
五、Nginx默认网站、访问控制、登录验证、日志管理、防盗链、日志截断
../sbin/nginx -g ../conf/nginx.conf
验证是否 ok 在重启
关了,在重启:
killall nginx
/usr/local/nginx/sbin/nginx
重启:
killall -s HUP nginx
    1、默认网站
        当Nginx配置⽂文件中有且只有只一个Server的时候,该Server就被Nginx认为是默认网站,
        所有发给Nginx服务器80端⼝口的数据都会默认给该Server.

        server {
            listen       80;
            server_name  localhost;
            location / {
                root   html;
                index  index.html index.htm;
            }
            error_page   500 502 503 504  /50x.html;
            location = /50x.html {
                root   html;
            }
        }


    2、访问控制
        location /a {
            allow 192.168.1.0/24;
            deny all;
            #return 404;
            return http://www.jd.com;

        }


    3、登陆验证
            auth_basic

        语法:     auth_basic string | off;

        默认值:   auth_basic off;
            auth_basic_user_file file;

        location /b {

            auth_basic ”登陆验证";
            auth_basic_user_file /etc/nginx/htpasswd;

        }


    4、日志管理
        Nginx访问日志主要有两个参数控制 log_format
        log_format  #用来定义记录日志的格式(可以定义多种日志格式,取不同名字即 可) access_log
                    #用来指定日至文件的路径及使用的何种日志格式记录日志

        access_log  logs/access.log  main;

        log_format格式变量:
            $remote_addr  #记录访问网站的客户端地址
            $remote_user  #远程客户端用户名
            $time_local  #记录访问时间与时区
            $request  #用户的http请求起始行信息
            $status  #http状态码,记录请求返回的状态码,例如:200、301、404等
            $body_bytes_sent  #服务器发送给客户端的响应body字节数
            $http_referer  #记录此次请求是从哪个连接访问过来的,可以根据该参数进 行防盗链设置。
            $http_user_agent  #记录客户端访问信息,例如:浏览器、手机客户端等
            $http_x_forwarded_for  #当前端有代理服务器时,设置web节点记录客户端 地址的配置,此参数生效的前提是代理服务器也要进行相关的x_forwarded_for设置

        案例
            自定义一个json格式的访问日志
            log_format main_json '{"@timestamp":"$time_local",'
                '"client_ip": "$remote_addr",'
                '"request": "$request",'
                '"status": "$status",'
                '"bytes": "$body_bytes_sent",'
                '"x_forwarded": "$http_x_forwarded_for",'
                '"referer": "$http_referer"' '}';

        access_log logs/access_json.log main_json;


    5、防盗链
        location /images/ {
            alias /data/images/;
            valid_referers none blocked *.ayitula.com;
            if ($invalid_referer) {
                rewrite ^/  http://www.ayitula.com/daolian.gif;
                #return 403;
            }
        }


    6、日志截断
        mv access.log access.log.0
        killall -USR1 `cat master.nginx.pid`
        sleep 1
        gzip access.log.0
六、Nginx虚拟主机
就是把一台物理服务器划分成多个“虚拟”的服务器,每一个虚拟主机都可以有独立的域名和独立的目录
同时发布两个网站:
DocumentRoot /usr/local/nginx/html/web1
DocumentRoot /usr/local/nginx/html/web2
    1、基于IP的虚拟主机

        实现条件:
            1) 两个IP
            2)DR 存在
            3)索引页  index.html
            #每个网站都需要一个IP
            #缺点  需要多个IP  如果是公网IP  每个IP都需要付费


            逻辑网卡,添加子网卡
            ifconfig
            ifconfig ens33:1 192.168.10.52/24 up

            mkdir /usr/local/nginx/html/web1
            mkdir /usr/local/nginx/html/web2

            echo web1 > mkdir /usr/local/nginx/html/web1/index.html

        配置:
            server {
                listen       192.168.10.42:80;
                location / {
                    root   html/web1;
                    index  index.html index.htm index.php;
                } }

            server {
                listen       192.168.10.52:80;
                location / {
                    root   html/web2;
                    index  index.html index.htm;
                } }


        运行:
            ../sbin/nginx -g nginx.conf   # 测试一下。才能关掉,在启动。
            killall nginx

            ../sbin/nginx  # 启动
            netstat -ntpl  # 查看已经启动得进程

        测试:
            elinks http://192.168.10.42 --dump
            elinks http://192.168.10.52 --dump
            ok

    2、基于端口的虚拟主机

        #只需要一个IP
        #缺点  端口你是无法告诉公网用户   无法适用于公网客户   适合内部用户

        ifconfig ens33:1 down

        配置:
            server {
                listen       80;
                #server_name  www.abc.com;
                location / {
                    root   html/web1;
                    index  index.html index.htm index.php;
                } }

            server {
                listen       8080;
                #server_name  www.abc.com;
                location / {
                    root   html/web2;
                    index  index.html index.htm;
                } }

        启动:
            ../sbin/nginx -g nginx.conf   # 测试一下。才能关掉,在启动。
            killall nginx
            netstat -ntpl

        测试:
            elinks http://192.168.10.42 --dump  # 没加端口,默认是80
            elinks http://192.168.10.42:8080 --dump

    3、基于域名的虚拟主机

        一个网站必然有一个域名
        配置:
            vim /etc/hosts
                。。。
                192.168.10.42  www.abc.com
                192.168.10.42  www.cbd.com
            server {
                listen       80;
                server_name  www.abc.com;
                location / {
                    root   html/web1;
                    index  index.html index.htm index.php;
                } }

            server {
                listen       80;
                server_name  www.cbd.com;
                location / {
                    root   html/web2;
                    index  index.html index.htm;
                } }

        测试:
            elinks www.abc.com --dump  # 没加端口,默认是80
            elinks www.cbd.com  --dump

 浙公网安备 33010602011771号