Kubernetes基础配置管理
一、ConfigMap创建
1-1、基于目录创建ConfigMap
- 首先创建一个configmap/conf存储目录,分别建立.conf文件
mkdir /configmap/conf

#创建。conf文件和添加内容
vim passwd.conf
username=user1
pwd=12345

#创建第二个conf文件和内容
dir=/home
power=rw
- 基于目录创建configMap命令。kubectl create configmap <映射名称> <数据源>
#命令使用介绍
kubectl create configmap <映射名称> <数据源>

#示例
[root@k8s-master1 conf]# kubectl create configmap cm --from-file=/configmap/conf/
configmap/cm created
注:
cm :指的是映射名称
--from-file= 指向数据源(/configmap/conf目录)
- 查看基于configMap目录创建状态
#查看方式1是否创建了cm映射对象
[root@k8s-master1 conf]# kubectl get cm
NAME               DATA   AGE
cm                 2      16s
kube-root-ca.crt   1      6d19h

#基于describe命令查看创建的内容
[root@k8s-master1 conf]# kubectl describe configmaps cm
Name:         cm
Namespace:    default
Labels:       <none>
Annotations:  <none>

Data
====
auth.conf:
----
dir=/home
power=rw

passwd.conf:
----
username=user1
pwd=12345


BinaryData
====

Events:  <none>
注:
目录/configmap/conf下的auth.conf和passwd.conf两个文件里面的内容出现在了Data下面
- 利用yaml文件格式查看创建内容
[root@k8s-master1 conf]# kubectl get configmaps cm -oyaml
apiVersion: v1
data:
  auth.conf: |
    dir=/home
    power=rw
  passwd.conf: |
    username=user1
    pwd=12345
kind: ConfigMap
metadata:
  creationTimestamp: "2022-09-27T01:57:56Z"
  name: cm
  namespace: default
  resourceVersion: "202341"
  uid: 583e2a95-d81b-49c1-8eee-659a2f601507
1-2、基于文件创建configMap
说明:你可以使用 kubectl create configmap 基于单个文件或多个文件创建 ConfigMap。
- 基于文件创建configMap命令
[root@k8s-master1 conf]# kubectl create configmap passwd --from-file=/configmap/conf/passwd.conf
configmap/passwd created
- 查看创建状态
[root@k8s-master1 conf]# kubectl get cm passwd
NAME     DATA   AGE
passwd   1      5m
[root@k8s-master1 conf]# kubectl describe configmap passwd
Name:         passwd
Namespace:    default
Labels:       <none>
Annotations:  <none>

Data
====
passwd.conf:
----
username=user1
pwd=12345


BinaryData
====
--from-file参数,从多个数据源创建 ConfigMap。
kubectl create configmap auth-pwd --from-file=/configmap/conf/auth.conf --from-file=/configmap/conf/passwd.conf
注:根据上面查看状态命令使用
1-3、使用 --from-env-file 选项从环境文件创建 ConfigMap,例如:
Env 文件包含环境变量列表。其中适用以下语法规则:
-
-
- Env 文件中的每一行必须为 VAR=VAL 格式。
- 以#开头的行(即注释)将被忽略。
- 空行将被忽略。
- 引号不会被特殊处理(即它们将成为 ConfigMap 值的一部分)。
-
- 示例文件
vim game-env.conf

enemies=aliens
lives=3
allowed="true"
- --from-env-file创建示例
[root@k8s-master1 conf]# kubectl create configmap game-env --from-env-file=/configmap/conf/game-env.conf
configmap/game-env created
- 创建状态
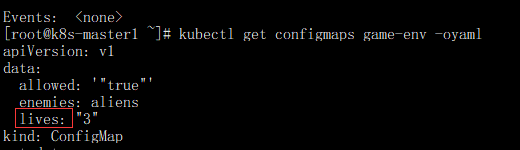
[root@k8s-master1 conf]# kubectl describe configmaps game-env
Name:         game-env
Namespace:    default
Labels:       <none>
Annotations:  <none>

Data
====
enemies:
----
aliens
lives:
----
3
allowed:
----
"true"

BinaryData
====

Events:  <none>
注:从 Kubernetes 1.23 版本开始,kubectl 支持多次指定 --from-env-file,多个文件创建跟--from-file一样
二、ConfigMap使用方法
2-1、生成一个deployment nginx yaml文件,把生成的yaml文件追加到nginx-configmap.yaml里面
#生成yaml命令
kubectl create deploy nginx --image=nginx:1.16.1-alpine --dry-run=client -oyaml > nginx-configmap.yaml

#对生成的yaml文件删除不使用参数,删除参数后的yaml文件如下

apiVersion: apps/v1
kind: Deployment
metadata:
  labels:
    app: nginx
  name: nginx
spec:
  replicas: 1
  selector:
    matchLabels:
      app: nginx
  template:
    metadata:
      creationTimestamp: null
      labels:
        app: nginx
    spec:
      containers:
      - image: nginx:1.16.1-alpine
        name: nginx
2-2、利用valueFrom定义容器环境变量。单个ConfigMap中的数据定义容器环境变量,修改nginx-configmap.yaml文件
apiVersion: apps/v1
kind: Deployment
metadata:
  labels:
    app: nginx
  name: nginx
spec:
  replicas: 1
  selector:
    matchLabels:
      app: nginx
  template:
    metadata:
      creationTimestamp: null
      labels:
        app: nginx
    spec:
      containers:
      - image: nginx:1.16.1-alpine
        name: nginx
        env:
          - name: LIEVS
            valueFrom:
              configMapKeyRef:
               name: game-env
               key: lives
注;
2-2-1、添加内容为:
env:
   - name: LIEVS                #生成容器里面的环境变量名称
      valueFrom:
         configMapKeyRef:
           name: game-env       #生成configMap的映射名称,利用kubectl get configmaps查看
           key: lives                  #生成configMap环境变量key
2-2-2、进入nginx容器终端查看利用configMap设置的LIEVS环境变量,红色方框是实在的变量
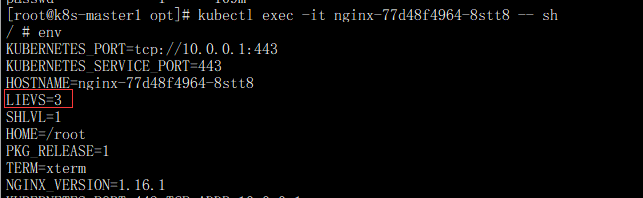
2-2-3、key: lives 指的就是如果红色方框查询处的key
2-2-4、可以添加多个环境变量,可以直接拷贝 如下:
- name: LIEVS                #改成新的容器里面的环境变量名称
      valueFrom:
         configMapKeyRef:
         name: game-env       #生成configMap的映射名称,利用kubectl get configmaps查看
         key: lives                  #生成configMap环境变量key
2-3、利用envFrom实现批量环境变量设置
apiVersion: apps/v1
kind: Deployment
metadata:
  labels:
    app: nginx
  name: nginx
spec:
  replicas: 1
  selector:
    matchLabels:
      app: nginx
  template:
    metadata:
      creationTimestamp: null
      labels:
        app: nginx
    spec:
      containers:
      - image: nginx:1.16.1-alpine
        name: nginx
        envFrom:
        - configMapRef:
            name: game-env
          prefix: game_env
注:
#利用envFrom这里的配置是实现批量环境变量设置
envFrom:
- configMapRef:
      name: game-env     #这里是创建的ConfigMap容器名称
      prefix: game_env_   #这里设置的是实区服是通过CofingMap还是自定义实现添加前缀字段
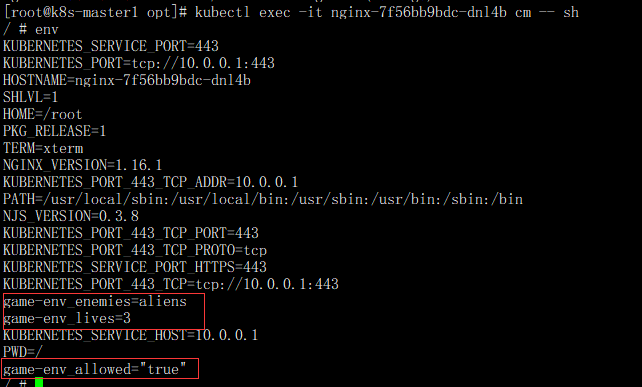
查看实现批量状态和设置区服前缀字段,如图红色框前缀显示
2-4、以文件的形式挂载ConfigMap
apiVersion: apps/v1
kind: Deployment
metadata:
  labels:
    app: web
  name: web
spec:
  replicas: 1
  selector:
    matchLabels:
      app: web
  template:
    metadata:
      creationTimestamp: null
      labels:
        app: web
    spec:
      containers:
      - image: nginx:1.16.1-alpine
        name: nginx
        volumeMounts:
        - name: auth-volume
          mountPath: /etc/config
      volumes:
        - name: auth-volume
          configMap:
            #提供包含要添加到容器中的文件的 ConfigMap 的名称
            name: auth
注:volumes 部分下添加 ConfigMap 名称。 这会将 ConfigMap 数据添加到 volumeMounts.mountPath 所指定的目录 (在本例中为 /etc/config)
2-4-1、利用volumes挂载文件相关配置注解
 volumeMounts:
   - name: auth-volume        #在这的auth-volume需要跟volues.-name下面的名称一致
      mountPath: /etc/config   #指定挂载目录路径
volumes:
   - name: auth-volume         #volumes.-name名称
      configMap:
          name: auth                #提供包含要添加到容器中ConfigMap 的名称,可以通过kubectl get configmaps
2-4-2、挂载文件验证
[root@k8s-master1 opt]# kubectl exec -it web-64d4ff5dd9-q9tjw -- sh
/ # ls -l /etc/config/
total 0
lrwxrwxrwx    1 root     root            16 Sep 28 07:09 auth.conf -> ..data/auth.conf
/ # cat /etc/config/auth.conf
dir=/home
power=rw
2-4-3、通过实现在线编辑,挂载文件内容进行自动修改
#把dir=/home修改为dir=/opt
kubectl get configmaps
查看修改后的内容状态
[root@k8s-master1 opt]# kubectl exec -it web-64d4ff5dd9-q9tjw -- sh
/ # cat /etc/config/auth.conf
dir=/opt
power=rw
注:修改后有可能会有相应的时间等待刷新。如果在程序中使用这个功能需要关注程序是否有热加载功能,如果程序没有加载功能修改后的配置程序不读取生效。
2-5、自定义挂载文件权限和名称
apiVersion: apps/v1
kind: Deployment
metadata:
  labels:
    app: web
  name: web
spec:
  replicas: 1
  selector:
    matchLabels:
      app: web
  template:
    metadata:
      creationTimestamp: null
      labels:
        app: web
    spec:
      containers:
      - image: nginx:1.16.1-alpine
        name: nginx
        volumeMounts:
        - name: auth-volume
          mountPath: /etc/config
      volumes:
        - name: auth-volume
          configMap:
            #提供包含要添加到容器中的文件的 ConfigMap 的名称
            name: auth
            items:
            - key: auth.conf
              path: auth.conf-back
注:
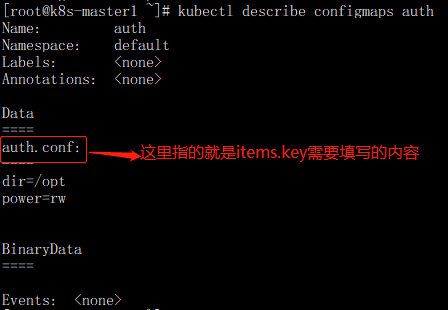
items:
- key: auth.conf               #kubectl describe configmaps auth 查到data下面的名称,如下图红色方框内容指的就是这里的key
   path: auth.conf-back     #自定义挂载文件名称
2-5-1、刷新yaml文件
kubectl replace -f web-volumes.yaml
2-5-2、查看自定义挂载文件名称
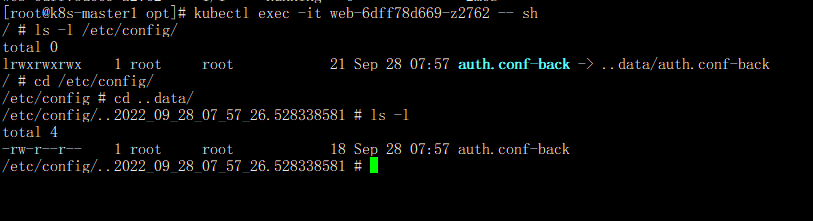
2-5-3、修改自定义挂载文件权限
apiVersion: apps/v1
kind: Deployment
metadata:
  labels:
    app: web
  name: web
spec:
  replicas: 1
  selector:
    matchLabels:
      app: web
  template:
    metadata:
      creationTimestamp: null
      labels:
        app: web
    spec:
      containers:
      - image: nginx:1.16.1-alpine
        name: nginx
        volumeMounts:
        - name: auth-volume
          mountPath: /etc/config
      volumes:
        - name: auth-volume
          configMap:
            #提供包含要添加到容器中的文件的 ConfigMap 的名称
            name: auth
            items:
            - key: auth.conf
              path: auth.conf-back
            defaultMode: 0666
查看挂载文件权限修改后如果:
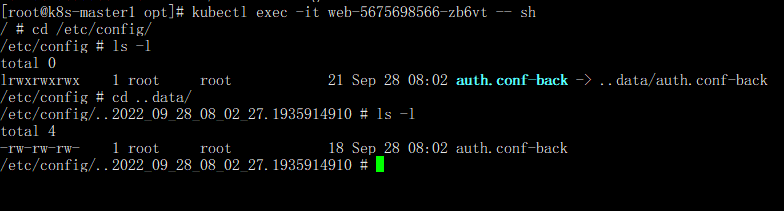
注:
1、defaultMode: 0666 设置挂载文件权限
2、可以对照源文件权限2-5-2图。查权限需要进入 ..data目录里面可以安装图上面的操作步骤,因为auth.conf-back是通过软连接建立
三、Secret创建
3-1、由用户名和密码组成的数据库连接字符串。 你可以在本地计算机上,将用户名存储在文件
/secret/conf/username.txt 中,将密码存储在文件 /secret/conf/password.txt 中
[root@k8s-master1 ~]# mkdir -p /secret/conf
[root@k8s-master1 ~]# cd /secret/conf/
[root@k8s-master1 conf]# echo -n 'admin' > username.txt
[root@k8s-master1 conf]# echo -n '1f2d1e2e67df' > password.txt
[root@k8s-master1 conf]# ls -l
total 8
-rw-r--r-- 1 root root 12 Sep 28 21:16 password.txt
-rw-r--r-- 1 root root  5 Sep 28 21:16 username.txt
3-2、kubectl create secret 命令创建secret
#创建
[root@k8s-master1 conf]# kubectl create secret generic db-user-pass \
> --from-file=/secret/conf/username.txt \
> --from-file=/secret/conf/password.txt
secret/db-user-pass created

#查看创建状态
[root@k8s-master1 conf]# kubectl get secrets db-user-pass -oyaml
apiVersion: v1
data:
  password.txt: MWYyZDFlMmU2N2Rm    #password.txt保存的密码进行了base64加密
  username.txt: YWRtaW4=                     #username.txt保存的用户名进行了base64加密
kind: Secret
metadata:
  creationTimestamp: "2022-09-28T13:18:38Z"
  name: db-user-pass
  namespace: default
  resourceVersion: "277748"
  uid: 8298357e-1b36-41ce-9b68-72ed958960e5
type: Opaque
3-3、通过yaml创建secret
#yaml文件

apiVersion: v1
kind: Secret
metadata:
  name: mysecret
type: Opaque
data:
  username: YWRtaW4=
  password: MWYyZDFlMmU2N2Rm

#创建secret
kubectl create -f secret.yaml
3-4、删除创建secret操作命令
kubectl delete secret mysecret
3-5、使用Secret拉取私有镜像仓库命令
kubectl create secret docker-registry myregistrykey \
--docker-server=DOCKER_REGISTRY_SERVER \
--docker-username=DOCKER_USER \
--docker-password=DOCKER_PASSWORD \
--docker-email=DOCKER_EMAIL
注:
➢ docker-registry:指定Secret的类型
➢ myregistrykey: Secret名称
➢ DOCKER_REGISTRY_SERVER:镜像仓库地址
➢ DOCKER_USER:镜像仓库用户名,需要有拉取镜像的权限
➢ DOCKER_PASSWORD:镜像仓库密码
➢ DOCKER_EMAIL:邮箱信息,可以为空
3-6、配置yaml文件用户名和密码下载私有镜像仓库镜像
apiVersion: apps/v1
kind: Deployment
metadata:
  labels:
    app: web
  name: web
spec:
  replicas: 1
  selector:
    matchLabels:
      app: web
  template:
    metadata:
      creationTimestamp: null
      labels:
        app: web
    spec:
     imagePullSecrets:
     - name: myregistry #创建的kubectl create secret docker-registry 容器名称
     containers:
     - image: 私有镜像连接地址
       name: nginx
注:
imagePullSecrets 设置获取私有镜像用户和密码
- name: myregistry #指的是创建secret docker-registry 容器是的名称
四、解决挂载volumeMounts挂载覆盖问题,主要修改mountPath和添加subPath参数。如以下示例
apiVersion: apps/v1
kind: Deployment
metadata:
  labels:
    app: web
  name: web
spec:
  replicas: 1
  selector:
    matchLabels:
      app: web
  template:
    metadata:
      creationTimestamp: null
      labels:
        app: web
    spec:
     imagePullSecrets:
     - name: myregistry
      containers:
      - image: nginx:1.16.1-alpine
        name: nginx
        volumeMounts:
        - name: nginx-conf
          mountPath: /etc/nginx/nginx.conf   #以文件的形式进行挂载,不要覆盖整个目录
          subPath: nginx.conf  #挂载配置文件名称
      volumes:
        - name: nginx-conf
          configMap:
            #提供包含要添加到容器中的文件的 ConfigMap 的名称
            name: nginx-conf
注:
1、主要修改mountPath: 把这里的路径直接指向到配置文件(如mountPath: /etc/nginx/nginx.conf )。已配置文件的形式镜像挂载,告诉容器不要覆盖整个目录。
2、mountPath下方添加subPath参数指向配置文件名称
五、关于ConfigMap和secret 热更新问题
说明:首先修改configMap或Secret的创建时 --from-file指向的配置文件。例如ConfigMap passwd.conf 配置文件内容修改后使用以下命令,进行对ConfigMap更新
kubectl create configmap auth --from-file=/configmap/conf/auth.conf --dry-run=client -oyaml | kubectl replace -f -
5-1、查看passwd.conf配置文件原来内容如下:
[root@k8s-master1 conf]# cat /configmap/conf/passwd.conf
username=user1
pwd=12345
[root@k8s-master1 conf]# kubectl describe configmaps passwd
Name:         passwd
Namespace:    default
Labels:       <none>
Annotations:  <none>

Data
====
passwd.conf:
----
username=user1
pwd=12345


BinaryData
====

Events:  <none>
把username=user1 修改为username=user2
5-2、更新ConfigMap和查看更新后内容
#修改配置文件后更新操作命令
[root@k8s-master1 opt]# kubectl create configmap passwd --from-file=/configmap/conf/passwd.conf --dry-run=client -oyaml | kubectl replace -f -
configmap/passwd replaced

#更新后查看更新内容
[root@k8s-master1 opt]# kubectl describe configmaps passwd
Name:         passwd
Namespace:    default
Labels:       <none>
Annotations:  <none>

Data
====
passwd.conf:
----
username=user2   #这里已经把原来的user1更新为user2
pwd=12345


BinaryData
====

Events:  <none>
注:Secret热更操作跟上面的示例一样

 浙公网安备 33010602011771号