vue基础
一、概览
1、vue 是一套构建用户界面的渐进式框架
npm安装命令:cnpm install --global vue-cli
也可以直接把vue.js下载下来在文件中直接引用;
每个 Vue 应用都需要通过实例化 Vue 来实现:
var vm = new Vue({
  el: '选择器',
  data:{},
  ...
  methods:{}
});
2、helloworld
<!DOCTYPE html>
<html>
    <head>
        <meta charset="utf-8">
        <title>helloworld</title>
        <script src="F://vue.js"></script>
    </head>
    <body>
        <div id="vue_det">
            <h1>title1 : {{header1}}</h1>
            <h1>{{helloworldMethod()}}</h1>
        </div>
        <script type="text/javascript">
            var vm = new Vue({
                el: '#vue_det',
                data: {
                    header1: "helloworld !",
                    alexa: "10000"
                },
                methods: {
                    helloworldMethod: function() {
                        return  'helloworldMethod';
                    }
                }
            })
        </script>
    </body>
</html>
data 用于定义属性,实例中有三个属性分别为:site、url、alexa。
methods 用于定义的函数,可以通过 return 来返回函数值
computed 用于定义计算属性,定义同methods,但在调用时不用(),可直接以函数名调用;计算属性是基于它们的响应式依赖进行缓存的,而methods每次都会计算
watch 监听属性,可与v-model联合使用;
3、响应式
当一个 Vue 实例被创建时,它将 data 对象中的所有的属性加入到 Vue 的响应式系统中。当这些属性的值发生改变时,视图将会产生“响应”,即匹配更新为新的值;后期添加的属性不具备响应式属性,同Object.freeze(obj)方法使用后,obj里的属性也不具备响应式;
4、基本语法
vue使用了基于 HTML 的模板语法,允许开发者声明式地将 DOM 绑定至底层 Vue 实例的数据。
 {{变量或方法}}    插入文本值: <p>{{ message }}</p>,通过使用 v-once 指令,你也能执行一次性地插值,当数据改变时,插值处的内容不会更新;<p v-once>{{ message }}</p>;
 v-html      插入html代码: <div v-html="message"></div>
 v-bind      设置属性,缩写:":",例: <div v-bind:class="{'class1': message}"   //v-bind:class可缩写为:class,此处message是可选的,值为true或false,false就不显示此class1;从 2.6.0 开始,可以用方括号括起来的 JavaScript 表达式作为一个指令的参数,<a v-on:[eventName]="doSomething"> ... </a>
 v-on        监听DOM事件,缩写:"@":    <a v-on:click="doSomething">    //v-on:click可缩写为@click
 v-model     用于input、select、text、checkbox、radio 等表单控件元素上创建双向数据绑定: <p>{{ message }}</p> <input v-model="message">  //写在input里的值会同时改变;
 v-if        条件语句:<p v-if="seen">现在你看到我了</p>  #seen为true时显示内容,否则不显示;可以使用 v-else 指令来表示 v-if 的“else 块”;2.1还新增了v-else-if
 v-for       循环    <li v-for="message in messages">{{message.id}}</li>  //messages可以为数字,messages也可以为object,用key,value,index同时或单独来取值,<li v-for="(value, key) in object"></li>
 {{ message | filterA | filterB(1) }}    过滤器,filter为函数,可接受参数,message就是第一个参数,表示先用filterA处理message内容,接着用filterB处理;
    filterA、B在传参时以filters属性来定义,例:filters:{filterA:function(agrv0){return 1}, filterB:function(agrv0,a){return a}}
二、修饰符
1、事件修饰符
<!-- 阻止单击事件冒泡 -->
<a v-on:click.stop="doThis"></a>

<!-- 提交事件不再重载页面 -->
<form v-on:submit.prevent="onSubmit"></form>

<!-- 修饰符可以串联  -->
<a v-on:click.stop.prevent="doThat"></a>

<!-- 只有修饰符 -->
<form v-on:submit.prevent></form>

<!-- 添加事件侦听器时使用事件捕获模式 -->
<div v-on:click.capture="doThis">...</div>

<!-- 只当事件在该元素本身(而不是子元素)触发时触发回调 -->
<div v-on:click.self="doThat">...</div>

<!-- click 事件只能点击一次,2.1.4版本新增 -->
<a v-on:click.once="doThis"></a>

<!-- 在 "change" 而不是 "input" 事件中更新 -->
<input v-model.lazy="msg" >

<!--将值转换为数值-->
<input v-model.number="age" type="number">

<!--去掉首尾空格-->
<input v-model.trim="msg">

<!-- 点击事件将只会触发一次 -->
<a v-on:click.once="doThis"></a>
2、按键修饰符
<!-- 只有在 keyCode 是 13 时调用 vm.submit() -->
<input v-on:keyup.13="submit">
<!-- 同上 -->
<input v-on:keyup.enter="submit">
<!-- 缩写语法 -->
<input @keyup.enter="submit">
所有按键别名: .enter .tab .delete (捕获 "删除" 和 "退格" 键) .esc .space .up .down .left .right .ctrl .alt .shift .meta
三、组件(Component)
1、定义
组件可以扩展 HTML 元素,封装可重用的代码。
例:
<div id="app">
    <mycomponent></mycomponent>
</div>

<script>
// 注册
Vue.component('mycomponent', {
  template: '<h1>自定义组件!</h1>'
})
// 创建根实例
new Vue({
  el: '#app'
})
</script>
以上<mycomponent>为全局可用,也可以在实例Vue时以components属性来实现局部属性
2、prop
prop 是父组件用来传递数据的一个自定义属性
例:
<child message="hello!"></child>
// 注册
Vue.component('child', {
  // 声明 props
  props: ['message'],
  // 同样也可以在 vm 实例中像 "this.message" 这样使用
  template: '<span>{{ message }}</span>'
})
// 创建根实例
new Vue({
  el: '#app'
})
prop 是一个对象而不是字符串数组时,它可包含验证要求
例:
props: {
    // 基础类型检测 (`null` 意思是任何类型都可以)
    propA: Number,
    // 多种类型
    propB: [String, Number],
    // 必传且是字符串
    propC: {
      type: String,
      required: true
    },
    // 数字,有默认值
    propD: {
      type: Number,
      default: 100
    },
    // 数组/对象的默认值应当由一个工厂函数返回
    propE: {
      type: Object,
      default: function () {
        return { message: 'hello' }
      }
    },
    // 自定义验证函数
    propF: {
      validator: function (value) {
        return value > 10
      }
    }
  }
type值有:String Number Boolean Function Object Array  (type 也可以是一个自定义构造器,使用 instanceof 检测)
3、组件之间通信
//vue原型链挂载总线
Vue.prototype.bus = new Vue();

//子组件发送数据
this.bus.$emit("change",data);

//子组件接收数据
this.bus.$on("change",function(data){
})
自定义事件写在methonds属性中
4、slot-scop 插槽(示例)
<!--组件内容-->
<template>
    <!--如果不指定name属性,则默认为default-->
    <slot name="action" v-bind:row="scope.row"></slot>
</template>
<!--调用方式-->
<template v-slot:action="{row}">
    <!--row这里接收参数处也可以不加花括号,但收到的参数会多包一层object-->
    <el-button size="small" @click="handleEdit2(row)">编辑2</el-button>
</template>
5、自定义指令
// 注册一个全局自定义指令 v-focus
Vue.directive('focus', {
  // 当绑定元素插入到 DOM 中。
  inserted: function (el) {
    // 聚焦元素
    el.focus()
  }
})
可以在实例使用 directives属性 选项来注册局部指令,这样指令只能在这个实例中使用
6、钩子
类似于TestNG中after,before之类功能的函数;
7、路由:router
Vue.js 路由需要载入 vue-router 库,路由允许我们通过不同的 URL 访问不同的内容。
路由传参 params 与 query两种方式的区别,query的参数类型于get请求会写到url上,params方式不会
this.$router.push({ name: 'testCase', params: {interfaceId : val.id}})
this.$router.push({path: 'scyProblemDetailHtml', query: {problemId: row.id}})
<router-link :to="{name: 'scyProblemDetail', params: preParams}">
参数接收:let interfaceId = this.$route.params.interfaceId;
(1)基础例子
<script src="https://unpkg.com/vue/dist/vue.js"></script>
<script src="https://unpkg.com/vue-router/dist/vue-router.js"></script>

<div id="app">
  <h1>Hello App!</h1>
  <p>
    <!-- 使用 router-link 组件来导航. -->
    <!-- 通过传入 `to` 属性指定链接. -->
    <!-- <router-link> 默认会被渲染成一个 `<a>` 标签 -->
    <router-link to="/foo">Go to Foo</router-link>
    <router-link to="/bar">Go to Bar</router-link>
  </p>
  <!-- 路由出口 -->
  <!-- 路由匹配到的组件将渲染在这里 -->
  <router-view></router-view>
</div>

// 0. 如果使用模块化机制编程,导入Vue和VueRouter,要调用 Vue.use(VueRouter)

// 1. 定义 (路由) 组件。
// 可以从其他文件 import 进来
const Foo = { template: '<div>foo</div>' }
const Bar = { template: '<div>bar</div>' }

// 2. 定义路由
// 每个路由应该映射一个组件。 其中"component" 可以是
// 通过 Vue.extend() 创建的组件构造器,
const routes = [
  { path: '/foo', component: Foo },
  { path: '/bar', component: Bar }
]

// 3. 创建 router 实例,然后传 `routes` 配置
const router = new VueRouter({
  routes // (缩写) 相当于 routes: routes
})

// 4. 创建和挂载根实例。
// 记得要通过 router 配置参数注入路由,
// 从而让整个应用都有路由功能
const app = new Vue({
  router
}).$mount('#app')

// Home.vue
export default {
  computed: {
    username() {
      // 通过注入路由器,我们可以在任何组件内通过 this.$router 访问路由器,也可以通过 this.$route 访问当前路由
      return this.$route.params.username
    }
  },
  methods: {
    goBack() {
      window.history.length > 1 ? this.$router.go(-1) : this.$router.push('/')
    }
  }
}
(2)动态路由
routes: [
    // 动态路径参数 以冒号开头
    { path: '/user/:id', component: User } ]
/user/foo 和 /user/bar 都将映射到相同的路由,而且会自动添加一个参数id到this.$route.params,对应的值就是'foo','bar';

模式    匹配路径    $route.params
/user/:username    /user/evan    { username: 'evan' }
/user/:username/post/:post_id    /user/evan/post/123    { username: 'evan', post_id: '123' }

history
router.replace()    功能和router.push()类似,但它不会向 history 添加新记录
router.go(n)        在 history 记录中向前或者后退多少步,正数是向前,负数向后

const router = new VueRouter({
  routes: [
    { path: '/a', redirect: '/b' },   //重定向
    { path: '/a', redirect: { name: 'foo' }},   //重定向
    { path: '/a', redirect: to => {
      // 方法接收 目标路由 作为参数
      // return 重定向的 字符串路径/路径对象
    }},
    { path: '/a', component: A, alias: '/b' }, //别名

  ]
})
四、其他
1、methods内方法调用this指向问题;
methods: {
            funA(){
                console.log(this.hello);
            },
            funB(){
                console.log(this.hello);
            },
            funC(that){
                console.log(that.hello);
            },
            fun(){
                //方式一
                this.funA();
                //方式二
                this.$options.methods.funB.bind(this)();
                //方式三
                var that = this;
                this.$options.methods.funC(that);
            }
        }
2、侦听watch
例
  data: {
    question: '',
    answer: 'I cannot give you an answer until you ask a question!'
  },
  watch: {
    // 如果 `question` 发生改变,这个函数就会运行
    question: function (newQuestion, oldQuestion) {
      this.answer = 'Waiting for you to stop typing...'
      this.debouncedGetAnswer()
    }
  }
3、API
相关实例属性
vm.$data === data // => true
vm.$el === document.getElementById('example') // => true
vm.$props
vm.$options
vm.$parent
vm.$root
vm.$children
vm.$slots
vm.$scopedSlots
vm.$refs
vm.$isServer
vm.$attrs
vm.$listeners
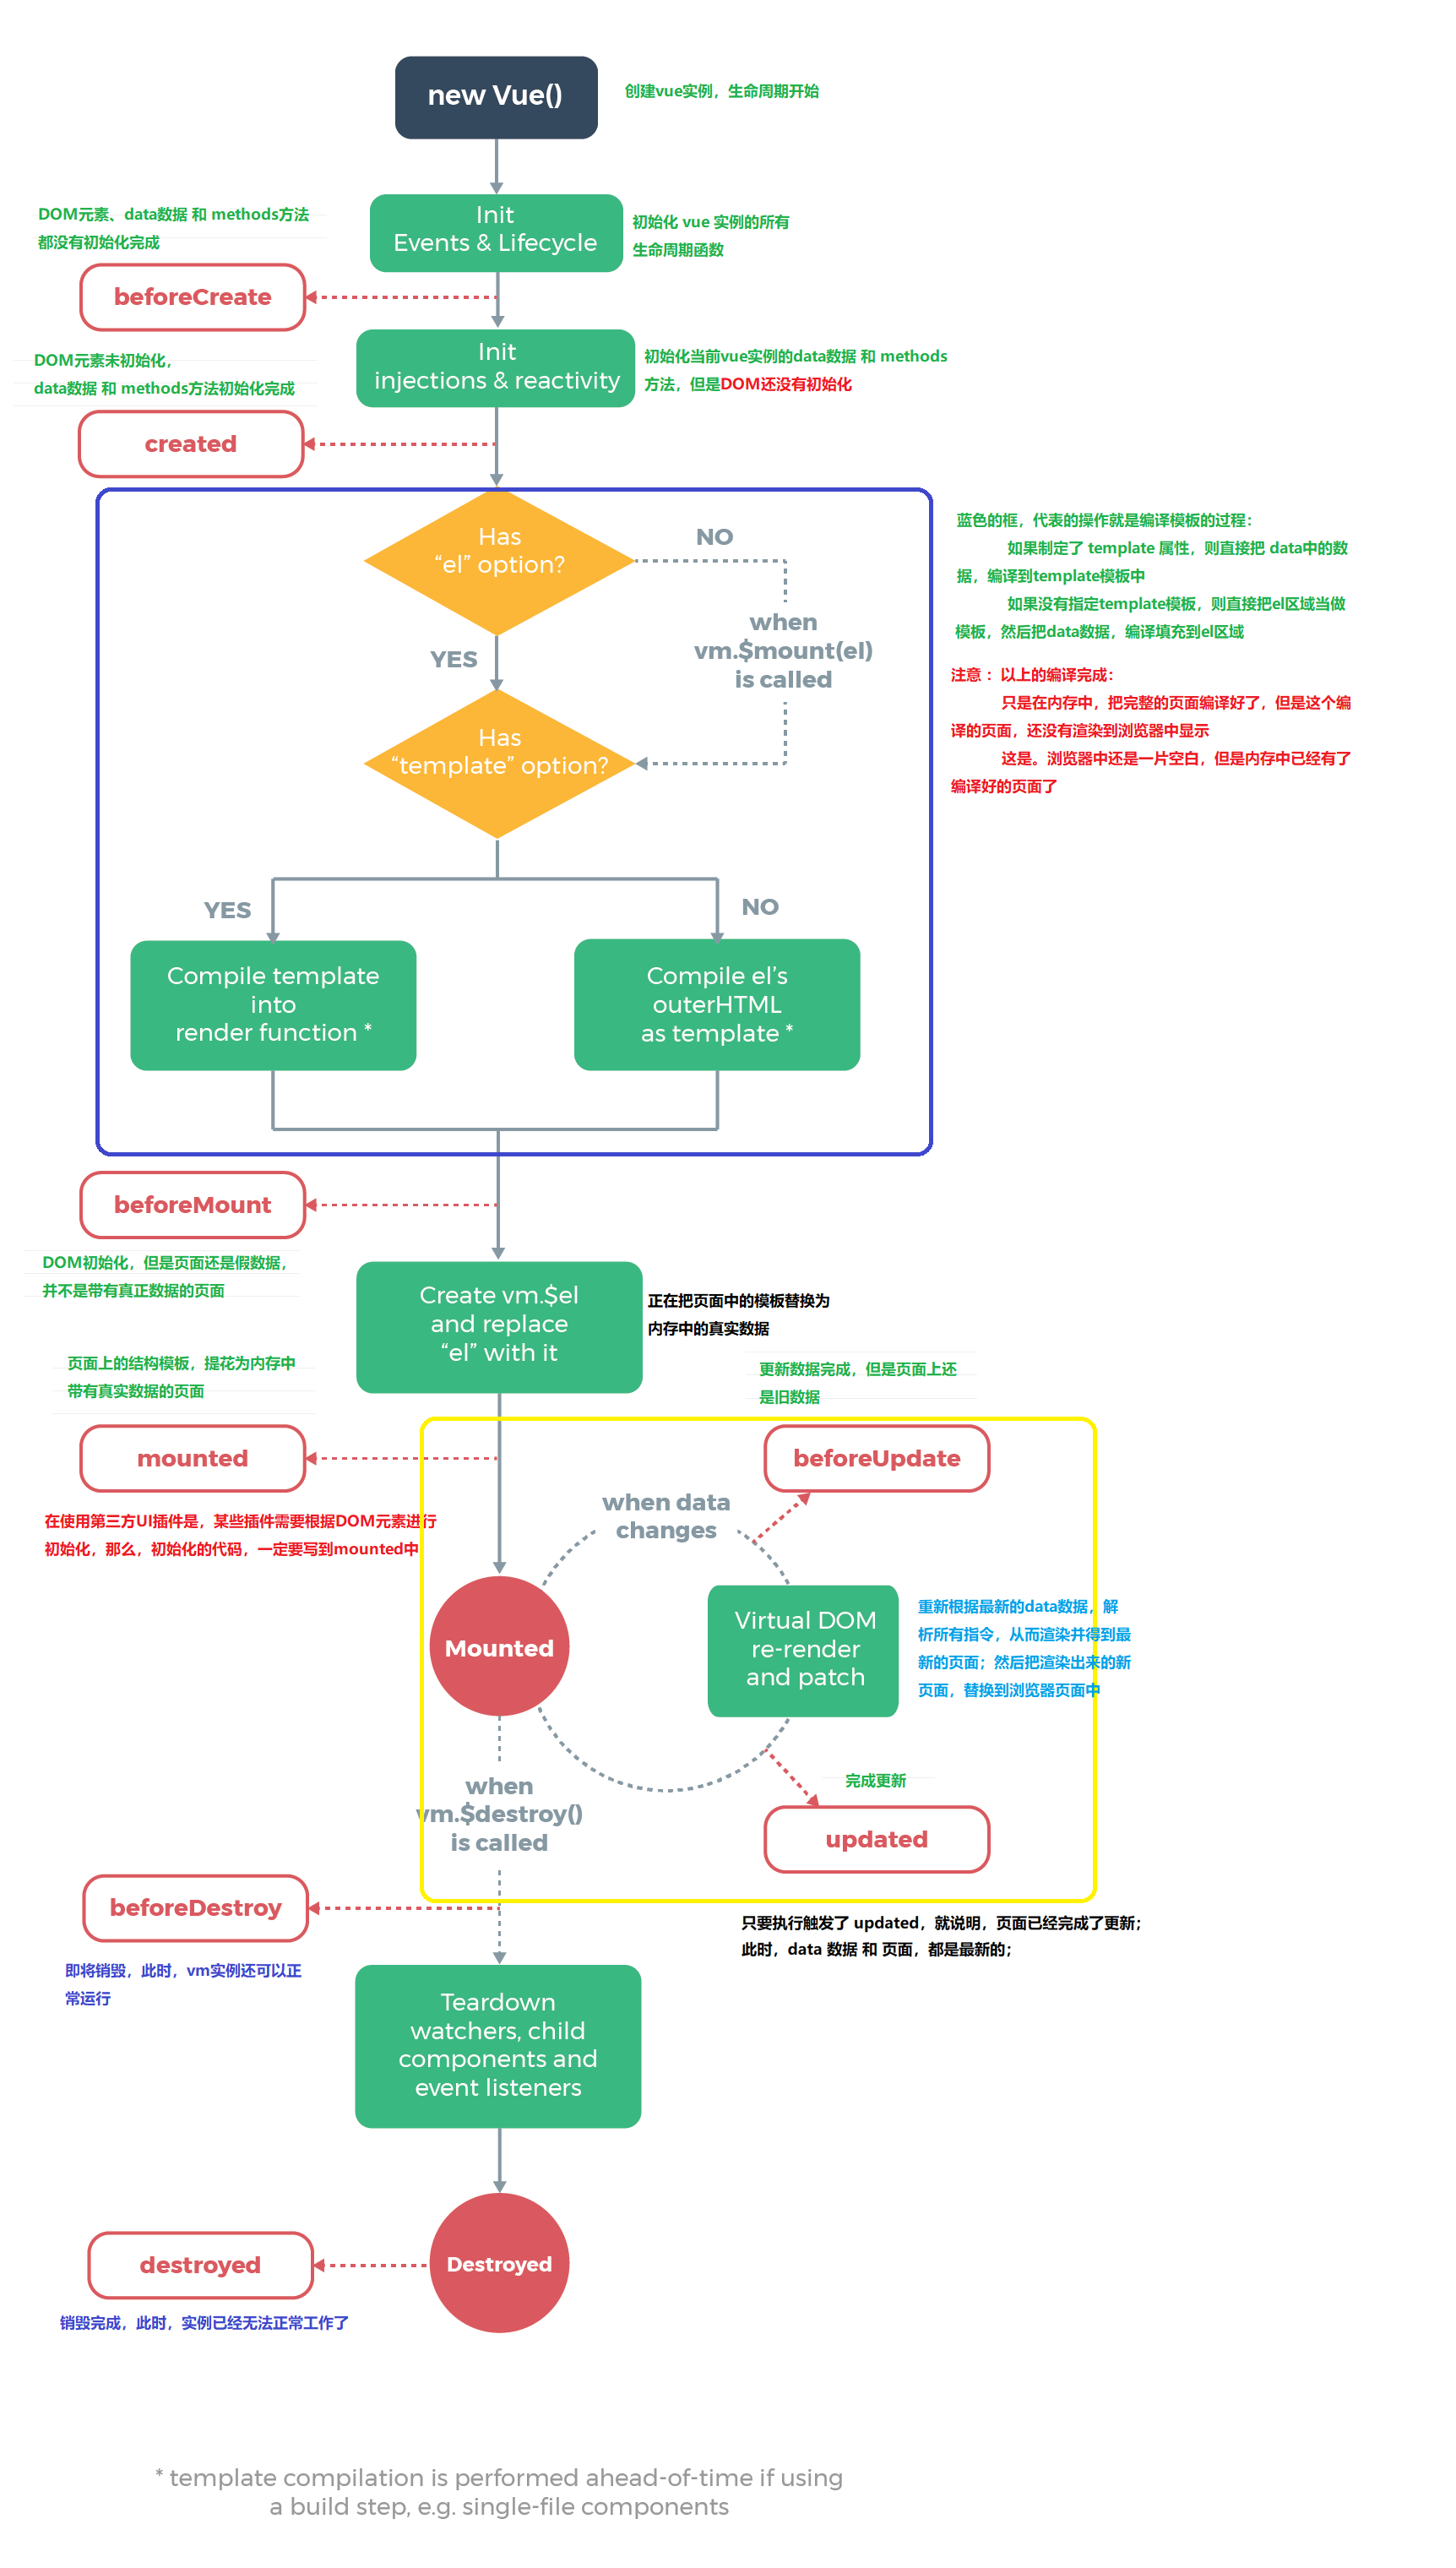
附:生命周期图
可参考文章: vue组件间通信六种方式

 浙公网安备 33010602011771号
