mysql数据库主从数据同步
1. 主从服务器安装配置mysql
# sudo apt-get install mysql-server
# sudo mysql_secure_installation

Securing the MySQL server deployment.

Connecting to MySQL using a blank password.

VALIDATE PASSWORD PLUGIN can be used to test passwords
and improve security. It checks the strength of password
and allows the users to set only those passwords which are
secure enough. Would you like to setup VALIDATE PASSWORD plugin?

Press y|Y for Yes, any other key for No: N
Please set the password for root here.(创建密码)

New password:

Re-enter new password:
By default, a MySQL installation has an anonymous user,
allowing anyone to log into MySQL without having to have
a user account created for them. This is intended only for
testing, and to make the installation go a bit smoother.
You should remove them before moving into a production
environment.

Remove anonymous users? (Press y|Y for Yes, any other key for No) : y(是否移除匿名用户)
Success.


Normally, root should only be allowed to connect from
'localhost'. This ensures that someone cannot guess at
the root password from the network.

Disallow root login remotely? (Press y|Y for Yes, any other key for No) : n(是否允许root远程登录)
Success.

By default, MySQL comes with a database named 'test' that
anyone can access. This is also intended only for testing,
and should be removed before moving into a production
environment.


Remove test database and access to it? (Press y|Y for Yes, any other key for No) : y(删除测试库)
 - Dropping test database...
Success.

 - Removing privileges on test database...
Success.

Reloading the privilege tables will ensure that all changes
made so far will take effect immediately.

Reload privilege tables now? (Press y|Y for Yes, any other key for No) : y(立即刷新数据库配置)
Success.

All done!

# sudo vi  /etc/mysql/mysql.conf.d/mysqld.cnf
  bind-address            = 0.0.0.0  (修改监听ip为自己指定的ip)
# sudo mysql -u root -p
mysql> grant all on *.* to root@'%' identified by '你的密码' with grant option; (*.*表示所有数据库,也可以指定数据库;root表示创建的用户;%表示所有主机都可以访问,也可以是具体ip;localhost表示只允许本地访问;密码是创建用户的密码)
mysql> flush privileges; # 刷新权限
mysql> exit
然后执行exit命令退出mysql服务,再执行如下命令重启mysql:
# sudo systemctl restart mysql
2. 配置主从数据库
如有需要最好先确保主从数据库服务器时间一致,可以使用NTP服务,slave数据库服务器自动同步master数据库服务器时间
(1)配置master数据库
登陆数据库
mysql> grant replication slave on *.* to 'sync_user'@'10.100.0.%' identified by '123123'; (主机上建立sync_user账户并赋权slave,用于连接master数据库)
mysql> flush privileges;
mysql>flush tables with read lock;       #  锁库,防止在配置从数据库的时候有人修改master数据库
mysql> exit;
配置mysql
# sudo vi /etc/mysql/mysql.conf.d/mysqld.cnf
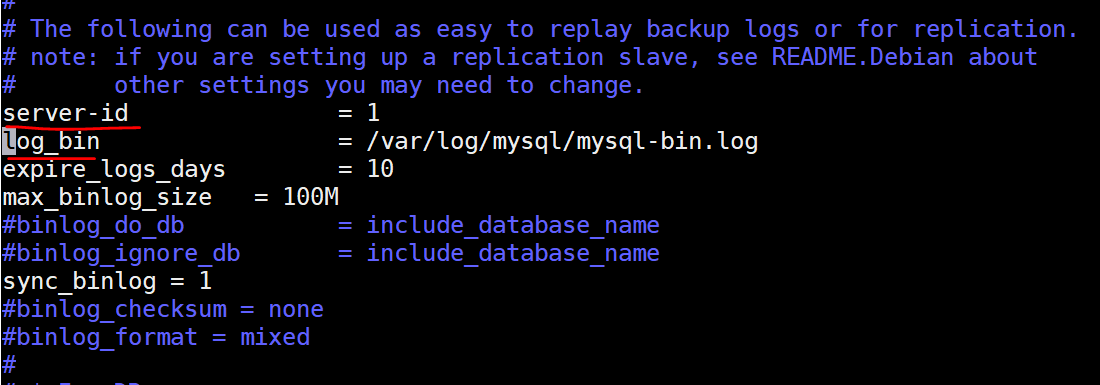
server-id=1 # 数据库唯一ID,主从的标识号绝对不能重复。 log-bin=/var/log/mysql/mysql-bin.log # 开启bin-log,并指定文件目录和文件名前缀 binlog-do-db= xxx # 需要同步xxx数据库。如果是多个同步库,就以此格式另写几行即可。如果不指明对某个具体库同步,就去掉此行,表示同步所有库(除了ignore忽略的库)。 binlog-ignore-db=mysql # 不同步mysql系统数据库。如果是多个不同步库,就以此格式另写几行;也可以在一行,中间逗号隔开。 replicate-do-db和replicate-ignore-db为互斥选项,只需要一个即可 sync_binlog = 1 # 确保binlog日志写入后与硬盘同步 binlog_checksum = none # 跳过现有的采用checksum的事件,mysql5.6.5以后的版本中binlog_checksum=crc32,而低版本都是binlog_checksum=none binlog_format = mixed # bin-log日志文件格式,设置为MIXED可以防止主键重复。温馨提示:在主服务器上最重要的二进制日志设置是sync_binlog,这使得mysql在每次提交事务的时候把二进制日志的内容同步到磁盘上,即使服务器崩溃也会把事件写入日志中。
sync_binlog 这个参数是对于MySQL系统来说是至关重要的,他不仅影响到Binlog对MySQL所带来的性能损耗,而且还影响到MySQL中数据的完整性。对于"sync_binlog"参数的各种设置的说明如下: sync_binlog=0,当事务提交之后,MySQL不做fsync之类的磁盘同步指令刷新binlog_cache中的信息到磁盘,而让Filesystem自行决定什么时候来做同步,或者cache满了之后才同步到磁盘。 sync_binlog=n,当每进行n次事务提交之后,MySQL将进行一次fsync之类的磁盘同步指令来将binlog_cache中的数据强制写入磁盘。- 在MySQL中系统默认的设置是sync_binlog=0,也就是不做任何强制性的磁盘刷新指令,这时候的性能是最好的,但是风险也是最大的。因为一旦系统Crash,在binlog_cache中的所有binlog信息都会被丢失。而当设置为“1”的时候,是最安全但是性能损耗最大的设置。因为当设置为1的时候,即使系统Crash,也最多丢失binlog_cache中未完成的一个事务,对实际数据没有任何实质性影响。
- 对于高并发事务的系统来说,“sync_binlog”设置为0和设置为1的系统写入性能差距可能高达5倍甚至更多
重启数据库服务
# systemctl restart mysql.service

mysql> show master status\G
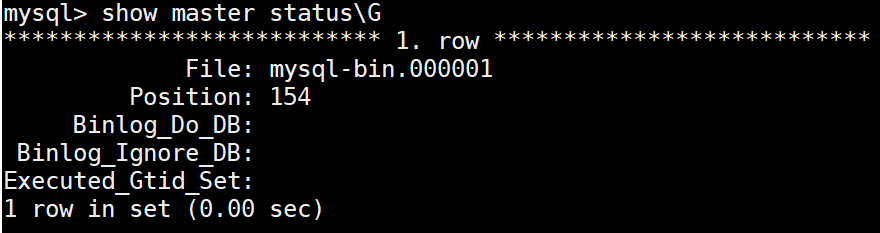
- 执行完此步骤后不要再操作主服务器MySQL,防止主服务器状态发生状态值变化
备份master数据库
# sudo mysqldump -uroot -p -A --events > backup.sql
拷贝到slave数据库等待导入
# sudo scp backup.sql root#10.100.0.147:/tmp/
(2)配置slave数据库
# sudo vi /etc/mysql/mysql.conf.d/mysqld.cnf
至少需要修改server-id = xx (xx为唯一值)
温馨提示:
slave-skip-errors = all# 跳过所有的错误,继续执行复制操作replicate-do-db=liting# 需要同步的数据库名。如果不指明同步哪些库,就去掉这行,表示所有库的同步(除了ignore忽略的库)replicate-ignore-db=mysql# 不同步test数据库
当只针对某些库的某张表进行同步时,如下,只同步liting库的haha表和test库的heihei表: replicate-do-db = liting
replicate-wild-do-table = liting.haha //当只同步几个或少数表时,可以这样设置。注意这要跟上面的库指定配合使用; replicate-do-db = test
replicate-wild-do-table = test.heihei //如果同步的库的表比较多时,就不能这样一一指定了,就把这个选项配置去掉,直接根据指定的库进行同步。
重启数据库服务
# sudo systemctl restart mysql.service
导入master备份数据库
# sudo mysql < /tmp/backup.sql

配置master DB
mysql> stop slave;
mysql> change master to master_host='10.100.0.249',master_port=3306,master_user='sync_user',master_password='123123',master_log_file='mysql-bin.000001',master_log_pos=154;
mysql> start slave;
mysql> show slave status\G
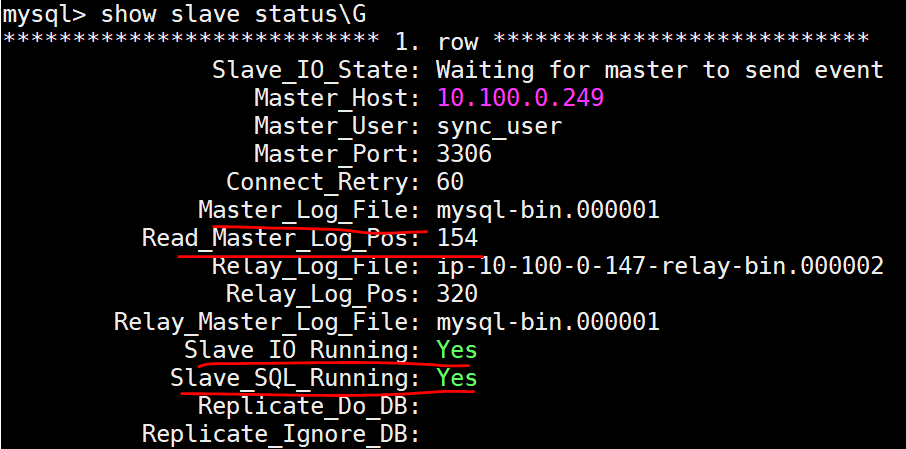
- Slave_IO_Running和Slave_SQL_Running都为yes,则表示同步成功
(3)登陆master数据库,解锁表
   mysql> unlock tables;
3. 测试和同步效果
登陆master数据库:
create database test;
mysql> create table people(
    -> user_id int unsigned auto_increment,
    -> user_name varchar(25) NOT NULL,
    -> age int ,
    -> primary key (user_id)
    -> );
mysql> insert into people(user_name,age) values('john',20);

登陆从数据库检查数据是否被同步:
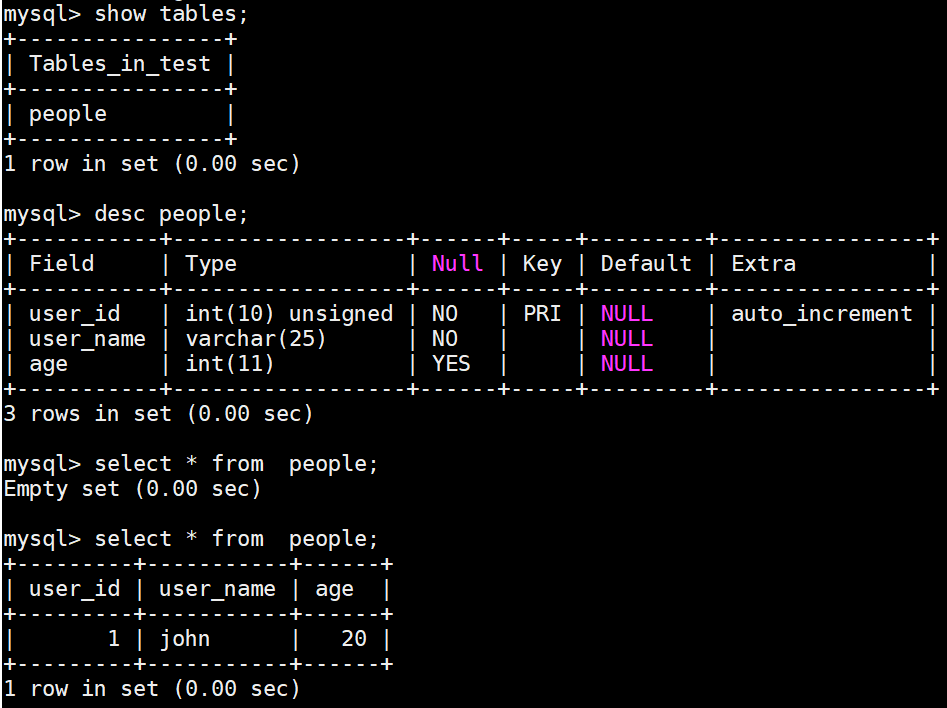
数据已被写入,同步正常。
若在主从同步的过程中,出现其中一条语句同步失败报错了,则后面的语句也不能同步成功了。例如,主库有一条数据,而从库并没有这一条数据,然而,在主库执行了更新操作,那么从库没有这么一条数据,从而报错了。在此时的从数据库的数据同步就失败了,因此后面的同步语句就无法继续执行。
# 在从数据库中,使用SET全局sql_slave_skip_counter来跳过事件,跳过这一个错误,然后执行从下一个事件组开始
mysql> stop slave;
mysql> set global sql_slave_skip_counter=1;
mysql> start slave;

 浙公网安备 33010602011771号