k8s部署zk集群
k8s 部署zk 集群
1. 环境介绍
使用helm 进行部署zookeeper:3.7
2. zk集群部署
helm repo add bitnami https://charts.bitnami.com/bitnami
3.创建zk集群
#首先使用fetch进行拉取chart
 helm fetch  bitnami/zookeeper

#将拉取下zk的压缩包进行解压
  tar   xf  zookeeper-6.7.1.tgz

#修改values.yaml部分字段
replicaCount: 3  #副本数为3
accessModes:
    - ReadWriteOnce
  size: 10Gi  #根据自己情况设定不能小于10G

serviceMonitor: #开启prometheus
    enabled: true
    namespace:zk

resources: #对pod进行资源限制
  requests:
    memory: 1Gi
    cpu: "1"
  limits:
    memory: 2Gi
    cpu: "1.5"

helm install   zk  bitnami/zookeeper -f values.yaml  -n zk #安装zk集群
4.查看pod
[root@baozexu tmp]# kubectl get pods -n zk
NAME   READY   STATUS    RESTARTS   AGE
zk-zookeeper-0    1/1     Running   0          3h36m
zk-zookeeper-1   1/1     Running   0          3h35m
zk-zookeeper-2     Running   0          3h35m
5.查看pvc
[root@baozexu tmp]# kubectl get pvc -n zk
NAME      STATUS   VOLUME                                     CAPACITY   ACCESS MODES   STORAGECLASS   AGE
zk-zk-0   Bound    pvc-bc74640f-5adb-46e6-ab48-c79f99f7a559   10Gi       RWO            cbs            4h5m
zk-zk-1   Bound    pvc-14f47244-6e7d-480b-8db6-a834ac0b8ea1   10Gi       RWO            cbs            4h4m
zk-zk-2   Bound    zk-zk-2                                    10Gi       RWO            cbs            66m
6.查看zk配置
[root@baozexu zookeeper]# kubectl exec -n zk  zk-zookeeper-0  -- cat /opt/bitnami/zookeeper/conf/zoo.cfg
# The number of milliseconds of each tick
tickTime=2000
# The number of ticks that the initial
# synchronization phase can take
initLimit=10
# The number of ticks that can pass between
# sending a request and getting an acknowledgement
syncLimit=5
# the directory where the snapshot is stored.
# do not use /tmp for storage, /tmp here is just
# example sakes.
dataDir=/bitnami/zookeeper/data
# the port at which the clients will connect
clientPort=2181
# the maximum number of client connections.
# increase this if you need to handle more clients
maxClientCnxns=60
#
# Be sure to read the maintenance section of the
# administrator guide before turning on autopurge.
#
# http://zookeeper.apache.org/doc/current/zookeeperAdmin.html#sc_maintenance
#
# The number of snapshots to retain in dataDir
autopurge.snapRetainCount=3
# Purge task interval in hours
# Set to "0" to disable auto purge feature
autopurge.purgeInterval=0

## Metrics Providers
#
# https://prometheus.io Metrics Exporter
#metricsProvider.className=org.apache.zookeeper.metrics.prometheus.PrometheusMetricsProvider
#metricsProvider.httpPort=7000
#metricsProvider.exportJvmInfo=true
maxCnxns=0
reconfigEnabled=false
quorumListenOnAllIPs=false
4lw.commands.whitelist=srvr, mntr, ruok
maxSessionTimeout=40000
server.1=zk-zookeeper-0.zk-zookeeper-headless.zk.svc.cluster.local:2888:3888;2181
server.2=zk-zookeeper-1.zk-zookeeper-headless.zk.svc.cluster.local:2888:3888;2181
server.3=zk-zookeeper-2.zk-zookeeper-headless.zk.svc.cluster.local:2888:3888;2181
7.查看集群状态
[root@baozexu tmp]# kubectl exec -n zk  zk-zookeeper-0 zkServer.sh  status
kubectl exec [POD] [COMMAND] is DEPRECATED and will be removed in a future version. Use kubectl exec [POD] -- [COMMAND] instead.
ZooKeeper JMX enabled by default
Using config: /usr/bin/../etc/zookeeper/zoo.cfg
Mode: follower
[root@baozexu tmp]# kubectl exec -n zk  zk-zookeeper-1  zkServer.sh  status
kubectl exec [POD] [COMMAND] is DEPRECATED and will be removed in a future version. Use kubectl exec [POD] -- [COMMAND] instead.
ZooKeeper JMX enabled by default
Using config: /usr/bin/../etc/zookeeper/zoo.cfg
Mode: leader
[root@baozexu tmp]# kubectl exec -n zk zk-zookeeper-2  zkServer.sh  status
kubectl exec [POD] [COMMAND] is DEPRECATED and will be removed in a future version. Use kubectl exec [POD] -- [COMMAND] instead.
ZooKeeper JMX enabled by default
Using config: /usr/bin/../etc/zookeeper/zoo.cfg
Mode: follower
8. zk 日志清理
- 自动清理
#在zoo.cfg 进行配置
autopurge.snapRetainCount=60
autopurge.purgeInterval=48
# 指定每隔48小时清理一次zookeeper事务日志,防止事务日志过多占用空间,清理后保留最近60份
2 .手动清理
zkCleanup.sh -n 60 清理后保留最近60份

#直接-n 指定保留的文件数即可,不需要指定目录,因为配置文件中已经写了
9.zk 备份
注意该备份工具不支持权限认证
git clone https://github.com/boundary/zoocreeper.git
- 将项目clone 下来之后进行maven 编译
mvn clean package
- 、要查看创建备份的可用选项
$ java -jar target/zoocreeper-1.0-SNAPSHOT.jar --help
- 要查看还原备份的可用选项,请运行:
$ java -cp target/zoocreeper-1.0-SNAPSHOT.jar \
    com.boundary.zoocreeper.Restore --help
示例:
./zoocreeper dump -z 127.0.0.1 > dumpfile.json # 备份
$ cat dumpfile.json | ./zoocreeper load -z 127.0.0.1 #恢复
由于命令备份太过简单 写了shell脚本 进行封装
备份
#!/bin/bash
Date=$(date +%F-%H-%M)
Dest=/backup
IP=10.7.255.222
Path=/root/zoocreeper
[ -d  $Dest/ ] || mkdir -p $Dest/
sh $Path/zoocreeper dump -z  $IP   > $Dest/zk_backup_${Date}.json
恢复
#!/bin/bash
Dest=/backup
Path=/root/zoocreeper
read -p  "【是否进行恢复[Y/N]】" Action
case  $Action in
Y)
read -p  "【请输入zk的链接地址】" IP
read -p  "【请输入备份数据的日期 示例:2021-04-23-19-22】" Date
cd $Dest/  \
if [  ! -f zk_backup_${Date}.json ];then
echo "备份文件不存在"
else
cat zk_backup_${Date}.json | sh $Path/zoocreeper load -z $IP
fi
;;
N)
exit 1
esac
9. 监控
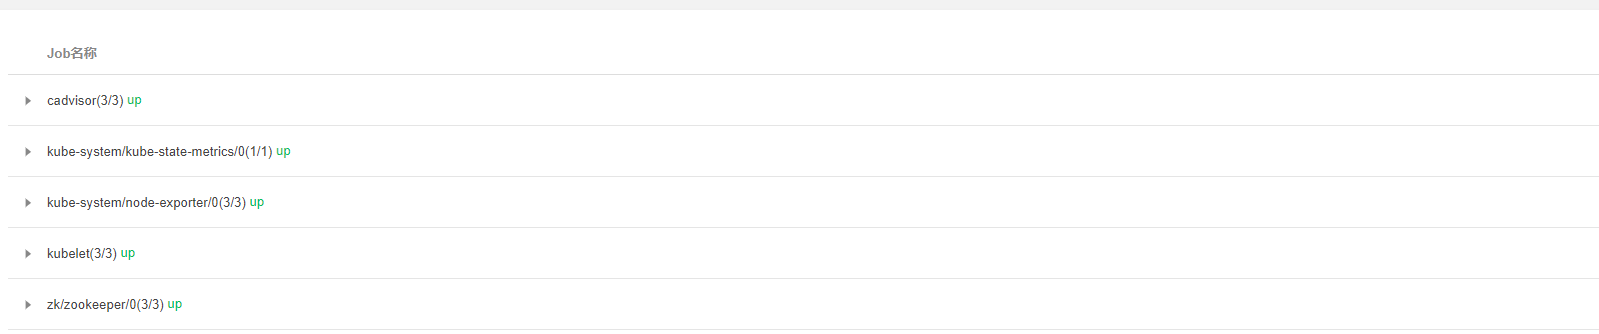
# 查看servicemonitor 是否存在
kubectl get servicemonitor -n zk
查看指标是否采集成功
开启grafana 外网访问
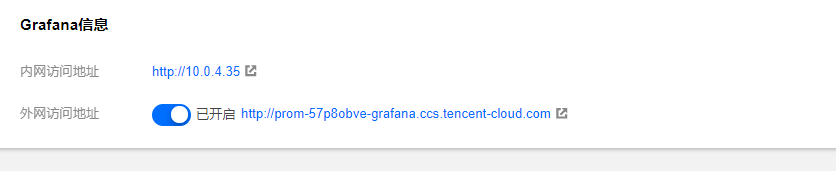
导入dashboard( https://grafana.com )

10.zk压测
https://github.com/brownsys/zookeeper-benchmark.git
生成和使用说明
#进行maven 编译
mvn -DZooKeeperVersion= package
#修改 benchmark.conf 配置文件
totalTime=300000 #压测时间
totalOperations=200000 #并发连接数
sync=false #同步/异步
server.1=10.7.255.222:2181 #zk的连接地址
#使用配置文件运行压力测试:
java -cp target/lib/*:target/* edu.brown.cs.zkbenchmark.ZooKeeperBenchmark --conf benchmark.conf
以下截图来自grafana
测试条件:
环境为k8s部署的3个pod
分别持续5分钟,操作数为20万,以下是压测结果


 浙公网安备 33010602011771号