

Netty并发连接测试(Docker版)
Netty代码
pom.xml
<project xmlns="http://maven.apache.org/POM/4.0.0"
         xmlns:xsi="http://www.w3.org/2001/XMLSchema-instance"
         xsi:schemaLocation="http://maven.apache.org/POM/4.0.0
                             http://maven.apache.org/xsd/maven-4.0.0.xsd">
    <modelVersion>4.0.0</modelVersion>

    <groupId>com.example</groupId>
    <artifactId>netty-stress-test</artifactId>
    <version>1.0-SNAPSHOT</version>

    <dependencies>
        <!-- netty -->
        <dependency>
            <groupId>io.netty</groupId>
            <artifactId>netty-all</artifactId>
            <version>4.1.100.Final</version>
        </dependency>
        <!--使用epoll-->
        <dependency>
            <groupId>io.netty</groupId>
            <artifactId>netty-transport-native-epoll</artifactId>
            <version>4.1.107.Final</version> <!-- 版本与 netty-core 保持一致 -->
            <classifier>linux-x86_64</classifier>
            <scope>runtime</scope> <!-- 原生依赖建议用 runtime -->
        </dependency>
    </dependencies>

    <build>
        <plugins>
            <!-- 编译插件,指定 Java 版本 -->
            <plugin>
                <artifactId>maven-compiler-plugin</artifactId>
                <version>3.8.1</version>
                <configuration>
                    <source>1.8</source>
                    <target>1.8</target>
                </configuration>
            </plugin>
            <!-- 打包出一个 包含所有依赖的胖 jar 包(jar-with-dependencies)-->
            <plugin>
                <artifactId>maven-assembly-plugin</artifactId>
                <version>3.3.0</version>
                <configuration>
                    <!-- 可以直接 java -jar 启动,无需再配类路径(classpath)-->
                    <archive>
                        <manifest>
                            <mainClass>com.example.NettyServerTest</mainClass> <!-- 或改为 NettyClientStressTest -->
                        </manifest>
                    </archive>
                    <descriptorRefs>
                        <descriptorRef>jar-with-dependencies</descriptorRef>
                    </descriptorRefs>
                </configuration>
                <executions>
                    <execution>
                        <id>make-assembly</id>
                        <phase>package</phase>
                        <goals>
                            <goal>single</goal>
                        </goals>
                    </execution>
                </executions>
            </plugin>
        </plugins>
    </build>
</project>
服务端
package org.autumn;
import io.netty.bootstrap.ServerBootstrap;
import io.netty.channel.*;
import io.netty.channel.epoll.EpollEventLoopGroup;
import io.netty.channel.epoll.EpollServerSocketChannel;
import io.netty.channel.nio.NioEventLoopGroup;
import io.netty.channel.socket.SocketChannel;
import io.netty.channel.socket.nio.NioServerSocketChannel;
import io.netty.buffer.ByteBuf;
import io.netty.util.CharsetUtil;
import java.util.concurrent.ConcurrentHashMap;
import java.util.concurrent.atomic.AtomicInteger;

public class NettyServerTest {

    private static final int PORT = 9000;
    private static final AtomicInteger connectionCount = new AtomicInteger(0);
    private static final ConcurrentHashMap<String, AtomicInteger> successCountMap = new ConcurrentHashMap<>();
    private static final ConcurrentHashMap<String, AtomicInteger> failCountMap = new ConcurrentHashMap<>();

    public static void main(String[] args) throws InterruptedException {

        System.out.println("Max FDs: " + java.lang.management.ManagementFactory.getOperatingSystemMXBean());
        System.out.println("sun.nio.ch.maxUpdateArraySize:" + System.getProperty("sun.nio.ch.maxUpdateArraySize"));
//        EventLoopGroup bossGroup = new NioEventLoopGroup(1);
//        EventLoopGroup workerGroup = new NioEventLoopGroup();
        //Linux使用epoll
        EventLoopGroup bossGroup = new EpollEventLoopGroup(4);
        EventLoopGroup workerGroup = new EpollEventLoopGroup(8);
        try {
            ServerBootstrap b = new ServerBootstrap();
            b.group(bossGroup, workerGroup)
                    // 使用EpollServerSocketChannel代替NioServerSocketChannel
                    //.channel(NioServerSocketChannel.class)
                    .channel(EpollServerSocketChannel.class)
                    .option(ChannelOption.SO_BACKLOG, 65536)
                    .childOption(ChannelOption.SO_KEEPALIVE, true)
                    .childHandler(new ChannelInitializer<SocketChannel>() {
                        @Override
                        protected void initChannel(SocketChannel ch) throws Exception {
                            connectionCount.incrementAndGet();
                            System.out.println("[连接建立] 当前连接数:" + connectionCount.get());

                            ch.closeFuture().addListener((ChannelFutureListener) future -> {
                                connectionCount.decrementAndGet();
                                System.out.println("[连接断开] 当前连接数:" + connectionCount.get());
                            });

                            ch.pipeline().addLast(new SimpleChannelInboundHandler<ByteBuf>() {
                                @Override
                                protected void channelRead0(ChannelHandlerContext ctx, ByteBuf msg) {
                                    String received = msg.toString(CharsetUtil.UTF_8);
                                    String ip = ctx.channel().remoteAddress().toString();

                                    if (received.contains("success")) {
                                        successCountMap.computeIfAbsent(ip, k -> new AtomicInteger()).incrementAndGet();
                                    } else {
                                        failCountMap.computeIfAbsent(ip, k -> new AtomicInteger()).incrementAndGet();
                                    }
                                }

                                @Override
                                public void exceptionCaught(ChannelHandlerContext ctx, Throwable cause) {
                                    String ip = ctx.channel().remoteAddress().toString();
                                    failCountMap.computeIfAbsent(ip, k -> new AtomicInteger()).incrementAndGet();
                                    System.err.println("[异常] " + ip + " -> " + cause.getMessage());
                                    ctx.close();
                                }
                            });
                        }
                    });

            ChannelFuture f = b.bind(PORT).sync();
            System.out.println("[Netty服务端] 启动成功,监听端口: " + PORT);

            // 启动一个线程定时打印每个IP的统计信息
            new Thread(() -> {
                while (true) {
                    try {
                        Thread.sleep(10000);
                        System.out.println("========== 每个 IP 的成功/失败统计 ==========");
                        for (String ip : successCountMap.keySet()) {
                            int success = successCountMap.get(ip).get();
                            int fail = failCountMap.getOrDefault(ip, new AtomicInteger(0)).get();
                            System.out.println(ip + " -> 成功: " + success + ", 失败: " + fail);
                        }
                    } catch (InterruptedException e) {
                        Thread.currentThread().interrupt();
                        break;
                    }
                }
            }).start();

            f.channel().closeFuture().sync();
        } finally {
            bossGroup.shutdownGracefully();
            workerGroup.shutdownGracefully();
        }
    }
}
客户端
package org.autumn;

import io.netty.bootstrap.Bootstrap;
import io.netty.channel.*;
import io.netty.channel.nio.NioEventLoopGroup;
import io.netty.channel.socket.SocketChannel;
import io.netty.channel.socket.nio.NioSocketChannel;
import io.netty.buffer.Unpooled;
import io.netty.util.CharsetUtil;

import java.net.InetSocketAddress;
import java.util.List;
import java.util.concurrent.*;

public class NettyClientStressTest {

    // 服务端的IP地址
    // 192.168.2.126
    // 127.0.0.1
    private static final String HOST = "192.168.2.126";
    // 服务端监听的端口号,客户端会连接这个端口
    private static final int PORT = 9000;

    // 客户端总数,一共要模拟这么多个客户端去连接服务端(如同放出1万个“网络机器人”)
    private static final int TOTAL_CLIENTS = 15000;

    // 每批启动的客户端数量(相当于一波发射1万个“客户端弹头”)
    private static final int BATCH_SIZE = 5000;

    // 每个客户端发送一次消息的间隔(单位:毫秒),用于控制发送节奏,防止一窝蜂打爆服务器
    private static final int SEND_INTERVAL_MS = 10000;

    // 共享的EventLoopGroup,线程数根据CPU核心数调节
    private static final EventLoopGroup group = new NioEventLoopGroup(Runtime.getRuntime().availableProcessors());

    // 共享定时任务线程池,用于发送消息
    private static final ScheduledExecutorService scheduler = Executors.newScheduledThreadPool(4);

    // 保存所有活跃channel,统一管理
    private static final List<Channel> channels = new CopyOnWriteArrayList<>();

    public static void main(String[] args) throws InterruptedException {
        int batchCount = TOTAL_CLIENTS / BATCH_SIZE;
        ExecutorService clientStarterPool = Executors.newFixedThreadPool(20); // 限制并发启动客户端线程数

        for (int i = 0; i < batchCount; i++) {
            System.out.println("启动第 " + (i + 1) + " 批客户端...");
            CountDownLatch latch = new CountDownLatch(BATCH_SIZE);

            for (int j = 0; j < BATCH_SIZE; j++) {
                clientStarterPool.execute(() -> {
                    startClient(latch);
                });
            }

            latch.await(); // 等待当前批全部启动完成
            System.out.println("第 " + (i + 1) + " 批客户端启动完成。");

            Thread.sleep(3000); // 批间隔,避免瞬时压力过大
        }

        System.out.println("所有客户端启动完成,开始定时发送消息...");

        // 定时发送任务:遍历所有channel,发送消息
        scheduler.scheduleAtFixedRate(() -> {
            for (Channel ch : channels) {
                if (ch.isActive()) {
                    ch.writeAndFlush(Unpooled.copiedBuffer("success", CharsetUtil.UTF_8));
                }
            }
        }, 0, SEND_INTERVAL_MS, TimeUnit.MILLISECONDS);
    }

    private static void startClient(CountDownLatch latch) {
        try {
            Bootstrap bootstrap = new Bootstrap();
            bootstrap.group(group)
                    .channel(NioSocketChannel.class)
                    .option(ChannelOption.TCP_NODELAY, true)
                    .handler(new ChannelInitializer<SocketChannel>() {
                        @Override
                        protected void initChannel(SocketChannel ch) {
                            ch.pipeline().addLast(new SimpleChannelInboundHandler<Object>() {
                                @Override
                                protected void channelRead0(ChannelHandlerContext ctx, Object msg) {
                                    // 忽略服务端返回
                                }

                                @Override
                                public void exceptionCaught(ChannelHandlerContext ctx, Throwable cause) {
                                    cause.printStackTrace();
                                    ctx.close();
                                }
                            });
                        }
                    });

            ChannelFuture future = bootstrap.connect(new InetSocketAddress(HOST, PORT)).sync();
            Channel channel = future.channel();
            channels.add(channel);
        } catch (Exception e) {
            e.printStackTrace();
        } finally {
            latch.countDown();
        }
    }
}
打包为jar文件
netty-stress-test-1.0-SNAPSHOT-jar-with-dependencies.jar
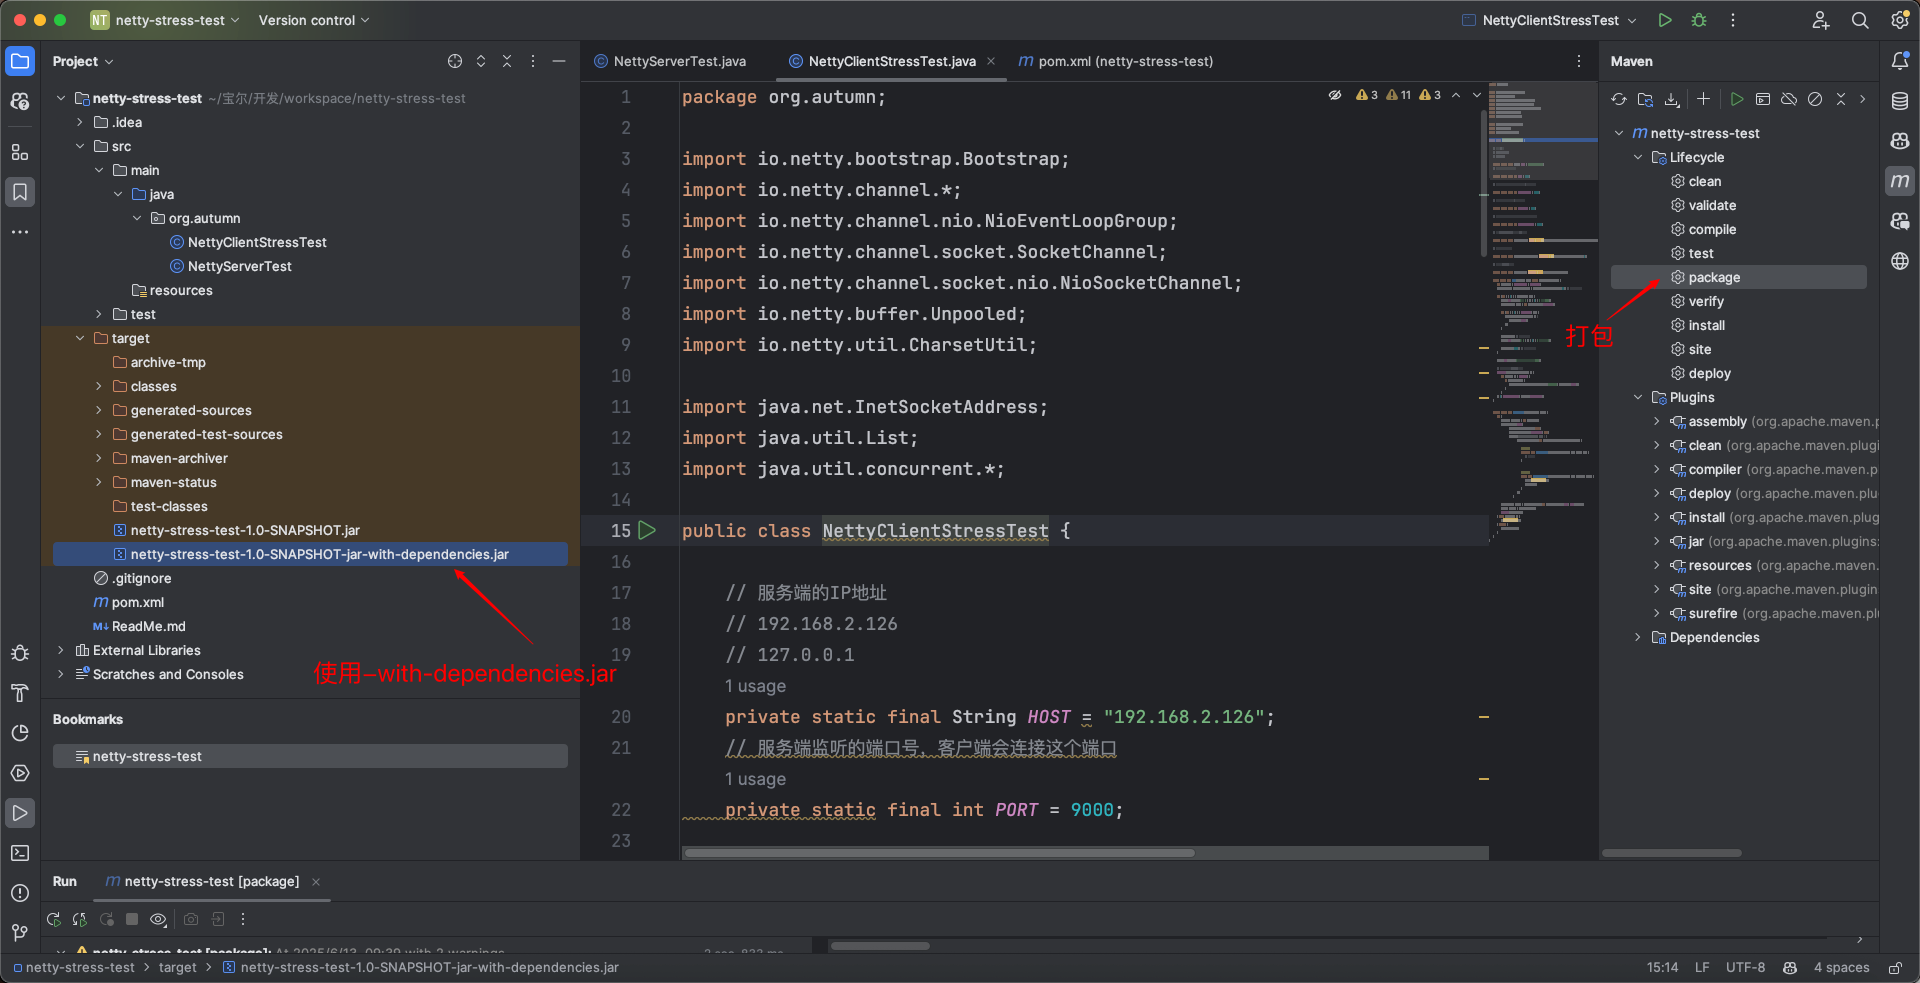
本地启动jar包命令
#启动服务端
java -cp netty-stress-test-1.0-SNAPSHOT-jar-with-dependencies.jar org.autumn.NettyServerTest
#启动客户端
java -cp netty-stress-test-1.0-SNAPSHOT-jar-with-dependencies.jar org.autumn.NettyClientStressTest
docker文件
docker init
选择docker服务
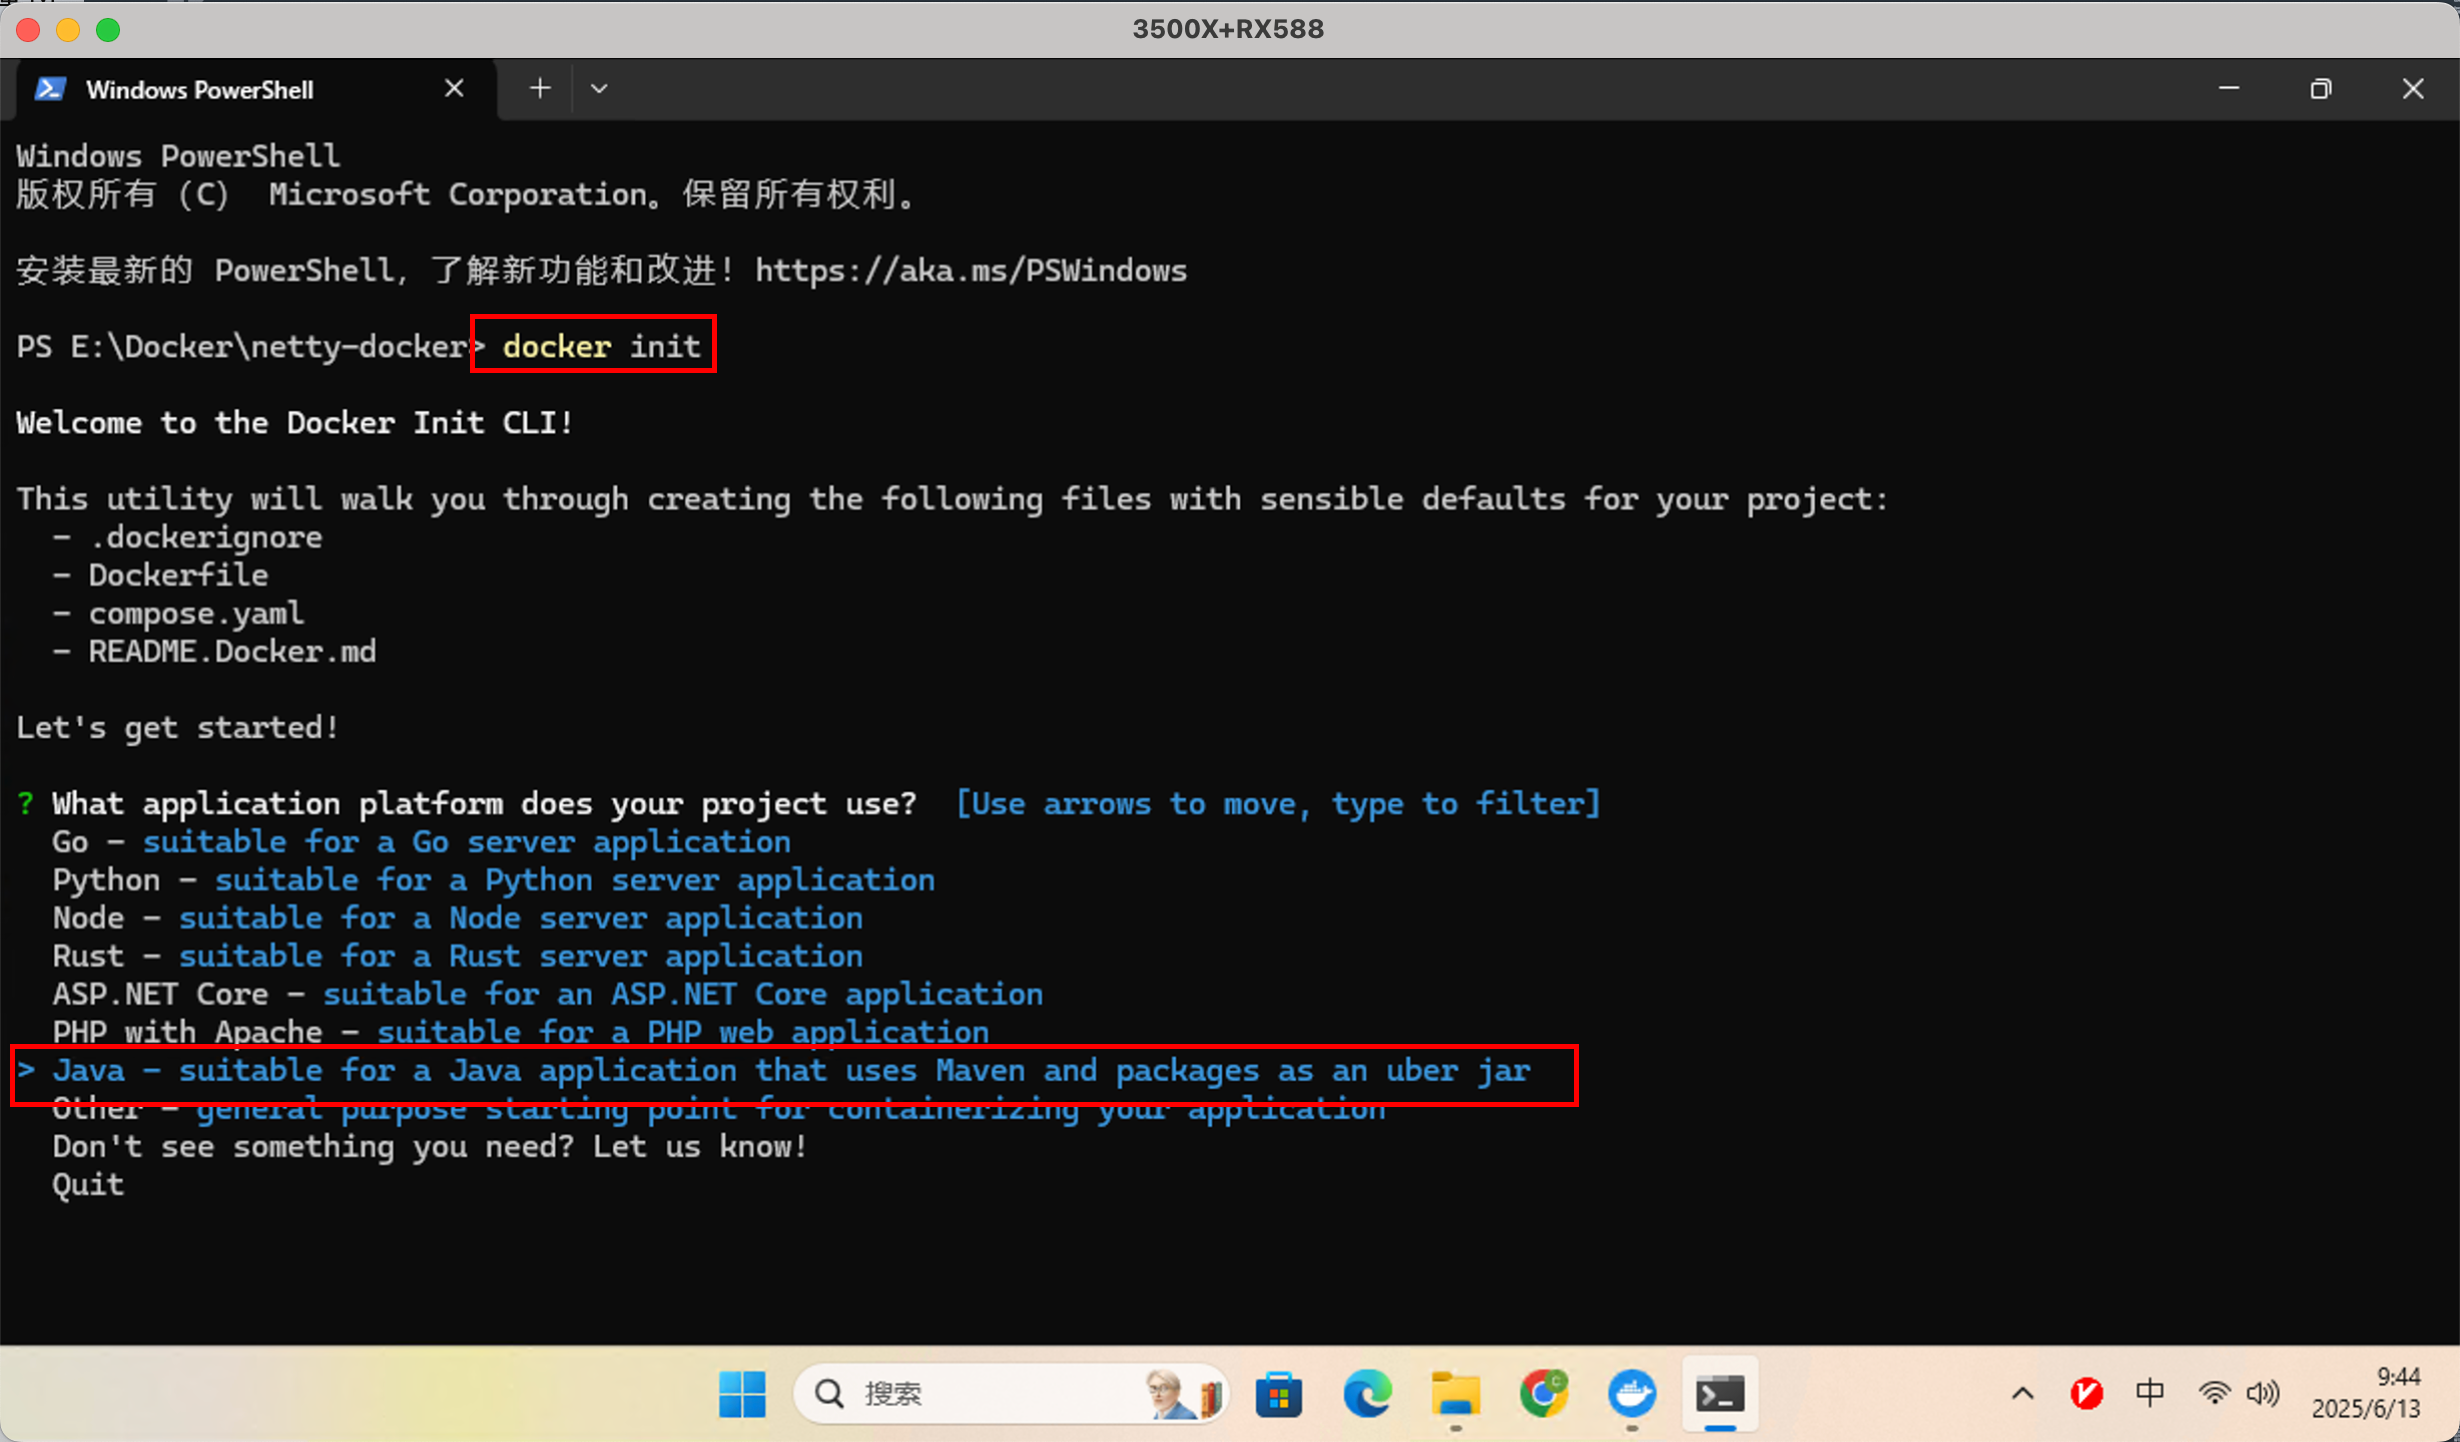
设置其他默认参数
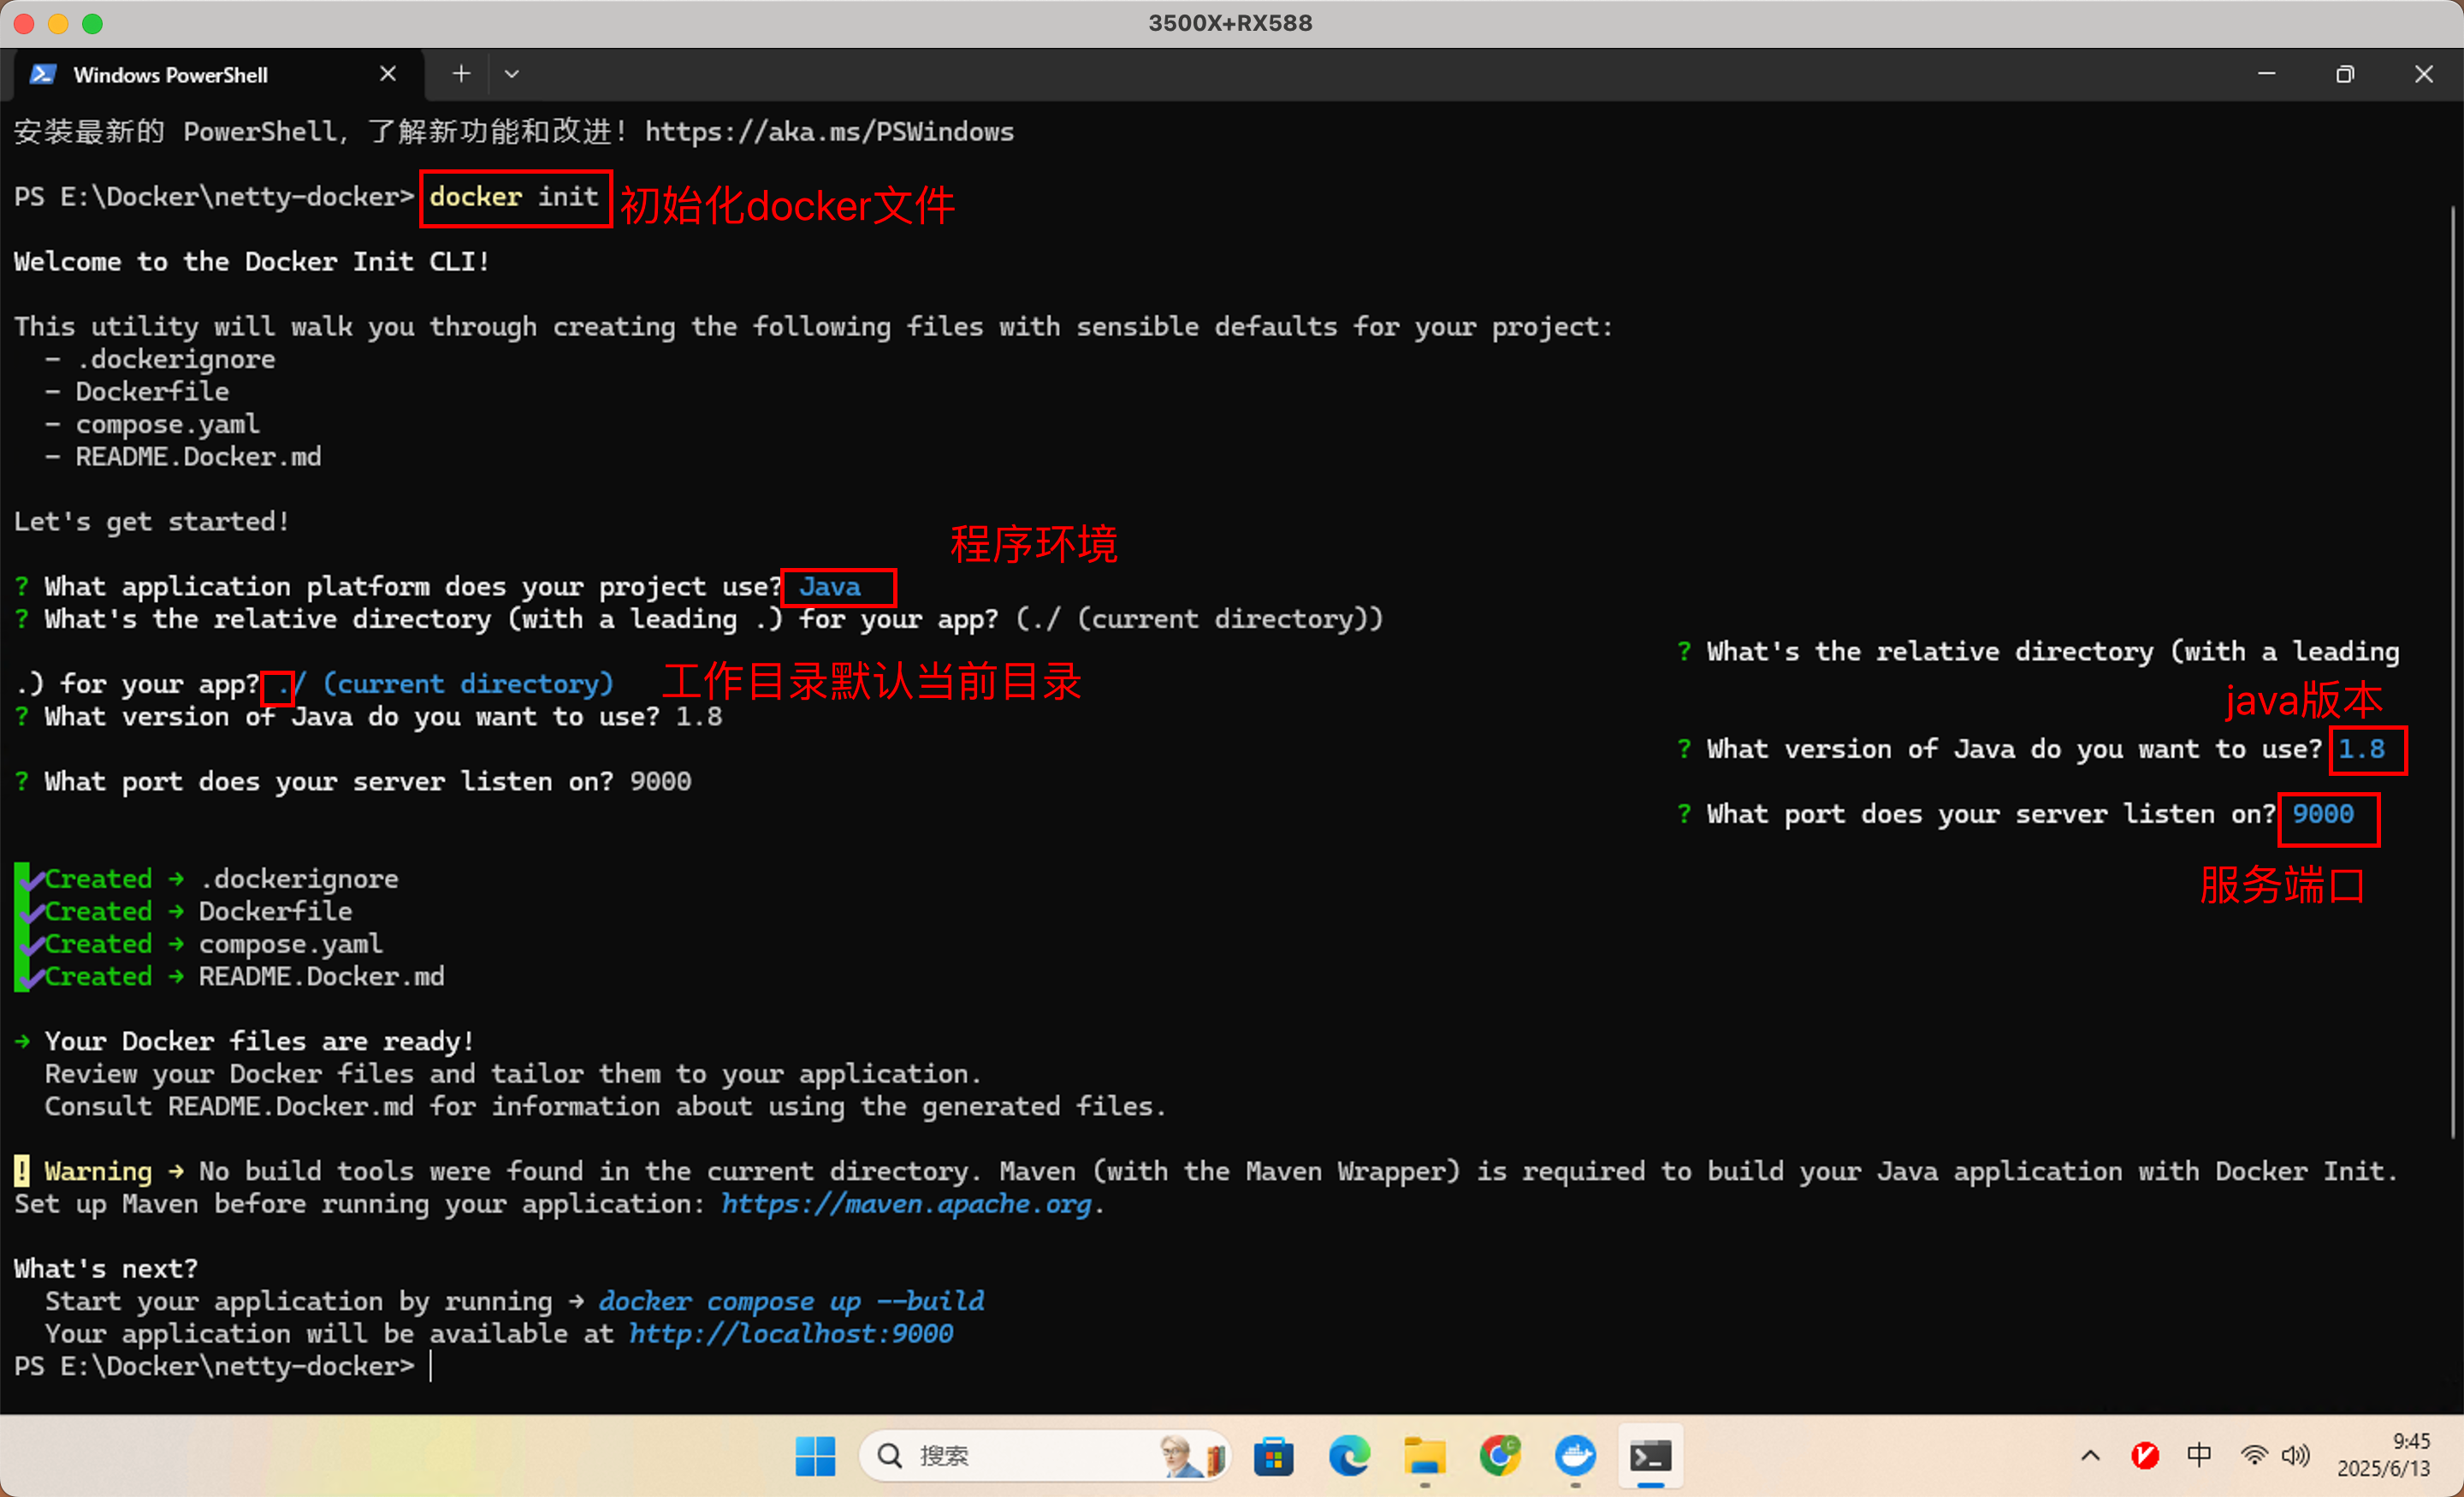
初始化文件如下

修改dockerfile文件
复制jar包到dockerfile同级目录
FROM centos:7

# 替换为阿里云镜像源
RUN curl -o /etc/yum.repos.d/CentOS-Base.repo http://mirrors.aliyun.com/repo/Centos-7.repo && \
    yum clean all && \
    yum makecache

# 安装 openjdk 1.8 + wget + unzip + glibc-common(中文支持)
RUN yum install -y java-1.8.0-openjdk wget unzip glibc-common && \
    yum clean all

# 设置中文 UTF-8 环境变量
ENV LANG=zh_CN.UTF-8
ENV LANGUAGE=zh_CN:zh
ENV LC_ALL=zh_CN.UTF-8

# 强制生成中文 UTF-8 locale(关键步骤)
RUN localedef -c -f UTF-8 -i zh_CN zh_CN.UTF-8 || true

WORKDIR /app

# 复制 jar 文件(需含 epoll native 支持)
COPY netty-stress-test-1.0-SNAPSHOT-jar-with-dependencies.jar /app/server.jar

# 设置代理
# ARG HTTP_PROXY
# ARG HTTPS_PROXY

# 启动 Netty 服务
CMD ["java", "-Dfile.encoding=UTF-8", "-Dio.netty.tryReflectionSetAccessible=true", "-cp", "server.jar", "org.autumn.NettyServerTest"]
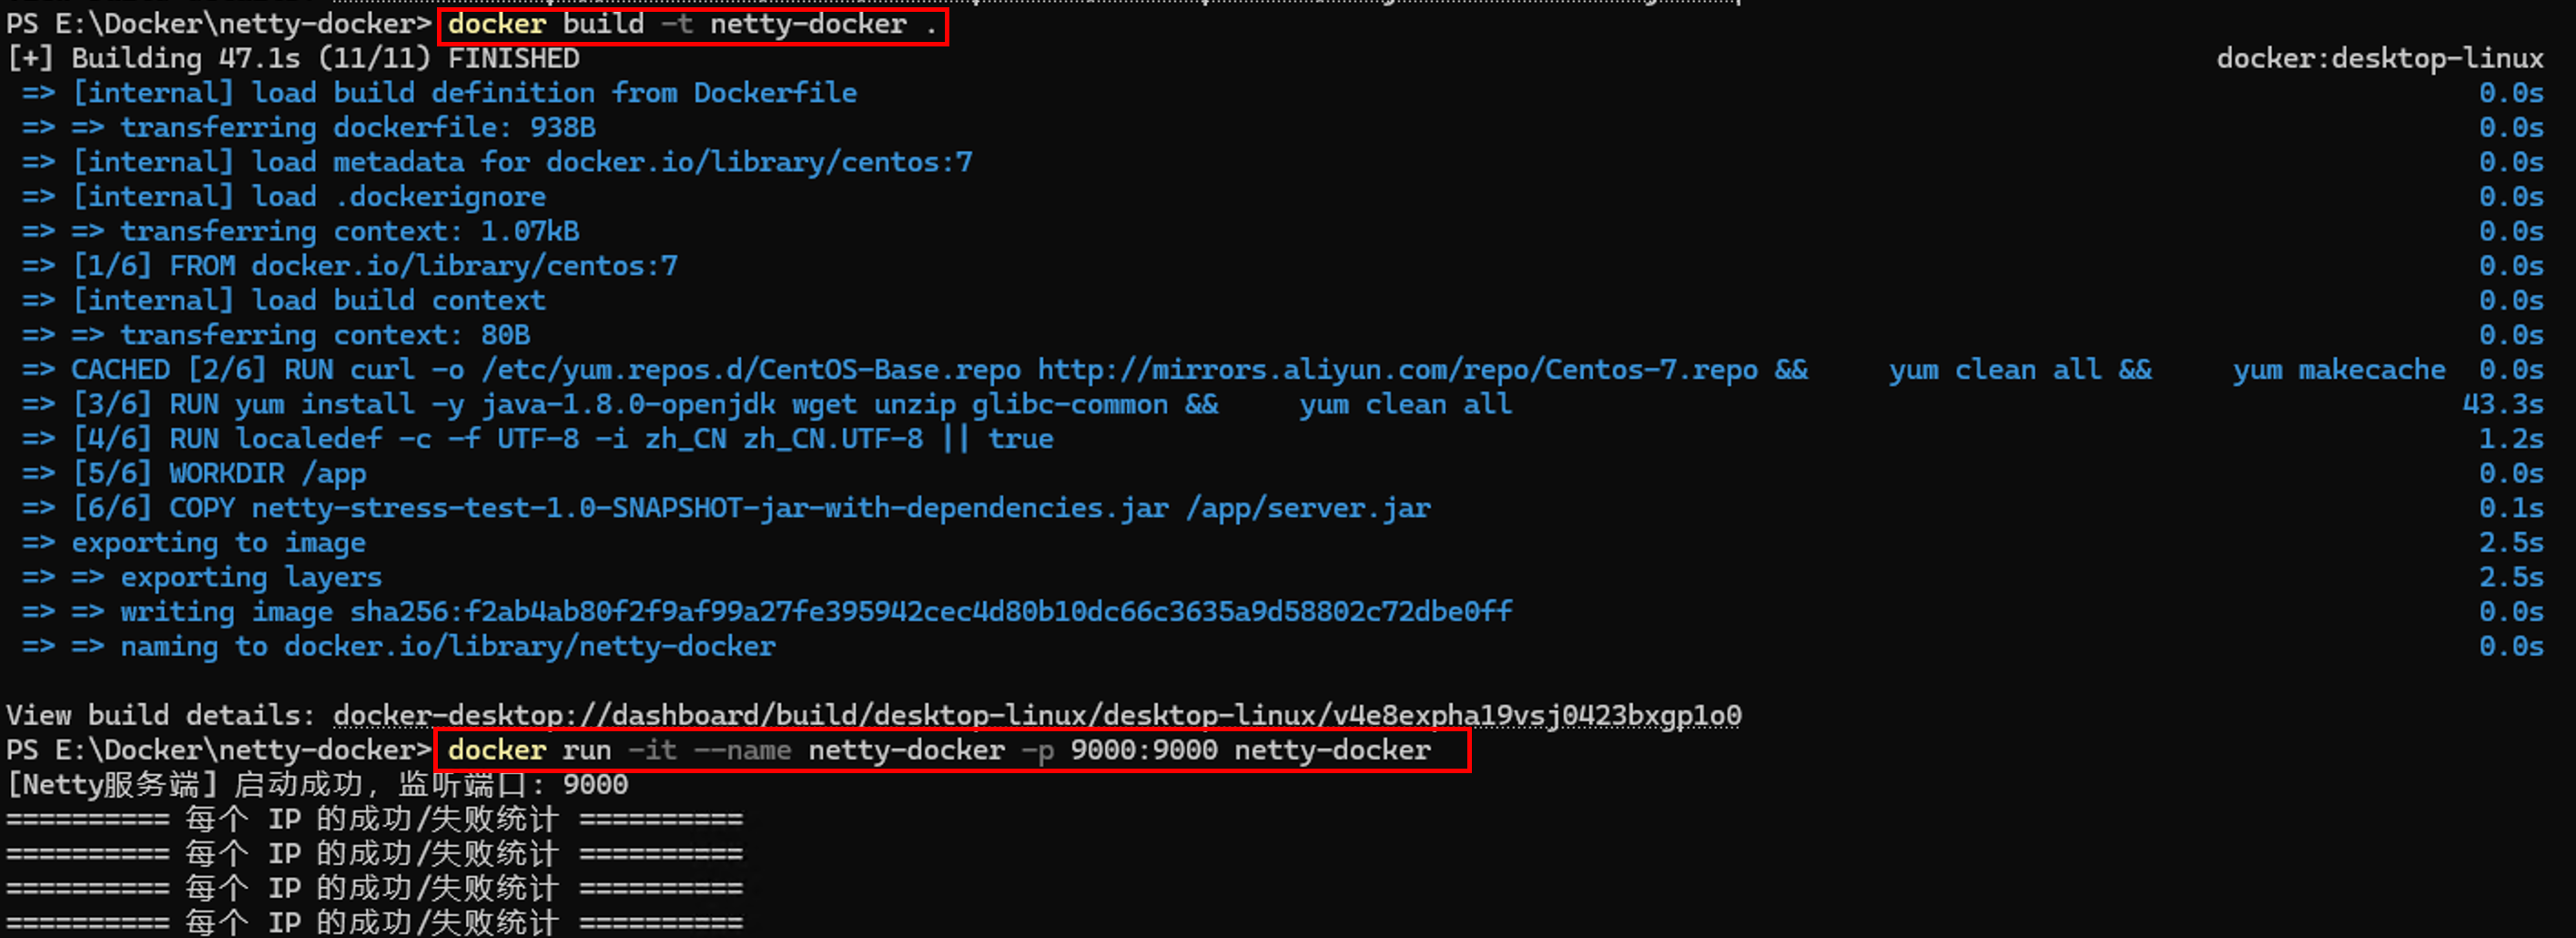
构建镜像
#docker初始化
docker init
#修改docker文件
#构造镜像
docker build -t netty-image .
使用镜像启动容器
#-it 相当于 -i -t 的组合:📌 -i 表示“交互式”运行(stdin 连接不断开)📌 -t 表示分配一个伪终端(tty),适合控制台交互
docker run --ulimit nofile=1048576:1048576 --sysctl net.core.somaxconn=65535 --sysctl net.ipv4.tcp_max_syn_backlog=65535 -it --name netty-docker -p 9000:9000 netty-image

遇到的问题
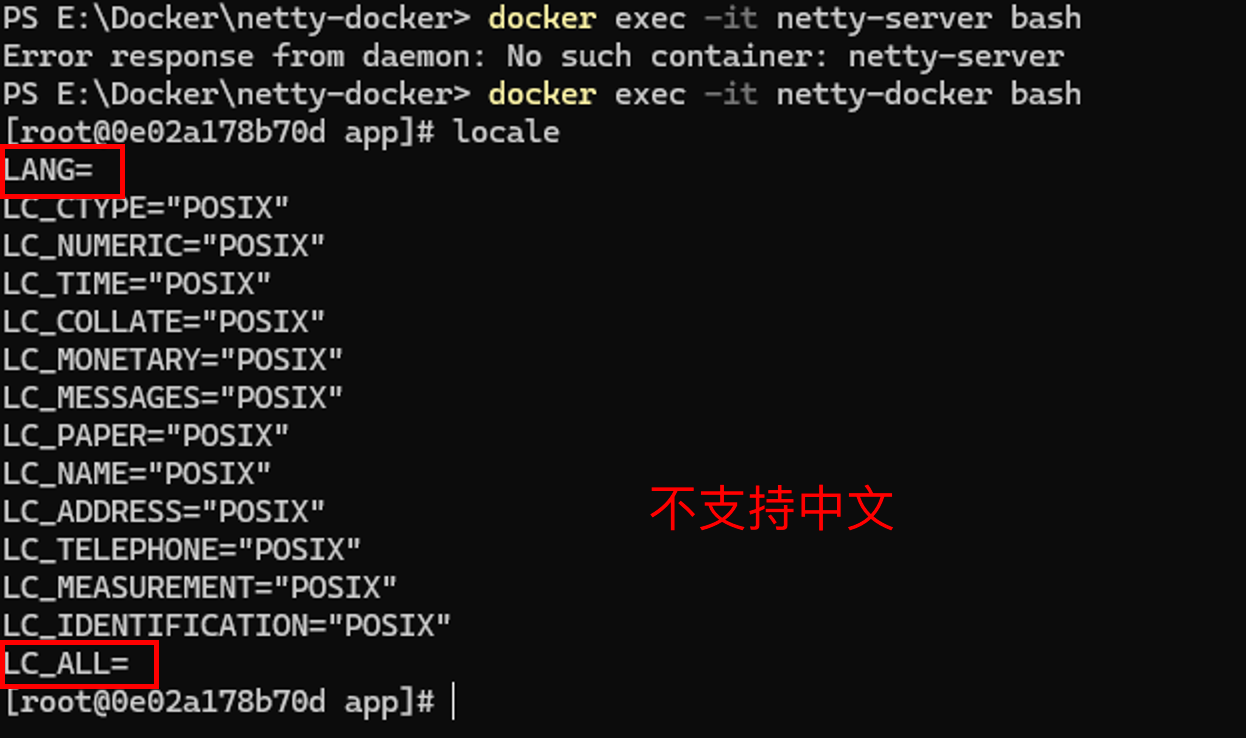
日志显示乱码
#进容器
docker exec -it netty-docker bash

locale     # 查看当前语言设置
echo $LANG
dockerfile添加如下内容
# 替换为阿里云镜像源
RUN curl -o /etc/yum.repos.d/CentOS-Base.repo http://mirrors.aliyun.com/repo/Centos-7.repo && \
    yum clean all && \
    yum makecache

# 安装 glibc-common(中文支持)
RUN yum install -y java-1.8.0-openjdk wget unzip glibc-common && \
    yum clean all

# 设置中文 UTF-8 环境变量
ENV LANG=zh_CN.UTF-8
ENV LANGUAGE=zh_CN:zh
ENV LC_ALL=zh_CN.UTF-8

# 强制生成中文 UTF-8 locale(关键步骤)
RUN localedef -c -f UTF-8 -i zh_CN zh_CN.UTF-8 || true
重新构建镜像和容器
测试
连接到10162时客户端报错Exception java.io.IOException: Too many open files
客户端报错Exception java.io.IOException: Too many open files;但是服务端没有报错,大概率是连接积压队列满了(TCP 半连接 or 全连接队列)
即使你设置了 ulimit -n,TCP 层面也有两个队列限制:
1. tcp_max_syn_backlog:半连接队列上限(SYN_RECV)
2. somaxconn:全连接 accept 队列上限(ESTABLISHED)

#临时生效
sysctl -w net.core.somaxconn=65535
sysctl -w net.ipv4.tcp_max_syn_backlog=65535

# 永久生效(追加到 /etc/sysctl.conf)
echo 'net.core.somaxconn=65535' >> /etc/sysctl.conf
echo 'net.ipv4.tcp_max_syn_backlog=65535' >> /etc/sysctl.conf
sysctl -p

#代码服务端中设置SO_BACKLOG
b.option(ChannelOption.SO_BACKLOG, 65535);
查看连接状态
#安装net-tool
yum install net-tool
#服务器当前到底有多少个“活跃”的TCP连接
netstat -anp | grep ESTABLISHED | wc -l
#TIME_WAIT 是 TCP 连接关闭后的“缓冲期”
netstat -anp | grep TIME_WAIT | wc -l
宿主机器调优
如果是宿主机(Linux)还需要修改如下内容,但是docker容器中无法设置这些东西:
#查看ulimit
ulimit -n
#如果很低,可以临时调整(当前 shell)
ulimit -n 1048576
#临时调整tcp参数
sysctl -w net.ipv4.tcp_tw_reuse=1
sysctl -w net.ipv4.tcp_tw_recycle=0
sysctl -w net.ipv4.tcp_fin_timeout=10
sysctl -w net.core.somaxconn=65535
sysctl -w net.ipv4.ip_local_port_range="1024 65535"
#测试时可以关闭 SELinux 和防火墙
setenforce 0
systemctl stop firewalld

#永久修改:
#/etc/security/limits.conf中添加* soft nofile 1048576和* hard nofile 1048576
echo -e '* soft nofile 1048576\n* hard nofile 1048576' | sudo tee -a /etc/security/limits.conf
#确保 PAM 模块生效,编辑 /etc/pam.d/login,添加session required pam_limits.so
echo 'session required pam_limits.so' | sudo tee -a /etc/pam.d/login
#修改内核参数 /etc/sysctl.conf
sudo tee /etc/sysctl.conf > /dev/null <<EOF
# ===== Netty 高并发优化 =====
fs.file-max = 2097152

net.core.somaxconn = 65535
net.core.netdev_max_backlog = 250000
net.core.rmem_max = 67108864
net.core.wmem_max = 67108864

net.ipv4.tcp_max_syn_backlog = 65536
net.ipv4.ip_local_port_range = 1024 65535
net.ipv4.tcp_tw_reuse = 1
net.ipv4.tcp_fin_timeout = 10
net.ipv4.tcp_keepalive_time = 120
net.ipv4.tcp_keepalive_probes = 3
net.ipv4.tcp_keepalive_intvl = 15
EOF

sudo sysctl -p
docker容器调优
宿主机系统级调优(重点)
主要包含文件描述符限制和内核参数优化
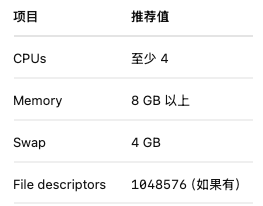
Docker Desktop 资源配置(非常关键)
打开 Docker Desktop → Settings → Resources → Advanced
设置如下:
#容器内查看 CPU 和内存
docker exec -it netty-docker bash
#查看容器cpu核心数
nproc
#查看容器内存
free -h
#动态监听
top
docker层面
# 启动时添加--ulimit nofile=1048576:1048576
docker run --ulimit nofile=1048576:1048576 -it --name ContainerName -p 9000:9000 ImageName
设置完进入容器查看
ulimit -n
# 1048576 —— 文件描述符软限制,够大,100万级别,正常!
cat /proc/sys/fs/file-max
# 9223372036854775807 —— 这个数值是 2^63 -1,简直是“无限”,不存在瓶颈。

代码层面
• 使用 EpollServerSocketChannel 替代默认的 NioServerSocketChannel
• 设置 backlog 为最大值
• 合理分配 EventLoopGroup 的线程数(CPU核数 × 2)
• 禁用自动读 (AUTO_READ = false) 避免数据洪水
Epoll模式
启用 Epoll 模式(Linux 高效 I/O),确保打包的 JAR 已内嵌 netty-transport-native-epoll,并在代码中优先使用:
需要添加依赖
<dependency>
roupId>
  <artifactId>netty-transport-native-epoll</artifactId>
  <classifier>linux-x86_64</classifier>
</dependency>
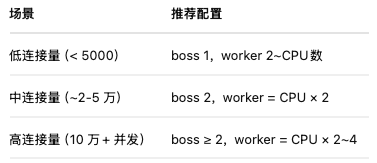
//bossGroup:1~2(最多不超过 4)接收连接是轻量操作,多了浪费
EventLoopGroup bossGroup = new EpollEventLoopGroup(4);
//workerGroup:核心数 × 2 或 核心数 × 2~4 处理连接数据,线程池大点可吞下更多连接
EventLoopGroup workerGroup = new EpollEventLoopGroup(8);
压测工具
可以使用如下客户端压测工具模拟百万连接:
• wrk:HTTP 层并发压测
• tcpcopy:tcp 流量回放
• netty-client-stress(自行编写 Netty 客户端连接模拟器,创建10万个连接,每个连接保持心跳)


 浙公网安备 33010602011771号