

Python
Python
是一种面向对象的动态类型语言,最初被设计用于编写自动化脚本(shell),随着版本的不断更新和语言新功能的添加,越来越多被用于独立的、大型项目的开发。
Python在执行时,首先会将.py文件中的源代码编译成Python的byte code(字节码),然后再由Python Virtual Machine(Python虚拟机)来执行这些编译好的byte code。
Python安装
https://www.python.org/下载安装包进行安装(猜测和java的JDK一样)
下载完成后安装,这里点击Add Python 3.7 to PATH添加到环境变量(3.5以下没有自动加入环境变量要自己配置),选择自定义安装。

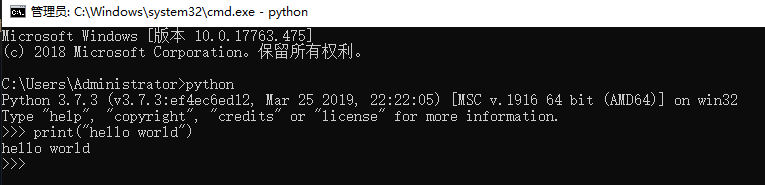
测试Python是否安装成功
安装完成后,用cmd命令执行python命令,测试hello world
配置环境变量
在环境变量Path中加入%PYTHON_HOME%\Python37\和%PYTHON_HOME%\Python37\Scripts这两个路径

使用python
写python可以使用三种方式编辑,cmd、Python命令框、IDLE工具,前两种都是交互式,IDLE是文本编辑工具。
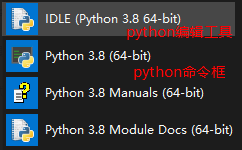
三种如下图

专业人员还是需要使用专业的工具,例如pycharm.
开发工具Pycharm
下载
去jetbrains的官网下载http://www.jetbrains.com/pycharm/,可以下载专业版然后激活

勾选如下的框

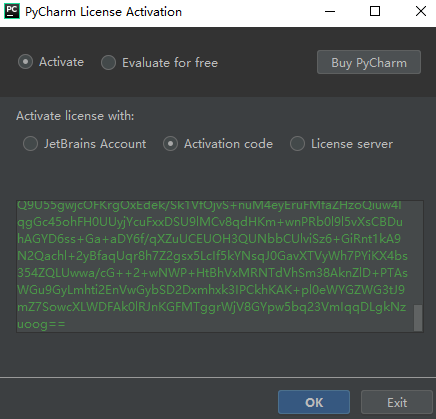
激活
进入到C:\Windows\System32\drivers\etc文件夹下,修改hosts.txt
在最下面加
0.0.0.0 account.jetbrains.com
打开软件,弹出如下框,选择Activation Code,网上搜pycharm激活码
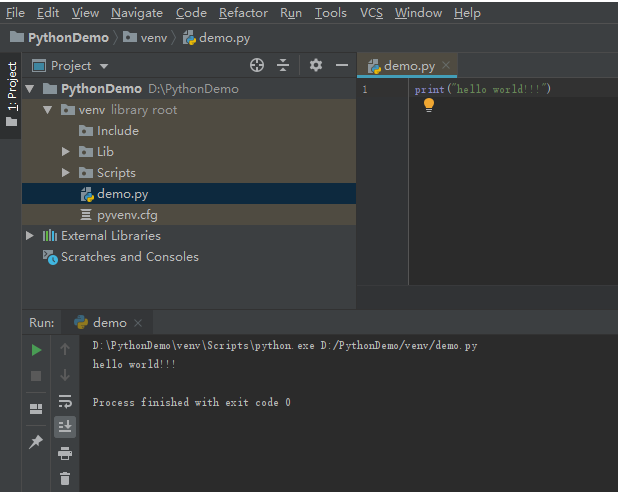
新建Pure Python项目,新建Python File,测试pycharm
数据类型
Python 中数据类型分为数字型和非数字型:
- Number(数字)
- int(整型)
- float(浮点型)
- bool(布尔型)
- complex(复数型)
非数字型
- String(字符串)
- List(列表)
- Tuple(元组)
- Dictionary(字典)
所有非数字型变量都支持以下特点:
- 都是一个序列sequence,可以理解为容器
- 取值[]
- 遍历for in
- 计算长度、最大/最小值、比较、删除
- 链接+和重复*
- 切片
列表
'''
列表最频繁的数据类型
用[]来定义list,数据之间由,分割
长度可变
索引从0开始
'''

#定义一个列表
name_list = [1,2,3,4,5,6]
#末位添加数据
name_list.append('python')
#指定位置插入数据
name_list.insert(2,'python')
#将列表二添加到列表一
age_list = [7,8,9]
name_list.extend(age_list)
#修改指定索引的数据
name_list[0] = 'first'
#删除指定索引的的数据  (不赞同使用,从内存中删除变量)
del name_list[4]
#删除第一个出现的指定数据
name_list.remove(8)
#删除末尾的数据,默认是弹出最后一个
name_list.pop()
#列表长度
print(len(name_list))
#数据在列表中出现的次数
print(name_list.count('python'))
#排序
name_list2 = [1,2,3,4,5,6]
name_list2.sort()  #升序
print(name_list2)
name_list2.sort(reverse=True)  #降序
print(name_list2)

print(name_list)
元组
'''
元组:tuple 和列表类似 不同的是元组元素不能修改
多个元素组成
定义:小括号() 索引从0开始
'''
info_tuple = (1,2,3,4,5,6,7,1)
print(info_tuple)   #打印元组()

#数据类型的转换  元组转list
list_data = list(info_tuple)
print(list_data)   #打印列表[]

#如果在元素中只有一个元素 需要加,
#info_tuple1 = (1)  这样写类型返回为int
info_tuple1 = (1,)
print(type(info_tuple1))

#查看元素出现的次数
print(info_tuple.count(1))

#查看元素的索引
print(info_tuple.index(2))

#遍历
print('遍历元组')
for i in info_tuple:
    print(i)
字典
'''
字典(dictionary):无序
定义:{} 键值对 ,分割
键key是索引
值value数据
键:值
键是唯一的
值是任何数据类型 但是键只能是字符串 数组 或者元素
'''

IronMan = {
    'name':'stack',
    'age':36,
    'gender':True,
    'height':1.80
}

#通过键来取值
print(IronMan['name'])
print(IronMan.get('age'))

# 取到字典的所有键
for i in IronMan.keys():
    print(i)

# 取到字典的所有值
for i in IronMan.values():
    print(i)

#取到键值对\
for i,v in IronMan.items():
    print(i,v)

#删除
del IronMan['name']
IronMan.pop('height')

#修改
IronMan['age'] = 40

#合并 ,键重复则覆盖
SpiderMan = {
    'age':20,
    'height1':180
}
IronMan.update(SpiderMan)

print(IronMan)
顺序选择循环
if语句
if 条件1:
    语句1……
elif 条件2:
    语句2……
else:
    执行语句3……
while语句
while 条件:
    语句……
石头剪刀布
'''
引入random函数
'''
import random

while 1==1:
    #将输入转为int
    player = int(input("请出: (1)石头  (2)剪刀  (3)布"))
    computer = random.randint(1,3)
    print(computer)
    if(player== 0):  #当为0时跳出循环
        print("退出")
        break;
    if(player ==1 and computer==2) or (player == 2 and computer == 3) or (player == 3 and computer == 1):
        print("you win")
    elif player == computer:
        print("平局")
    else:
        print("你输了")
函数
'''
def 函数名():
    函数封装的代码

函数名() 调用函数
def define 缩写
函数名称 可以表达函数封装代码的功能
符合标志符 命名规则
字母 数组 下划线
不能以数字开头
不能与关键字重名
'''

#定义一个无参函数
#python的解释器 知道我们定义了一个函数
def sayHello():
    print('hello world')
    print('hello!!!')

#调用函数
sayHello()

#定义一个有参函数
#定义时,小括号里的参数为形参
def num_sum(num1,num2):
    result = num1+num2
    print('{}+{}+{}'.format(num1,num2,result))

#调用时,小括号里的参数为实参
num_sum(50,60)

'''
函数的返回值:一个函数执行结束后 告诉调用者一个结果
返回值是函数完成工作后 最后给调用者的一个结果

在函数内部使用return关键字可以返回结果
调用的一方需要用变量来进行接收
'''
#定义一个有参函数
def num_sum2(num1,num2):
    result = num1+num2
    return result

#使用一个变量来接收参数
result = num_sum2(50, 70)
print(result)
不定参数
'''
*args表示任何多个无名参数,它是一个tuple;**kwargs表示键值对参数,它是一个dict
同时使用*args和**kwargs时,必须*args参数列要在**kwargs前
*args:元组
**kwargs:字典
'''
def test(a,*args,**kwargs):
    print(a)
    print(args)
    print(kwargs)
    #打印tuple和dictionary中的值
    print(args[0])  #根据下标取元组中值
    print(kwargs['d'])  #根据键取字典中值

test(1,'2',3,d='4',e=5)
@装饰函数
和面向对象的装饰模式有异曲同工之妙,第一次被python这门语言震撼到。
无参装饰函数
#装饰函数
def funA(fn):
    #@装饰函数会在原函数声明时就开始装饰原函数,所以这里的print在原函数声明时就开始执行
    print("before ...")
    fn()
    print("after ...")
    return '装饰器函数结果';

#原函数
#这里@funA相当于funB = funA(funB),因为funA返回的是一个字符串,所以此时funB为funA返回的字符串
@funA
def funB():
    print("func was called")

#funB函数经过装饰funB已经变字符串类型,打印装饰函数返回的字符串
print(funB);
带参数装饰模式
#装饰函数
def funA(fn):
    # 定义一个嵌套函数,arc即为原函数fn的参数,这里把原函数包装成新的函数
    def new_funB(arc):
        #fn(arc)
        print("装饰函数:",arc)
    #把原本的函数包装为一个新的函数并返回
    return new_funB

#原函数,使用@表示被funA函数装饰
@funA
def funB(arc):
    print("funA函数执行",arc)

#调用funB实际为被funA装饰后的函数funB = funA(funB)
funB("参数")
类
类定义
类定义及_init_构造函数,参数self代表实例。
#!/usr/bin/python3

#类定义
class people:
    #定义基本属性
    name = ''
    age = 0
    #定义私有属性,私有属性在类外部无法直接进行访问
    __weight = 0
    #定义构造方法
    def __init__(self,n,a,w):
        self.name = n
        self.age = a
        self.__weight = w
    def speak(self):
        print("%s 说: 我 %d 岁。" %(self.name,self.age))

# 实例化类
p = people('runoob',10,30)
p.speak()
单继承
#单继承示例
class student(people):
    grade = ''
    def __init__(self,n,a,w,g):
        #调用父类的构函
        people.__init__(self,n,a,w)
        self.grade = g
    #覆写父类的方法
    def speak(self):
        print("%s 说: 我 %d 岁了,我在读 %d 年级"%(self.name,self.age,self.grade))
多继承
#另一个类,多重继承之前的准备
class speaker():
    topic = ''
    name = ''
    def __init__(self,n,t):
        self.name = n
        self.topic = t
    def speak(self):
        print("我叫 %s,我是一个演说家,我演讲的主题是 %s"%(self.name,self.topic))

#多重继承
class sample(speaker,student):
    a =''
    def __init__(self,n,a,w,g,t):
        student.__init__(self,n,a,w,g)
        speaker.__init__(self,n,t)

test = sample("Tim",25,80,4,"Python")
test.speak()   #方法名同,默认调用的是在括号中排前地父类的方法
方法重写
#!/usr/bin/python3

class Parent:        # 定义父类
   def myMethod(self):
      print ('调用父类方法')

class Child(Parent): # 定义子类,重写myMethod方法
   def myMethod(self):
      print ('调用子类方法')

c = Child()          # 子类实例
c.myMethod()         # 子类调用重写方法
#super(类,对象实例)
super(Child,c).myMethod() #用子类对象调用父类已被覆盖的方法
config.ini配置读取
config.py模块代码如下
import os
import configparser

#声明一个类,集成object类
class Config(object):
    #定义构造函数,self代表实例本身,config_file形参赋初值,config.ini必须在config.py同目录下
    def __init__(self, config_file='config.ini'):
        #通过os库获取目录join拼接成文件全路径
        self._path = os.path.join(os.getcwd(), config_file)
        #检测是否存在文件
        if not os.path.exists(self._path):
            #抛出FileNotFound异常
            raise FileNotFoundError("No such file: config.ini")
        #configRaw
        self._config = configparser.ConfigParser()
        self._config.read(self._path, encoding='utf-8-sig')
        #获取configRaw
        self._configRaw = configparser.RawConfigParser()
        self._configRaw.read(self._path, encoding='utf-8-sig')

    def get(self, section, name):
        return self._config.get(section, name)

    def getRaw(self, section, name):
        return self._configRaw.get(section, name)
#实例化一个变量,其他module需要导入时可以用from config import global_config直接导入这个实例
global_config = Config()

#测试,读取config.ini配置文件中[config]段的键为fp的值
ip=global_config.getRaw("config","ip");
print(ip);
其他模块引用
#引入config模块中的global_config实例变量
from config import global_config

#直接使用global_config这个实例即可
ip=global_config.getRaw("config","ip");
print(ip);
自定义异常
exception.py
#自定义一个异常
class AutException(Exception):
    #构造函数
    def __init__(self, message):
        super().__init__(message)

#测试
raise AutException('自定义异常');
日志模块
Aut_logger.py
import logging
import logging.handlers
'''
日志模块
'''
LOG_FILENAME = 'autumn.log'
#获取日志实例
logger = logging.getLogger()

#设置日志模板方法
def set_logger():
    logger.setLevel(logging.INFO)
    formatter = logging.Formatter('%(asctime)s - %(process)d-%(threadName)s - '
                                  '%(pathname)s[line:%(lineno)d] - %(levelname)s: %(message)s')
    console_handler = logging.StreamHandler()
    console_handler.setFormatter(formatter)
    logger.addHandler(console_handler)
    file_handler = logging.handlers.RotatingFileHandler(
        LOG_FILENAME, maxBytes=10485760, backupCount=5, encoding="utf-8")
    file_handler.setFormatter(formatter)
    logger.addHandler(file_handler)

#设置日志模板
set_logger()

#测试,其他模块引入from logger import logger后直接调用logger的方法
logger.info('信息展示');
logger.error('结果异常')
Request请求
import requests;

url = 'http://www.xxx.com/name.png';
response_data = requests.get(url)

#判断是否请求成功,返回true/false
def getresponse_status(resp):
    if resp.status_code != requests.codes.OK:
        print('Status: %u, Url: %s' % (resp.status_code, resp.url))
        return False
    return True

#打印是否成功
print(getresponse_status(response_data))
图片保存
requests下载保存图片,pillow打开图片
import requests;
#pip install pillow安装,可以展示图片
from PIL import Image


#url地址
url = 'http://www.xxx.com/name.png';

#响应内容
response_data = requests.get(url)

#打印内容,content - 字节
print(response_data.content)

#数据保存
#with open('文件名','文件读写方式','文本编码格式') as f:
#   f.write()
#w 有则写入无则创建,b进制文件的读写方式
with open("img.jpg","wb") as f:
    #把字节写入文件
    f.write(response_data.content)

#打开图片
im = Image.open("img.jpg")
#展示图片
im.show()
#关闭
im.close()
大图片下载
requests下载保存图片,os打开图片
import requests;
import os;

#保存大图片
def save_image(resp, image_file):
    with open(image_file, 'wb') as f:
        for chunk in resp.iter_content(chunk_size=1024):
            f.write(chunk)

#定义打开图片方法
def open_image(image_file):
    if os.name == "nt":
        os.system('start ' + image_file)  # for Windows
    else:
        if os.uname()[0] == "Linux":
            if "deepin" in os.uname()[2]:
                os.system("deepin-image-viewer " + image_file)  # for deepin
            else:
                os.system("eog " + image_file)  # for Linux
        else:
            os.system("open " + image_file)  # for Mac

#请求图片
url = 'http://www.xxx.com/name.png';
response_data = requests.get(url)
#保存打开
save_image(response_data,"bigimg.jpg")
open_image("bigimg.jpg")
禁用安全请求警告
import urllib3
from urllib3.exceptions import InsecureRequestWarning

#禁用安全请求警告
urllib3.disable_warnings(InsecureRequestWarning)
随机请求头
import random

USER_AGENTS = [
    "Mozilla/5.0 (Windows NT 6.1) AppleWebKit/537.36 (KHTML, like Gecko) Chrome/41.0.2228.0 Safari/537.36",
    "Mozilla/5.0 (Macintosh; Intel Mac OS X 10_10_1) AppleWebKit/537.36 (KHTML, like Gecko) Chrome/41.0.2227.1 Safari/537.36",
    "Mozilla/5.0 (X11; Linux x86_64) AppleWebKit/537.36 (KHTML, like Gecko) Chrome/41.0.2227.0 Safari/537.36",
    "Mozilla/5.0 (Windows NT 6.1; WOW64) AppleWebKit/537.36 (KHTML, like Gecko) Chrome/41.0.2227.0 Safari/537.36",
    "Mozilla/5.0 (Windows NT 6.3; WOW64) AppleWebKit/537.36 (KHTML, like Gecko) Chrome/41.0.2226.0 Safari/537.36",
    "Mozilla/5.0 (Windows NT 6.4; WOW64) AppleWebKit/537.36 (KHTML, like Gecko) Chrome/41.0.2225.0 Safari/537.36",
    "Mozilla/5.0 (Windows NT 6.3; WOW64) AppleWebKit/537.36 (KHTML, like Gecko) Chrome/41.0.2225.0 Safari/537.36",
    "Mozilla/5.0 (Windows NT 5.1) AppleWebKit/537.36 (KHTML, like Gecko) Chrome/41.0.2224.3 Safari/537.36",
    "Mozilla/5.0 (Windows NT 10.0) AppleWebKit/537.36 (KHTML, like Gecko) Chrome/40.0.2214.93 Safari/537.36"
    ]

#随机选择列表中的一个值
def get_random_useragent():
    return random.choice(USER_AGENTS)
带Header&Param请求
import requests

def send_withParam(message):
    #url,{}为字符串占位符
    url = 'http://www.xxxx.com/{}/send'.format("restful")
    #http参数
    payload = {
        "param1":'参数一',
        "param2": message
    }
    #http请求头
    headers = {
        'User-Agent':'Mozilla/5.0 (Windows NT 6.1) AppleWebKit/537.36 (KHTML, like Gecko) Chrome/41.0.2228.0 Safari/537.36'
    }
    #发送请求
    res = requests.get(url, params=payload, headers=headers)
    return res.text;
Json解析
import json

def parse_json(s):
    #可以直接json.loads(s),加个s[begin:end]截取首个{和尾个}可以排除首位的非json数据
    begin = s.find('{')
    end = s.rfind('}') + 1
    return json.loads(s[begin:end])


#测试
if __name__ == "__main__":
    str = '干扰数据1{"total":2,"rows":[{"startStamp":"1610007480","startTime":"2021-01-07 16:18"},{"startStamp":"1610007480","startTime":"2021-01-07 16:18"}]}干扰数据2'
    #解析并取出键为total的值
    t = parse_json(str)['total']
    print(t)
    #解析并取出键为rows的值
    r = parse_json(str)['rows']
    print(r)
Sleep随机时间
睡眠0.1s~0.3s
import random
import time

#等待0.1s~0.3s
def wait_some_time():
    time.sleep(random.randint(100, 300) / 1000)
时间
import time
import requests
import json

from datetime import datetime
from Aut_logger import logger
from config import global_config


class Timer(object):
    def __init__(self, sleep_interval=0.5):
        #获取购买时间
        self.buy_time = datetime.strptime(global_config.getRaw('config','buy_time'), "%Y-%m-%d %H:%M:%S.%f")
        #购买时间转换为购买时间毫秒数
        self.buy_time_ms = int(time.mktime(self.buy_time.timetuple()) * 1000.0 + self.buy_time.microsecond / 1000)
        #等待间隔
        self.sleep_interval = sleep_interval
        #时间区别
        self.diff_time = self.local_jd_time_diff()

    #获取服务器时间
    def jd_time(self):
        """
        从京东服务器获取时间毫秒
        :return:
        """
        url = 'https://a.jd.com//ajax/queryServerData.html'  #接口
        ret = requests.get(url).text #请求接口返回json字符串
        js = json.loads(ret) #json字符串转换为json
        return int(js["serverTime"]) #根据json的key获取值

    #获取本地时间戳
    def local_time(self):
        """
        获取本地毫秒时间
        :return:
        """
        return int(round(time.time() * 1000))

    #获取时间差
    def local_jd_time_diff(self):
        """
        计算本地与京东服务器时间差
        :return:
        """
        return self.local_time() - self.jd_time()

    #当大于某时间点时跳出循环
    def start(self):
        logger.info('正在等待到达设定时间:{},检测本地时间与京东服务器时间误差为【{}】毫秒'.format(self.buy_time, self.diff_time))
        while True:
            # 本地时间减去与京东的时间差,能够将时间误差提升到0.1秒附近
            # 具体精度依赖获取京东服务器时间的网络时间损耗
            if self.local_time() - self.diff_time >= self.buy_time_ms:
                logger.info('时间到达,开始执行……')
                break
            else:
                time.sleep(self.sleep_interval)
Session对象带cookie
import requests
import os
import pickle
from config import global_config

class SpiderSession:
    """
    Session初始化相关操作,设置cookie目录,设置带header的session
    """
    def __init__(self):
        self.cookies_dir_path = "./cookies/"
        self.user_agent = global_config.getRaw('config', 'DEFAULT_USER_AGENT')

        self.session = self._init_session()
    #获取session函数 - 初始化用
    def _init_session(self):
        session = requests.session()
        session.headers = self.get_headers()
        return session
    #获取请求头函数 - 初始化用
    def get_headers(self):
        return {"User-Agent": self.user_agent,
                "Accept": "text/html,application/xhtml+xml,application/xml;"
                          "q=0.9,image/webp,image/apng,*/*;"
                          "q=0.8,application/signed-exchange;"
                          "v=b3",
                "Connection": "keep-alive"}

    #获取请求头
    def get_user_agent(self):
        return self.user_agent

    #获取session
    def get_session(self):
        """
        获取当前Session
        :return:
        """
        return self.session

    #从session中获取cookie
    def get_cookies(self):
        """
        获取当前Cookies
        :return:
        """
        return self.get_session().cookies

    #设置session中的cookie
    def set_cookies(self, cookies):
        self.session.cookies.update(cookies)

    #从本地文件中获取cookie,并放入session.cookie中
    def load_cookies_from_local(self):
        """
        从本地加载Cookie
        :return:
        """
        cookies_file = ''
        if not os.path.exists(self.cookies_dir_path):  #判断cookies文件夹是否存在
            return False #没有则直接返回false
        for name in os.listdir(self.cookies_dir_path):  #遍历cookies文件夹下面的文件
            if name.endswith(".cookies"):    #判断文件是否以cookies结尾
                cookies_file = '{}{}'.format(self.cookies_dir_path, name)    #把./cookies/路径和文件(cookies结尾)连接
                break
        if cookies_file == '':
            return False
        with open(cookies_file, 'rb') as f:   #打开cookies结尾的文件
            local_cookies = pickle.load(f)  #pickle库读取文件中的内容(cookie)
        self.set_cookies(local_cookies)  #把文件中的cookie放入session中

    #保存cookie到本地
    def save_cookies_to_local(self, cookie_file_name):
        """
        保存Cookie到本地
        :param cookie_file_name: 存放Cookie的文件名称
        :return:
        """
        cookies_file = '{}{}.cookies'.format(self.cookies_dir_path, cookie_file_name)  #获取cookie文件全路径
        directory = os.path.dirname(cookies_file)   #返回文件的目录路径
        if not os.path.exists(directory):   #如果目录不存在
            os.makedirs(directory)   #则创建目录
        with open(cookies_file, 'wb') as f:   #打开文件
            pickle.dump(self.get_cookies(), f)  #将cookie对象保存到文件中
二维码登录
import random
import time
import requests
import json

from Aut_logger import logger
from timer import Timer
from config import global_config
from exception import AutException
from util import (
    parse_json,
    send_wechat,
    wait_some_time,
    response_status,
    save_image,
    open_image
)

#二维码扫码
class QrLogin:
    """
    扫码登录
    """
    def __init__(self, spider_session: SpiderSession):
        """
        初始化扫码登录
        大致流程:
            1、访问登录二维码页面,获取Token
            2、使用Token获取票据
            3、校验票据
        :param spider_session:
        """
        self.qrcode_img_file = 'qr_code.png'    #文件名

        self.spider_session = spider_session   #获取带cookie的session对象
        self.session = self.spider_session.get_session()   #获取session

        self.is_login = False    #是否登录
        self.refresh_login_status()   #验证

    #刷新是否登录状态
    def refresh_login_status(self):
        """
        刷新是否登录状态
        :return:
        """
        self.is_login = self._validate_cookies()

    #验证cookie是否有效
    def _validate_cookies(self):
        """
        验证cookies是否有效(是否登陆)
        通过访问用户订单列表页进行判断:若未登录,将会重定向到登陆页面。
        :return: cookies是否有效 True/False
        """
        url = 'https://order.jd.com/center/list.action'
        payload = {
            'rid': str(int(time.time() * 1000)),
        }
        try:
            resp = self.session.get(url=url, params=payload, allow_redirects=False)  #禁止重定向
            if resp.status_code == requests.codes.OK:
                return True
        except Exception as e:
            logger.error("验证cookies是否有效发生异常", e)
        return False

    #获取登录页面,此时
    def _get_login_page(self):
        """
        获取PC端登录页面
        :return:
        """
        url = "https://passport.jd.com/new/login.aspx"
        page = self.session.get(url, headers=self.spider_session.get_headers())
        return page

    #获取二维码并自动打开
    def _get_qrcode(self):
        """
        缓存并展示登录二维码
        :return:
        """
        url = 'https://qr.m.jd.com/show'
        payload = {
            'appid': 133,
            'size': 147,
            't': str(int(time.time() * 1000)),
        }
        headers = {
            'User-Agent': self.spider_session.get_user_agent(),
            'Referer': 'https://passport.jd.com/new/login.aspx',
        }
        resp = self.session.get(url=url, headers=headers, params=payload)

        if not response_status(resp):
            logger.info('获取二维码失败')
            return False

        save_image(resp, self.qrcode_img_file)
        logger.info('二维码获取成功,请打开京东APP扫描')
        open_image(self.qrcode_img_file)
        return True

    #扫码后接口获取token
    def _get_qrcode_ticket(self):
        """
        通过 token 获取票据
        :return:
        """
        url = 'https://qr.m.jd.com/check'
        payload = {
            'appid': '133',
            'callback': 'jQuery{}'.format(random.randint(1000000, 9999999)),
            'token': self.session.cookies.get('wlfstk_smdl'),
            '_': str(int(time.time() * 1000)),
        }
        headers = {
            'User-Agent': self.spider_session.get_user_agent(),
            'Referer': 'https://passport.jd.com/new/login.aspx',
        }
        resp = self.session.get(url=url, headers=headers, params=payload)

        if not response_status(resp):
            logger.error('获取二维码扫描结果异常')
            return False

        resp_json = parse_json(resp.text)  #解析返回的文本
        if resp_json['code'] != 200:
            logger.info('Code: %s, Message: %s', resp_json['code'], resp_json['msg'])
            return None
        else:
            logger.info('已完成手机客户端确认')
            return resp_json['ticket']   #返回接口中ticket部分

    #验证票据
    def _validate_qrcode_ticket(self, ticket):
        """
        通过已获取的票据进行校验
        :param ticket: 已获取的票据
        :return:
        """
        url = 'https://passport.jd.com/uc/qrCodeTicketValidation'
        headers = {
            'User-Agent': self.spider_session.get_user_agent(),
            'Referer': 'https://passport.jd.com/uc/login?ltype=logout',
        }

        resp = self.session.get(url=url, headers=headers, params={'t': ticket})
        if not response_status(resp):
            return False

        resp_json = json.loads(resp.text)
        if resp_json['returnCode'] == 0:
            return True
        else:
            logger.info(resp_json)
            return False

    #通过二维码登录
    def login_by_qrcode(self):
        #session请求登录页
        self._get_login_page()

        # 下载二维码
        if not self._get_qrcode():
            raise AutException('二维码下载失败')

        # 获取票据
        ticket = None
        retry_times = 85
        for _ in range(retry_times):   #循环85次
            ticket = self._get_qrcode_ticket()    #获取ticket
            if ticket:   #如果请求到ticket则退出
                break
            time.sleep(2)   #每次睡眠2秒
        else:
            raise AutException('二维码过期,请重新获取扫描')

        # 验证ticket有效
        if not self._validate_qrcode_ticket(ticket):
            raise AutException('二维码信息校验失败')
        #再次验证是否登录成功
        self.refresh_login_status()

        logger.info('二维码登录成功')
安装其他模块
在线安装
pip线上安装库
pip install requests

安装时指定源
pip install packageNmae -i https://pypi.tuna.tsinghua.edu.cn/simple
packageNmae: 需要安装的第三方库的名字
-i: 选项 --index-url 的缩写
中国境内常用的源
阿里云:http://mirrors.aliyun.com/pypi/simple/
清华:https://pypi.tuna.tsinghua.edu.cn/simple
中科大:https://pypi.mirrors.ustc.edu.cn/simple/
配置永久国内的源
# 命令会生成一个名为pi 的文件夹,并在该文件夹内生成一个名为 pip.ini 的文件,
# 路径C:\Users\your_username\AppData\Roaming\pip\pip.ini
# 使用 --global 选项时,pip.ini 文件位于 C:\ProgramData\pip\pip.ini
pip config set global.index-url https://pypi.tuna.tsinghua.edu.cn/simple

# 直接使用记事本打开 pip.ini
pip config --editor notepad edit --user
# 或
pip config --editor notepad edit --global

# 查看配置项
pip config list
# 查看指定配置项
pip config get global.index-url
离线包安装
pypi网站:https://pypi.python.org/pypi/
国内网站:https://www.lfd.uci.edu/~gohlke/pythonlibs/
下载好whl压缩包,然后用命令安装
pip install ***.whl


 浙公网安备 33010602011771号