012_02 博客系统(设计表时需要注意的)
1、表继承
因为当你makemigrations和migrate的时候会自动生成auth_user表
所以创建用户表的时候可以用人家自定义的auth_user表, 如果你还想在表里增加一些字段,可以利用继承
from django.contrib.auth.models import AbstractUser
class UserInfo(AbstractUser):
    pass
要是这样用继承的话需要在settings中配置一下:
AUTH_USER_MODEL ="应用名称.UserInfo"
2、头像:可用FileField或者ImageField
avatar = models.FileField(verbose_name="头像",upload_to="avatar",default="/avatar/default.png")
upload_to:上传到的具体位置
default:默认位置
3、创建时间
auto_now :无论是你添加还是修改对象,时间为你添加或者修改的时间
auto_now_add:是你当前创建的时间,当你更新对象时时间不会有变法
create_time = models.DateTimeField(verbose_name="创建时间",auto_now_add=True)
4、自己创建第三张表,并设置字段。。以下是具体操作
这样做的好处是:方便以后操作,可以在第三张关联表中增加或删除字段
class Tag(models.Model):
    pass
class Article(models.Model):
    tags = models.ManyToManyField(to="Tag",through="article2tag",through_fields=('article', 'tag'))  #through_fields=('article', 'tag')相当于给这两个字段关联
class Article2tag(models.Model):
    article = models.ForeignKey(verbose_name="文章",to="Article")
    tag = models.ForeignKey(verbose_name="标签",to="Tag")
    class Meta:
        '''联合唯一'''
        unique_together = [
            ("article","tag")
        ]
5、choices属性
type_choices = [
        (1,"编程语言"),
        (2,"软件设计"),
        (3,"前端系列"),
        (4,"数据库"),
        (5,"操作系统")
    ]
artcle_type_id = models.IntegerField(choices=type_choices,default=None)
6、自关联的两种表示方式,假设为null的时候是文章赞
方式一
farther_comment = models.ForeignKey(to="Comment",verbose_name="父级评论",null=True,blank=True)
方式二
farther_comment = models.ForeignKey("self",verbose_name="父级评论",null=True,blank=True)
7、联合唯一的表示方式
class Meta:
    '''联合唯一'''
    unique_together = ("user_id","comment_id",)
    verbose_name_plural = "评论点赞表"

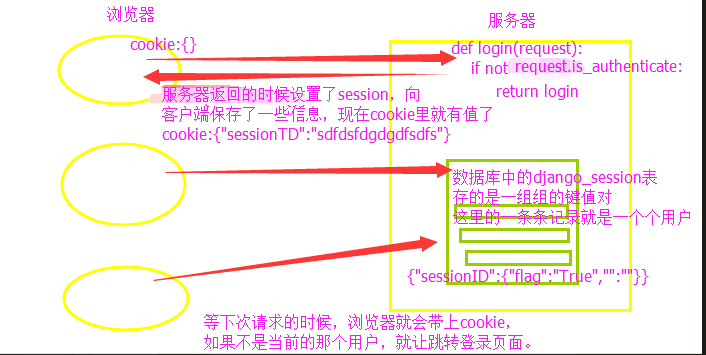
1、cookie和session
cookie可以单独工作
cookie也可以和session配合来用
每一个浏览器都会有一个cookie:{}
浏览器第一次访问服务器的时候cookie是空的
服务器需要让客户端保存一些数据cookie {"sessionID":"随机字符串"},当下次请求的时候就会带着一些你保存的数据
django_session表里的每一条记录就是一个个用户,类似一个大的字典
session_key:存的是sessionID对应的值
session_data:{"":"","":"",...}存的是一组组键值对
等再次访问的时候就会带着sessionID
2、登录和注册
- 登录(ajax)
- 涉及验证码的实现(可以吧获取的验证码存放在session中,以方便验证的时候判断。每次访问的时候浏览器都会带着你存放在里面的值,用的时候取它就行了)
- 登录成功之后设置session,以后每次请求进来的时候浏览器都会带着cookie,就知道是谁进来了。保存了状态。(用auth模块)
user=auth.authenticate(username=username,password=password)#验证用户名和密码
if user:
ret["flag"] = True
auth.login(request,user) #session request.session["flag"]=True    #如果认证成功,就让登录,这个login里面包括了session操作和cookie
...
如果是当前的用户就做什么操作,如果不是当前的用户就不让他进
- 注册(ajax+Form)
- 涉及头像的实现
具体见上篇博客
3、系统主页
1、设计系统主页(系统主页是用户不管登录不登录都是可以看到的,所以没必要进行验证)
- 导航条:
- 需要注意的是:
- 如果用户是登录进来的,就让显示登录状态;如果用户还没有登录,就在导航条上显示登录,注册(如图)
登录状态

没有登录状态

所以具体我们还得判断一下
 {% if request.user.is_authenticated %}
         <li class="active"><a href="#"><span
               class="glyphicon glyphicon-user"></span>{{ request.user.username }}</a></li>
         <li class="active"><a href="/log_out/">注销</a></li>
  {% else %}
         <li class="active"><a href="/login/">登录</a></li>
         <li class="active"><a href="/register/">注册</a></li>
  {% endif %}
- 注销
- 修改密码
像是注销,登录,修改密码我们都可以借助auth模块来实现
- 具体显示内容可以分三大块
- 左侧菜单系列
- 显示文章系列
- 文章标题:
- 作者头像:
- 是谁发布的,发布时间,等...
- 文章不可能只有一篇,会有好多篇文章,这是还得加上分页
- 右侧可以放一写其他信息
2、下面是具体流程,需要注意的知识点
====================================
当做左侧的时候需要多加两张表
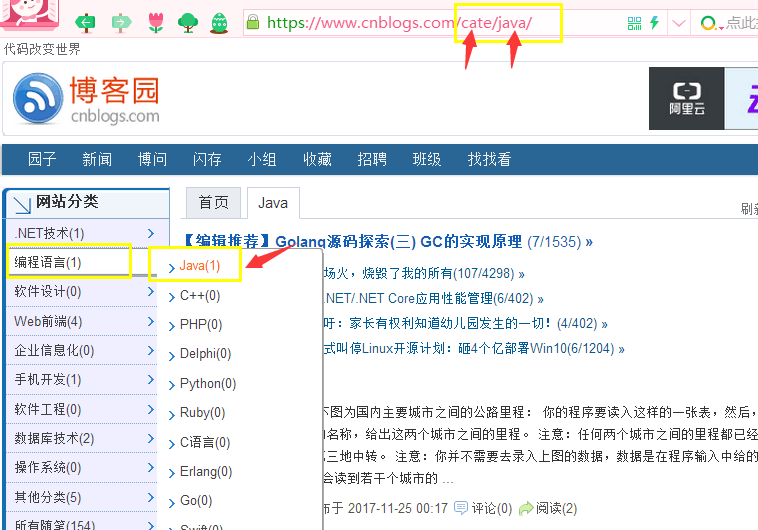
- 多加了一个网站分类表和网站文章分类表(可参考博客园cnblogs.com的系统主页)
- 一个网站分类里面又可以对文章分好多类 (建立了一对多的关系)
- 文章分类里面又有好多相关的具体文章(建立了一对多的关系) 注意关联字段要写在多的一方
class SiteCategory(models.Model):
    '''网站分类表'''
    name = models.CharField(max_length=32,verbose_name="分类名")
    class Meta:
        verbose_name_plural="网站分类表"
    def __str__(self):
        return self.name

class SiteArticleCategory(models.Model):
    '''网站文章分类表'''
    name = models.CharField(max_length=32,verbose_name="分类名")
    sitecategory = models.ForeignKey(to="SiteCategory",verbose_name="所属网站")

    class Meta:
        verbose_name_plural = "网站文章分类表"
    def __str__(self):
        return self.name
====================================
- 建立好关系之后就可以实现左侧菜单了
- 左侧菜单需要注意的是你点击菜单的时候的跳转路径,当然有人会想到用模板继承的方式,这种方式是能实现,但是还有一种更机智的办法。我们可以参考博客园的跳转路径,还是继续走index视图,
但是我们得把路径匹配一下,如图
url(r'^index/', views.index),
url(r'^$', views.index), #根目录下也让走index
url(r'^cate/(?P<site_article_category>.*)/', views.index) #有名分组
注意:
【1】
这时得注意,你的index现在有两个路径了,所以我们不能直接把site_article_category传进去, 我们得用一个**kwargs来接受(因为你的url(r'^login/$', views.login)这个路径是没有参数的,
如果你直接吧site_article_category这样传进去,就会报错了,区分不了要走有路径的还是要走没有路径的,所以我们用**kwargs),当有参数的时候,有名分组是按照关键字传参数的,所以会把传进来的值 以字典的形式让kwargs接收;当没有参数的时候。就走index/路径,直接显示index首页就行了
【2】
当两个路径有冲突的时候,一定要把规则少的放在匹配多的上面,不然就会给覆盖了
【3】
在模板中渲染的时候,需要在后端先把数据查出来,然后在前端渲染
====================================
- 显示文章系列
- 查出所有的文章,渲染在页面(以及标题啊什么的,只要有article对象了,渲染的时候在页面中用.的方式,就可以查到信息了)
需要注意的是:这里需要判断一下。具体如下
print("-----------",kwargs) #接收到的是一个字典
kwargs = kwargs.get("site_article_category")
print("=======",kwargs) #得到的是site_article_category对应的值
if kwargs:
  print("xxxxxxxxxxxxxx")
  article_obj = models.Article.objects.filter(site_article_category__name=kwargs) # article_obj打印的是一个对象 ,如果点击的是左侧的,就让现实左侧的相关文章
else:
  article_obj = models.Article.objects.all()#如果没有点击左侧就查询所有的文章
- 点击头像跳转
<div class="avatar col-md-2">
<a href="{% url 'aaa' article.user.username %}"> <!-- 跳转路径--> 这里是用到了
<img src="{{ article.user.avatar.url }}" alt="" width="60" height="60"></a><!-- 图片路径-->
</div>
注意:
【1】:跳转路径
<a href="{% url 'aaa' article.user.username %}"> <!-- 跳转路径--> 这里是用到了反向解析(按照别名去匹配路径),因为url现在是有参数的,所以后面还得加上参数
url(r'^(?P<username>.*)/$', views.homesite, name='aaa'),
【2】:图片路径有两种方式:
1、我们也可以指定/media/{{article.user.avatar}}
2、直接{{article.user.avatar.url}} django会自动找到图片对应的位置
- 分页
{% if article_obj.has_previous %}
<li class="previous"><a href="{{ request.path_info }}?page={{ article_obj.previous_page_number }}">上一页</a></li>
{% else %}
<li class="previous disabled"><a href="#">上一页</a></li>
{% endif %}
注意:
【1】:一定要把跳转路径对应好了,不然就混乱了。
4、个人主页
设计个人主页的时候,可以仿照博客园的页面设计,当然每个人的个人主页都是不一样的,不过这个也挺简单的,下面会说到
我设计的个人主页:还是分了三大块
- 导航条:
- 左侧:
- 个人信息
- 我的标签
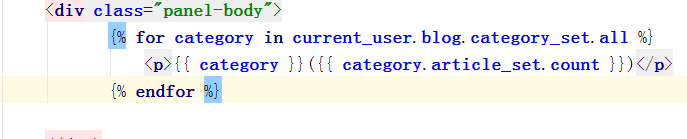
- 随笔分类
- 日期归档
- 右侧:显示文章
- 涉及到的知识点
1、模板继承
当点击文章标题的时候用到,因为当点击文章标题的时候,就要显示具体的文章内容
这时候需要再走一个路由,专门处理具体的文章内容的操作
 标题#}
<div class="title">
  <h4><a href="/blog/{{ current_user.username }}/articles/{{ article.id }}">{{ article.title }}</a></h4>
</div>
url:这里用到的是路由分发。。。
url(r'^(?P<username>.*)/articles/(?P<article_id>\d+)/$', views.article_detail),
注意:在admin录入文章内容数据的时候,如果你直接吧随便找的文章粘贴过来,这样粘贴过来的是没有样式的,我们要把html源码粘贴进去
当吧源码粘贴进去的时候会全部都是标签,而不是文章内容,这是由于做了安全机制了,吧标签当成是字符串了,我们得告诉浏览器。
我的代码是安全的,这样才会显示中文。
解决办法:safe <p>{{ article_obj.article_detail.content|safe }}</p>
2、ORM查询
1、查询操作
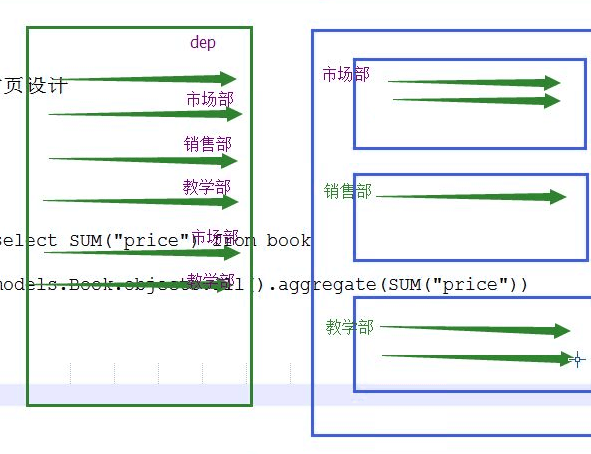
# 查询当前用户下的所有文章
current_user = models.UserInfo.objects.filter(username=username).first()
models.Article.objects.filter(user=current_user)
#查看当前用户的个人博客,(个人博客和用户是一对一的关系,一个用户有一个个人博客)
current_user.blog
#查询当前用户下的而所有的分类以及文章数
models.Classfication.objects.filter(blog=current_blog).annotate(count=Count("article__title")).values_list("title","count")
#查询当前用户下的而所有的标签以及文章数
models.Tag.objects.all().filter(blog=current_blog).annotate(count=Count("article__id")).values_list("name","count")
#查询当前用户下的而所有的年月日期以及文章数
models.Article.objects.all().filter(user=current_user).extra(select={"filter_create_date":"strftime('%%Y/%%m',create_time)"}).values_list("filter_create_date").annotate(Count("title"))
涉及:
基于对象查询
基于双下划线,分组函数 annotate
理解分组:
查日期的时候:extra过滤
3、左侧的标签分类和随笔分类,日期归档,当点击的时候跳转,参照博客园的跳转路径,具体操作和系统主页的类似,不需要模板继承,也不需要跳转到其他的地方,让还在当前页面上跳转
我们可以吧跳转路径匹配一下
url(r'^(?P<username>.*)/(?P<condition>category|tag|data)/(?P<para>.*)/$', views.homesite),
在HTML中:
日期归档,
<p><a href="/blog/{{ current_user.username }}/data/{{ data.0 }}/">{{ data.0 }}({{ data.1 }})</a></p>
随笔分类
<p><a href="/blog/{{ current_user.username }}/category/{{ category.0 }}/">{{ category.0 }}({{ category.1 }})</a></p>
标签分类
<p><a href="/blog/{{ current_user.username }}/tag/{{ tag.0 }}/">{{ tag.0 }}({{ tag.1 }})</a></p>
4、每个人都有一套默认的皮肤
1、在static下创建一个存皮肤的文件夹user_home_style
a.css 设置a样式
b.css 设置b样式
....
2、吧homesite里面的你不想用的样式删除了
3、在数据库里吧theme主题修改一下,存成 a.css
b.css
....
4、导入:在link的时候{{current_user.blog.theme}}
<link rel="stylesheet" href="/static/user_home_style/{{ current_user.blog.theme }}"> #这样就每个用户对应的样式就找到了
5、个人主页的文章详细以及点赞和评论
涉及到的知识点:
- ajax
- F查询
点赞思路:用ajax实现:
发送数据,要对那篇文章点赞,需要发一个article_id
还需要知道当前用户的id,这个我们可以不用ajax发了,直接在后端查出来,用request.user.nid
在后端接收数据
先创建赞示例
models.Article_poll.objects.create(user_id=user_id,article_id=article_id)
然后点赞数+1
models.Article.objects.filter(id=article_id).update(poll_count=F("poll_count")+1)
然后返回给前端,在前端渲染
渲染的时候
1、吧页面上的数字加1,并且显示点赞成功
2、如果已经点过赞了,提示不能重复点赞,
3、如果是用户登录了可以点赞,没有登录提示请先登录,登录做个超链接,链接到login页面
6、url:路径斜杠问题
当加/的时候,是从根目录拼接
当没有加/的时候,是从当前路径拼接
7、 查看当前用户
current_user = models.UserInfo.objects.filter(username=username).first()
print("current_user==========",current_user,type(current_user))
print("request.user.username======",request.user.username,type(request.user.username))
打印结果
current_user========== haiyan <class 'app01.models.UserInfo'> #对象
request.user.username====== haiyan <class 'str'> #字符串,,可以在页面中渲染
一、点赞与点灭
思路分析:
1、给点赞和点灭添加事件
2、发送ajax请求
3、实现点灭的时候需要在给表里面增加一个字段,不用再创建一张表来存储了
注意点赞和点灭。评论等涉及到的一个知识点:
事务:要么同时发生,要么同时不发生(就像你到银行里面取钱一样,你输了200,而取款机却把你的钱扣了,不给你钱。那你就不高兴了)
所以,当用户进行点赞的时候,创建赞示例和点赞数必须是同时发生的,当你点完一次赞,数据库里的赞和点赞数都是要增加的。这就用到事务了。
说起事务,在sql里面学过,那么怎么在django中实现事务呢?
1、首先需要导入:
from django.db import transaction
2、如下
 with transaction.atomic():
      print("========")
      # 当有人点赞的时候数据库的数据肯定会多一条
       models.Article_poll.objects.create(user_id=user_id,article_id=article_id)
       # 并且点赞数加1
       models.Article.objects.filter(id=article_id).update(up_count=F("up_count")+1)
下面是实现点赞和点灭的具体操作
class Article_poll(models.Model):
    '''文章点赞表'''
    time = models.DateTimeField(verbose_name="点赞时间",auto_now_add=True)
    article = models.ForeignKey(to="Article",verbose_name="点赞文章",null=True,blank=True)   #一个文章可以有多个赞
    user = models.ForeignKey(to="UserInfo",verbose_name="点赞人",null=True,blank=True)
    is_positive = models.BooleanField(default=1,verbose_name="点赞或踩")      #如果为True的时候代表式赞,如果是False的时候代表式
 //用ajax实现点赞
        $(".diggit").click(function () {
            if ($(".info").attr("user_name")) {  //登录状态
                $.ajax({
                    url: "/blog/poll/",
                    type: "POST",
                    data: {
                        csrfmiddlewaretoken: $("[name='csrfmiddlewaretoken']").val(),
                        article_id: "{{ article_obj.id }}",   //需要知道用户对那篇文章点赞
                        is_positive: "1"
                    },
                    success: function (data) {
                        var data = JSON.parse(data);
                        console.log(data["tishi"]);  //falseif (data["state"]) {
                            var val = parseInt($("#digg_count").html()) + 1;
                            $("#digg_count").html(val);
                            $(".message").html("点赞成功").css("color", "red");
                        }
                        else if (data["is_repeat"]) {
                            $(".message").html("不能重复点赞").css("color", "red")
                        }
                    }
                })
            }
            else {
                alert(location.pathname);  //拿到的是路径部分
                location.href = "/login/?next=" + location.pathname
            }
        });
点灭


 1 //用ajax实现点灭
 2         $(".buryit").click(function () {
 3             if ($.cookie("username")) {    //登录状态,和点赞一样,是第二种方式,建议用cookie的方式
 4                 $.ajax({
 5                     url: "/blog/poll/",
 6                     type: "POST",
 7                     headers: {"X-CSRFToken": $.cookie('csrftoken')},
 8                     data: {
 9                         csrfmiddlewaretoken: $("[name='csrfmiddlewaretoken']").val(),
10                         article_id: "{{ article_obj.id }}",
11                         is_positive: "0"
12                     },
13                     success: function (data) {
14                         var data = JSON.parse(data);
15                         console.log(data);
16                         console.log(data.tishi);
17                         if (data["state"]) {
18                             var val = parseInt($("#bury_count").html()) + 1;
19                             $("#bury_count").html(val);
20                             $(".message").html("踩成功").css("color", "red");
21                         }
22                         else if (data["is_repeat"]) {
23                             $(".message").html("不能重复点").css("color", "red")
24                         }
25                     }
26                 })
27             }
28             else {
29                 alert(location.pathname);  //拿到的是路径部分
30                 location.href = "/login/?next=" + location.pathname
31             }
32         });
views.py
 1 def poll(request):
 2     '''点赞和点灭操作'''
 3     pollresponse = {"state": True, "is_repeat": None}  # 如果state为True代表访问成功,is_repeat为是否重复
 4
 5     article_id = request.POST.get("article_id")
 6     user_id = request.user.nid
 7     is_positive = request.POST.get("is_positive")
 8     print("===========",is_positive)
 9     # print(article_id,user_id)
10     print("user",request.user.username)
11     # if models.Article_poll.objects.filter(user_id=user_id,article_id=article_id):
12     #     #如果这条记录存在,就不能在提交了,这是没有建联合唯一的时候实现的方法,有了联合唯一就不用判断了
13     #     pollresponse["state"] = False
14     #     pollresponse["is_repeat"] = True
15     # else:
16     try:
17         '''解决联合唯一的问题,如果是联合唯一你一创建就会报错,捕获一下走except的内容'''
18         if is_positive=="1":  #点赞
19             with transaction.atomic():
20                 print("========")
21                 # 当有人点赞的时候数据库的数据肯定会多一条
22                 models.Article_poll.objects.create(user_id=user_id,article_id=article_id)
23                 # 并且点赞数加1
24                 models.Article.objects.filter(id=article_id).update(up_count=F("up_count")+1)
25         else: #点灭
26             with transaction.atomic():
27                 print("=======zzzz")
28                 # 当有人点赞的时候数据库的数据肯定会多一条
29                 models.Article_poll.objects.create(user_id=user_id, article_id=article_id)
30                 # 并且点赞数加1
31                 models.Article.objects.filter(id=article_id).update(down_count=F("down_count")+1)
32     except:
33             pollresponse["state"] = False
34             pollresponse["is_repeat"] = True
35     return HttpResponse(json.dumps(pollresponse))
三、评论树
1、===============构建评论树=================
首先回顾一下可变类型和不可变数据类型
可变数据类型:[],{}
不可变数据类型:字符串,元组,数字
#吧father_comment_id为NULL的筛选出来,father_comment_id为none的说明是根评论(对文章的评论),有值就是子评论(对评论的评论)
comment_list=[
     {'id': 154, 'content': '发个', 'farther_comment_id': None},
     {'id': 155, 'content': '你好啊', 'farther_comment_id': None},
     {'id': 156, 'content': '嘻嘻', 'farther_comment_id': 155},
     {'id': 157, 'content': '哎呦', 'farther_comment_id': 156},
     {'id': 158, 'content': '不错。继续加油', 'farther_comment_id': None},
     {'id': 159, 'content': '运往直前', 'farther_comment_id': None},
     {'id': 160, 'content': '加油啦', 'farther_comment_id': 159},
     {'id': 161, 'content': '爱你啊', 'farther_comment_id': 159},
     {'id': 162, 'content': '@undefined\n的说的得分是', 'farther_comment_id': None}
]
一开始查到的所有的评论是这样的列表,我们需要把这些数据构建一下,方便处理
# ===========放一个字典,吧id提出来,并且在每一个字典中加一个"children_comment":[]键值对==========
comment_dict = {}
for comment in comment_list:
    comment["children_comment"] = []
    comment_dict[comment["id"]]=comment
# print(comment_dict)   #{1:{"":"","":""},2:{"":"","":""},3:{}}
{
    154: {'id': 154, 'content': '发个', 'farther_comment_id': None, 'children_comment': []},
    155: {'id': 155, 'content': '你好啊', 'farther_comment_id': None, 'children_comment': []},
    156: {'id': 156, 'content': '嘻嘻', 'farther_comment_id': 155, 'children_comment': []},
    157: {'id': 157, 'content': '哎呦', 'farther_comment_id': 156, 'children_comment': []},
    158: {'id': 158, 'content': '不错。继续加油', 'farther_comment_id': None, 'children_comment': []},
    159: {'id': 159, 'content': '运往直前', 'farther_comment_id': None, 'children_comment': []},
    160: {'id': 160, 'content': '加油啦', 'farther_comment_id': 159, 'children_comment': []},
    161: {'id': 161, 'content': '爱你啊', 'farther_comment_id': 159, 'children_comment': []},
    162: {'id': 162, 'content': '@undefined\n的说的得分是', 'farther_comment_id': None, 'children_comment': []}
}
找farther_comment_id为none的存放起来
comment_tree=[]
for comment in comment_list:
    pid = comment["farther_comment_id"]
    if pid:   #如果有值就找到对应的pid添加到children_comment列表中
        comment_dict[pid]["children_comment"].append(comment)
    else:
        '''如果pid为none的时候找一个列表存起来'''
        comment_tree.append(comment)
print(comment_tree)
最后拿到的comment_tree是这样的
'''
comment_tree:
[
 {
        'id': 154,
        'content': '发个',
        'farther_comment_id': None,
        'children_comment': [

        ]
    },
    {
        'id': 155,
        'content': '你好啊',
        'farther_comment_id': None,
        'children_comment': [
            {
                'id': 156,
                'content': '嘻嘻',
                'farther_comment_id': 155,
                'children_comment': [
                    {
                        'id': 157,
                        'content': '哎呦',
                        'farther_comment_id': 156,
                        'children_comment': [

                        ]
                    }
                ]
            }
        ]
    },
    {
        'id': 158,
        'content': '不错。继续加油',
        'farther_comment_id': None,
        'children_comment': []
    },
    {
        'id': 159,
        'content': '运往直前',
        'farther_comment_id': None,
        'children_comment': [
            {
                'id': 160,
                'content': '加油啦',
                'farther_comment_id': 159,
                'children_comment': [

                ]
            },
            {
                'id': 161,
                'content': '爱你啊',
                'farther_comment_id': 159,
                'children_comment': [

                ]
            }
        ]
    },
    {
        'id': 162,
        'content': '@undefined\n的说的得分是',
        'farther_comment_id': None,
        'children_comment': [

        ]
    }
]
'''
2、===============获取评论树=================
在后端吧上面结构化的数据返回过去,
在前端发ajax请求:
    $.ajax({
        url:"/blog/commentTree/{{article_obj.id}}",
        type:"post",
        success:function(data){
            console.log(data)
            var data = JSON.parse(data)
            //定义一个展开评论树的函数
            var s = showCommentTree(data)
            $(".comment_tree_list").append(s)
        }
    })
3、===============展开评论树=================
展开应该是这样的层级
2
    2222
        22222
3
    33
4
模拟上面的层级结构
<div class="comment_tree_list">
        <div class="comment_list">
            <div class="content_t"><span>2</span></div>
            <div class="comment_list">
                <div class="content_t"><span>2222</span></div>
                <div class="comment_list">
                    <div class="content_t"><span>22222</span></div>
                </div>
            </div>
        </div>
        <div class="comment_list">
            <div class="content"><span>3</span></div>
        </div>
      </div>
</div>
通过下面的函数构建像上面这样的结构
function showCommentTree(comment_list){   //comment_list传进来的那个data[{},{},{}]

    var html = ''
    $.each(comment_list,function(i,comment_dict){  //comment_dict是一个一个的字典
        var val = comment_dict["content"]
        var content_str = '<div class="comment_list"><div class="content"><span>+val+</span></div>'
     if(comment_dict["chidren_commentList"]){
            var s=showCommentTree(comment_dict["chidren_commentList"]);    // [{},{}]
            commnent_str+=s
        }
    content_str+="</div>"吧最后的div拿走,拼接一下(因为有时候你不确定它的中间还有没有自评论,不要给写死了)
     html +=content_str })

  return html #返回的值让s接收了
 }

错开他们的位置:找到content_t标签,margin-left
递归函数的两个条件:

  1、自己调用自己,,,,
  2、有一个结束条件。,,
四、关于评论回复点赞按钮是不是要求必须用户是登陆状态
 客户端如何判断是否登录:

             方法1:设置自定义的属性
                   <div class="info" user_username="{{ request.user.username }}" article_id="{{ article_obj.nid }}"></div>

                   if ($(".info").attr("user_username")){// 登录成功状态}

             方法2:在服务端设置cookie

                    obj=render(request,"article_detail.html",locals())

                    obj.set_cookie("user_username",request.user.username)
                    return obj


                   if($.cookie("user_username")){// 登录成功状态}
这两种方式也有好处:
  当我们在js文件在外部引用的时候,只要是有模板语法的都是不被渲染的。(因为当render返回页面的时候,会渲染整个页面,当它吧整个页面渲染完的时候,才发现有个<script src="xxx.js"></script>),这时候当在去请求这个路径的时候就不会渲染了,因为已经渲染完成了
   所以我们可以采用上面的方式,吧模板语法替换了
五、跳转问题:从哪来跳那去( window.location.href)
当你打开文章要看的时候,你进行点赞跳转到登录,当用户登录进来的时候应该看到的也是当前的文章页面
思路:获取上一次的url路径
有三种方式:
一:根据location.pathname:
location.pathname :返回的是当前url的路径部分
    article_detail.html:
                if 未登录:location.href="/login/?next="+location.pathname     // /login/?next=/blog/yuan/articles/1

                login.html:
                       if (response["is_login"]){

                           if(location.search.slice(6)){   // /blog/yuan/articles/1           //location.search只拿问号后面的,包括问号
                                                       #如果拿到的是当前你点击的文章的那个路径就还是让跳转的这个位置

                               location.href=location.search.slice(6)
                           }
                           else {
                                location.href="/"
                           }

                       }
二: 根据(document.referrer)
 referrer是上一次请求的路径
 article_detail.html:
     if 未登录:location.href="/login/"

 login.html:
     if (response["is_login"]){

             if(document.referrer){   // /blog/yuan/articles/1   如果是上一次请求的路径,就额昂跳转到上一次请求的路径

                  location.href=document.referrer
          }
             else {
                  location.href="/"
          }

  }
三:根据cookie设置next_path(推荐用这种)
 views.py :
 def articleDetail(request)

       obj=render(request,"article_detail.html",locals())
       obj.set_cookie("next_path",request.path)
       return obj


article_detail.html:
       if 未登录:location.href="/login/"
login.html:
        if (response["is_login"]){
              $.cookie("next_path")
              if($.cookie("next_path")){   // /blog/yuan/articles/1
                     location.href=$.cookie("next_path")
              }
             else {
                     location.href="/"
           }

       }
五、计算园龄的时间
计算园龄的时间:用先在的时间减去创建的时间
由于时间没有减法的过滤器,我们可以自定义一个过滤器
1、创建一个templatetags文件夹------文件夹下创建myfilter.py
2、需要导入
from django import template
import datetime
from django.utils.safestring import mark_safe
3、开始写计算时间差的函数
register = template.Library()  # register的名字是固定的,不可改变
@register.filter  #过滤器
def yuanlingtime(createtime):
    #计算时间差:当前的时间减去创建的时间
    now_time = datetime.datetime.now()   #当前的时间
    user_create_time = datetime.datetime(year=createtime.year,month=createtime.month,day=createtime.day,hour=createtime.hour,minute=createtime.minute,second=createtime.second)
    ret = now_time-user_create_time
    print("---------",ret)  #5 days, 15:51:47.855688
    print(type(ret))  #<class 'datetime.timedelta'>
    return mark_safe(str(ret)[:-17])  #mark_dafe只是做一个安全机制,和safe过滤器一样,安全之后返回
# print(datetime.datetime(year=2017,month=2,day=5))  #2017-02-05 00:00:00
4、在模板中调用过滤器
  先导入:
 {% load myfilter %}
  <p>园龄:{{ current_user.create_time|yuanlingtime }}</p>

 浙公网安备 33010602011771号