
PaddleOCR安装与使用
一、安装
1.1 环境环境
CentOS 7 / Ubuntu16.04 / Ubuntu18.04 / Ubuntu20.04 (64bit)  // 这里是有CentOS 7

GPU版本支持CUDA 10.1/10.2/11.2  // 默认使用CPU版本

conda 版本 4.8.3+ (64 bit)
1.2 安装Anaconda
# 首先安装wget
sudo yum install wget  # CentOS
# 然后使用wget从清华源上下载
# 如要下载Anaconda3-2021.05-Linux-x86_64.sh,则下载命令如下:
wget https://mirrors.tuna.tsinghua.edu.cn/anaconda/archive/Anaconda3-2021.05-Linux-x86_64.sh
# 若您要下载其他版本,需要将最后1个/后的文件名改成您希望下载的版本
下载完毕,进行安装
[root@k8s-node-2 home]# sh Anaconda3-2021.05-Linux-x86_64.sh

Welcome to Anaconda3 2021.05

In order to continue the installation process, please review the license
agreement.
Please, press ENTER to continue
>>>
根据要求按 ENTER 键,浏览许可条款
Last updated April 5, 2021

Do you accept the license terms? [yes|no]
[no] >>>
输入yes 回车,同意许可条款
Anaconda3 will now be installed into this location:
/root/anaconda3

  - Press ENTER to confirm the location
  - Press CTRL-C to abort the installation
  - Or specify a different location below

[/root/anaconda3] >>> /home/anaconda
指定安装目录,此处安装目录是 /home/anaconda,回车等待安装完毕。
注意:后续若是报错
- 一般情况是安装包是不完整的,重新下载。下载完记得删除原来的 anaconda 文件,才能重新安装。
- 或者服务器磁盘资源不足,无法继续安装。
当看到如下信息,恭喜你安装成功
If you'd prefer that conda's base environment not be activated on startup,
   set the auto_activate_base parameter to false:

conda config --set auto_activate_base false

Thank you for installing Anaconda3!

===========================================================================

Working with Python and Jupyter notebooks is a breeze with PyCharm Pro,
designed to be used with Anaconda. Download now and have the best data
tools at your fingertips.

PyCharm Pro for Anaconda is available at: https://www.anaconda.com/pycharm
1.3 将conda加入环境变量
vim ~/.bashrc
# 在第一行输入:
export PATH="/home/anaconda/bin:$PATH"
# 本次安装地址是/home/anaconda,保存并退出
 # 修改后的~/.bash_profile文件应如下(其中xxx为用户名):
 export PATH="~/opt/anaconda3/bin:$PATH"
 # >>> conda initialize >>>
 # !! Contents within this block are managed by 'conda init' !!
 __conda_setup="$('/Users/xxx/opt/anaconda3/bin/conda' 'shell.bash' 'hook' 2> /dev/null)"
 if [ $? -eq 0 ]; then
     eval "$__conda_setup"
 else
     if [ -f "/Users/xxx/opt/anaconda3/etc/profile.d/conda.sh" ]; then
         . "/Users/xxx/opt/anaconda3/etc/profile.d/conda.sh"
     else
         export PATH="/Users/xxx/opt/anaconda3/bin:$PATH"
     fi
 fi
 unset __conda_setup
 # <<< conda initialize <<<
1.4 验证是否识别conda命令
在终端中输入source ~/.bash_profile以更新环境变量
再在终端输入conda info --envs,若能显示当前有base环境,则conda已加入环境变量
二、创建conda环境
2.1 使用命令创建conda环境
conda create --name paddle_env python=3.7 --channel https://mirrors.tuna.tsinghua.edu.cn/anaconda/pkgs/free/
该命令会创建1个名为paddle_env、python版本为3.7的可执行环境,根据网络状态,需要花费一段时间。
之后命令行中会输出提示信息,输入y并回车继续安装。
# To activate this environment, use
#
#     $ conda activate paddle_env
#
# To deactivate an active environment, use
#
#     $ conda deactivate
看到如上信息,新的conda环境就创建好了。
2.2 激活刚创建的conda环境,在命令行中输入以下命令:
# 激活paddle_env环境
conda activate paddle_env
以上anaconda环境和python环境安装完毕。
如果激活conda环境提示。
CommandNotFoundError: Your shell has not been properly configured to use 'conda activate'.
To initialize your shell, run

    $ conda init <SHELL_NAME>

Currently supported shells are:
  - bash
  - fish
  - tcsh
  - xonsh
  - zsh
  - powershell

See 'conda init --help' for more information and options.

IMPORTANT: You may need to close and restart your shell after running 'conda init'.
表示配置 ~/.bashrc 失败,将如下内容copy到 ~/.bashrc 内,保存退出后,再次使用命令 source ~/.bashrc 使配置生效
# >>> conda initialize >>>
# !! Contents within this block are managed by 'conda init' !!
__conda_setup="$('/home/anaconda/bin/conda' 'shell.bash' 'hook' 2> /dev/null)"
if [ $? -eq 0 ]; then
    eval "$__conda_setup"
else
    if [ -f "/home/anaconda/etc/profile.d/conda.sh" ]; then
        . "/home/anaconda/etc/profile.d/conda.sh"
    else
        export PATH="/home/anaconda/bin:$PATH"
    fi
fi
unset __conda_setup
# <<< conda initialize <<<
注意配置路径改为自己所安装的路径。
[root@k8s-node-2 ~]# vim ~/.bashrc
[root@k8s-node-2 ~]# source ~/.bashrc
(base) [root@k8s-node-2 ~]# conda activate paddle_env
(paddle_env) [root@k8s-node-2 ~]#
以上表示paddle_env环境创建、激活成功。
三、安装paddlepaddle、paddleocr
在paddle_env环境安装paddlepaddle、paddleocr
python3 -m pip install paddlepaddle==2.3.0 -i https://mirror.baidu.com/pypi/simple
亲测:就算自己的服务器是GPU架构,直接安装paddlepaddle即可,不要安装paddlepaddle-gpu,原因就是其依赖CUDA,安装 CUDA 和 cuDNN 太复杂了。
python3 -m pip install paddleocr -i https://mirror.baidu.com/pypi/simple
安装paddleocr时如果报如下错误:
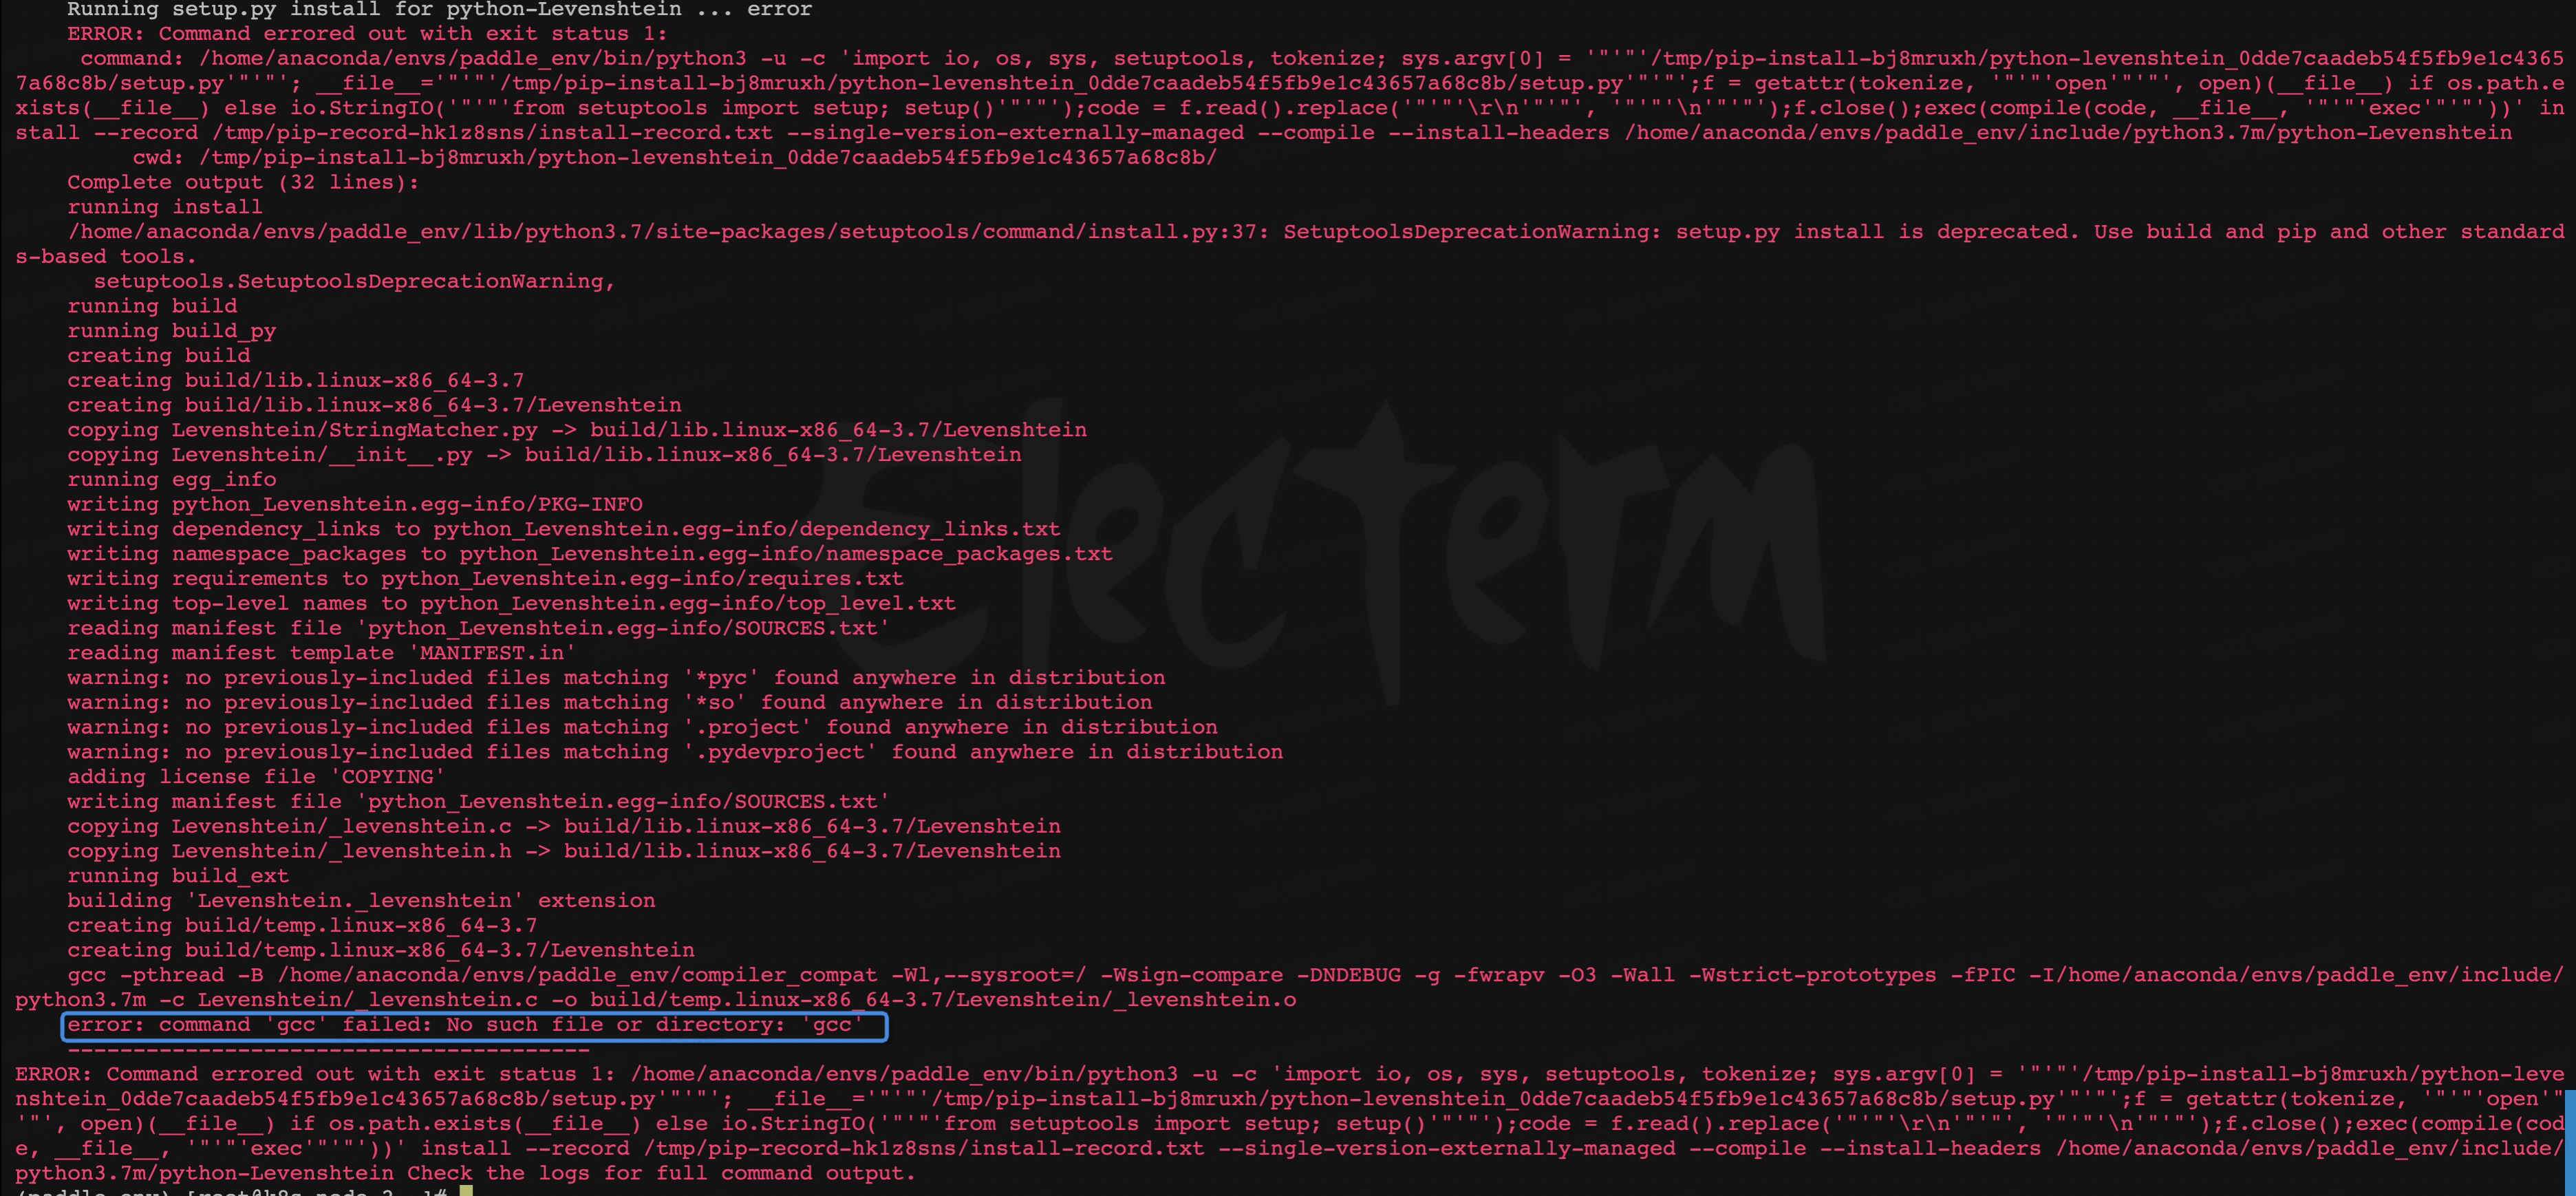
解决方法如下:
sudo yum install python3-dev
sudo yum install gcc
重新安装paddleocr,看到如下结果及成功

验证安装是否成功:
(paddle_env) [root@k8s-node-2 ~]# python
Python 3.7.13 (default, Mar 29 2022, 02:18:16)
[GCC 7.5.0] :: Anaconda, Inc. on linux
Type "help", "copyright", "credits" or "license" for more information.
>>> from paddleocr import PaddleOCR, draw_ocr
Traceback (most recent call last):
  File "<stdin>", line 1, in <module>
  File "/home/anaconda/envs/paddle_env/lib/python3.7/site-packages/paddleocr/__init__.py", line 14, in <module>
    from .paddleocr import *
  File "/home/anaconda/envs/paddle_env/lib/python3.7/site-packages/paddleocr/paddleocr.py", line 25, in <module>
    import cv2
  File "/home/anaconda/envs/paddle_env/lib/python3.7/site-packages/cv2/__init__.py", line 5, in <module>
    from .cv2 import *
ImportError: libGL.so.1: cannot open shared object file: No such file or directory
>>>
解决方法:
如果已经安装了 opencv-python-headless ,需要先卸载然后重新安装
pip uninstall opencv-python-headless
python3 -m pip install "opencv-python-headless<4.3" -i https://mirror.baidu.com/pypi/simple
继续验证:
(paddle_env) [root@k8s-node-2 ~]# python
Python 3.7.13 (default, Mar 29 2022, 02:18:16)
[GCC 7.5.0] :: Anaconda, Inc. on linux
Type "help", "copyright", "credits" or "license" for more information.
>>> from paddleocr import PaddleOCR, draw_ocr
>>>
没有报错,表示离成功更进一步。
执行一段代码继续验证:
from paddleocr import PaddleOCR, draw_ocr

# Paddleocr目前支持的多语言语种可以通过修改lang参数进行切换
# 例如`ch`, `en`, `fr`, `german`, `korean`, `japan`
ocr = PaddleOCR(use_angle_cls=True, lang="ch")  # need to run only once to download and load model into memory
img_path = '/root/aa.jpg' # 注意上传一张图片,并修改正确的图片地址
result = ocr.ocr(img_path, cls=True)
for line in result:
    print(line)
看到如下结果,及安装成功
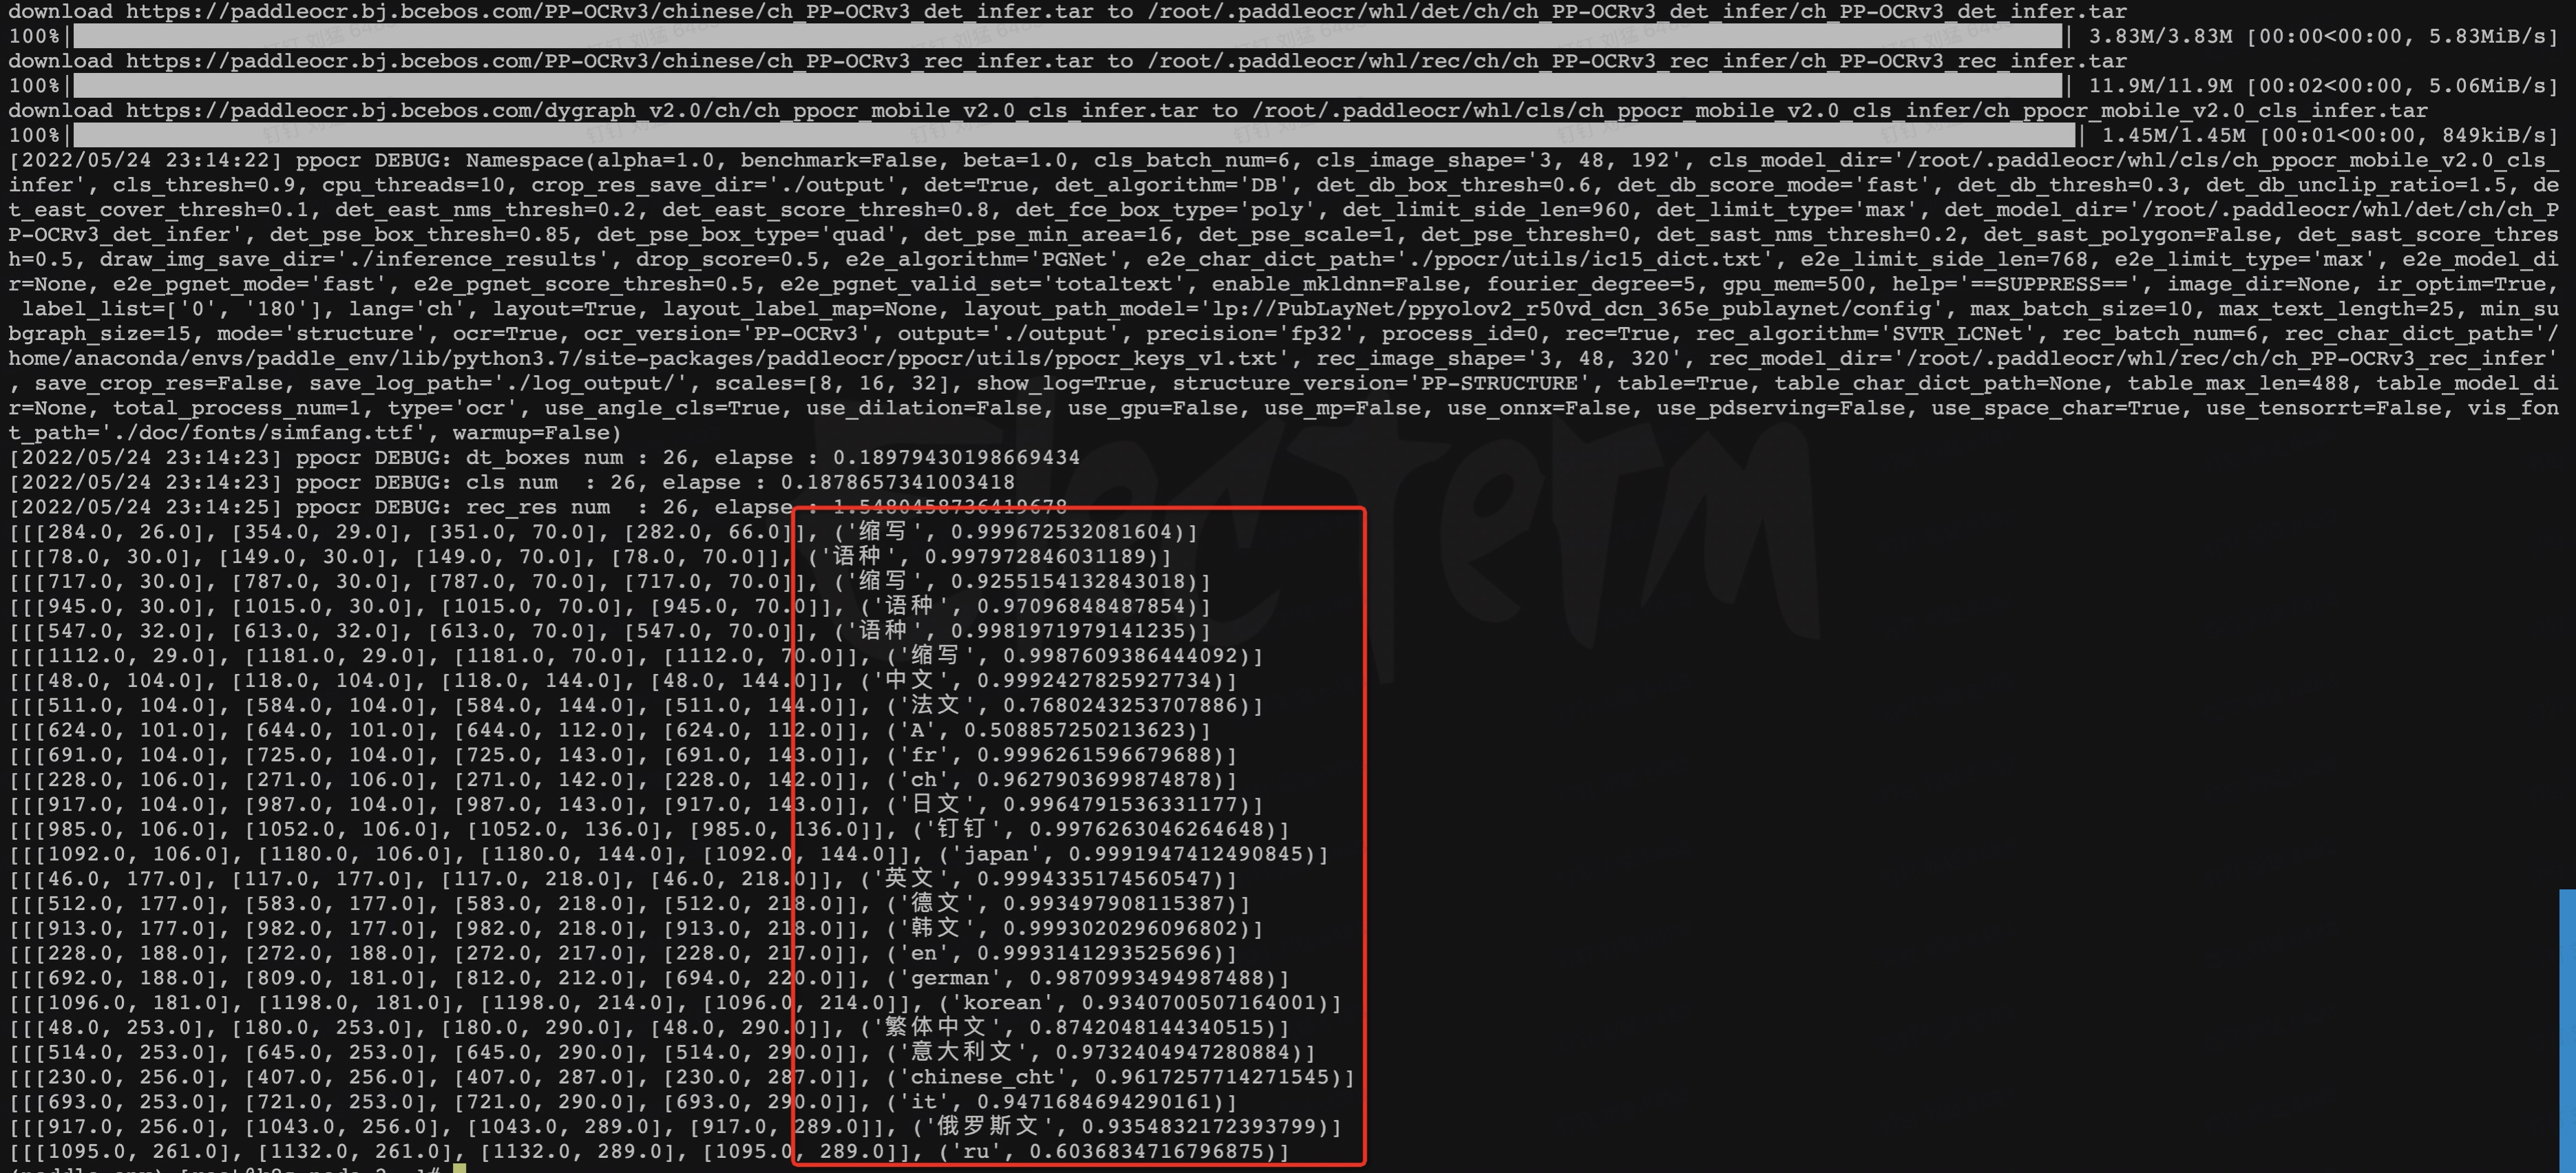
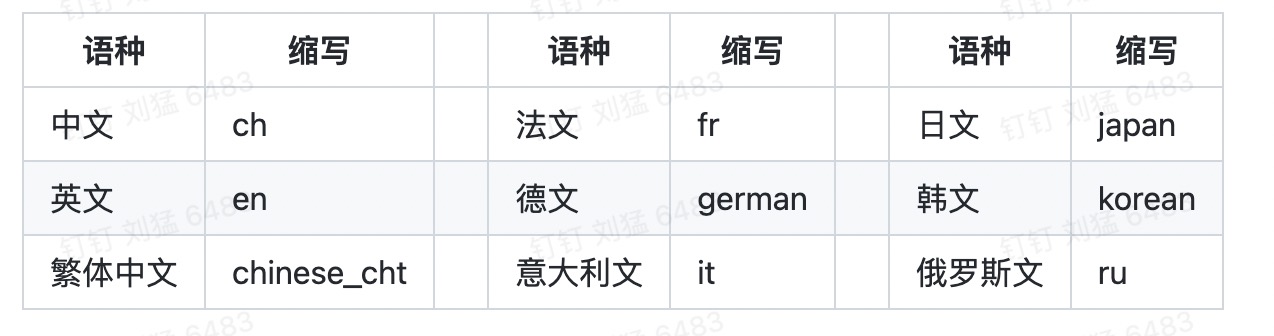
aa.py图片如下:
结束!

 浙公网安备 33010602011771号