Android悬浮窗实现 使用WindowManager

本文转载自: http://blog.csdn.net/stevenhu_223/article/details/8504058

悬浮窗口的实现涉及到WindowManager(基于4.0源码分析),它是一个接口,实现类有WindowManagerImpl,CompatModeWrapper(WindowManagerImpl的内部类),LocalWindowManager(Window的内部类),它们之间的关系如下图的类图:
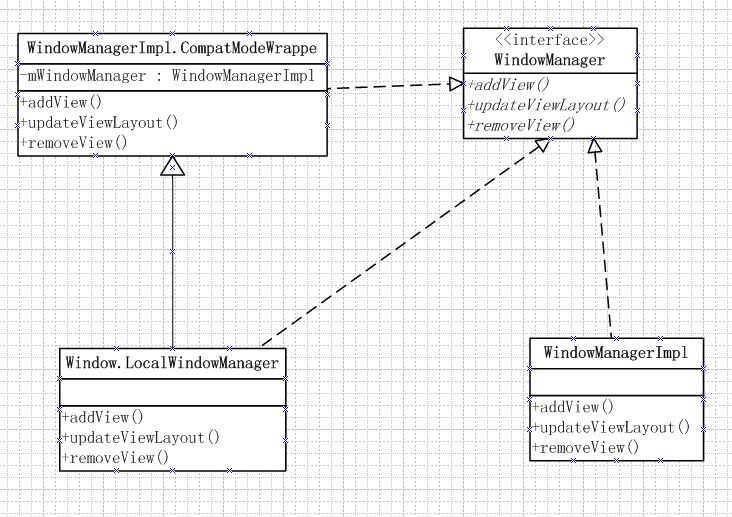


WindowManagerImpl:

      1.是WindowManager的实现类,windowmanager的大部分操作都在这里实现,但是并不会直接调用,而是作为LocalWindowManager和WindowManagerImpl.CompatModeWrapper的成员变量来使用。

       2.在WindowManagerImpl中有3个数组View[],ViewRoot[],WindowManager.LayoutParams[],分别用来保存每个图层的数据。

       3.WindowManagerImpl最重要的作用就是用来管理View,LayoutParams, 以及ViewRoot这三者的对应关系。

LocalWindowManager:

     在源码的Activity类中,有一个重要的成员变量mWindow(它的实现类为PhoneWindow),同时也有一个成员变量mWindowManager(跟踪源码可知它是一个LocalWindowManager),而在PhoneWindow中同时也有和Activity相同名字的mWindowManager成员变量。而且Activity中的mWindowManager是通过Window类中的setWindowManager函数初始化获取的。

    所以,在Activity中的LocalWindowManager的生命周期是小于Activity的生命周期的,而且在ActivityThread每创建一个Activity时都有该Activity对应的一个属于它的LocalWindowManager。

    对LocalWindowManager的小结:

      1.该类是Window的内部类,父类为CompatModeWrapper,同样都是实现WindowManager接口。

       2.每个Activity中都有一个mWindowManager成员变量,Window类中 也有相应的同名字的该成员变量。该变量是通过调用Window的setWindowManager方法初始化得到的,实际上是一个LocalWindowManger对象。

       3.也就说,每生成的一个Activity里都会构造一个其相应LocalWindowManger来管理该Activity承载的图层。(该对象可以通过Activity.getWindowManager或getWindow().getWindowManager获取)

         4.LocalWindowMangers 的生命周期小于Activity的生命周期,(因为mWindowManager是Window的成员变量,而mWindow又是Activity的成员变量),所以,如果我们在一个LocalwindowManager中手动添加了其他的图层, 在Activity的finish执行之前, 应该先调用LocalwindowManager的removeView, 否则会抛出异常。

CompatModeWrapper:

    该类就是实现悬浮窗口的重要类了。

    跟踪源码可知:

      1.CompatModeWrapper相当于是一个壳,而真正实现大部分功能的是它里面的成员变量mWindowManager(WindowManagerImpl类)。

      2.该对象可以通过getApplication().getSystemService(Context.WINDOW_SERVICE)得到。(注:如果是通过activity.getSystemService(Context.WINDOW_SERVICE)得到的只是属于Activity的LocalWindowManager)。

      3.这个对象的创建是在每个进程开始的时候, 通过ContextImpl中的静态代码块创建的, 它使用了单例模式, 保证每个application只有一个。

      4.通过该类可以实现创建添加悬浮窗口,也就是说,在退出当前Activity时,通过该类创建的视图还是可见的,它是属于整个应用进程的视图,存活在进程中,不受Activity的生命周期影响。


ok,在通过上面对WindowManager接口的实现类做一些简要的介绍后,接下来就动手编写实现悬浮窗口的App。既然我们知道可以通过getApplication().getSystemService(Context.WINDOW_SERVICE)得到CompatModeWrapper,然后实现应用添加悬浮窗口视图。那么,具体的实现操作可以在Activity或者Service中(这两者都是可以创建存活在应用进程中的Android重要组件)实现。


下面的App程序代码实现通过主Activity的启动按钮,启动一个Service,然后在Service中创建添加悬浮窗口:

       要获取CompatModeWrapper,首先得在应用程序的AndroidManifest.xml文件中添加权限<uses-permission android:name="android.permission.SYSTEM_ALERT_WINDOW" />

      MainActivity的代码如下:

1
2
3
4
5
6
7
8
9
10
11
12
13
14
15
16
17
18
19
20
21
22
23
24
25
26
27
28
29
30
31
32
33
34
35
36
37
38
39
40
41
42
public class MainActivity extends Activity
{
 
    @Override
    public void onCreate(Bundle savedInstanceState)
    {
        super.onCreate(savedInstanceState);
        setContentView(R.layout.main);
        //获取启动按钮
        Button start = (Button)findViewById(R.id.start_id);
        //获取移除按钮
        Button remove = (Button)findViewById(R.id.remove_id);
        //绑定监听
        start.setOnClickListener(new OnClickListener()
        {
             
            @Override
            public void onClick(View v)
            {
                // TODO Auto-generated method stub
                Intent intent = new Intent(MainActivity.this, FxService.class);
                //启动FxService
                startService(intent);
                finish();
            }
        });
         
        remove.setOnClickListener(new OnClickListener()
        {
             
            @Override
            public void onClick(View v)
            {
                //uninstallApp("com.phicomm.hu");
                Intent intent = new Intent(MainActivity.this, FxService.class);
                //终止FxService
                stopService(intent);
            }
        });
         
    }
}


     FxService的代码如下:

1
2
3
4
5
6
7
8
9
10
11
12
13
14
15
16
17
18
19
20
21
22
23
24
25
26
27
28
29
30
31
32
33
34
35
36
37
38
39
40
41
42
43
44
45
46
47
48
49
50
51
52
53
54
55
56
57
58
59
60
61
62
63
64
65
66
67
68
69
70
71
72
73
74
75
76
77
78
79
80
81
82
83
84
85
86
87
88
89
90
91
92
93
94
95
96
97
98
99
100
101
102
103
104
105
106
107
108
109
110
111
112
113
114
115
116
117
118
119
120
121
122
123
124
125
126
127
128
129
130
131
132
133
134
135
package com.phicomm.hu;
 
import android.app.Service;
import android.content.Intent;
import android.graphics.PixelFormat;
import android.os.Handler;
import android.os.IBinder;
import android.util.Log;
import android.view.Gravity;
import android.view.LayoutInflater;
import android.view.MotionEvent;
import android.view.View;
import android.view.WindowManager;
import android.view.View.OnClickListener;
import android.view.View.OnTouchListener;
import android.view.WindowManager.LayoutParams;
import android.widget.Button;
import android.widget.LinearLayout;
import android.widget.Toast;
 
public class FxService extends Service
{
 
    //定义浮动窗口布局
    LinearLayout mFloatLayout;
    WindowManager.LayoutParams wmParams;
    //创建浮动窗口设置布局参数的对象
    WindowManager mWindowManager;
     
    Button mFloatView;
     
    private static final String TAG = "FxService";
     
    @Override
    public void onCreate()
    {
        // TODO Auto-generated method stub
        super.onCreate();
        Log.i(TAG, "oncreat");
        createFloatView();     
    }
 
    @Override
    public IBinder onBind(Intent intent)
    {
        // TODO Auto-generated method stub
        return null;
    }
 
    private void createFloatView()
    {
        wmParams = new WindowManager.LayoutParams();
        //获取的是WindowManagerImpl.CompatModeWrapper
        mWindowManager = (WindowManager)getApplication().getSystemService(getApplication().WINDOW_SERVICE);
        Log.i(TAG, "mWindowManager--->" + mWindowManager);
        //设置window type
        wmParams.type = LayoutParams.TYPE_PHONE;
        //设置图片格式,效果为背景透明
        wmParams.format = PixelFormat.RGBA_8888;
        //设置浮动窗口不可聚焦(实现操作除浮动窗口外的其他可见窗口的操作)
        wmParams.flags = LayoutParams.FLAG_NOT_FOCUSABLE;     
        //调整悬浮窗显示的停靠位置为左侧置顶
        wmParams.gravity = Gravity.LEFT | Gravity.TOP;      
        // 以屏幕左上角为原点,设置x、y初始值,相对于gravity
        wmParams.x = 0;
        wmParams.y = 0;
 
        //设置悬浮窗口长宽数据 
        wmParams.width = WindowManager.LayoutParams.WRAP_CONTENT;
        wmParams.height = WindowManager.LayoutParams.WRAP_CONTENT;
 
         /*// 设置悬浮窗口长宽数据
        wmParams.width = 200;
        wmParams.height = 80;*/
    
        LayoutInflater inflater = LayoutInflater.from(getApplication());
        //获取浮动窗口视图所在布局
        mFloatLayout = (LinearLayout) inflater.inflate(R.layout.float_layout, null);
        //添加mFloatLayout
        mWindowManager.addView(mFloatLayout, wmParams);
        //浮动窗口按钮
        mFloatView = (Button)mFloatLayout.findViewById(R.id.float_id);
         
        mFloatLayout.measure(View.MeasureSpec.makeMeasureSpec(0,
                View.MeasureSpec.UNSPECIFIED), View.MeasureSpec
                .makeMeasureSpec(0, View.MeasureSpec.UNSPECIFIED));
        Log.i(TAG, "Width/2--->" + mFloatView.getMeasuredWidth()/2);
        Log.i(TAG, "Height/2--->" + mFloatView.getMeasuredHeight()/2);
        //设置监听浮动窗口的触摸移动
        mFloatView.setOnTouchListener(new OnTouchListener()
        {
             
            @Override
            public boolean onTouch(View v, MotionEvent event)
            {
                // TODO Auto-generated method stub
                //getRawX是触摸位置相对于屏幕的坐标,getX是相对于按钮的坐标
                wmParams.x = (int) event.getRawX() - mFloatView.getMeasuredWidth()/2;
                Log.i(TAG, "RawX" + event.getRawX());
                Log.i(TAG, "X" + event.getX());
                //减25为状态栏的高度
                wmParams.y = (int) event.getRawY() - mFloatView.getMeasuredHeight()/2 - 25;
                Log.i(TAG, "RawY" + event.getRawY());
                Log.i(TAG, "Y" + event.getY());
                 //刷新
                mWindowManager.updateViewLayout(mFloatLayout, wmParams);
                return false//此处必须返回false,否则OnClickListener获取不到监听
            }
        });
         
        mFloatView.setOnClickListener(new OnClickListener()
        {
             
            @Override
            public void onClick(View v)
            {
                // TODO Auto-generated method stub
                Toast.makeText(FxService.this, "onClick", Toast.LENGTH_SHORT).show();
            }
        });
    }
     
    @Override
    public void onDestroy()
    {
        // TODO Auto-generated method stub
        super.onDestroy();
        if(mFloatLayout != null)
        {
            //移除悬浮窗口
            mWindowManager.removeView(mFloatLayout);
        }
    }
     
}


      悬浮窗口的布局文件为R.layout.float_layout,所以,如果我们想设计一个非常美观的悬浮窗口,可以在该布局文件里编写。当然,也可以使用自定义View来设计(哈哈,少年们,在此基础上发挥想象吧)。

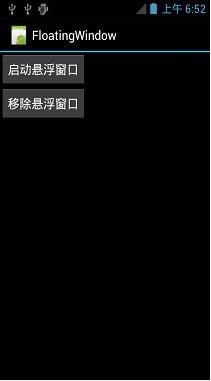
     上面代码的效果图如下:左边为启动界面。点击“启动悬浮窗口”按钮,会启动后台service创建悬浮窗口,同时finish当前Activity,这样一个悬浮窗口就创建出来了,该窗口可实现任意位置移动,且可点击监听创建Toast提示(当然,也可以启动一个Activity)。若要移除已创建的窗口,可点击“移除悬浮窗口按钮”,或者强制禁止该应用进程。


同样的,在一个Activity里绘制悬浮视图,不过下面的代码主要还是验证区分LocalWindowManger和CompatModeWrapper添加的视图。

      LocalWindowManger可通过activity.getSystemService(Context.WINDOW_SERVICE)或getWindow().getWindowManager获取。当我们通过LocalWindowManger添加视图时,退出Activity,添加的视图也会随之消失。

        验证代码如下:

1
2
3
4
5
6
7
8
9
10
11
12
13
14
15
16
17
18
19
20
21
22
23
24
25
26
27
28
29
30
31
32
33
34
35
36
37
38
39
40
41
42
43
44
45
46
47
48
49
50
51
52
53
54
55
56
57
58
59
60
61
62
63
64
65
66
67
68
69
70
71
72
73
74
75
76
77
78
79
80
81
82
83
84
85
86
87
88
89
90
91
92
93
94
95
96
97
98
99
100
101
102
103
104
105
106
107
108
109
110
111
112
113
114
115
116
117
118
119
120
121
122
123
124
125
126
127
128
129
130
131
132
133
package com.phicomm.hu;
 
import android.app.Activity;
import android.content.Context;
import android.content.Intent;
import android.graphics.PixelFormat;
import android.os.Bundle;
import android.util.Log;
import android.view.Gravity;
import android.view.LayoutInflater;
import android.view.MotionEvent;
import android.view.View;
import android.view.WindowManager;
import android.view.View.OnClickListener;
import android.view.View.OnTouchListener;
import android.view.WindowManager.LayoutParams;
import android.widget.Button;
import android.widget.LinearLayout;
 
public class FloatWindowTest extends Activity
{
    /** Called when the activity is first created. */
     
    private static final String TAG = "FloatWindowTest";
    WindowManager mWindowManager;
    WindowManager.LayoutParams wmParams;
    LinearLayout mFloatLayout;
    Button mFloatView;
    @Override
    public void onCreate(Bundle savedInstanceState)
    {
        super.onCreate(savedInstanceState);
        //createFloatView();
        setContentView(R.layout.main);
         
        Button start = (Button)findViewById(R.id.start);
        Button stop = (Button)findViewById(R.id.stop);
         
        start.setOnClickListener(new OnClickListener()
        {
             
            @Override
            public void onClick(View v)
            {
                // TODO Auto-generated method stub
                createFloatView();
                //finish();
                //handle.post(r);
            }
        });
         
        stop.setOnClickListener(new OnClickListener()
        {
             
            @Override
            public void onClick(View v)
            {
                // TODO Auto-generated method stub
                if(mFloatLayout != null)
                {
                    mWindowManager.removeView(mFloatLayout);
                    finish();
                }  
        }
        });
         
         
    }
     
    private void createFloatView()
    {
        //获取LayoutParams对象
        wmParams = new WindowManager.LayoutParams();
         
        //获取的是LocalWindowManager对象
        mWindowManager = this.getWindowManager();
        Log.i(TAG, "mWindowManager1--->" + this.getWindowManager());
        //mWindowManager = getWindow().getWindowManager();
        Log.i(TAG, "mWindowManager2--->" + getWindow().getWindowManager());
      
        //获取的是CompatModeWrapper对象
        //mWindowManager = (WindowManager) getApplication().getSystemService(Context.WINDOW_SERVICE);
        Log.i(TAG, "mWindowManager3--->" + mWindowManager);
        wmParams.type = LayoutParams.TYPE_PHONE;
        wmParams.format = PixelFormat.RGBA_8888;;
        wmParams.flags = LayoutParams.FLAG_NOT_FOCUSABLE;
        wmParams.gravity = Gravity.LEFT | Gravity.TOP;
        wmParams.x = 0;
        wmParams.y = 0;
        wmParams.width = WindowManager.LayoutParams.WRAP_CONTENT;
        wmParams.height = WindowManager.LayoutParams.WRAP_CONTENT;
         
        LayoutInflater inflater = this.getLayoutInflater();//LayoutInflater.from(getApplication());
         
        mFloatLayout = (LinearLayout) inflater.inflate(R.layout.float_layout, null);
        mWindowManager.addView(mFloatLayout, wmParams);
        //setContentView(R.layout.main);
        mFloatView = (Button)mFloatLayout.findViewById(R.id.float_id);
         
        Log.i(TAG, "mFloatView" + mFloatView);
        Log.i(TAG, "mFloatView--parent-->" + mFloatView.getParent());
        Log.i(TAG, "mFloatView--parent--parent-->" + mFloatView.getParent().getParent());
        //绑定触摸移动监听
        mFloatView.setOnTouchListener(new OnTouchListener()
        {
             
            @Override
            public boolean onTouch(View v, MotionEvent event)
            {
                // TODO Auto-generated method stub
                wmParams.x = (int)event.getRawX() - mFloatLayout.getWidth()/2;
                //25为状态栏高度
                wmParams.y = (int)event.getRawY() - mFloatLayout.getHeight()/2 - 40;
                mWindowManager.updateViewLayout(mFloatLayout, wmParams);
                return false;
            }
        });
         
        //绑定点击监听
        mFloatView.setOnClickListener(new OnClickListener()
        {
             
            @Override
            public void onClick(View v)
            {
                // TODO Auto-generated method stub
                Intent intent = new Intent(FloatWindowTest.this, ResultActivity.class);
                startActivity(intent);
            }
        });
         
    }
}


    将上面的代码相关注释部分取消,然后运行代码查看Log信息,那么就可以知道问题所在了(每一个Activity对应一个LocalWindowManger,每一个App对应一个CompatModeWrapper),所以要实现在App所在进程中运行的悬浮窗口,当然是得要获取CompatModeWrapper,而不是LocalWindowManger。

本文相关的完整代码下载链接:http://download.csdn.net/detail/stevenhu_223/4996970


另:

悬浮窗如何覆盖到任务栏之上呢?

flags里加上这两个: LayoutParams.FLAG_FULLSCREEN
和LayoutParams.FLAG_LAYOUT_IN_SCREEN
。然后type用 LayoutParams.TYPE_SYSTEM_ERROR。就可以了

posted @ 2019-03-07 15:53  天涯海角路  阅读(1068)  评论(0)    收藏  举报