SpringBoot中使用缓存
github地址:springboot-learn
缓存的应用是十分广泛的,大大减少了数据库的压力,本文介绍使用Redis和Ehcache
环境搭建
项目搭建
在yml文件添加:
logging:
  level:
    com:
      spbt:
        dao: debug
level后面是要给那个路径配置日志输出级别以观察SQL的执行情况。
访问- http://localhost:8080/web/getStudent/001
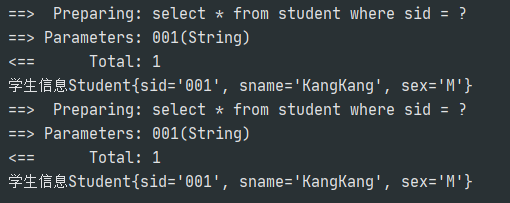
可发现第二个查询虽然和第一个查询完全一样,但其还是对数据库进行了查询。接下来引入缓存来改善这个结果。
引入缓存
要开启Spring Boot的缓存功能,需要在pom中引入spring-boot-starter-cache:
<dependency>
    <groupId>org.springframework.boot</groupId>
    <artifactId>spring-boot-starter-cache</artifactId>
</dependency>
在Spring Boot入口类中加入@EnableCaching注解开启缓存功能:
@SpringBootApplication
@EnableCaching
public class Application {
    public static void main(String[] args) {
        SpringApplication.run(Application.class,args);
    }
}
在StudentService接口中加入缓存注解:
@Service
@CacheConfig(cacheNames = "student")
public interface StudentService {

    @Cacheable(key = "#p0")
    Student selectBySid(String sid);

}
缓存注解
@CacheConfig:主要用于配置该类中会用到的一些共用的缓存配置。在这里@CacheConfig(cacheNames = "student"):配置了该数据访问对象中返回的内容将存储于名为student的缓存对象中,我们也可以不使用该注解,直接通过@Cacheable自己配置缓存集的名字来定义;@Cacheable:配置了queryStudentBySno函数的返回值将被加入缓存。同时在查询时,会先从缓存中获取,若不存在才再发起对数据库的访问。该注解主要有下面几个参数:value、cacheNames:两个等同的参数(cacheNames为Spring 4新增,作为value的别名),用于指定缓存存储的集合名。由于Spring 4中新增了@CacheConfig,因此在Spring 3中原本必须有的value属性,也成为非必需项了;key:缓存对象存储在Map集合中的key值,非必需,缺省按照函数的所有参数组合作为key值,若自己配置需使用SpEL表达式,比如:@Cacheable(key = "#p0"):使用函数第一个参数作为缓存的key值,更多关于SpEL表达式的详细内容可参考 -https://docs.spring.io/spring/docs/current/spring-framework-reference/integration.html#cache;condition:缓存对象的条件,非必需,也需使用SpEL表达式,只有满足表达式条件的内容才会被缓存,比如:@Cacheable(key = "#p0", condition = "#p0.length() < 3"),表示只有当第一个参数的长度小于3的时候才会被缓存;unless:另外一个缓存条件参数,非必需,需使用SpEL表达式。它不同于condition参数的地方在于它的判断时机,该条件是在函数被调用之后才做判断的,所以它可以通过对result进行判断;keyGenerator:用于指定key生成器,非必需。若需要指定一个自定义的key生成器,我们需要去实现org.springframework.cache.interceptor.KeyGenerator接口,并使用该参数来指定;cacheManager:用于指定使用哪个缓存管理器,非必需。只有当有多个时才需要使用;cacheResolver:用于指定使用那个缓存解析器,非必需。需通过org.springframework.cache.interceptor.CacheResolver接口来实现自己的缓存解析器,并用该参数指定;
@CachePut:配置于函数上,能够根据参数定义条件来进行缓存,其缓存的是方法的返回值,它与@Cacheable不同的是,它每次都会真实调用函数,所以主要用于数据新增和修改操作上。它的参数与@Cacheable类似,具体功能可参考上面对@Cacheable参数的解析;@CacheEvict:配置于函数上,通常用在删除方法上,用来从缓存中移除相应数据。除了同@Cacheable一样的参数之外,它还有下面两个参数:allEntries:非必需,默认为false。当为true时,会移除所有数据;beforeInvocation:非必需,默认为false,会在调用方法之后移除数据。当为true时,会在调用方法之前移除数据。
缓存实现
要使用上Spring Boot的缓存功能,还需要提供一个缓存的具体实现。Spring Boot根据下面的顺序去侦测缓存实现:
- Generic
- JCache (JSR-107)
- EhCache 2.x
- Hazelcast
- Infinispan
- Redis
- Guava
- Simple
除了按顺序侦测外,我们也可以通过配置属性spring.cache.type来强制指定。
接下来主要介绍基于Redis和Ehcache的缓存实现。
Redis
在Spring Boot项目里引入Redis:
<!-- spring-boot redis -->
<dependency>
    <groupId>org.springframework.boot</groupId>
    <artifactId>spring-boot-starter-data-redis</artifactId>
</dependency>
在application.yml中配置Redis:
spring:
  redis:
    # Redis数据库索引(默认为0)
    database: 0
    # Redis服务器地址
    host: localhost
    # Redis服务器连接端口
    port: 6379
    pool:
      # 连接池最大连接数(使用负值表示没有限制)
      max-active: 8
      # 连接池最大阻塞等待时间(使用负值表示没有限制)
      max-wait: -1
      # 连接池中的最大空闲连接
      max-idle: 8
      # 连接池中的最小空闲连接
      min-idle: 0
    # 连接超时时间(毫秒)
    timeout: 0
自定义缓存策略
@Configuration
public class RedisConfig extends CachingConfigurerSupport {

    /**
     * 配置自定义redisTemplate
     *
     * @param connectionFactory
     * @return
     */
    @Bean
    public RedisTemplate<String, Object> redisTemplate(RedisConnectionFactory connectionFactory) {
        RedisTemplate<String, Object> template = new RedisTemplate<>();
        template.setConnectionFactory(connectionFactory);
        template.setValueSerializer(jackson2JsonRedisSerializer());
        //使用StringRedisSerializer来序列化和反序列化redis的key值
        template.setKeySerializer(new StringRedisSerializer());
        template.setHashKeySerializer(new StringRedisSerializer());
        template.setHashValueSerializer(jackson2JsonRedisSerializer());
        template.afterPropertiesSet();
        return template;
    }

    /**
     * json序列化
     * @return
     */
    @Bean
    public RedisSerializer<?> jackson2JsonRedisSerializer() {
        //使用Jackson2JsonRedisSerializer来序列化和反序列化redis的value值
        Jackson2JsonRedisSerializer<Object> serializer = new Jackson2JsonRedisSerializer<Object>(Object.class);

        ObjectMapper mapper = new ObjectMapper();
        mapper.setVisibility(PropertyAccessor.ALL, JsonAutoDetect.Visibility.ANY);
        mapper.enableDefaultTyping(ObjectMapper.DefaultTyping.NON_FINAL);
        serializer.setObjectMapper(mapper);
        return serializer;
    }

    /**
     * 配置缓存管理器
     * @param redisConnectionFactory
     * @return
     */
    @Bean
    public CacheManager cacheManager(RedisConnectionFactory redisConnectionFactory) {
        // 生成一个默认配置,通过config对象即可对缓存进行自定义配置
        RedisCacheConfiguration config = RedisCacheConfiguration.defaultCacheConfig();
        // 设置缓存的默认过期时间,也是使用Duration设置
        config = config.entryTtl(Duration.ofMinutes(1))
                // 设置 key为string序列化
                .serializeKeysWith(RedisSerializationContext.SerializationPair.fromSerializer(new StringRedisSerializer()))
                // 设置value为json序列化
                .serializeValuesWith(RedisSerializationContext.SerializationPair.fromSerializer(jackson2JsonRedisSerializer()))
                // 不缓存空值
                .disableCachingNullValues();

        // 设置一个初始化的缓存空间set集合
        Set<String> cacheNames = new HashSet<>();
        cacheNames.add("timeGroup");
        cacheNames.add("user");

        // 对每个缓存空间应用不同的配置
        Map<String, RedisCacheConfiguration> configMap = new HashMap<>();
        configMap.put("timeGroup", config);
        configMap.put("user", config.entryTtl(Duration.ofSeconds(120)));

        // 使用自定义的缓存配置初始化一个cacheManager
        RedisCacheManager cacheManager = RedisCacheManager.builder(redisConnectionFactory)
                // 一定要先调用该方法设置初始化的缓存名,再初始化相关的配置
                .initialCacheNames(cacheNames)
                .withInitialCacheConfigurations(configMap)
                .build();
        return cacheManager;
    }

    /**
     * 缓存的key是 包名+方法名+参数列表
     */
    @Override
    @Bean
    public KeyGenerator keyGenerator() {
        return (target, method, objects) -> {
            StringBuilder sb = new StringBuilder();
            sb.append(target.getClass().getName());
            sb.append("::" + method.getName() + ":");
            for (Object obj : objects) {
                sb.append(obj.toString());
            }
            return sb.toString();
        };
    }
Ehcache
引入依赖
<!-- ehcache -->
<dependency>
    <groupId>net.sf.ehcache</groupId>
    <artifactId>ehcache</artifactId>
</dependency>
新建ehcache.xml
<?xml version="1.0" encoding="UTF-8"?>
<ehcache xmlns:xsi="http://www.w3.org/2001/XMLSchema-instance"
         xsi:noNamespaceSchemaLocation="http://ehcache.org/ehcache.xsd"
         updateCheck="false">
    <defaultCache
            maxElementsInMemory="10000"
            eternal="false"
            timeToIdleSeconds="3600"
            timeToLiveSeconds="0"
            overflowToDisk="false"
            diskPersistent="false"
            diskExpiryThreadIntervalSeconds="120" />

    <cache
            name="student"
            maxEntriesLocalHeap="2000"
            eternal="false"
            timeToIdleSeconds="3600"
            timeToLiveSeconds="0"
            overflowToDisk="false"
            statistics="true"/>
</ehcache>
关于Ehcahe的一些说明:
- name:缓存名称。
- maxElementsInMemory:缓存最大数目
- maxElementsOnDisk:硬盘最大缓存个数。
- eternal:对象是否永久有效,一但设置了,timeout将不起作用。
- overflowToDisk:是否保存到磁盘。
- timeToIdleSeconds:设置对象在失效前的允许闲置时间(单位:秒)。仅当
eternal=false对象不是永久有效时使用,可选属性,默认值是0,也就是可闲置时间无穷大。 - timeToLiveSeconds:设置对象在失效前允许存活时间(单位:秒)。最大时间介于创建时间和失效时间之间。仅当
eternal=false对象不是永久有效时使用,默认是0,也就是对象存活时间无穷大。 - diskPersistent:是否缓存虚拟机重启期数据,默认值为false。
- diskSpoolBufferSizeMB:这个参数设置DiskStore(磁盘缓存)的缓存区大小。默认是30MB。每个Cache都应该有自己的一个缓冲区。
- diskExpiryThreadIntervalSeconds:磁盘失效线程运行时间间隔,默认是120秒。
- memoryStoreEvictionPolicy:当达到maxElementsInMemory限制时,Ehcache将会根据指定的策略去清理内存。默认策略是LRU(最近最少使用)。你可以设置为FIFO(先进先出)或是LFU(较少使用)。
- clearOnFlush:内存数量最大时是否清除。
- memoryStoreEvictionPolicy:Ehcache的三种清空策略:FIFO,first in first out,这个是大家最熟的,先进先出。LFU, Less Frequently Used,就是上面例子中使用的策略,直白一点就是讲一直以来最少被使用的。如上面所讲,缓存的元素有一个hit属性,hit值最小的将会被清出缓存。LRU,Least Recently Used,最近最少使用的,缓存的元素有一个时间戳,当缓存容量满了,而又需要腾出地方来缓存新的元素的时候,那么现有缓存元素中时间戳离当前时间最远的元素将被清出缓存。
YML配置
spring:
  cache:
    ehcache:
      config: 'classpath:ehcache.xml'
访问 -http://localhost:8080/web/getStudent/001

对于Ehcache来说,更新方法加不加@CachePut注解,结果都一样。
见贤思齐焉见不贤而内自省也

 浙公网安备 33010602011771号