Python | 使用Keras实现汽车识别
一、选题的背景
当今社会,汽车已经深入人们的生活,日常出行都离不开车辆。随着生活水平的提高,车辆的数量也与日剧增,对车辆的管理压力也在不断增加,马路上的摄像头每天拍摄下的许多汽车照片,怎么在大量的图片中筛选出是汽车的图片,是本次选题的重点。
本项目还对防止汽车碰撞发生车祸有作用,车上的电脑可借助前置摄像影像识别前方是否有车辆,并提醒驾驶员控制车速,防止追尾,从而避免车祸的发生,保障驾驶员人身安全!
二、机器学习案例设计方案
1.本次选题采用机器学习car数据集
这个数据集包含 17000 张汽车与非车图像(每个类别都有 8000 张),大小为110MB。首先创建属于自己的数据集,此次学习并没有用到所有的数据,而只有4000张训练图像,2000张测试图像和2000张验证图像。
每个类别各 2000 个样本的训练集、每个类别各 1000个样本的验证集和每个类别各 1000个样本的测试集。
数据集中大部分图片是正常的,有少部分异常图片和低分辨率图片,对于训练集来说这些异常数据是要剔除掉的。
数据集分为train,validation,text三个目录,且每个目录分为两个子目录。
2.采用的机器学习框架描述
本项目使用的卷积神经网络(Convolutional Neural Network, CNN),卷积神经网络是深度学习技术中极具代表的网络结构之一, 在图像处理领域取得了很大的成功。
本项目的扩展可以使用Keras和Flask搭建部署一个简单易用的深度学习图像网页应用, 可以通过网页导入一张车的图片预测是否是车的概率。
3.涉及到的技术难点与解决思路
二维数组输出5×5图片,plt.subplot(5,5,i+1)输出x,y轴
plt.xlabel("Actual: {}".format(li_pred[np.argmax(y_test[i])]))
plt.ylabel("Pred: {}".format(li_pred[pred_test[i]]))
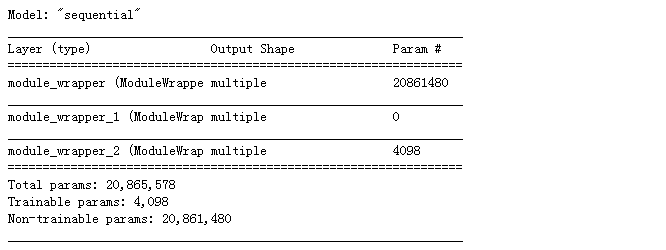
训练模型时发生报错,原因是没有告诉模型输入的格式,需要在model.summary()上面写一句:model.summary( model.build((None,150, 150, 3)))。
三、机器学习实现步骤
#导入库与数据集
#导入库
import numpy as np
import pandas as pd

import matplotlib.pyplot as plt

import tensorflow as tf
from tensorflow import keras
#统计卷积核参数
from keras.layers import Dense,MaxPooling2D,Conv2D,Flatten,GlobalAveragePooling2D

from keras.preprocessing import image
from keras.preprocessing.image import ImageDataGenerator as Imgen

from PIL import Image
#查看包更新情况
#查看包的更新
pip install split-folders --quiet

#数据集分类
#分为训练集和测试集
#检查一下包含多少张图像
import splitfolders
splitfolders.ratio("D:\carzlx\data",output='splitted',ratio=(0.8,0.1,0.1))

#检查一下每个分组(训练 / 测试)中分别包含多少张图像

train_ds = Imgen(rescale=1./255).flow_from_directory(#归一化
    "D:\carzlx\data/train", #指向验证集图片目录路径
    seed = 1,
    target_size = (150,150),#  输入训练图像尺寸
    batch_size = 32
)

val_ds = Imgen(rescale=1./255).flow_from_directory(
    "D:\carzlx\data/validation", #指向验证集图片目录路径
    seed = 1,
    target_size = (150,150),#  输入训练图像尺寸
    batch_size = 32
)

test_ds = Imgen(rescale=1./255).flow_from_directory(
    "D:\carzlx\data/text", #指向验证集图片目录路径
    seed = 1,
    target_size = (150,150),#  输入训练图像尺寸
    batch_size = 32
)

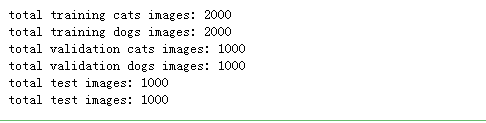
import os
train_path="D:\carzlx\data/train/"
print('total training cats images:', len(os.listdir(train_path+"car")))
print('total training dogs images:', len(os.listdir(train_path+"ano-car")))
valid_path="D:\carzlx\data/validation/"
print('total validation cats images:', len(os.listdir(valid_path+"car")))
print('total validation dogs images:', len(os.listdir(valid_path+"ano-car")))

test_path="D:\carzlx\data/text/"
print('total test images:', len(os.listdir(valid_path+"car")))
print('total test images:', len(os.listdir(valid_path+"ano-car")))
#制定训练情况标识
#训练车为“1”,非车为“0”
train_ds.class_indices

#迭代返回值
x_train,y_train = next(train_ds)
print(x_train.shape,y_train.shape)

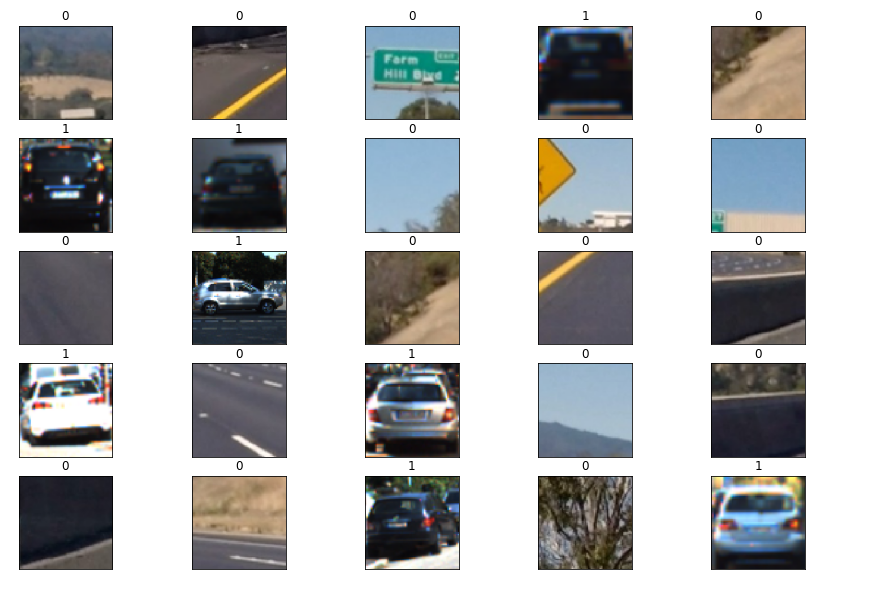
#二维数组输出5×5图片显示
#二维数组输出5×5图片显示
plt.figure(figsize=(15,10))
for i in range(25):
    plt.subplot(5,5,i+1)#输出5×5图片
    #去除坐标轴刻度
    plt.xticks([])
    plt.yticks([])
    plt.imshow(x_train[i])
    #判断图片“1”为车,“0”为非车,并在标题显示
    plt.title(np.argmax(y_train[i]))
#开始训练
#在keras中实例化Xception模型
from keras.applications.xception import Xception
# 编译模型
base_model = Xception(weights='imagenet',
                     input_shape=(150,150,3),#输入形状
                      include_top=False
                     )
base_model.trainable = False

#第一个卷积层作为输入层,32个3*3卷积核,输入形状input_shape = (150,150,3)
model = keras.models.Sequential()

model.add(base_model)

model.add(GlobalAveragePooling2D())
#添加密集连接层
model.add(Dense(2,activation='relu'))
#查看一下特征图的维度如何随着每层变化
model.summary( model.build((None,150, 150, 3)))
#导入损失函数
#损失函数
model.compile(optimizer='sgd',loss=keras.losses.BinaryCrossentropy(from_logits=True),metrics=['accuracy'])
#损失容值
callback = keras.callbacks.EarlyStopping(monitor='val_accuracy',patience=3)
#训练模型
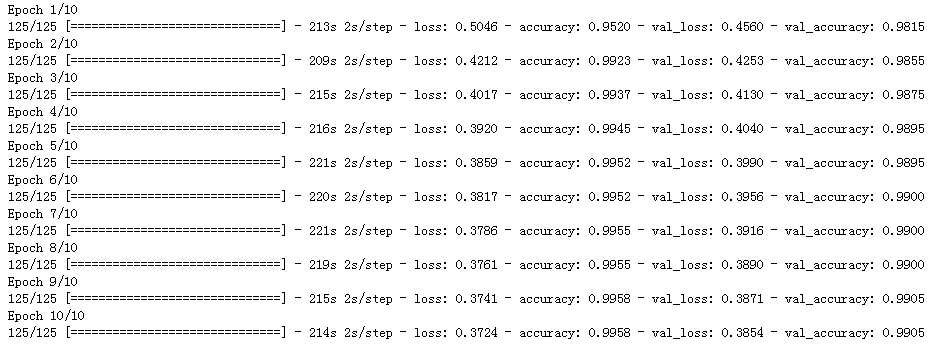
#训练模型10轮次,可以修改epochs的值
hist = model.fit(train_ds,
                 epochs=10,
                 validation_data=val_ds,
                 callbacks=[callback]
                )
#测试准确度
#测试
model.evaluate(test_ds)

#保存训练后模型
#将训练过程产生的数据保存为h5文件
model.save('D:\carzlx\Car/car.h5')
#显示图片
plt.imshow(Image.open("D:\carzlx\data\car/10.png"));

#可视化预测
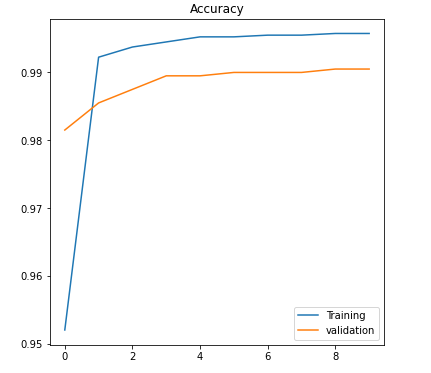
#可视化预测
#准确度曲线
plt.figure(figsize=(6,6))#图片尺寸6×6
#训练集准确度函数曲线
plt.plot(hist.epoch,hist.history['accuracy'],label = 'Training')#训练曲线
#测试集准确度函数曲线
plt.plot(hist.epoch,hist.history['val_accuracy'],label = 'validation')#测试曲线

plt.title("Accuracy")#准确度
plt.legend()
plt.show()
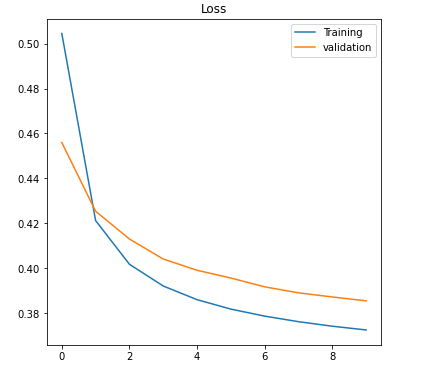
#可视化预测
#损失曲线
plt.figure(figsize=(6,6))#图片尺寸6×6
#训练集损失函数曲线
plt.plot(hist.epoch,hist.history['loss'],label = 'Training')#训练曲线
#测试集损失函数曲线
plt.plot(hist.epoch,hist.history['val_loss'],label = 'validation')#测试曲线

plt.title("Loss")#损失度
plt.legend()
plt.show()
#预测
#迭代返回值
x_test,y_test = next(test_ds)
#预测
pred_test = model.predict(x_test)
pred_test = [np.argmax(i) for i in pred_test]
#判断是否是车
test_dict = test_ds.class_indices
li_pred = list(test_dict.keys())
li_pred

#判断是否为车辆
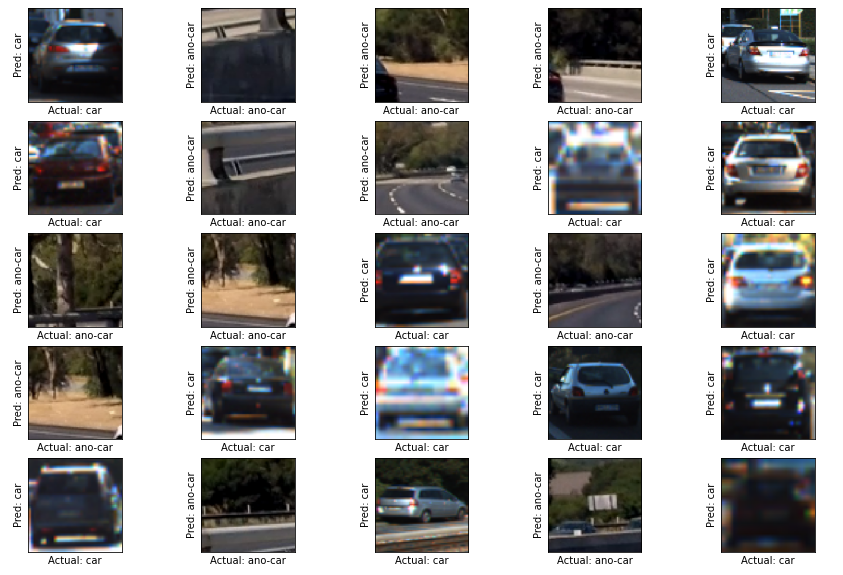
#二维数组输出5×5图片显示
#判断显示图片是否是车
plt.figure(figsize=(15,10))
for i in range(25):
    plt.subplot(5,5,i+1)#输出5×5图片
    #去除坐标轴刻度
    plt.xticks([])
    plt.yticks([])
    plt.imshow(x_test[i])
    #输出x,y轴
    plt.xlabel("Actual: {}".format(li_pred[np.argmax(y_test[i])]))
    plt.ylabel("Pred: {}".format(li_pred[pred_test[i]]))
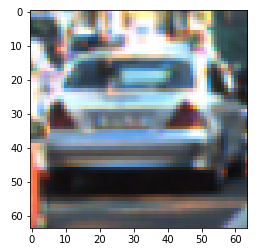
#显示图片
#识别这张图片是否是车
plt.imshow(Image.open("D:\carzlx\data\car/1013.png"));
#处理预测图片
#处理图片
def predict_image(dir):#导入图片
    img = image.load_img(dir,target_size=(150,150))
    #图片转化为数组
    img  = image.img_to_array(img)
    img = np.expand_dims(img,axis=0)
    #预测函数
    pred_img = model.predict(img)

    return li_pred[np.argmax(pred_img)]
#输出判断结果是否为车
print(predict_image('D:\carzlx\data\car/1013.png'))

判断此图片为车辆!
四、总结:
通过本次机器学习过程实现,巩固了之前学习的知识,也对机器学习有了更深层次的理解。本次案例是为了实现对车辆的识别,总体来说,功能较为简易,但是也让我体会到了Python功能的强大。案例使用Keras架构,最终实现对车辆图片的识别。本次机器学习案例使我受益匪浅!!!

