Spring IOC 笔记
什么是IOC与DI
IOC(inversion of control) 它描述的其实是一种面向对象编程中的设计原则,用来降低代码之间的耦合度, 而DI(dependency Injection)依赖注入是spring对IOC编程思想的实现
spring的编程风格
- 基于xml配置文件维护bean之间的关系
- 基于注解维护bean之间的关系
- 基于javaconfig维护bean之间的关系
IOC中注入Bean的两种方式
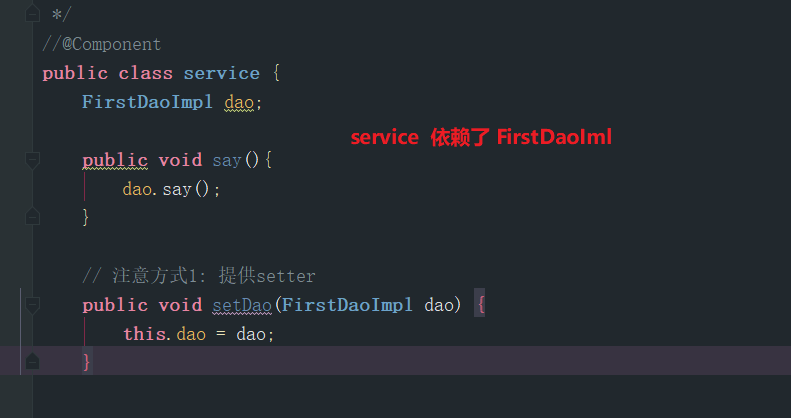
方式1: 配置文件+setter方法
配置文件
<bean id="dao" class="com.changwu.tryspring.FirstDaoImpl"></bean>
<bean id="service" class="com.changwu.tryspring.service">
    <property name="dao" ref="dao"></property>
</bean>
java类中提供构造方法
public class service {
    FirstDaoImpl dao;

    public void say(){
        dao.say();
    }

    // 注意方式1: 提供setter

    public void setDao(FirstDaoImpl dao) {
        this.dao = dao;
    }
}
方式2: 配置文件+构造方法注入
配置文件
   <bean id="dao" class="com.changwu.tryspring.FirstDaoImpl">

    </bean>
    <bean id="service" class="com.changwu.tryspring.service">
         <constructor-arg ref="dao"></constructor-arg>
    </bean>
java类,提供构造方法
public class service {
    FirstDaoImpl dao;
    // 方式2 构造方法


    public service(FirstDaoImpl dao) {
        this.dao = dao;
    }

    public void say(){
        dao.say();
    }

}
方式3: 基于注解注入Bean
在配置文件中配置开启注解模式
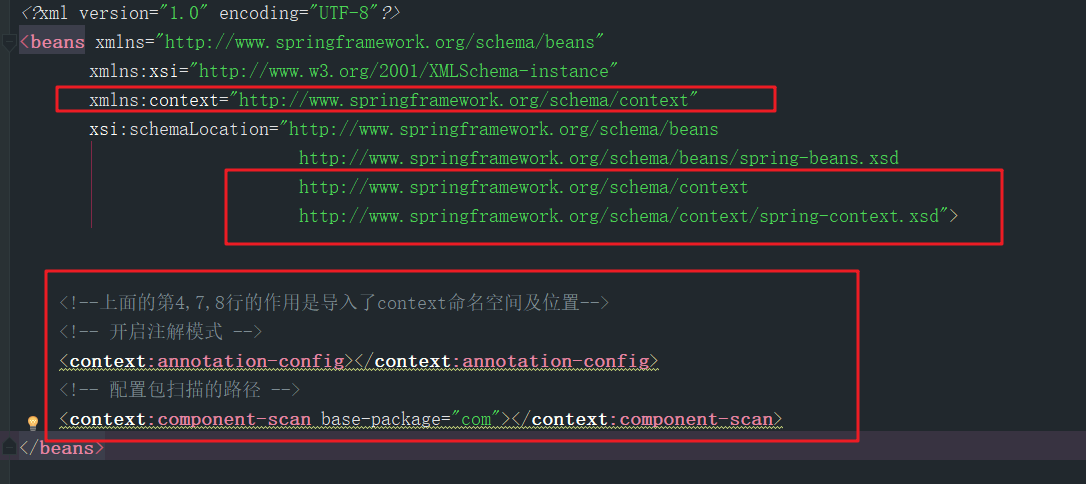
在spring4中,仅仅保存下面的一行配置信息,(它涵盖了开启注解和包扫描两层语义)
<!-- 配置包扫描的路径 -->
<context:component-scan base-package="com"></context:component-scan>
虽然现在可以开启注解了,但是xml文件还在,下面演示使用java-basic方式完成注入bean,完全抛弃xml
通过这个配置类完全舍弃xml
@Configuration
@ComponentScan("com.changwu.tryspring")
public class SpringConfiguration {
}
启动类
public class MainTest {
    public static void main(String[] args) {
        AnnotationConfigApplicationContext applicationContext = new AnnotationConfigApplicationContext(SpringConfiguration.class);
        service bean = applicationContext.getBean(service.class);
        bean.say();
    }
}
annotaion + xml + java-basic 混合使用的实现方式:
在javaConfiguration类上使用@ImportResources("classpath:spring.xml")
@Configuration
@ComponentScan("com.changwu.tryspring")
@ImportResource("classpath:spring.xml")
public class SpringConfiguration {
}
自动装配的优势参考
就像上面那样, 本来我们的java代码中就已经存在了类之间的关系,但是还得通过xml文件的方式再重复描述一遍类之间的关系,这本来就是很鸡肋,
自动装配模式就帮我们省去了在xml中描述类之间的关系这一步
有了自动装配,当对象中添加或者减少某些属性时,不用更改 xml文件中
基于xml版的自动装配的五种模式
no & default
不使用自动装配,需要我们手动装配,否则报错
byType
常用的根据类型的自动注入
我的java类
然后这样写配置文件
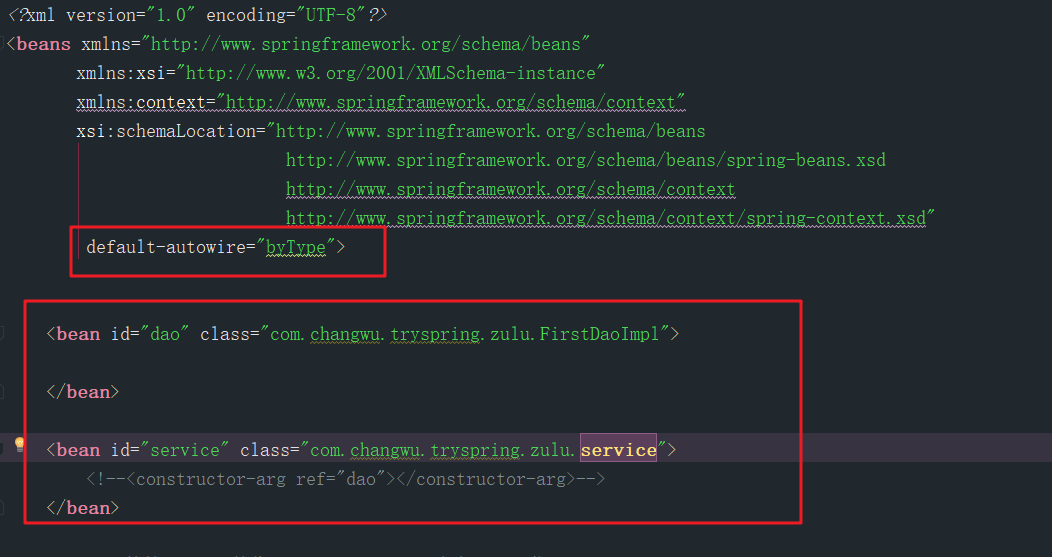
程序一开始运行他就去读取配置文件,根据配置文件创建出相应的bean的代理对象放到IOC中但是,虽然我没有明确的指出service依赖于FirstDaoImpl,程序会正常运行因为我添加了default-autowired=byType,他会替我将FirstDaoImpl装配进service
这是根据类型的自动装配,如果是我们像下面的配置一样,添加多个FirstDaoImpl,他就会报错: 说同一个类型的对象找到了两个,不知道使用哪个
byName
还是上面的场景,使用byName的自动装配,当程序发现service依赖FirstDaoImpl时,会根据名字在IOC中查询出指定的bean,完成依赖注入,
那使用的什么名字呢? 就是我们在service类中提供的setter方法去掉开头的set然后首字母小写, 默认情况下,name和id相同
constructor
补充
byName,ByType等这些自动装配的配置还可以单独的配置在某一个<bean>上,如下
<bean id="service" class="com.changwu.tryspring.service" autowire="byType">
    <!--<constructor-arg ref="dao"></constructor-arg>-->
</bean>
注解版本的自动装配
@Autowired默认使用的自动装配类型为Autowired_No- 但是还是会通过
byType查找, 如果没有找到,就使用byName, 什么name呢? 就是属性名
- 但是还是会通过
@Resource默认采用的自动装配类型为byName,和xml版本不同的是,它是根据属性名完成的注入,而xml版本的name为setter方法去掉set后首字母小写的英文单词@Resource(name = "XXX")明确指定按照名字注入, XXX是什么呢? 其实是类名首字母小写@Resource(type=A.class)就是明确指定注入A.class
使用注解的方式完成依赖注入
举个例子, 通过@Bean 往IOC中注入对象时,如果这个对象还依赖其他的对象,可以使用下面的构造函数的方式注入进去
public class AppConfig {
    @Bean
    public TransferService transferService(AccountRepository accountRepository) {
        return new TransferServiceImpl(accountRepository);
    }

    @Bean
    public AccountRepository accountRepository(AccountRepository accountRepository) {
        return new AccountRepository();
    }
}
Spring中的循环依赖
如果Spring中的Bean的单例的,可以存在循环引用,因为在扫描包时,会把扫描的到的bean实例化到一个缓冲区,然后他们就可以相互引用了,但是
如果是prototype多例的bean,容器创建之初,不进行初始化,因此循环引用失败
Spring的懒加载
默认情况下,spring上下文中的bean都是单例的,并且spring在加载上下文时,就会初始化所有的单实例bean.因为这样做可以立即发现环境中的
错误,我们也可以配置懒加载,也就是说在第一次使用bean时对bean进行初始化的工作
在xml中可以这样配置
<bean id="lazy" class="com.something.ExpensiveToCreateBean" lazy-init="true"/>
<bean name="not.lazy" class="com.something.AnotherBean"/>
或者
<beans default-lazy-init="true">
    <!-- no beans will be pre-instantiated... -->
</beans>
或者使用注解 @Lazy
SpringBean的作用域
默认是singleton
基于xml配置文件配置单例
<bean id="accountService" class="com.something.DefaultAccountService"/>

<!-- the following is equivalent, though redundant (singleton scope is the default) -->
<bean id="accountService" class="com.something.DefaultAccountService" scope="singleton"/>
基于注解:@Scope 默认单例
- 多例
prototype
bean被配置成多例,每次从IOC中获取都将获取一个新的对象,并且容器不负责该对象的销毁
此外还有四种
- request
- session
- application
- websocket
拓展-多例失效问题
当单例bean中引用了多例bean时,默认情况下多实例bean的多实例会失效
例:多例bean代码如下
@Component
@Scope("prototype")
public class FirstDaoImpl implements FirstDao {
    @Override
    public void say() {
        System.out.println("hello");
    }
}
单例bean如下
@Component
public class service {
    @Autowired
    FirstDaoImpl dao;

    public void say(){
        System.out.println("this.hashcode = "+this.hashCode());
        System.out.println("dao.hashcode = "+dao.hashCode());
       // dao.say();
    }
主类:
public class MainTest {
        public static void main(String[] args) {
            AnnotationConfigApplicationContext applicationContext = new AnnotationConfigApplicationContext(SpringConfiguration.class);
            service bean = applicationContext.getBean(service.class);
            bean.say();
            service bean1 = applicationContext.getBean(service.class);
            bean1.say();
            service bean2 = applicationContext.getBean(service.class);
            bean2.say();
        }
打印的结果中可以看到,单例的service和多例的dao中的一个实例进行了唯一的绑定,换句话说是多例失效,如果项目真的需要dao是
多例的话,就会产生并发问题
this.hashcode = 1032000752
dao.hashcode = 770911223
this.hashcode = 1032000752
dao.hashcode = 770911223
this.hashcode = 1032000752
dao.hashcode = 770911223
- 解决方法1
实现ApplicationContextAware接口,通过这个接口可以获取到Spring的应用上下文,进而通过getBean()随意获取IOC的bean
@Component
public class service implements ApplicationContextAware {
    private ApplicationContext applicationContext;

    public void say(){
        System.out.println("this.hashcode = "+this.hashCode());
        System.out.println("dao.hashcode = "+applicationContext.getBean("firstDaoImpl").hashCode());
    }

    @Override
    public void setApplicationContext(ApplicationContext applicationContext) throws BeansException {
        this.applicationContext = applicationContext;
    }
}
- 解决方法2
使用@lookup注解
@Component
public class service   {
  /*  @Autowired
    FirstDaoImpl dao;*/

   @Lookup
    public FirstDaoImpl getFirstDaoImpl(){
        return null;
    }

    public void say(){
        System.out.println("this.hashcode = "+this.hashCode());
        System.out.println("dao.hashcode = "+getFirstDaoImpl().hashCode());
    }
或者
@Component
public abstract class service   {
    @Lookup
    public abstract FirstDaoImpl getFirstDaoImpl();

    public void say(){
        System.out.println("this.hashcode = "+this.hashCode());
        System.out.println("dao.hashcode = "+getFirstDaoImpl().hashCode());
    }
方法名字随便取,返回值没差就行
springBean的生命周期和回调
- 实现Spring提供的InitializingBean接口
- 通过xml配置
- 通过注解完成
在构造方法完成后的回调钩子
方式1: 实现InitializingBean接口
public class AnotherExampleBean implements InitializingBean {

    @Override
    public void afterPropertiesSet() {
        // do some initialization work
    }
}
方式2: 配置xml
public class DefaultBlogService implements BlogService {

    private BlogDao blogDao;

    public void setBlogDao(BlogDao blogDao) {
        this.blogDao = blogDao;
    }

    // this is (unsurprisingly) the initialization callback method
    public void init() {
        if (this.blogDao == null) {
            throw new IllegalStateException("The [blogDao] property must be set.");
        }
    }
}
配置default-init-method如下
<beans default-init-method="init">

    <bean id="blogService" class="com.something.DefaultBlogService">
        <property name="blogDao" ref="blogDao" />
    </bean>
</beans>
或者配置init-method
<bean id="exampleInitBean" class="examples.ExampleBean" init-method="init"/>
方式3: 添加注解
@PostConstruct
容器销毁前的回调
方式1: 实现接口
实现这个接口
org.springframework.beans.factory.DisposableBean
重写它的 void destroy() throws Exception;
方式2: 通过xml配置
<bean id="exampleInitBean" class="examples.ExampleBean" destroy-method="cleanup"/>
方式3: 添加注解
@PreDestroy
如果为一个对象的用不同的方式添加了不同声明周期回调钩子,并且回调的方法名还不一样**,那么这些会钩子按顺序依次回调,
方法名一样的话,回调一次, 回调的顺序如下
initialization methods are called as follows
-
Methods annotated with @PostConstruct
-
afterPropertiesSet() as defined by the InitializingBean callback interface
-
A custom configured init() method
Destroy methods are called in the same order:
-
Methods annotated with @PreDestroy
-
destroy() as defined by the DisposableBean callback interface
-
A custom configured destroy() method

 浙公网安备 33010602011771号