

0010 MyBatis知识点-黑马教程
01 链接地址
视频链接地址:https://www.bilibili.com/video/BV1MT4y1k7wZ?p=14&spm_id_from=333.788.top_right_bar_window_history.content.click
代码链接地址:https://gitee.com/zero1231/mybatis
02 mybatis简介
2.1 什么是mybatis
- l Mybatis是一款优秀的持久层框架,用于简化jdbc开发
- l Mybatis是Apache的一个开源项目ibatis,2010年这个项目由Apache software foundation迁移到Google code,并且改名为mybatis,2013年11月迁移到github上
- l 官网:https://mybatis.org/mybatis-3/zh/index.html
- l Mabtis的好处就是几乎免除了所有jdbc代码以及设置参数和获取结果集的工作
- l mybatis可以通过简单的xml或注释来配置和映射原始类型、接口和javaPOJO为数据库中的记录
2.2 持久层
- l 负责将数据保存在数据库的那一层代码
- l JavaEE三层架构:表现层、业务层、持久层
2.3 框架
- l 框架就是一个半成品软件,是一套可重用的,通用的,软件基础代码模型
- l 在框架的基础之上构建软件,并编写更加高效、规范、通用、可扩展
03 mybatis快速入门
3.1 查询user表中的所有数据
步骤:
① 创建user表,添加数据
②创建模块,导入坐标
③编写MyBatis核心配置文件
④ 编写SQL映射文件--》统一管理SQL语句,解决硬编码的问题
⑤编码
- 定义POJO类
- 加载核心配置文件,获取SqlSessionFactory对象
- 获取SqlSession对象,执行SQL语句
- 释放资源
案例:
01 创建user表,并添加数据
CREATE DATABASE mybatis;
DROP TABLE IF EXISTS tb_user;

CREATE TABLE tb_user(
	id INT PRIMARY KEY AUTO_INCREMENT,
	username VARCHAR(20),
	`password` VARCHAR(20),
	gender CHAR(1),
	addr VARCHAR(30)
);

INSERT INTO tb_user VALUES (1, 'zhangsan', '123', '男','北京');
INSERT INTO tb_user VALUES (2, '李四', '234', '女','天津');
INSERT INTO tb_user VALUES (3, '王五', '11', '男','西安');
02 导入依赖
  <dependencies>
    <!--mybatis-->
    <dependency>
        <groupId>org.mybatis</groupId>
        <artifactId>mybatis</artifactId>
        <version>3.5.5</version>
    </dependency>
    <!--mysql -->
    <dependency>
        <groupId>mysql</groupId>
        <artifactId>mysql-connector-java</artifactId>
        <version>5.1.46</version>
    </dependency>
    <!--junit 单元测试-->
    <dependency>
        <groupId>junit</groupId>
        <artifactId>junit</artifactId>
        <version>4.13</version>
        <scope>test</scope>
    </dependency>
    <!--slf4日志api-->
    <dependency>
        <groupId>org.slf4j</groupId>
        <artifactId>slf4j-api</artifactId>
        <version>1.7.21</version>
    </dependency>
    <!--logback-classic-->
    <dependency>
        <groupId>ch.qos.logback</groupId>
        <artifactId>logback-classic</artifactId>
        <version>1.2.3</version>
    </dependency>
    <!--logback-core-->
    <dependency>
        <groupId>ch.qos.logback</groupId>
        <artifactId>logback-core</artifactId>
        <version>1.2.3</version>
    </dependency>
</dependencies>
03 配置文件mybatis-config.xml
<?xml version="1.0" encoding="UTF-8" ?>
<!DOCTYPE configuration
PUBLIC "-//mybatis.org//DTD Config 3.0//EN"
"http://mybatis.org/dtd/mybatis-3-config.dtd">
<configuration>
<environments default="development">
<environment id="development">
<transactionManager type="JDBC"/>
<dataSource type="POOLED">
<!--数据库的连接信息-->
<property name="driver" value="com.mysql.jdbc.Driver"/>
<property name="url" value="jdbc:mysql:///mybatis?useSSL=false"/>
<property name="username" value="root"/>
<property name="password" value="123456"/>
</dataSource>
</environment>
</environments>
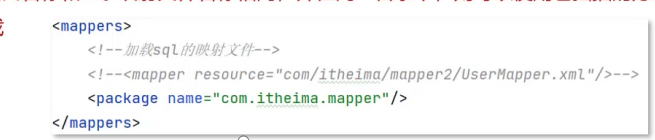
<mappers>
<!--加载SQL的映射文件-->
<mapper resource="UserMapper.xml"/>
    <!--加载SQL的映射文件-->
        <package name="com.ite=heima.mapper"/>
</mappers> </configuration>
04 定义实体类User.java
//alt+鼠标左键:可以进行整列编辑
public class User {

    private Integer id;
    private String username;
    private String password;
    private String gender;
    private String addr;

    Getter/Setter

    ToString
    ... ...

}
05定义UserMapper.java
public interface UserMapper {
    List<User> selectAll();

    User selectById(Integer id);
}
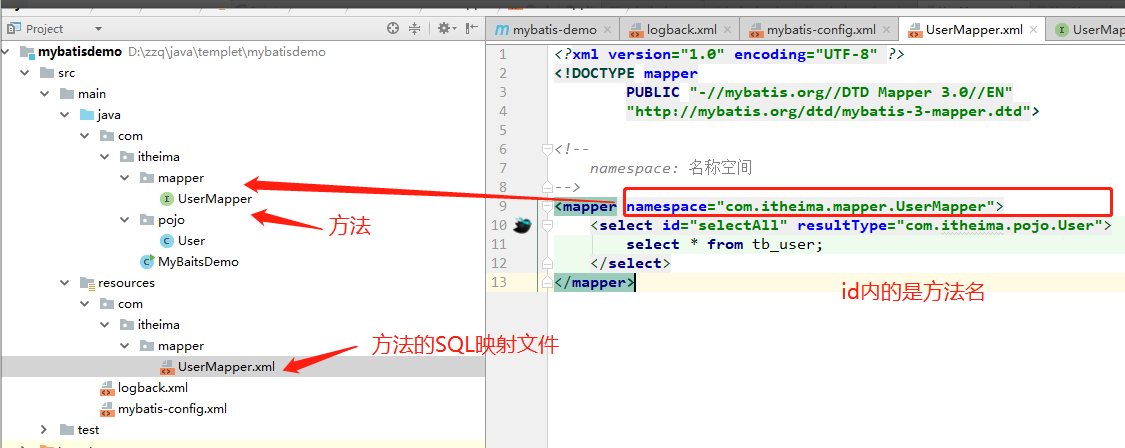
06 定义映射UserMapper.xml
<?xml version="1.0" encoding="UTF-8" ?>
<!DOCTYPE mapper
        PUBLIC "-//mybatis.org//DTD Mapper 3.0//EN"
        "http://mybatis.org/dtd/mybatis-3-mapper.dtd">
<!--
    namespace: 名称空间
-->
<mapper namespace="com.itheima.mapper.UserMapper">
    <select id="selectAll" resultType="com.itheima.pojo.User">
        select * from tb_user;
    </select>

    <!--根据id查询相关信息-->
    <select id="selectById" resultType="com.itheima.pojo.User">
        select * from tb_user where id = #{id};
    </select>
</mapper>
07 定义启动函数
/*
* mybaits快速入门代码
* */
public class MyBaitsDemo {
    public static void main(String[] args) throws IOException {
        //1. 加载mybatis核心配置文件,获取sqlSessionFactory
        String resource = "mybatis-config.xml";
        InputStream inputStream = Resources.getResourceAsStream(resource);
        SqlSessionFactory sqlSessionFactory = new SqlSessionFactoryBuilder().build(inputStream);
        //2. 获取SQLSession对象,用它来执行SQL
        SqlSession sqlSession = sqlSessionFactory.openSession();
        //3. 执行SQL
        List<Object> users = sqlSession.selectList("test.selectAll");
        System.out.println(users);
        //4. 释放资源
        sqlSession.close();
    }
}
04 Mapper代理开发
满足的要求:
- 定义与SQL映射文件同名的mapper接口,并且将mapper接口和SQL映射文件在同一目录下
- 设置SQL映射文件的namespace属性为Mapper接口全限定名
- 在mapper接口中定义方法,方法名就是SQL映射文件中SQL语句的id,并保持参数类型和返回值类型一致
- 编码
- 通过SqlSession的getMapper方法回去Mapper接口的代理对象
- 调用对应方法完成SQL的执行
注意事项:定义的路径需要一致,在资源文件连续创建文件夹的方式是加/,而不是.
如果mapper接口名称和SQL映射文件名称相同,并且在同一个目录下的话,则可以使用包扫描的方式简化SQL映射文件的加载
注意:实体类和数据库中字段不一致的解决办法(驼峰命名)
<?xml version="1.0" encoding="UTF-8" ?>
        <!DOCTYPE mapper
                PUBLIC "-//mybatis.org//DTD Mapper 3.0//EN"
                "http://mybatis.org/dtd/mybatis-3-mapper.dtd">

        <!--
            namespace: 名称空间
        -->
<mapper namespace="com.itheima.mapper.BrandMapper">

<!--
    resultMap:
        1. 定义<resultMap>标签
        2. 在<select>标签中,使用reusktMap属性替换resultType属性

    id: 唯一标识
    type: 映射的类型,支持别名
-->
<resultMap id="BrandSelectMap" type="com.itheima.pojo.Brand">
    <!--
        id: 完成主键字段的映射
        result:完成一般字段的映射
            column:表的列名
            property:属性名
    -->
    <id column="id" property="id"/>
    <result column="brand_name" property="brandName"/>
    <result column="company_name" property="companyName"/>

</resultMap>


    <!--
        查询所有数据
    -->
<select id="selectAll" resultMap="BrandSelectMap">
    select * from tb_brand;
</select>

    <!--
        根据id查询该条内容的所有数据
    -->
    <!--
        * 参数占位符
            1. #{}: 会将其替换为?,为了防止SQL注入攻击
            2. ${}: 会自动把数值拼接到sql后面,存在sql注入问题
            3. 使用实际:
                * 参数传递的时候:使用#{}
                * 表名和列名不固定的情况下,可以使用${}

        * 参数类型:parameterType="int",其中parameterType可以省略
        * 特殊字符的处理:
            1. 转义字符
            2. CDATA区: <![CDATA[文本内容 如:>和< ]]>

    -->
    <select id="selectById"  resultMap="BrandSelectMap">
        select * from tb_brand where id = #{id};
    </select>
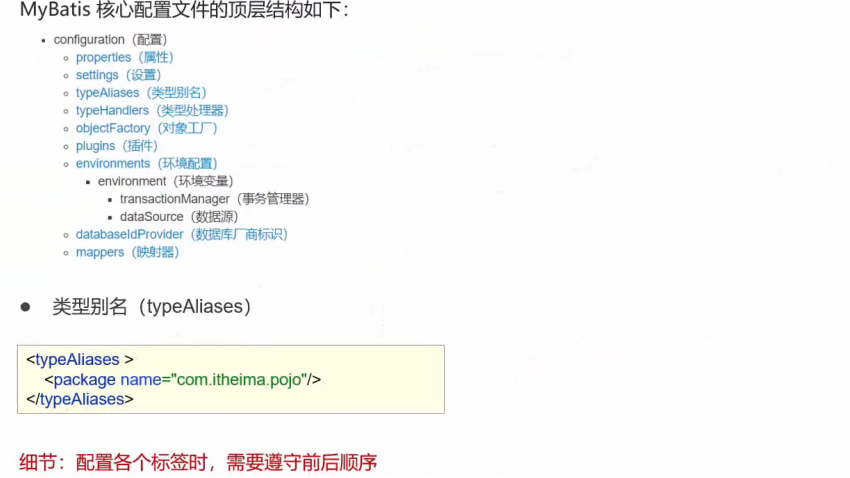
05 MyBatis核心配置文件详解

06 增删改查
要完成的功能列表【基础功能】
- 查询
- 查询所有数据
- 查询详情
- 条件查询
- 添加
- 修改
- 修改全部字段
- 修改动态字段
- 删除
- 删除一个
- 批量删除
6.1 准备环境
- 数据库表tb_brand
- 实体类
- 测试用例
- 安装MyBatisX插件(功能:实现xml和接口方法的相互调换;根据接口方法生成statement)
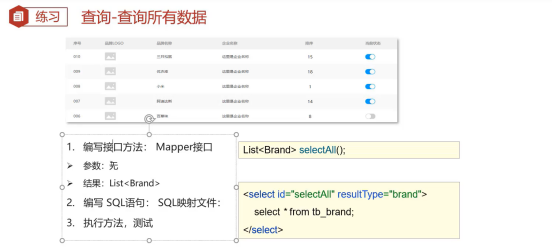
6.2 查询所有数据

6.3 查看详情

6.4 条件查询
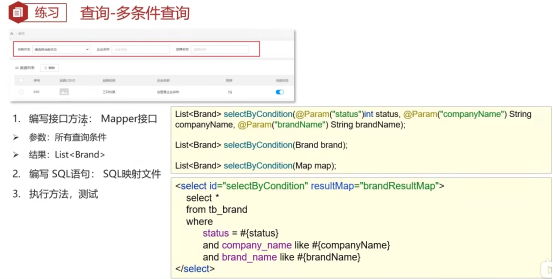
条件查询
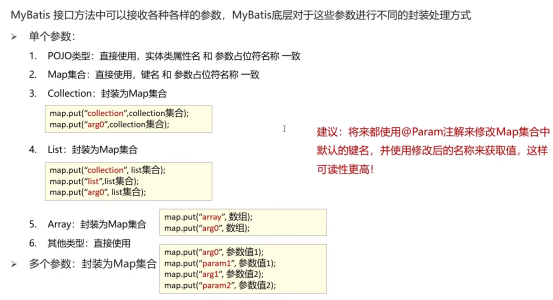
* 参数查询
1. 散装参数:如果方法中有多个参数,需要使用@Param("SQL参数占位符名称")
2. 对象参数: 对象的属性名称要和参数的占位符名称一致
3. map集合参数

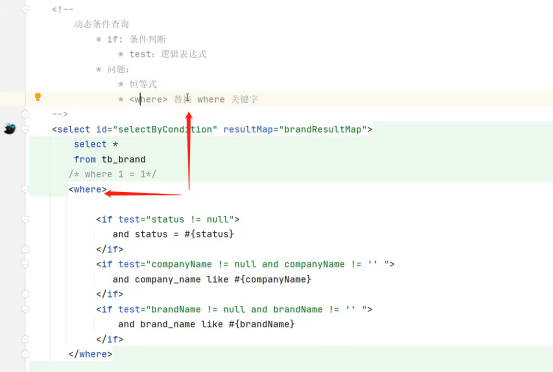
01 多条件-动态条件查询

案例:
总结

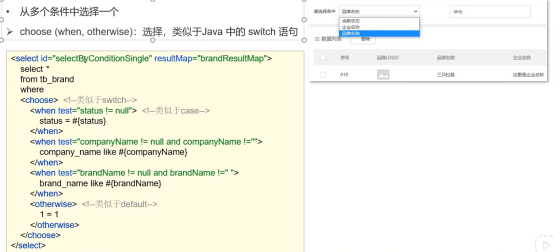
02 单条件-动态条件查询
代码:
    <!--
        条件查询
    -->
    <select id="selectByCondition" resultMap="BrandSelectMap">
        select * from tb_brand
        <where>
            <if test="status != null" >
              and status = #{status}
            </if>
            <if test="companyName != null and companyName != ''">
                and company_name like #{companyName}
            </if>
            <if test="brandName != null and brandName != ''">
                and brand_name like #{brandName}
            </if>
        </where>
</select>
    <!--单条件查询-->
    <select id="selectByConditionSingle" resultMap="BrandSelectMap">
        select * from tb_brand
        where<!--可以把where改成where标签,这样就可以省略1=1-->
        <choose><!--相当于switch-->
            <when test="status != null"><!-- 相当于case -->
                status = #{status}
            </when>
            <when test="companyName != null and companyName != ''">
                company_name like #{companyName}
            </when>
            <when test="brandName != null and brandName != ''">
                brand_name like #{brandName}
            </when>
            <otherwise>
                1=1
            </otherwise>
        </choose>
    </select>
6.5 添加
01 正常添加
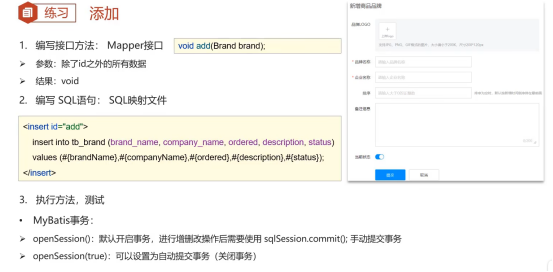
02 主键返回
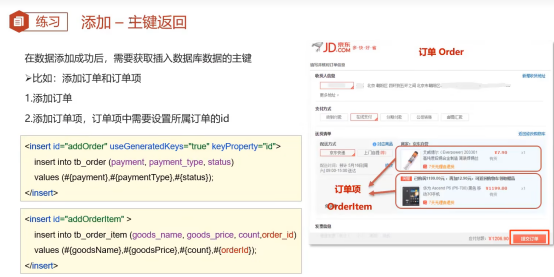
案例:
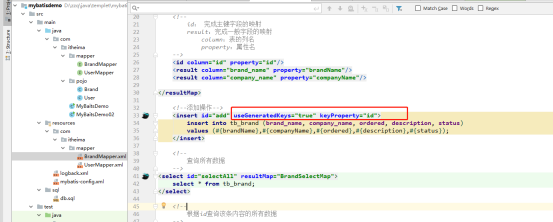
总结:

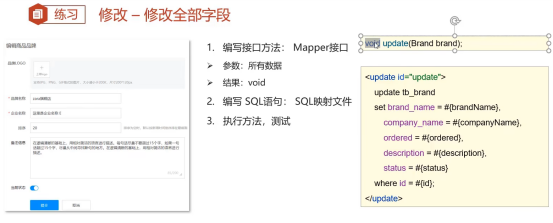
6.6 修改
01 修改全部字段
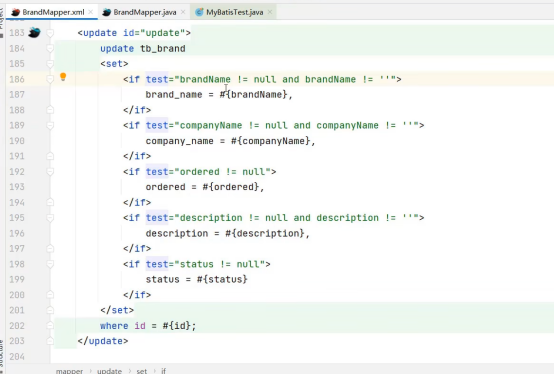
02 修改动态字段
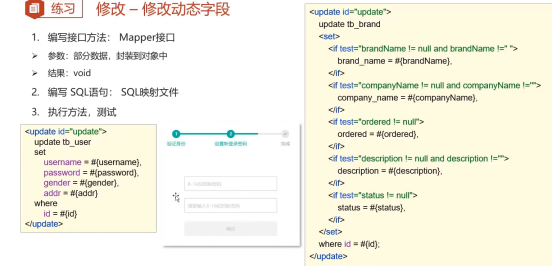
案例:
6.7 删除
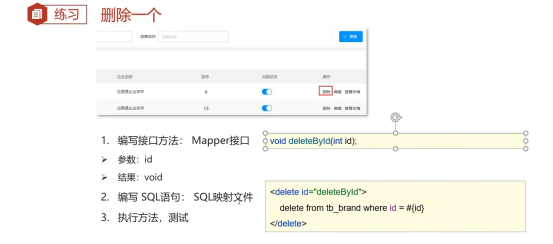
01 删除一个
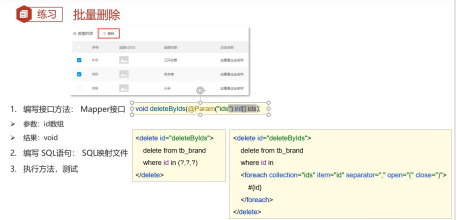
02 批量删除
07 参数传递
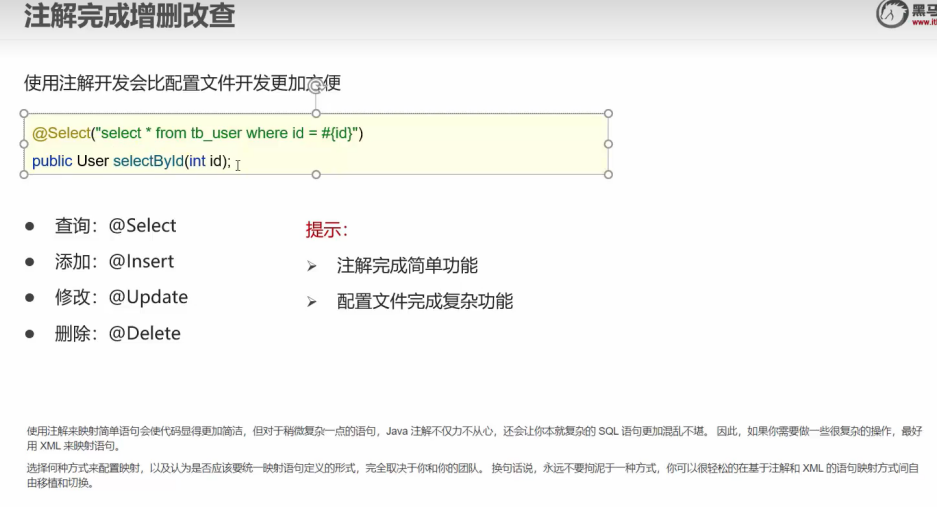
08 使用注释的方式(SQL语句简单的情况下使用)
先知道这么多,接着下面的内容学起 2022-07-21

 浙公网安备 33010602011771号