nacos基本使用
nacos基本使用
官方文档:https://nacos.io/zh-cn/docs/what-is-nacos.html
根据官方文档在本地安装好nacos,启动并登录
以下案例基于spring cloud nacos,所以需要在父工程导入依赖:
<dependency>
    <groupId>org.springframework.cloud</groupId>
    <artifactId>spring-cloud-dependencies</artifactId>
    <version>Hoxton.SR1</version>
    <type>pom</type>
    <scope>import</scope>
</dependency>
服务注册
导入依赖
<dependency>
    <groupId>com.alibaba.cloud</groupId>
    <artifactId>spring-cloud-starter-alibaba-nacos-discovery</artifactId>
</dependency>
application.yml配置文件
server:
  port: 9002

spring:
  application:
    name: nacos-payment
  cloud:
    nacos:
      discovery:
        server-addr: localhost:8848
主启动类添加@EnableDiscoveryClient注解
package com.yl.nacos.payment;

import org.springframework.boot.SpringApplication;
import org.springframework.boot.autoconfigure.SpringBootApplication;
import org.springframework.cloud.client.discovery.EnableDiscoveryClient;

@SpringBootApplication
@EnableDiscoveryClient
public class NacosPayment9002Application {

    public static void main(String[] args) {
        SpringApplication.run(NacosPayment9002Application.class,args);
    }

}
contoller
package com.yl.nacos.payment.controller;

import org.springframework.beans.factory.annotation.Value;
import org.springframework.web.bind.annotation.GetMapping;
import org.springframework.web.bind.annotation.PathVariable;
import org.springframework.web.bind.annotation.RequestMapping;
import org.springframework.web.bind.annotation.RestController;

/**
 * 支付
 *
 * @auther Y-wee
 */
@RestController
@RequestMapping("/payment")
public class PaymentController {
    @Value("${server.port}")
    private String serverPort;

    /**
     * 获取服务端口号
     *
     * @param id id
     * @return 端口号、id
     */
    @GetMapping(value = "/nacos/{id}")
    public String getPayment(@PathVariable("id") Integer id) {
        return "nacos registry, serverPort: " + serverPort + "\t id" + id;
    }
}
启动服务,可以在nacos服务列表看到该服务注册进去了
动态配置服务
以中心化、外部化和动态化的方式管理所有环境的应用配置和服务配置,将配置交由nacos统一管理
在服务注册的基础上进行改造
增加依赖
<dependency>
    <groupId>com.alibaba.cloud</groupId>
    <artifactId>spring-cloud-starter-alibaba-nacos-config</artifactId>
</dependency>
新建bootstrap.yml配置文件(bootstrap.yml是系统级配置文件,优先级高于application.yml),将application.yml配置迁移到bootstrap.yml
server:
  port: 9002

spring:
  application:
    name: nacos-payment
  cloud:
    nacos:
      discovery:
        server-addr: localhost:8848
      config:
        server-addr: localhost:8848
        file-extension: yaml
        group:
        namespace:
nacos新建配置文件nacos-payment.yaml,添加以下配置
nacos:
    config: from nacos version=2
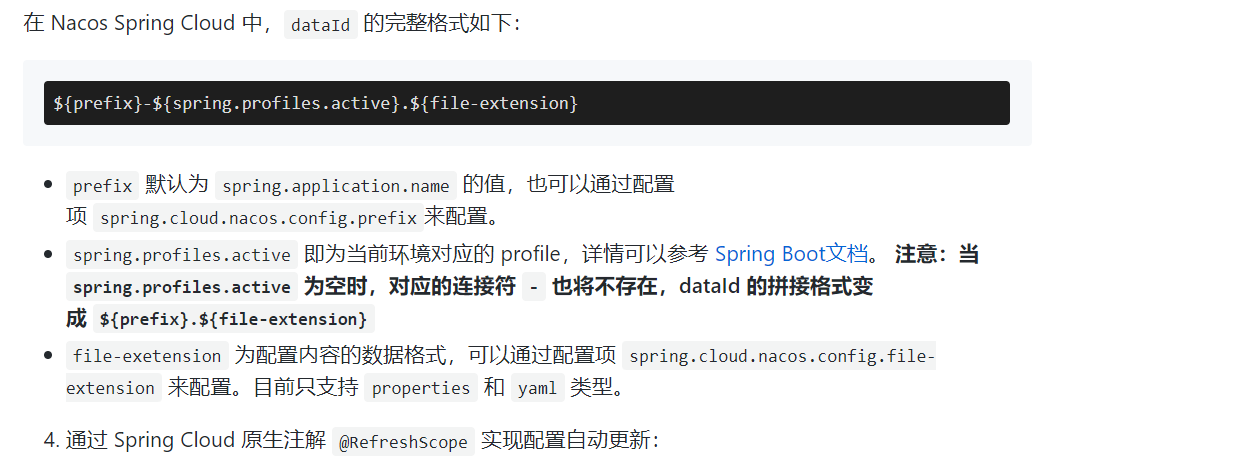
nacos配置文件命名方式参考官方文档
controller新增接口方法获取nacos配置信息,添加@RefreshScope注解实现配置动态刷新
package com.yl.nacos.payment.controller;

import org.springframework.beans.factory.annotation.Value;
import org.springframework.cloud.context.config.annotation.RefreshScope;
import org.springframework.web.bind.annotation.GetMapping;
import org.springframework.web.bind.annotation.PathVariable;
import org.springframework.web.bind.annotation.RequestMapping;
import org.springframework.web.bind.annotation.RestController;

/**
 * 支付
 *
 * @auther Y-wee
 */
@RestController
@RequestMapping("/payment")
@RefreshScope
public class PaymentController {
    @Value("${server.port}")
    private String serverPort;
    @Value("${nacos.config}")
    private String nacosConfig;

    /**
     * 获取服务端口号
     *
     * @param id id
     * @return 端口号、id
     */
    @GetMapping(value = "/nacos/{id}")
    public String getPayment(@PathVariable("id") Integer id) {
        return "nacos registry, serverPort: " + serverPort + "\t id" + id;
    }

    /**
     * 测试配置实时更新
     *
     * @return 配置
     */
    @GetMapping("/nacos/config")
    public String getConfigInfo() {
        return nacosConfig;
    }
}
启动服务,发送请求测试实时从nacos获取配置成功
单机模式支持mysql
在0.7版本之前,在单机模式时nacos使用嵌入式数据库(derby)实现数据的存储,不方便观察数据存储的基本情况,如果启动多个默认配置下的nacos节点,数据存储是存在一致性问题的,为了解决这个问题,nacos采用了集中式存储的方式来支持集群化部署,目前只支持MySQL
0.7版本增加了支持mysql数据源能力,具体的操作步骤:
-
在nacos的conf目录下找到nacos-mysql.sql脚本,在数据库执行该脚本,初始化mysql数据库
-
修改nacos的conf目录下application.properties文件,增加支持mysql数据源配置,添加mysql数据源的url、用户名和密码
spring.datasource.platform=mysql

db.num=1
db.url.0=jdbc:mysql://127.0.0.1:3306/nacos_config?characterEncoding=utf8&connectTimeout=1000&socketTimeout=3000&autoReconnect=true&serverTimezone=UTC
db.user=root
db.password=123456
配置完成后重启nacos即可

 浙公网安备 33010602011771号