前端学习之Vue项目使用
上一篇我们说了Vue项目平台搭建以及Vue项目目录说明,这篇我们说一下如何使用Vue项目进行前端项目开发
一、Vue项目介绍
-
Vue是一个单页面页用,我们用到的html在public文件夹下
-
入口文件
-
根组件
-
页面组件
-
路由配置文件
二、组件相关知识点
'''
1、vue项目的请求生命周期:main.js完成环境的加载与根组件的渲染;router的index.js完成路由映射
2、<router-view />标签作为路由映射的页面组件占位符
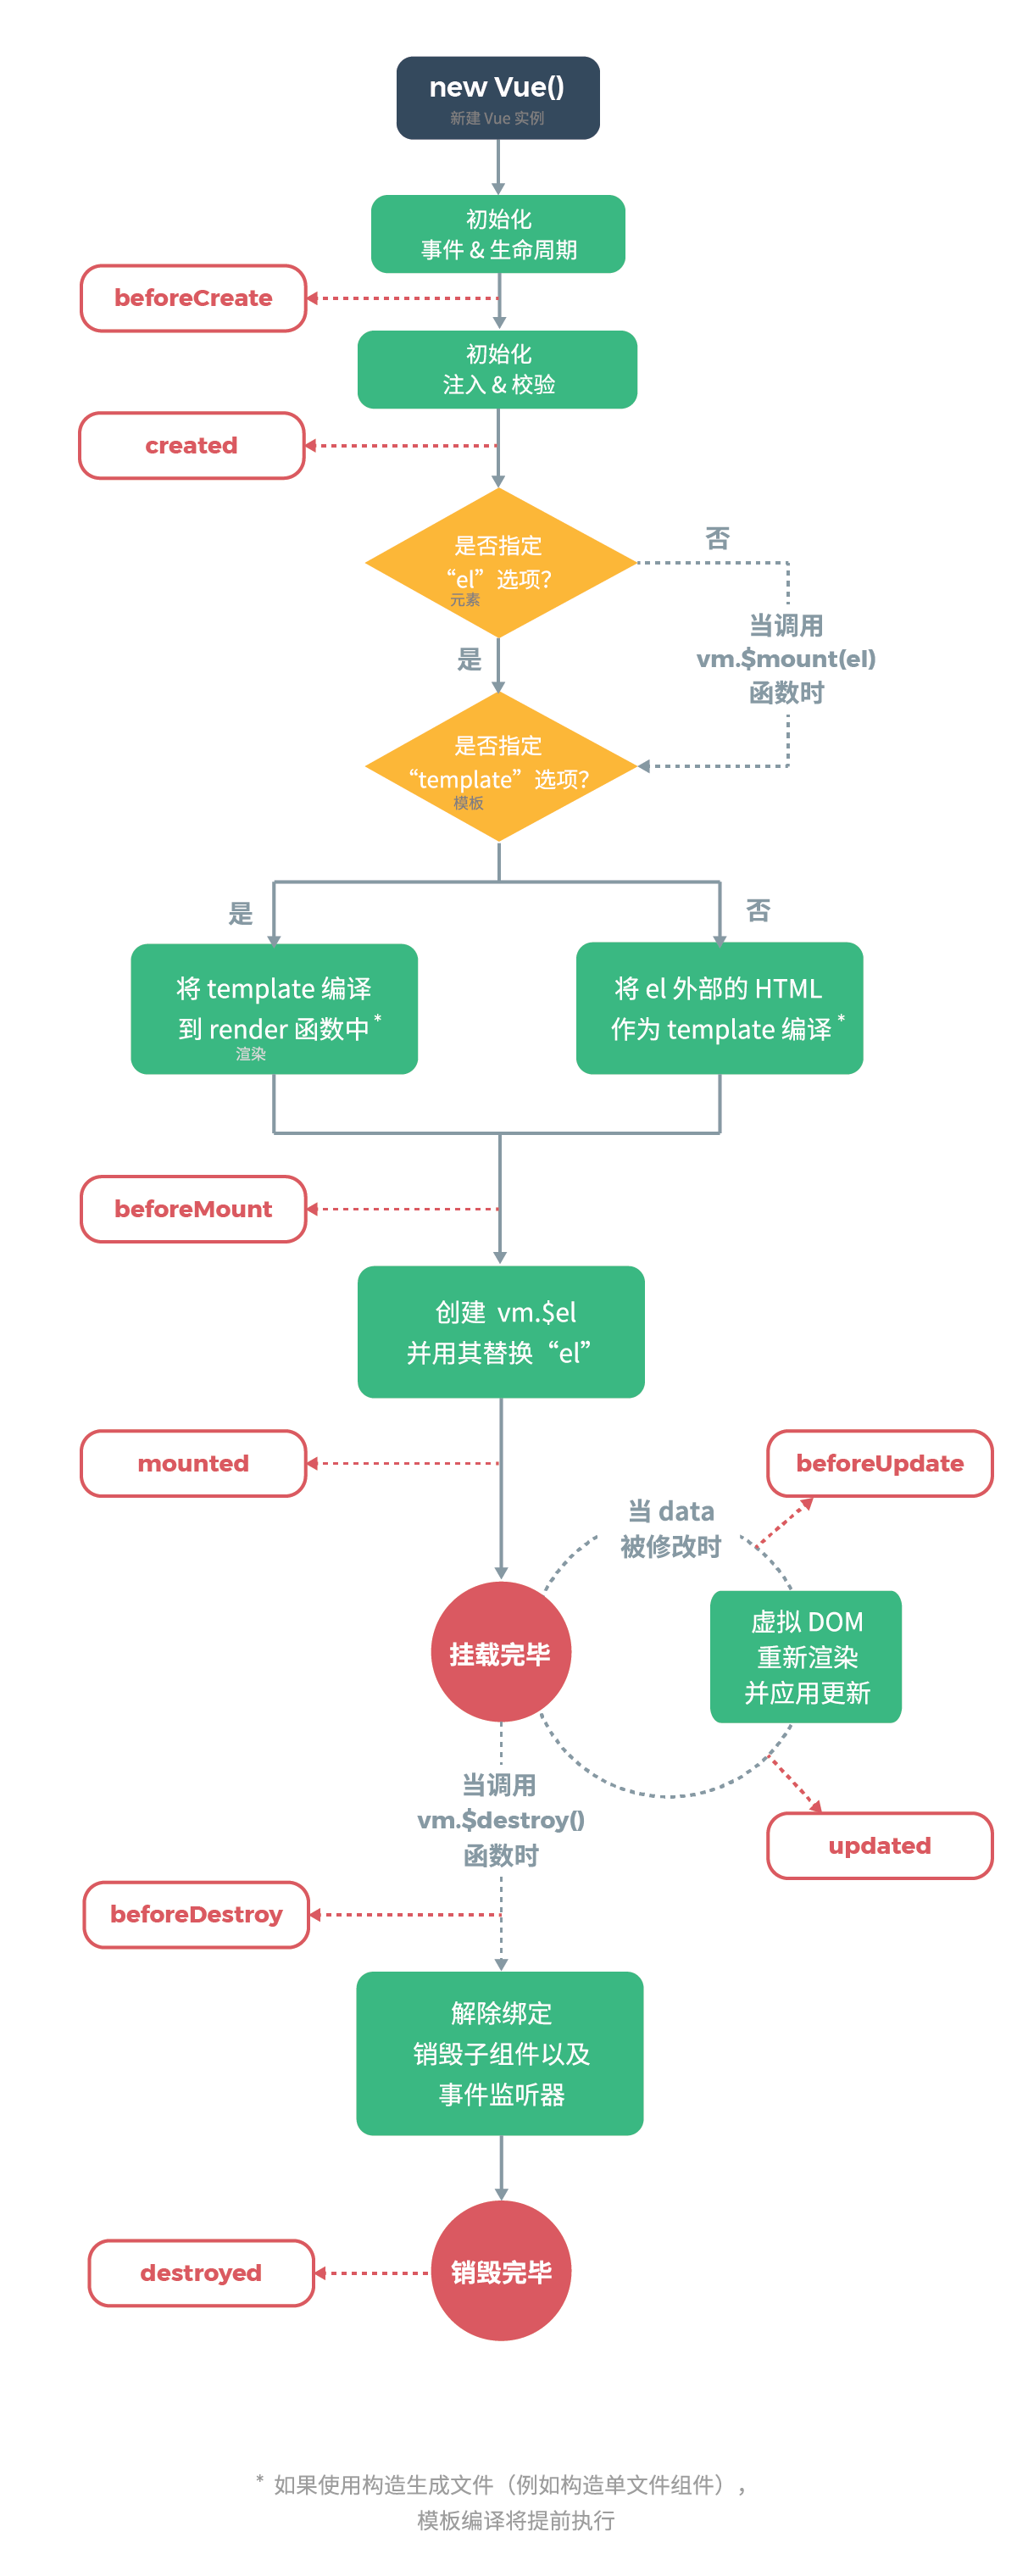
3、组件的生命周期钩子:
一个组件,会在页面中渲染,也会销毁存放到内存(不渲染) => 加载组件到销毁组件
从加载一个组件到销毁该组件,整个生命周期中存在很多特殊的时间节点(组件要创建了,创建成功了,要加载了,加载成功了,
要更新数据了,数据更新完毕了,要销毁了,销毁成功了),这些特殊的时间节点,vue都提供了对应的回调方法,来辅助完成在这些时间
节点需要完成的业务逻辑
生命周期钩子函数书写的位置:钩子直接作为vue实例的成员
重点:1、书写位置 2、每个钩子节点时的特性
'''
VUE生命周期状态图
三、路由相关知识点
'''
1、<router-link></router-link>来完成路由的跳转(可以带参数可以不带参数, 需要在路由中配置)
    eg: <router-link :to="'/book/detail/' + book.id">{{ book.title }}</router-link>
    eg: <router-link :to="{name: 'book-detail', params: {pk: book.id}}">-->
            {{ book.title }}-->
        </router-link>-->

2、this.$router来完成路由的跳转:push() | go()  (可以带参数可以不带参数, 需要在路由中配置)
	// router的逻辑转跳
    eg: this.$router.push(`/book/detail/${id}`);
    eg: this.$router.push({
            name: 'book_detail',
        	// query: {pk : id} //路由跳转会在url上拼接参数。
            params: {pk : id}, // 路由跳转不会再url上拼接参数,而是放在this.$route.params中
            });
	// router采用history方式访问上一级
    eg: this.$router.go(-1); // go的参数是正负整数,代表历史记录前进或后退几步

3、this.$route来完成路由的传参
	eg: let pk = this.$route.params.pk; // 拿到路由传递的参数

'''
路由配置
router-> index.js

// 路由规则表:注册页面组件,与url路径形成映射关系
const routes = [
    {
        path: '/',
        name: 'home',
        component: Home
    },
    {
        path: '/index',
        redirect: '/'   // 重定向
    },
    {
        // 路由传参  有名分组 :pk代表是参数
        path: '/book/detail/:pk',
        name: 'book_detail',    // 用-表示连接
        component: BookDetail
    },
]
四、vuex
- vuex提供的store仓库存储,可以完成组件间的传参(了解)
// 在任何一个组件中,均可以通过this.$store.state.msg访问msg的数据
// state永远只能拥有一种状态值
state: {
    msg: "状态管理器"
},
// 让state拥有多个状态值
mutations: {
    // 在一个一个组件中,均可以通过this.$store.commit('setMsg', new_msg)来修改state中的msg
    setMsg(state, new_msg) {
        state.msg = new_msg
    }
},
// 让mutations拥有多个状态值
actions: {

}
五、vue-cookie
// 安装cookie的命令
// npm install vue-cookie --save
// 为项目配置全局vue-cookie
import VueCookie from 'vue-cookie'
// 将插件设置给Vue原型,作为全局的属性,在任何地方都可以通过this.$cookie进行访问
Vue.prototype.$cookie = VueCookie
// 持久化存储val的值到cookie中
this.$cookie.set('val', this.val)
// 获取cookie中val字段值
this.$cookie.get('val')
六、axios
// 安装 axios(ajax)的命令
// npm install axios--save
// 为项目配置全局axios
import Axios from 'axios'
Vue.prototype.$ajax = Axios
let _this = this
this.$ajax({
    method: 'post',
    url: 'http://127.0.0.1:5000/loginAction',
    params: {
        usr: this.usr,
        ps: this.ps
    }
}).then(function(res) {
    // this代表的是回调then这个方法的调用者(axios插件),也就是发生了this的重指向
    // 要更新页面的title变量,title属于vue实例
    // res为回调的对象,该对象的data属性就是后台返回的数据
    _this.title = res.data
}).catch(function(err) {
    window.console.log(err)
})
# 用pycharm启动该文件模拟后台
from flask import Flask, request, render_template
from flask_cors import CORS
app = Flask(__name__)
CORS(app, supports_credentials=True)

@app.route('/')
def index():
    return "<h1>主页</h1>"

@app.route('/loginAction', methods=['GET', 'POST'])
def test_action():
    # print(request.args)
    # print(request.form)
    # print(request.values)
    usr = request.args['usr']
    ps = request.args['ps']
    if usr != 'abc' or ps != '123':
        return 'login failed'
    return 'login success'


if __name__ == '__main__':
    app.run()

 浙公网安备 33010602011771号