
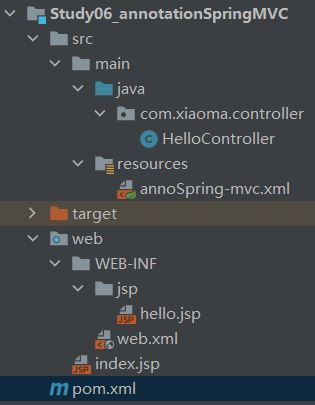
项目目录
一.创建maven项目,添加web支持,在pom.xml问价引入一下代码
    <build>
        <resources>
            <resource>
                <directory>src/main/java</directory>
                <includes>
                    <include>**/*.properties</include>
                    <include>**/*.xml</include>
                </includes>
                <filtering>false</filtering>
            </resource>
            <resource>
                <directory>src/main/resources</directory>
                <includes>
                    <include>**/*.properties</include>
                    <include>**/*.xml</include>
                </includes>
                <filtering>false</filtering>
            </resource>
        </resources>
    </build>
二..web模块部分的代码与上一小节的相同,新建jsp文件,配置web.xml
1.web.xml代码
<?xml version="1.0" encoding="UTF-8"?>
<web-app xmlns="http://xmlns.jcp.org/xml/ns/javaee"
         xmlns:xsi="http://www.w3.org/2001/XMLSchema-instance"
         xsi:schemaLocation="http://xmlns.jcp.org/xml/ns/javaee http://xmlns.jcp.org/xml/ns/javaee/web-app_4_0.xsd"
         version="4.0">
    <context-param>
        <param-name>contextConfigLocation</param-name>
        <param-value>classpath:annoSpring-mvc.xml</param-value>
    </context-param>

    <servlet>
        <servlet-name>Spring-mvc</servlet-name>
        <servlet-class>org.springframework.web.servlet.DispatcherServlet</servlet-class>
        <init-param>
            <param-name>contextConfigLocation</param-name>
            <param-value>classpath:annoSpring-mvc.xml</param-value>
        </init-param>
        <load-on-startup>1</load-on-startup>
    </servlet>
    <servlet-mapping>
        <servlet-name>Spring-mvc</servlet-name>
        <url-pattern>/</url-pattern>
    </servlet-mapping>
</web-app>
2.jsp代码
<%@ page contentType="text/html;charset=UTF-8" language="java" %>
<html>
<head>
    <title>Title</title>
</head>
<body>
    ${msg}
</body>
</html>
三.在Java文件夹下创建com.xiaoma.controller.HelloControler类文件,代码如下
package com.xiaoma.controller;

import org.springframework.stereotype.Controller;
import org.springframework.ui.Model;
import org.springframework.web.bind.annotation.RequestMapping;

/**
 * Author:xiaoma
 * FileName:HelloController
 * Data:2022/4/27 9:35
 */
@Controller
public class HelloController {
    @RequestMapping("hello")
    public String sayHello(Model model){
        model.addAttribute("msg","hello");
        //web-inf/jsp/hello.jsp
        return "hello";
    }
}
四.在resources文件夹下创建annoSpring-mvc.xml,代码如下
<?xml version="1.0" encoding="UTF-8"?>
<beans xmlns="http://www.springframework.org/schema/beans"
       xmlns:xsi="http://www.w3.org/2001/XMLSchema-instance"
       xmlns:context="http://www.springframework.org/schema/context"
       xmlns:mvc="http://www.springframework.org/schema/mvc"
       xsi:schemaLocation="http://www.springframework.org/schema/beans
       http://www.springframework.org/schema/beans/spring-beans.xsd
       http://www.springframework.org/schema/context
       https://www.springframework.org/schema/context/spring-context.xsd
       http://www.springframework.org/schema/mvc
       https://www.springframework.org/schema/mvc/spring-mvc.xsd">

    <!-- 自动扫描包,让指定包下的注解生效,由IOC容器统一管理 -->
    <context:component-scan base-package="com.xiaoma.controller"/>

    <!--下面的代码固定死的-->
    <!-- 让Spring MVC不处理静态资源 -->
    <mvc:default-servlet-handler />
    <!--
    支持mvc注解驱动
        在spring中一般采用@RequestMapping注解来完成映射关系
        要想使@RequestMapping注解生效
        必须向上下文中注册DefaultAnnotationHandlerMapping
        和一个AnnotationMethodHandlerAdapter实例
        这两个实例分别在类级别和方法级别处理。
        而annotation-driven配置帮助我们自动完成上述两个实例的注入。
     -->
    <mvc:annotation-driven />
    <!-- 视图解析器 -->
    <bean class="org.springframework.web.servlet.view.InternalResourceViewResolver" id="internalResourceViewResolver">
        <!-- 前缀 -->
        <property name="prefix" value="/WEB-INF/jsp/" />
        <!-- 后缀 -->
        <property name="suffix" value=".jsp" />
    </bean>
</beans>
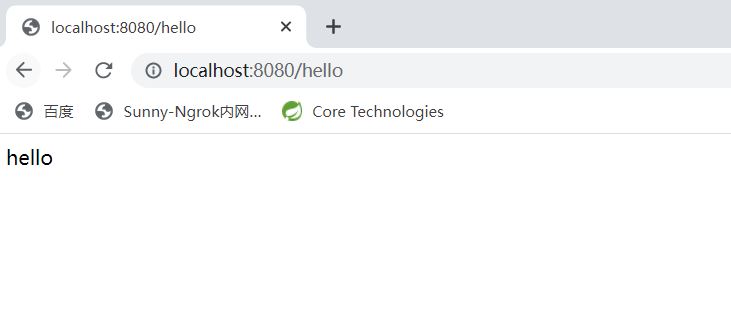
五.配置并启动tomcat,浏览器访问localhost:8080/hello,结果界面上显示“hello”字样
注意1:tomcat的Deployment的Application context路径为/
注意2:记得点击idea菜单栏的File-》Project Structure-》在Output Layout中添加lib文件夹并添加所有依赖,否则会报404或者500的错误

 浙公网安备 33010602011771号