vuejs简单入门
vuejs介绍
Vue.js是一个构建数据驱动的 web 界面的渐进式框架。Vue.js 的目标是通过尽可能简单的 API 实现响应的数据绑
定和组合的视图组件。它不仅易于上手,还便于与第三方库或既有项目整合。
官网:https://cn.vuejs.org/
MVVM模式
MVVM是Model-View-ViewModel的简写。它本质上就是MVC 的改进版。MVVM 就是将其中的View 的状态和行为
抽象化,让我们将视图 UI 和业务逻辑分开
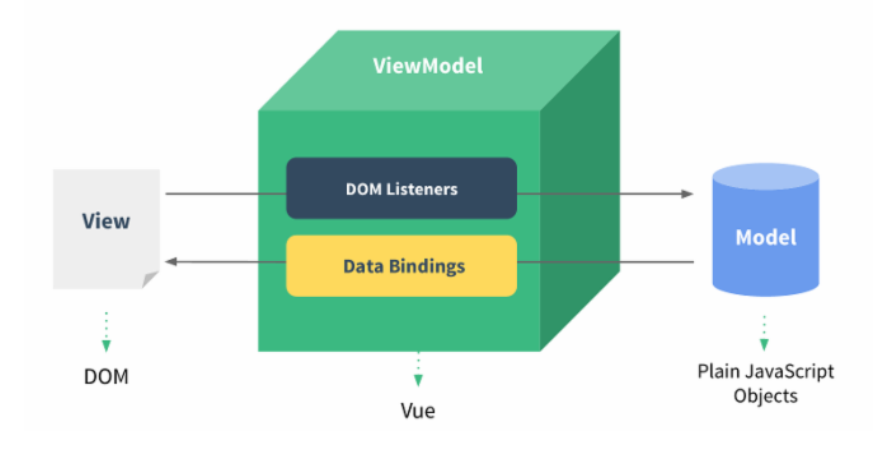
MVVM模式和MVC模式一样,主要目的是分离视图(View)和模型(Model) Vue.js 是一个提供了 MVVM 风格的双向数据绑定的 Javascript 库,专注于View 层。
它的核心是 MVVM 中的 VM,也就是 ViewModel。 ViewModel负责连接 View 和 Model,保证视图和数据的一致性,这种轻量级的架构让前端
开发更加高效、便捷.
vuejs快速入门
<!DOCTYPE html>
<html>
    <head>
        <meta charset="UTF-8">
        <title>vuejs入门</title>
        <script src="js/vuejs_v2.5.17.js"></script>//首先引入标签
    </head>
    <body>
        <div id="app">
            {{message}}
        </div>
        <script>
            new Vue({
                el:"#app",//选择器  ${#app} 表示当前vue对象接管了div区域
                data:{      //module
                    message:"hello world"     //注意不要写分号结尾
                },
                methods:{//可以自定义方法

                }
            });
        </script>

    </body>
</html>
插值表达式
数据绑定最常见的形式就是使用“Mustache”语法 (双大括号) 的文本插值,Mustache 标签将会被替代为对应数据对
象上属性的值。无论何时,绑定的数据对象上属性发生了改变,插值处的内容都会更新。
Vue.js 都提供了完全的 JavaScript 表达式支持。
    <div id="app">
            {{message}}
            {{5>3?"yes":"no"}}
        </div>

        <script>
            //创建vue对象
            new Vue({
                el:"#app",  // 选择器    $("#app")
                data:{  //封装数据
                    message:10
                }
            });

        </script>
这些表达式会在所属 Vue 实例的数据作用域下作为 JavaScript 被解析。有个限制就是,每个绑定都只能包含单个
表达式,所以下面的例子都不会生效。
<!-- 这是语句,不是表达式 -->
{{ var a = 1 }}
<!-- 流控制也不会生效,请使用三元表达式 -->
{{ if (ok) { return message } }}
vuejs常用系统指令
v-on
可以用 v-on 指令监听 DOM 事件,并在触发时运行一些 JavaScript 代码
v-on:click
<div id="app">
            {{message}}

            <input type="button" value="点我" v-on:click="fun1('good')" />
        </div>

        <script>
            //创建vue对象
            new Vue({
                el:"#app",  // 选择器    $("#app")
                data:{  //封装数据
                    message:"hello"
                },
                methods:{
                    fun1:function(msg){
                        this.message=msg;
                    }
                }
            });


        </script>
v-on:keydown
<div id="app">
            <input type="text" v-on:keydown="fun1()"/>
        </div>

        <script>
            //创建vue对象
            new Vue({
                el:"#app",  // 选择器    $("#app")
                methods:{
                    fun1:function(){
                        //event:事件源
                        var code=event.keyCode;//得到当前按键的编码
                        //alert(code)
                        if(!(code>=48&&code<=57)){//如果不是0-9的数字,阻止事件关联
                            event.preventDefault();//通知浏览器不要执行与事件关联的默认动作
                        }
                    }
                }
            });

        </script>
v-on:mouseover
<div id="app">
            <div v-on:mouseover="fun1()" style="border:1px solid red">
                <textarea v-on:mouseover="fun2()">这是一个文本域</textarea>
            </div>
        </div>

        <script>
            //创建vue对象
            new Vue({
                el:"#app",  // 选择器    $("#app")
                methods:{ //定义方法
                    fun1:function(){
                        alert("div");
                    },
                    fun2:function(){
                        alert("textarea");
                        event.stopPropagation();//不再派发事件
                    }
                }
            });

        </script>
事件修饰符
Vue.js 为 v-on 提供了事件修饰符来处理 DOM 事件细节,如:event.preventDefault() 或 event.stopPropagation()。 Vue.js通过由点(.)表示的指令后缀来调用修饰符。
.stop
.prevent
.capture
.self
.once
<div id="app">
            <!--
                @click == v-on:click
            -->
            <form @submit.prevent action="http://www.baidu.com">
                <input type="submit" value="提交" />
            </form>

            <div @click="fun1">
                <a @click.stop href="http://www.baidu.com">百度</a>
            </div>
        </div>

        <script>
            //创建vue对象
            new Vue({
                el:"#app",  // 选择器    $("#app")
                methods:{ //定义方法
                    fun1:function(){
                        alert("div事件执行了");
                    }
                }
            });

        </script>
按键修饰符
Vue 允许为 v-on 在监听键盘事件时添加按键修饰符
全部的按键别名:
.enter
.tab
.delete (捕获 "删除" 和 "退格" 键)
.esc
.space
.up
.down
.left
.right
.ctrl
.alt
.shift
.meta
<div id="app">
<input type="text" v-on:keyup.enter="fun1">
</div>
<script>
new Vue({
el:'#app', //表示当前vue对象接管了div区域
methods:{
fun1:function(){
alert("你按了回车");
 }
 }
 });
</script>
v-text与v-html
<div id="app">
            <div v-text="message"></div>
            <div v-html="message"></div>
        </div>

        <script>
            //创建vue对象
            new Vue({
                el:"#app",  // 选择器    $("#app")
                data:{
                    message:"<font color='red'>大幂幂</font>"
                }
            });

        </script>
v-bind
<div id="app">
            <font v-bind:color="ys1" >大幂幂</font>
            <font v-bind:color="ys2" >小幂幂</font>
        </div>

        <script>
            //创建vue对象
            new Vue({
                el:"#app",  // 选择器    $("#app")
                data:{
                    ys1:"red",
                    ys2:"lime"
                }
            });

        </script>
<!-- 完整语法 -->
<a v-bind:href="url">...</a>
<!-- 缩写 -->
<a :href="url">...</a>
v-model
既可以取值又可以给对象赋值
<div id="app">
            用户名:<input type="text" v-model="username"/><br/>
            密码:<input type="text" v-model="password"/><br/>
            <input type="button" value="操作" @click="fun1" />
        </div>

        <script>
            //创建vue对象
            new Vue({
                el:"#app",  // 选择器    $("#app")
                data:{
                    username:"tom",
                    password:"123"
            //user:{username:"rose",password:"123"}


                },
                methods:{
                    fun1:function(){
                        alert(this.username+"===="+this.password);
               //alert(this.user.username+"==="+this.user.user.password)
                    }
                }
            });

        </script>
v-for
<div id="app">
            <ul>
                <li v-for="(v,i) in arr">{{v+"   "+i}}</li>
            </ul>

            <ul>
                <li v-for="(val,key) in person">{{val+"  "+key}}</li>
            </ul>

            <table border="1">
                <tr>
                    <td>编号</td>
                    <td>姓名</td>
                    <td>年龄</td>
                </tr>
                <!--
                    for(User u : users)
                -->
                <tr v-for="u in users">
                    <td>{{u.id}}</td>
                    <td>{{u.name}}</td>
                    <td>{{u.age}}</td>
                </tr>
            </table>
        </div>

        <script>
            //创建vue对象
            new Vue({
                el:"#app",  // 选择器    $("#app")
                data:{
                    arr:["aa","bb","mm","sb"],
                    person:{id:1,name:"tom",age:18},
                    users:[{id:1,name:"tom",age:18},{id:2,name:"jerry",age:19}]
                }
            });

        </script>
v-if与v-show
div id="app">
            <font v-if="flag">大幂幂</font>
            <font v-show="flag">小幂幂</font>
            <input type="button" @click="fun1" value="切换"/>
        </div>

        <script>
            //创建vue对象
            new Vue({
                el:"#app",  // 选择器    $("#app")
                data:{
                    flag:false
                },
                methods:{
                    fun1:function(){
                        this.flag = !this.flag;
                    }
                }
            });

        </script>
VueJS生命周期
每个 Vue 实例在被创建之前都要经过一系列的初始化过程
vue在生命周期中有这些状态,
beforeCreate,created,beforeMount,mounted,beforeUpdate,updated,beforeDestroy,destroyed。Vue
在实例化的过程中,会调用这些生命周期的钩子,给我们提供了执行自定义逻辑的机会。那么,在这些vue钩子(回调函数)
中,vue实例到底执行了那些操作,我们先看下面执行的例子
<body>
        <div id="app">
            {{message}}
        </div>

        <script>
            //创建vue对象
            var vm = new Vue({
                el:"#app",  // 选择器    $("#app")
                data:{
                    message:"hello"
                },
                methods:{

                },
                beforeCreate: function() {
//                  console.log(this);
                    showData('创建vue实例前', this);
                },
                created: function() {
                    showData('创建vue实例后', this);
                },
                beforeMount: function() {
                    showData('挂载到dom前', this);
                },
                mounted: function() {
                    showData('挂载到dom后', this);
                },
                beforeUpdate: function() {
                    showData('数据变化更新前', this);
                },
                updated: function() {
                    showData('数据变化更新后', this);
                },
                beforeDestroy: function() {
                    vm.test = "3333";
                    showData('vue实例销毁前', this);
                },
                destroyed: function() {
                    showData('vue实例销毁后', this);
                }
            });

             function showData(process, obj) {
                console.log(process);
                console.log('data 数据:' + obj.test)
                console.log('挂载的对象:')
                console.log(obj.$el)
                realDom();
                console.log('------------------')
                console.log('------------------')
            }

            function realDom() {
                console.log('真实dom结构:' + document.getElementById('app').innerHTML);
            }

            //vm.message = "hello world";
            vm.$destroy(); //销毁
        </script>
vue对象初始化过程中,会执行到beforeCreate,created,beforeMount,mounted 这几个钩子的内容
beforeCreate :数据还没有监听,没有绑定到vue对象实例,同时也没有挂载对象
created :数据已经绑定到了对象实例,但是还没有挂载对象
beforeMount: 模板已经编译好了,根据数据和模板已经生成了对应的元素对象,将数据对象关联到了对象的
el属性,el属性是一个HTMLElement对象,也就是这个阶段,vue实例通过原生的createElement等方法来创
建这个html片段,准备注入到我们vue实例指明的el属性所对应的挂载点
mounted:将el的内容挂载到了el,相当于我们在jquery执行了(el).html(el),生成页面上真正的dom,上面我们
就会发现dom的元素和我们el的元素是一致的。在此之后,我们能够用方法来获取到el元素下的dom对象,并
进 行各种操作
当我们的data发生改变时,会调用beforeUpdate和updated方
beforeUpdate :数据更新到dom之前,我们可以看到$el对象已经修改,但是我们页面上dom的数据还
没有发生改变
updated: dom结构会通过虚拟dom的原则,找到需要更新页面dom结构的最小路径,将改变更新到
dom上面,完成更新
beforeDestroy,destroed :实例的销毁,vue实例还是存在的,只是解绑了事件的监听还有watcher对象数据
与view的绑定,即数据驱动
VueJS ajax
1) vue-resource
vue-resource是Vue.js的插件提供了使用XMLHttpRequest或JSONP进行Web请求和处理响应的服务。 当vue更新
到2.0之后,作者就宣告不再对vue-resource更新,而是推荐的axios,在这里大家了解一下vue-resource就可以。
vue-resource的github: https://github.com/pagekit/vue-resource
2) axios(推荐用)
Axios 是一个基于 promise 的 HTTP 库,可以用在浏览器和 node.js 中
axios的github:https://github.com/axios/axios
引入axios
首先就是引入axios,如果你使用es6,只需要安装axios模块之后
import axios from 'axios';
//安装方法
 npm install axios
//或
bower install axios
当然也可以用script引入
<script src="https://unpkg.com/axios/dist/axios.min.js"></script>
get请求
//通过给定的ID来发送请求
axios.get('/user?ID=12345')
    .then(function(response){
        console.log(response);
    })
    .catch(function(err){
        console.log(err);
     });
//以上请求也可以通过这种方式来发送
axios.get('/user',{
    params:{
        ID:12345
       }
     })
  .then(function(response){
    console.log(response);
    })
  .catch(function(err){
     console.log(err);
    });
post请求
axios.post('/user',{
    firstName:'Fred',
    lastName:'Flintstone'
})
.then(function(res){
    console.log(res);
})
.catch(function(err){
    console.log(err);
});
为方便起见,为所有支持的请求方法提供了别名
axios.request(confifig)axios.get(url[, confifig])
axios.delete(url[, confifig])
axios.head(url[, confifig])
axios.post(url[, data[, confifig]])
axios.put(url[, data[, confifig]])
axios.patch(url[, data[, confifig]])
案例(springboot方式实现)
数据库设计与表结构
CREATE DATABASE vuejsdemo;
USE vuejsdemo;
CREATE TABLE USER(
    id INT PRIMARY KEY AUTO_INCREMENT,
    username VARCHAR(20),
    PASSWORD VARCHAR(50),
    age INT,
    sex VARCHAR(20),
    email VARCHAR(50)
);

INSERT  INTO `user`(`id`,`username`,`PASSWORD`,`age`,`sex`,`email`) VALUES
(1,'tom','123',18,'男','tom@163.com'),
(2,'jerry','333',19,'女','jerry@163.com');
服务端
创建maven工程引入坐标
 <parent>
        <groupId>org.springframework.boot</groupId>
        <artifactId>spring-boot-starter-parent</artifactId>
        <version>2.0.1.RELEASE</version>
    </parent>
    <dependencies>
        <dependency>
            <groupId>org.springframework.boot</groupId>
            <artifactId>spring-boot-starter-web</artifactId>
        </dependency>
        <dependency>
            <groupId>org.springframework.boot</groupId>
            <artifactId>spring-boot-starter-data-jpa</artifactId>
        </dependency>
        <dependency>
            <groupId>mysql</groupId>
            <artifactId>mysql-connector-java</artifactId>
            <version>5.1.6</version>
        </dependency>
        <dependency>
            <groupId>org.projectlombok</groupId>
            <artifactId>lombok</artifactId>
            <version>1.16.10</version>
        </dependency>
    </dependencies>
加入配置文件
#DB Configuration:
spring.datasource.driverClassName=com.mysql.jdbc.Driver
spring.datasource.url=jdbc:mysql://127.0.0.1:3306/vuejsdemo
spring.datasource.username=root
spring.datasource.password=root
加入pojo
@Data//自动生成get/set
@Entity//与表建立映射关系
public class User implements Serializable {
    @Id//对应主键
    private Integer id;
    private String username;
    private String password;
    private String email;
    private String sex;
    private Integer age;
}
创建启动类
@SpringBootApplication
public class ApplicationRun {
    public static void main(String[] args) {
        SpringApplication.run(ApplicationRun.class,args);
    }
}
controller
@RestController
@RequestMapping("/user")
public class UserController {

    @Autowired
    private UserService userService;

    @RequestMapping("/findAll")
    public List<User> findAll(){ return userService.findAll(); }

    @RequestMapping(value = "/findById/{id}")
    public User findById(@PathVariable("id")int id){
        return userService.findById(id);
    }

    @RequestMapping("/update")
    public void update(@RequestBody User user){
        userService.update(user);
    }
}
service
public interface UserService {
    public List<User> findAll();

    User findById(int id);

    void update(User user);
}
impl
@Service
public class UserServiceImpl implements UserService {

    @Autowired
    private UserDao userDao;

    @Override
    public List<User> findAll() {
        return userDao.findAll();
    }

    @Override
    public User findById(int id) {
        Optional<User> opt = userDao.findById(id);
        return opt.get();
    }

    @Override
    public void update(User user) {
        userDao.save(user);
    }

}
dao
public interface UserDao extends JpaRepository<User,Integer> {
}
前台html页面略
前台js页面
new Vue({
    el:"#abc",
    data:{
        userList:[],
        user:[]
    },
    methods: {
        //查询所有
        findAll: function () {
            var _this = this;
            //执行ajax查询数据
            var url = "user/findAll";
            axios.get(url).then(function (result) {
                _this.userList = result.data;
            }).catch(function (error) {

            });
        },
        //根据id查询
        findById:function(id){
            var _this=this;
            //执行ajax查询数据
            var url="user/findById/"+id;
            axios.get(url).then(function(result){
                _this.user=result.data;
                //显示窗口
                $("#myModal").modal("show");
            }).catch(function(){

            });
        },
        //修改
        update:function(){
            var _this=this;
            //执行ajax请求
            var url="user/update";
            axios.post(url,_this.user).then(function(){
                //重新查询
                _this.findAll();
                //隐藏窗口
                $("#myModal").modal("hide");
            }).catch(function(error){

            })
        }
    },
    //创建vue实例后执行
    created: function () {
        this.findAll();
    }
});

 浙公网安备 33010602011771号