跳一跳小外挂(附完整代码)
![]()
![]() 1实验环境
1实验环境

操作系统:Windows10
编码语言:Python3.6
编译平台:Pycharm
Python库:os、datetime、matplotlib、opencv-python、time
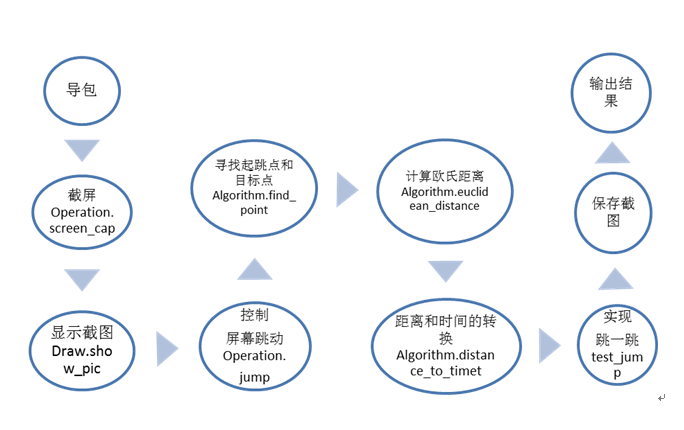
2实验代码流程图
3代码运行步骤和结果等
3.1 手机和电脑用数据线连接
使用通过数据线连接手机,将开发者模式打开并授权
通过adb命令
|
adb devices |
可以查看连接的Android设备的信息

3.2 获取手机相关的信息
查看Android手机的分辨率(第四行)
|
adb shell dumpsys window displays |

获取屏幕密度
|
adb shell wm density |

获取手机型号
|
adb shell getprop ro.product.device |

获取Android系统的版本
|
adb shell getprop ro.build.version.release |

3.3 截屏
输入如下命令:
|
adb shell screencap -p /sdcard/auto.png |
此时,截屏的图片就保存到 /sdcard/auto.png文件中。
注意:/sdcard/和/data/目录是可以写入的。
可以通过命令查看sdcard目录下所有的文件。
|
adb shell ls /sdcard/ -l |
通过如下命令把手机上的文件拷贝到电脑上
|
adb pull /sdcard/auto.png h:\ |
此时,图片就会被拷贝到h:\根目录下了。打开即可看到当前手机的屏幕信息。
3.4 屏幕点击事件
通过如下命令模拟手机的滑动事件
|
adb shell input swipe x1 y1 x2 y2 duration |
通过adb shell input swipe命令进行滑动
l x1、y1:滑动开始的点。
l x2、y2:滑动结束的点。
l duration:持续的时间(单位ms)。
特殊情况下:如果不写duration参数,就理解为点击事件。如果写duration,然后x1y1和x2y2是相同的点,就表示长按。
跳一跳关键是:duration的值的计算。
尝试:
|
adb shell input swipe 100 100 100 100 700 |
尝试修改duration的值,看看跳的效果。
求得可以拿到加分的中间值。比如555~871都可以拿到加分(555以下和871以上就不能拿到加分),此时则取中间值为(555+871)/2=713 作为后面计算的参考值。
3.5 duration值的计算
假设我们截屏的效果是如下:

从图中可以看到,时间的值跟开始位置到结束位置的距离有关。
假设时间是t,距离是s。公式应该是s = at
基本思路:两点之间的距离乘以一个时间系数。
所以要从截图上识别出起跳位置的坐标(x1,y1)和目标位置的坐标(x2,y2)。
起跳位置的坐标:小人的底座中心点
目标位置的坐标:目标菱形的中心点
然后计算这两点之间的距离(欧氏距离):sqrt((x1-x2)2+(y1-y2)2)
3.6 寻找关键坐标——起跳坐标
算法策略:获取小人的底座中心点的值作为起跳点。
1 获取小人的所有像素点中y坐标的最大值
2 在小人y坐标的最大值那些像素点中,计算出x的平均值,作为小人底座的x的值。
3 y坐标的最大值减去一个偏移值,就作为小人底座的y值。(注意:该偏移值不同的设备是不同的,同一台设备不同场景下是一样的)
比如教师机的设备中最低点的值是(410,1162),中心值是(410,1142),从而计算出偏移值为1162-1142=20

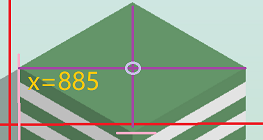
3.7 获取目标坐标的y值
取屏幕宽和高的一半(x=540和y=960)
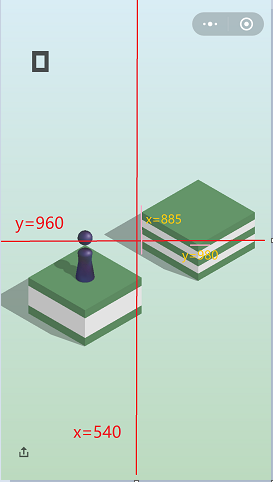
我们会发现,目标格子的边沿(x=560,y=980)和这个是差不多的(y的偏差是20,x的偏差是20)
以后每次跳动的时候,假如已经知道目标格子的边沿,和目标坐标的x值,就可以很轻松计算出目标坐标的y值。
注意:每个格子的宽和高的比例是相同的。
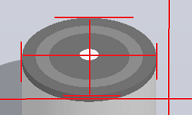
方形:左:(560,848) 园:左:(251,876)
右:(1015,848) 右:(522,876)
上:(790,718) 上:(388,799)
下:(790,980) 下:(388,957)
中:(790,850) 中:(388,876)
高和宽的比例:(980-718)/(1015-560) =262/455=0.576。假设该值为p
最后,由已知的目标坐标的x值,求目标坐标的y值。
先附上运行结果,以及截图信息:

在理解了跳一跳的基本思路之后,现在附上完整代码(有注释):
# main.py
# _*_ coding:utf-8 _*_
__author__ = 'WoLykos'

from operations import *
from draw import *
from algorithm import *
import time
import random


# 测试截屏
# def test_screen_cap():
#     op = Operation()
#     op.screen_cap()


# 测试显示图片
def test_show_pic():
    draw = Draw()
    draw.show_pic("img/auto.png")


# 测试计算欧式距离
def test_euclidean_distance():
    algorithm = Algorithm()
    p1 = (3, 4)
    p2 = (6, 8)
    d = algorithm.euclidean_distance(p1, p2)
    print(d)


# 测试寻找关键坐标
def test_find_point():
    op = Operation()
    im = op.screen_cap()
    algorithm = Algorithm()
    start_x, start_y, end_x, end_y = algorithm.find_point(im)
    print("start_point:", start_x, start_y)
    print("end_point:", end_x, end_y)

    start_point = (start_x, start_y)
    end_point = (end_x, end_y)
    distance = algorithm.euclidean_distance(start_point, end_point)
    # print(distance)
    press_time = algorithm.distance_to_time(distance)
    op.jump(start_point, end_point, press_time)


if __name__ == "__main__":
    # test_screen_cap()
    # test_show_pic()
    while True:
        # test_euclidean_distance()
        test_find_point()
        time.sleep(1 + 2*random.random())
# algorithm.py
# _*_ coding:utf-8 _*_
__author__ = 'WoLykos'


class Algorithm:
    # 构造器
    def __int__(self):
        pass

    # 计算两点之间的欧氏距离
    # p1和p2表示两个点 用元组来表示
    def euclidean_distance(self, p1, p2):
        return ((p1[0]-p2[0])**2+(p1[1]-p2[1])**2)**0.5  # ((p1[0]-p2[0])**2+(p1[1]-p2[1])**2)**0.5

    # 寻找关键坐标
    # 返回值1,2 piece_x, piece_y 起跳点的坐标 170,555
    # 返回值3,4 board_x, board_y 目标点的坐标 395,425
    def find_point(self, im):
        # piece_x = piece_y = 0
        # board_x = board_y = 0

        # 图像的大小
        w, h = im.size  # (1080,1920)
        # 加载图像
        im_pixel = im.load()
        # 记录小人所有的点
        points = []

        # 记录y的最大值
        piece_y_max = 0

        # 1 计算出起跳点 就是小人底座的中心点
        # 1.1 获取小人的所有像素点中y坐标的最大值
        # 遍历图像中的每一个点
        # 遍历每一行
        for i in range(h // 3, h * 2 // 3):
            # 遍历每一列
            for j in range(w):

                pixel = im_pixel[j, i]
                # print("i = ", i, ",j = ", j, "pixel = ", pixel)

                # 判断pixel是否小人所在的位置
                # 当该点的RGB值约为56,56,82的时候就可以认为是小人所在的像素点了
                if (51 < pixel[0] < 61 and 51 < pixel[1] < 61 and 72 < pixel[2] < 102):
                    # 把当前的点添加到points数组中
                    points.append((j, i))  # (x,y)
                    # 记录下y的值
                    if i > piece_y_max:
                        piece_y_max = i

        # print("piece_y_max = %d" % (piece_y_max,))

        # 1.2 在小人y坐标的最大值那些像素点中,计算出x的平均值,作为小人底座的x的值。
        bottom_x = []
        for x, y in points:
            if y == piece_y_max:
                bottom_x.append(x)

        piece_x = sum(bottom_x) // len(bottom_x)
        # print("piece_x = %d" % (piece_x,))

        # 1.3 y坐标的最大值减去一个偏移值,就作为小人底座的y值。(注意:该偏移值不同的设备是不同的,同一台设备不同场景下是一样的)
        piece_y = piece_y_max - 20  # 偏移值1130-110=20
        # print("piece_y = %d" % (piece_y,))

        # 2计算 目标格子的中心点
        # 2.1计算目标格子的x值
        points = []
        # 只取中间1/3进行扫描
        for i in range(h // 3, h * 2 // 3):
            if len(points) > 0:
                break
            # 取坐标的一个点作为背景的参照物
            last_pixel = im_pixel[0, i]
            # 逐个扫描右边的点
            for j in range(w):
                pixel = im_pixel[j, i]
                # 把当前点与最左边的点比较 如果RGB差异比较大 则认为是目标点
                # 排除该点为小人像素点56,56,82的可能性,BUG
                if not (54 < pixel[0] < 141 and 54 < pixel[1] < 130 and 69 < pixel[2] < 172):
                    if (abs(pixel[0] - last_pixel[0]) + abs(pixel[1] - last_pixel[1])
                            + abs(pixel[2] - last_pixel[2]) > 10):
                        points.append((j, i))

        top_x = []
        for x, y in points:
            top_x.append(x)

        board_x = sum(top_x) // len(top_x)
        # print("board_x = %d" % (board_x,))

        # 2.2计算目标格式子y值
        # 屏幕中心的值
        center_x = w / 2 + 20  # x的偏差是20
        center_y = h / 2 + 20  # y的偏差是20,园
        # 格子高和宽的比例
        height_per_width = 262 / 455
        # 计算出目标格子的y值(需要转换成整数)
        # 从piece_x调到board_x 如果piece_x < board_x则表示从左往右跳
        # 如果piece_x > board_x 则表示从右往左跳
        if piece_x < board_x:
            board_y = int(center_y - height_per_width * (board_x - center_x))
        else:  # 从右往左跳
            board_y = int(center_y + height_per_width * (board_x - center_x))
        # print("board_y = %d" % (board_y,))

        return piece_x, piece_y, board_x, board_y

    # 距离与时间的转换
    def distance_to_time(self, distance):
        # 当0分的时候 距离为 527.5234591939964 时间为713
        p = 713 / 527.5234591939964  # 该算法后面待优化
        press_time = distance * p
        return press_time
# operations.py
# _*_ coding:utf-8 _*_
__author__ = 'WoLykos'

import os
import datetime

from PIL import Image


# 实现控制安卓
class Operation:
    # 构造方法
    def __int__(self):
        pass

    # 截屏
    def screen_cap(self):
        filename = time = datetime.datetime.now().strftime("%H%M%S")+".png"
        # 截屏并保存到手机
        cmd = "adb shell screencap -p /sdcard/auto.png"
        os.system(cmd)
        # 拷贝到电脑
        cmd = "adb pull /sdcard/auto.png "+"img/"+filename
        os.system(cmd)

        # 打开图像文件
        return Image.open("img/"+filename)

    # 控制屏幕进行跳动
    def jump(self, src, dst, press_time):
        # print(press_time)
        press_time = int(press_time)
        cmd = "adb shell input swipe %d %d %d %d %d" % (
            int(src[0]), int(src[1]),
            int(dst[0]), int(dst[1]),
            press_time
        )
        print(cmd)
        os.system(cmd)
大功告成!!
谢谢各位。。

 浙公网安备 33010602011771号