


Two weeks ago I blogged about a new MVC (Model View Controller) framework for ASP.NET that we are going to be supporting as an optional feature soon. It provides a structured model that enforces a clear separation of concerns within applications, and makes it easier to unit test your code and support a TDD workflow. It also helps provide more control over the URLs you publish in your applications, and can optionally provide more control over the HTML that is emitted from them.
Since then I've been answering a lot of questions from people eager to learn more about it. Given the level of interest I thought it might make sense to put together a few blog posts that describe how to use it in more detail. This first post is one of several I'll be doing in the weeks ahead.
A Simple E-Commerce Storefront Application
I'm going to use a simple e-commerce store application to help illustrate how the ASP.NET MVC Framework works. For today's post I'll be implementing a product listing/browsing scenario in it.
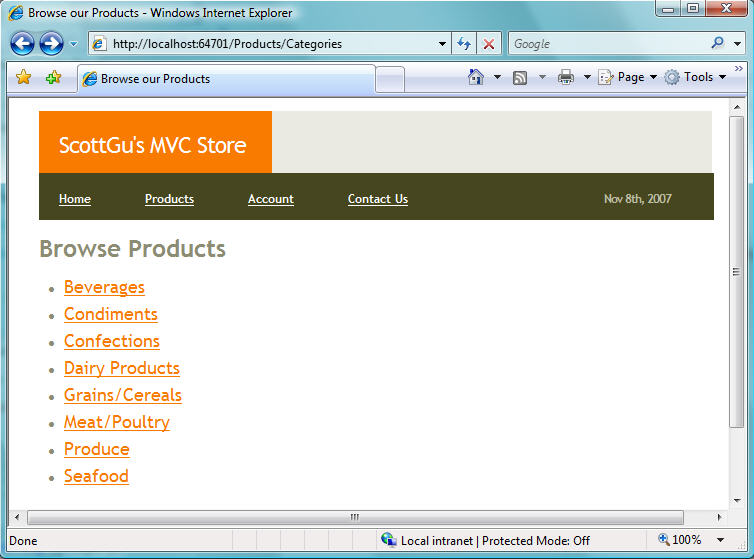
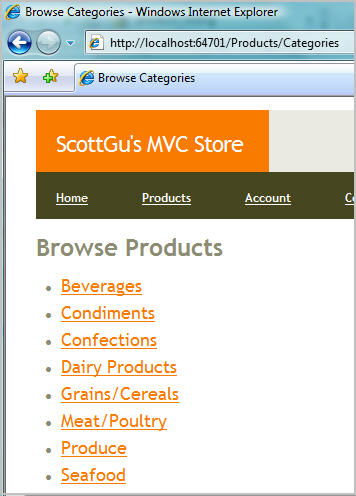
Specifically, we are going to build a store-front that enables end-users to browse a list of product categories when they visit the /Products/Categories URL on the site:
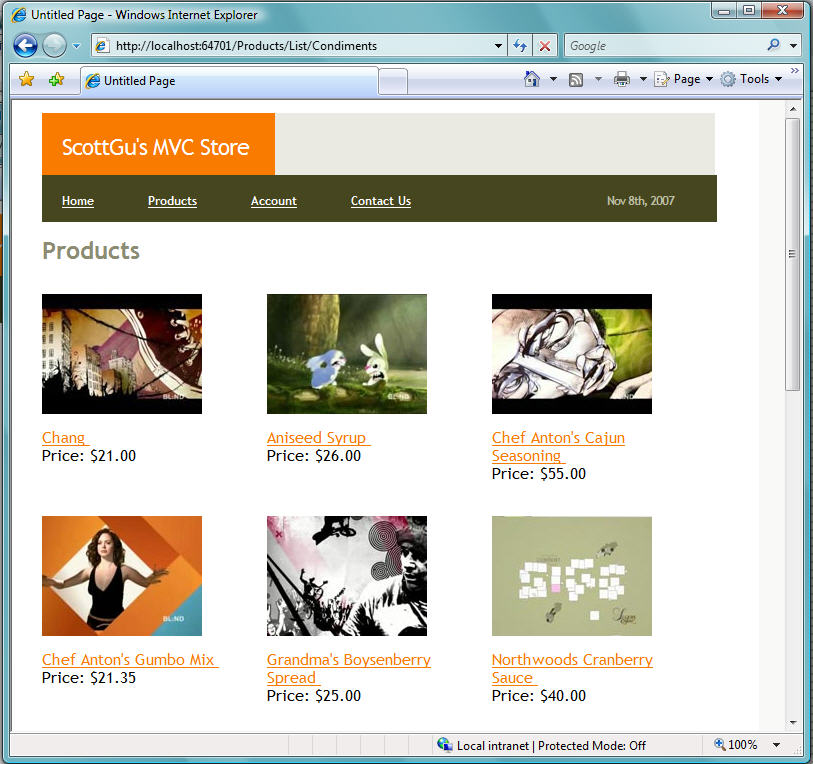
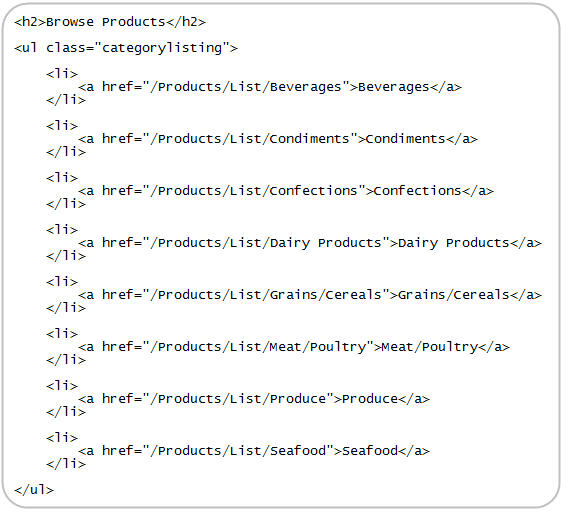
When a user clicks on a product category hyperlink on the above page, they'll navigate to a product category listing URL - /Products/List/CategoryName - that lists the active products within the specific category:
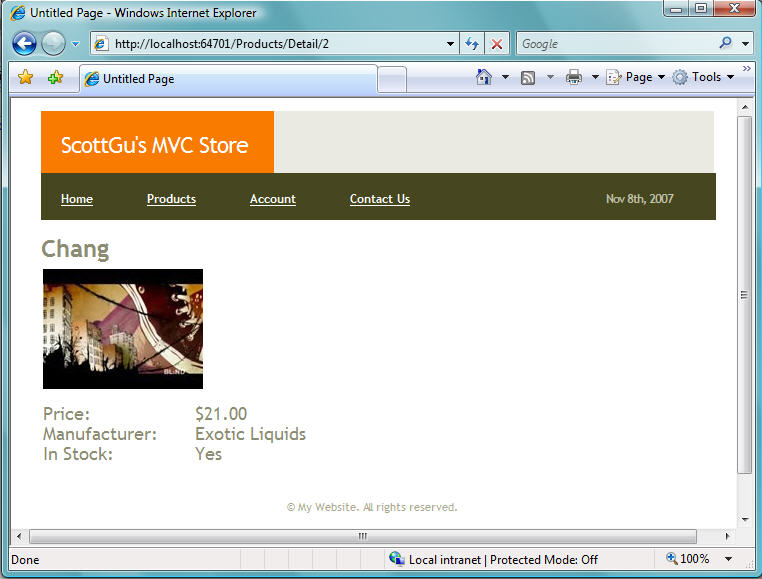
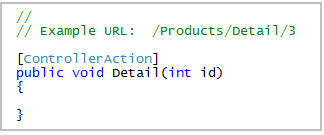
When a user clicks an individual product, they'll navigate to a product details URL - /Products/Detail/ProductID - that displays more details about the specific product they selected:
We'll build all of the above functionality using the new ASP.NET MVC Framework. This will enable us to maintain a "clean separation of concerns" amongst the different components of the application, and enable us to more easily integrate unit testing and test driven development.
Creating A New ASP.NET MVC Application
The ASP.NET MVC Framework includes Visual Studio Project Templates that make it easy to create a new web application with it. Simply select the File->New Project menu item and choose the "ASP.NET MVC Web Application" template to create a new web application using it.
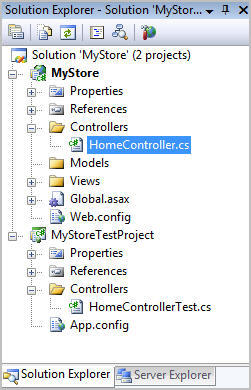
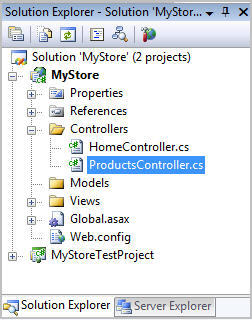
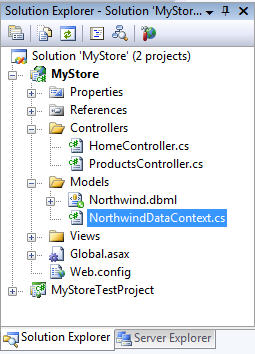
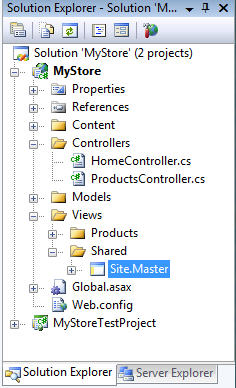
By default when you create a new application using this option, Visual Studio will create a new solution for you and add two projects into it. The first project is a web project where you'll implement your application. The second is a testing project that you can use to write unit tests against it:
You can use any unit testing framework (including NUnit, MBUnit, MSTest, XUnit, and others) with the ASP.NET MVC Framework. VS 2008 Professional now includes built-in testing project support for MSTest (previously in VS 2005 this required a Visual Studio Team System SKU), and our default ASP.NET MVC project template automatically creates one of these projects when you use VS 2008.
We'll also be shipping project template downloads for NUnit, MBUnit and other unit test frameworks as well, so if you prefer to use those instead you'll also have an easy one click way to create your application and have a test project immediately ready to use with it.
Understanding the Folder Structure of a Project
The default directory structure of an ASP.NET MVC Application has 3 top-level directories:
- /Controllers
- /Models
- /Views
As you can probably guess, we recommend putting your Controller classes underneath the /Controllers directory, your data model classes underneath your /Models directory, and your view templates underneath your /Views directory.
While the ASP.NET MVC framework doesn't force you to always use this structure, the default project templates use this pattern and we recommend it as an easy way to structure your application. Unless you have a good reason to use an alternative file layout, I'd recommend using this default pattern.
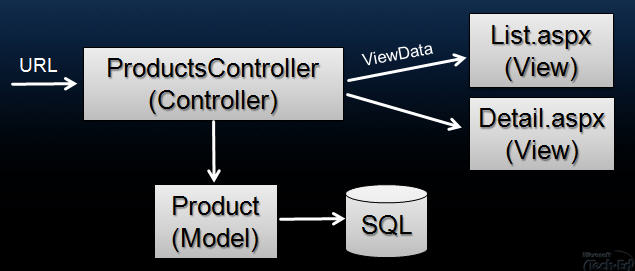
Mapping URLs to Controller Classes
In most web frameworks (ASP, PHP, JSP, ASP.NET WebForms, etc), incoming URLs typically map to template files stored on disk. For example, a "/Products.aspx" or "/Products.php" URL typically has an underlying Products.aspx or Products.php template file on disk that handles processing it. When a http request for a web application comes into the web server, the web framework runs code specified by the template file on disk, and this code then owns handling the processing of the request. Often this code uses the HTML markup within the Products.aspx or Products.php file to help with generating the response sent back to the client.
MVC frameworks typically map URLs to server code in a different way. Instead of mapping URLs to template files on disk, they instead map URLs directly to classes. These classes are called "Controllers" and they own processing incoming requests, handling user input and interactions, and executing appropriate application and data logic based on them. A Controller class will then typically call a separate "View" component that owns generating the actual HTML output for the request.
The ASP.NET MVC Framework includes a very powerful URL mapping engine that provides a lot of flexibility in how you map URLs to Controller classes. You can use it to easily setup routing rules that ASP.NET will then use to evaluate incoming URLs and pick a Controller to execute. You can also then have the routing engine automatically parse out variables that you define within the URL and have ASP.NET automatically pass these to your Controller as parameter arguments. I'll be covering more advanced scenarios involving the URL routing engine in a future blog post in this series.
Default ASP.NET MVC URL Routing to Controller Classes
By default ASP.NET MVC projects have a preconfigured set of URL routing rules that enable you to easily get started on an application without needing to explicitly configure anything. Instead you can start coding using a default set of name-based URL mapping conventions that are declared within the ASP.NET Application class of the Global.asax file created by the new ASP.NET MVC project template in Visual Studio.
The default naming convention is to map the leading URL path of an incoming HTTP request (for example: /Products/) to a class whose name follows the pattern UrlPathController (for example: by default a URL leading with /Products/ would map to a class named ProductsController).
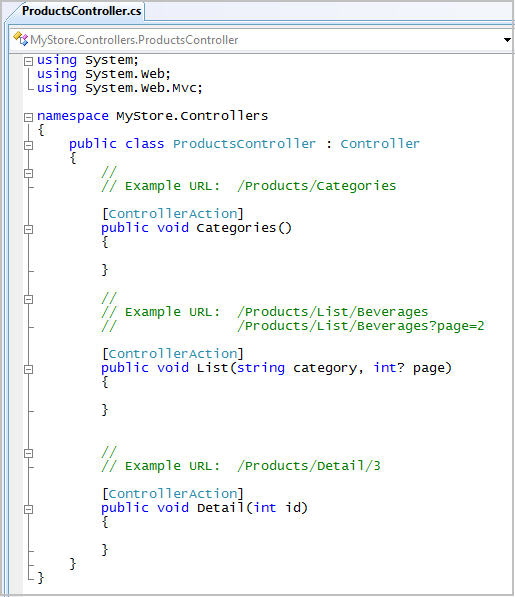
To build our e-commerce product browsing functionality, we'll add a new "ProductsController" class to our project (you can use the "Add New Item" menu in Visual Studio to easily create a Controller class from a template):
Our ProductsController class will derive from the System.Web.MVC.Controller base class. Deriving from this base class isn't required - but it contains some useful helper methods and functionality that we'll want to take advantage of later:

Once we define this ProductsController class within our project, the ASP.NET MVC framework will by default use it to process all incoming application URLs that start under the "/Products/" URL namespace. This means it will be automatically called to process the "/Products/Categories", "/Products/List/Beverages", and "/Products/Detail/3" URLs that we are going to want to enable within our store-front application.
In a future blog post we'll also add a ShoppingCartController (to enable end users to manage their shopping carts) and an AccountController (to enable end users to create new membership accounts on the site and login/logout of it). Once we add these two new controller classes to our project, URLs that start with /ShoppingCart/ and /Account/ will automatically be routed to them for processing.
Note: The ASP.NET MVC framework does not require that you always use this naming convention pattern. The only reason our application uses this by default is because there is a mapping rule that configures this that was automatically added to our ASP.NET Application Class when we created the new ASP.NET MVC Project using Visual Studio. If you don't like this rule, or want to customize it to use a different URL mapping pattern, just go into the ASP.NET Application Class (in Global.asax) and change it. I'll cover how to-do this in a future blog post (when I'll also show some of the cool scenarios the URL routing engine enables).
Understanding Controller Action Methods
Now that we have a created a ProductsController class in our project we can start adding logic to handle the processing of incoming "/Products/" URLs to the application.
When defining our e-commerce storefront use cases at the beginning of this blog post, I said we were going to implement three scenarios on the site: 1) Browsing all of the Product Categories, 2) Listing Products within a specific Category, and 3) Showing Details about a Specific Product. We are going to use the following SEO-friendly URLs to handle each of these scenarios:
| URL Format | Behavior | URL Example |
| /Products/Categories | Browse all Product Categories | /Products/Categories |
| /Products/List/Category | List Products within a Category | /Products/List/Beverages |
| /Products/Detail/ProductID | Show Details about a Specific Product | /Products/Detail/34 |
There are a couple of ways we could write code within our ProductsController class to process these three types of incoming URLs. One way would be to override the "Execute" method on the Controller base class and write our own manual if/else/switching logic to look at the incoming URL being requested and then execute the appropriate logic to process it.
A much easier approach, though, is to use a built-in feature of the MVC framework that enables us to define "action methods" on our controller, and then have the Controller base class automatically invoke the appropriate action method to execute based on the URL routing rules in use for our application.
For example, we could add the below three controller action methods to our ProductsController class to handle our three e-commerce URL scenarios above:

The URL routing rules that are configured by default when a new project is created treat the URL sub-path that follows the controller name as the action name of the request. So if we receive a URL request of /Products/Categories, the routing rule will treat "Categories" as the name of the action, and the Categories() method will be invoked to process the request. If we receive a URL request of /Products/Detail/5, the routing rule will treat "Detail" as the name of the action, and the Detail() method will be invoked to process the request, etc.
Note: The ASP.NET MVC framework does not require that you always use this action naming convention pattern. If you want to use a different URL mapping pattern, just go into the ASP.NET Application Class (in Global.asax) and change it.
Mapping URL Parameters to Controller Action Methods
There are several ways to access URL parameter values within the action methods of Controller classes.
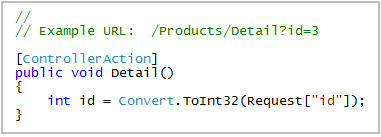
The Controller base class exposes a set of Request and Response objects that can be used. These objects have the exact same API structure as the HttpRequest/HttpResponse objects that you are already familiar with in ASP.NET. The one important difference is that these objects are now interface based instead of sealed classes (specifically: the MVC framework ships with new System.Web.IHttpRequest and System.Web.IHttpResponse interfaces). The benefit of having these be interfaces is that it is now easy to mock them - which enables easy unit testing of controller classes. I'll cover this in more depth in a future blog post.
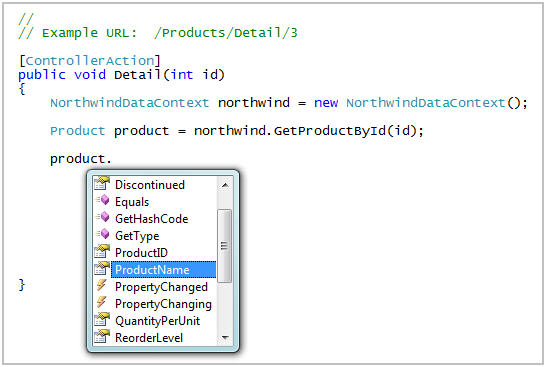
Below is an example of how we could use the Request API to manually retrieve an ID querystring value from within our Detail action method in the ProductsController class:
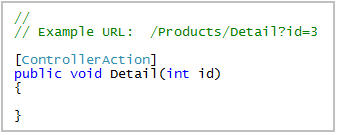
The ASP.NET MVC framework also supports automatically mapping incoming URL parameter values as parameter arguments to action methods. By default, if you have a parameter argument on your action method, the MVC framework will look at the incoming request data to see if there is a corresponding HTTP request value with the same name. If there is, it will automatically pass it in as a parameter to your action method.
For example, we could re-write our Detail action method to take advantage of this support and make it cleaner like below:
In addition to mapping argument values from the querystring/form collection of a request, the ASP.NET MVC framework also allows you to use the MVC URL route mapping infrastructure to embed parameter values within the core URL itself (for example: instead of /Products/Detail?id=3 you could instead use /Products/Detail/3).
The default route mapping rule declared when you create a new MVC project is one with the format: "/[controller]/[action]/[id]". What this means is that if there is any URL sub-path after the controller and action names in the URL, it will by default be treated as a parameter named "id" - and which can be automatically passed into our controller action method as a method argument.
This means that we can now use our Detail method to also handle taking the ID argument from the URL path (e.g: /Products/Detail/3):
I can use a similar approach for the List action so that we can pass in the category name as part of the URL (for example: /Products/List/Beverages). In the interest of making the code more readable, I made one tweak to the routing rules so that instead of having the argument name be called "id" it will be called "category" for this action.
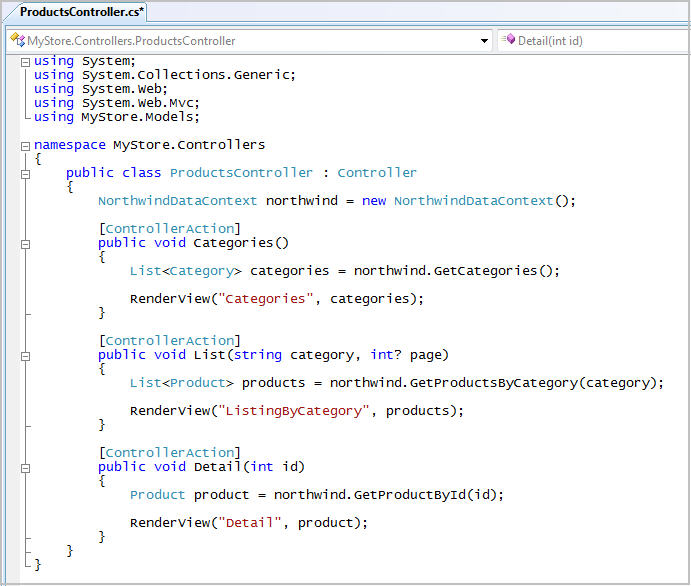
Below is a version of our ProductsController class that now has full URL routing and parameter mapping support implemented:
Note above how the List action takes the category parameter as part of the URL, and then an optional page index parameter as a querystring (we'll be implementing server-side paging and using that value to indicate which page of category data to display with the request).
Optional parameters in our MVC framework are handled using nullable type arguments on Controller Action methods. Because the page parameter on our List action is a nullable int (that is what "int?" means syntactically), the MVC framework will either pass in a value if it is present in the URL - or pass in null if not. Check out my previous post on the ?? null coalescing operator to learn a useful tip/trick on how to work with nullable types that are passed as arguments like this.
Building our Data Model Objects
We now have a ProductsController class and three action methods on it ready to process incoming web requests. Our next step will be to build some classes that will help us work with our database to retrieve the appropriate data needed to handle these web requests.
In an MVC world "models" are the components of an application that are responsible for maintaining state. With web applications this state is typically persisted inside a database (for example: we might have a Product object that is used to represent product data from the Products table inside our SQL database).
The ASP.NET MVC Framework enables you to use any data access pattern or framework you want in order to retrieve and manage your models. If you want to use ADO.NET DataSets/DataReaders (or abstractions built on top of them) you can. If you prefer to use an object relational mapper (ORM) like NHibernate, LLBLGen, WilsonORMapper, LINQ to SQL/LINQ to Entities you can absolutely use those as well.
For our e-commerce sample application I'm going to use the built-in LINQ to SQL ORM shipped in .NET 3.5 and VS 2008. You can learn more about LINQ to SQL from my ongoing blog tutorial series that covers it (in particular make sure to check out my Part1, Part2, Part3 and Part4 posts).
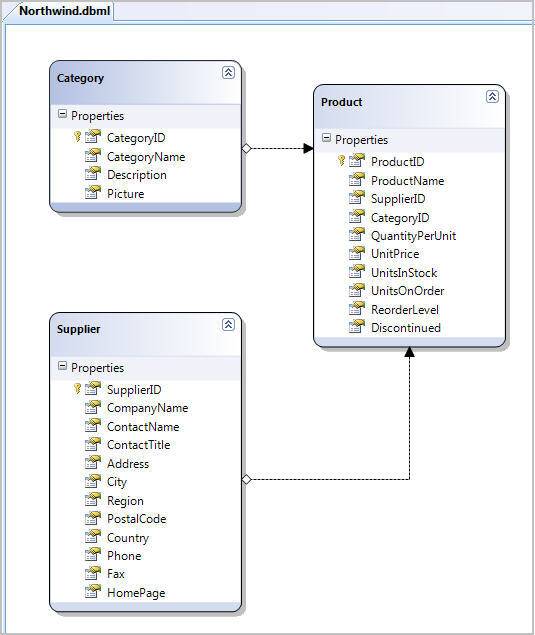
I'll start by right-clicking on the "Models" sub-directory of our MVC web project inside VS and choose the "Add New Item" option to add a LINQ to SQL model. Within the LINQ to SQL ORM designer I'll define three data model classes that map to the Categories, Products, and Suppliers table inside the SQL Server Northwind sample database (read Part 2 of my LINQ to SQL series to learn how to-do this):
Once we've defined our LINQ to SQL data model classes, I'll then add a new NorthwindDataContext partial class to our Models directory as well:
Within this class I'll define a few helper methods that encapsulate some LINQ expressions that we can use to retrieve the unique Category objects from our database, retrieve all Product objects within a specific category in our database, as well as retrieve an individual Product object based on a supplied ProductID:

These helper methods will make it easy for us to cleanly retrieve the data model objects needed from our ProductsController class (without having to write the LINQ expressions within the Controller class itself):
We now have all of the data code/objects we need to finish implementing our ProductsController functionality.
Finishing the Implementation of our ProductsController Class
Controllers in a MVC based application are responsible for processing incoming requests, handling user input and interactions, and executing appropriate application logic based on them (retrieving and updating model data stored in a database, etc).
Controllers typically do not generate the specific HTML response for a request. The task of generating an HTML response is instead owned by "View" components within the application - which are implemented as separate classes/templates from Controllers. Views are intended to be focused entirely on encapsulating presentation logic, and should not contain any application logic or database retrieval code (instead all app logic should be handled by the Controller).
In a typical MVC web workflow, Controller action methods will handle the incoming web request, use the incoming parameter values to execute appropriate application logic code, retrieve or update data model objects from a database, and then select a "View" to use to render an appropriate UI response back to a browser. As part of picking the appropriate View to render, the Controller will explicitly pass in (as arguments) all of the data and variables required by the "View" in order to for it to render the appropriate response:
You might be wondering - what is the benefit of separating the Controller and the View like this? Why not just put them in the same class? The primary motivation in partitioning the application like this is to help enforce the separation of your application/data logic from your UI generation code. This makes it much easier to unit test your application/data logic in isolation from your UI rendering logic. It can also help make your application more maintainable over time - since it makes it harder for you to accidentally add application/data logic in your view templates.
When implementing the three controller action methods of our ProductsController class, we'll use the incoming URL parameter values to retrieve the appropriate model objects from our database, and then pick a "View" component to use to render an appropriate HTML response. We'll use one of the RenderView() methods on the Controller base class to specify the View we want to use, as well as explicitly pass in the specific data that we want the View to use to render its response.
Below is the final result of our ProductsController implementation:
Notice that the number of lines of code in our action methods above is pretty small (two lines each). This is partly because the URL parameter parsing logic is handled entirely for us by the MVC framework (saving us from having to write a lot of this code). This is also partly because the product browsing scenario is fairly simple from a business logic perspective (the action methods are all read-only display scenarios).
In general, though, you'll often find that you'll have what are sometimes called "skinny controllers" - meaning controller methods full of relatively terse action methods (less than 10 lines of code). This is often a good sign that you have cleanly encapsulated your data logic and factored your controller logic well.
Unit Testing our ProductsController
You might be surprised that the next step we are going to work on is to test our application logic and functionality. You might ask - how is that even possible? We haven't implemented our Views, and our application currently doesn't render a single tag of HTML. Well, part of what makes an MVC approach attractive is that we can unit test the Controller and Model logic of applications completely independently of the View/Html generation logic. As you'll see below we can even unit test these before we create our Views.
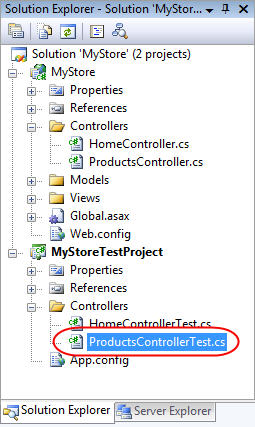
To unit test the ProductsController class that we've been working on, we'll add a ProductsControllerTest class into the Test Project that was added to our solution by default when we created our ASP.NET MVC Application using Visual Studio:
We'll then define a simple unit test that tests the Detail action of our ProductsController:

The ASP.NET MVC framework has been designed specifically to enable easy unit testing. All core APIs and contracts within the framework are interfaces, and extensibility points are provided to enable easy injection and customization of objects (including the ability to use IOC containers like Windsor, StructureMap, Spring.NET, and ObjectBuilder). Developers will be able to use built-in mock classes, or use any .NET type-mocking framework to simulate their own test versions of MVC related objects.
In the unit test above, you can see an example of how we are injecting a dummy "ViewFactory" implementation on our ProductsController class before calling the Detail() action method. By doing this we are overriding the default ViewFactory that would otherwise handle creating and rendering our View. We can use this test ViewFactory implementation to isolate the testing of just our ProductController's Detail action behavior (and not have to invoke the actual View to-do this). Notice how we can then use the three Assert statements after the Detail() action method is called to verify that the correct behavior occurred within it (specifically that the action retrieved the correct Product object and then passed it to the appropriate View).
Because we can mock and simulate any object in the MVC framework (including IHttpRequest and IHttpResponse objects), you do not have to run unit tests in the context of an actual web-server. Instead, we can create our ProductsController within a normal class library and test it directly. This can significantly speed up the execution of unit tests, as well as simplify the configuration and running of them.
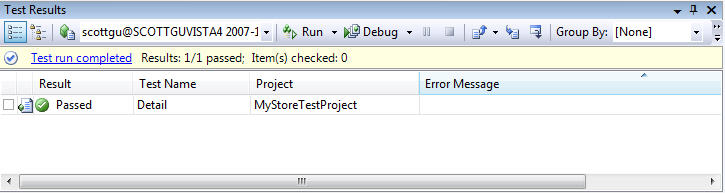
If we use the Visual Studio 2008 IDE, we can also easily track the success/failure of our test runs (this functionality is now built-into VS 2008 Professional):
I think you'll find that the ASP.NET MVC Framework makes writing tests easy, and enables a nice TDD workflow.
Rendering UI with Views
We've finished implementing and testing the application + data logic for the product browsing section of our e-commerce application. Now we need to implement the HTML UI for it.
We'll do this by implementing "Views" that render the appropriate UI using the view-related data objects that our ProductsController action method provided when calling the RenderView() method:
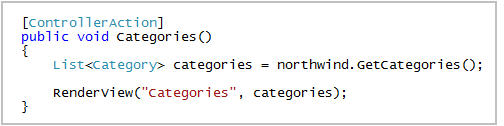
In the code example above the RenderView method's "Categories" parameter is indicating the name of the view we want to render, and the second parameter is a list of category objects that we want to pass to the view and have it use as data to generate the appropriate HTML UI for.
The ASP.NET MVC Framework supports the ability to use any templating engine to help with generating UI (including existing templating engines like NVelocity, Brail - as well as new ones you write yourself). By default the ASP.NET MVC Framework uses the existing ASP.NET Page (.aspx), Master Page (.master), and UserControl (.ascx) support already within ASP.NET.
We'll be using the built-in ASP.NET view engine to implement our E-commerce Application UI.
Defining a Site.Master File
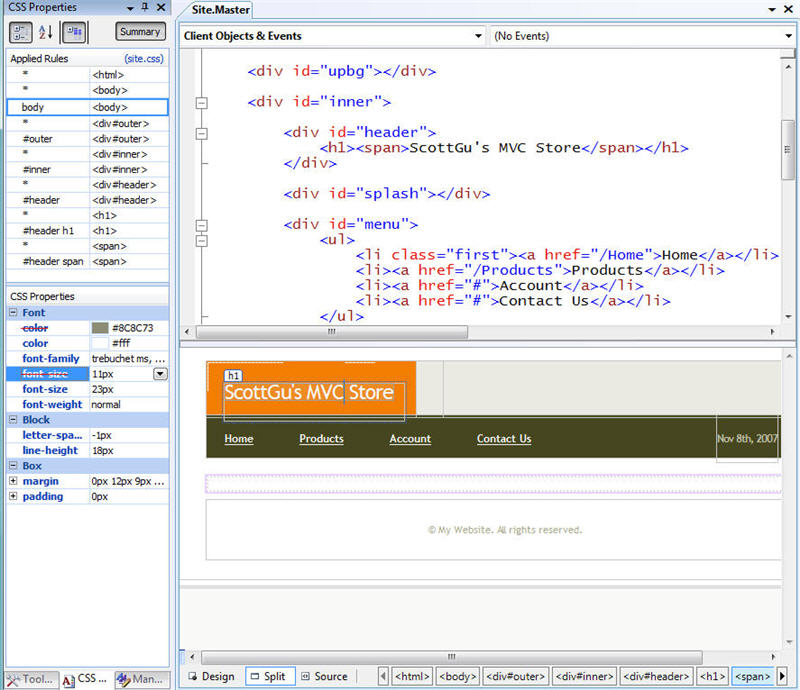
Because we are going to be building many pages for our site, we'll start our UI work by first defining a master page that we can use to encapsulate the common HTML layout/chrome across the site. We'll do this in a file called "Site.Master" that we'll create under the \Views\Shared directory of our project:
We can reference an external CSS stylesheet to encapsulate all styles for the site, and then use the master page to define the overall layout of the site, as well as identify content placeholder regions where we'll want pages to be able to fill in page specific content. We can optionally use all of the cool new VS 2008 designer features when doing this (including the HTML split-view designer, CSS Authoring, and Nested Master Pages support).
Understanding the /Views Directory Structure
By default when you create a new ASP.NET MVC Project using Visual Studio, it will create a "Shared" sub-directory underneath the "Views" directory root. This is the recommended place to store Master Pages, User Controls, and Views that we want to share across multiple Controllers within the application.
When building views that are specific to an individual controller, the default ASP.NET MVC convention is to store them in sub-directories under the \Views root. By default the name of a sub-directory should correspond to the Controller name. For example, because the Controller class we have been building is called "ProductsController", we will by default store the Views specific to it within the \Views\Products sub-directory:
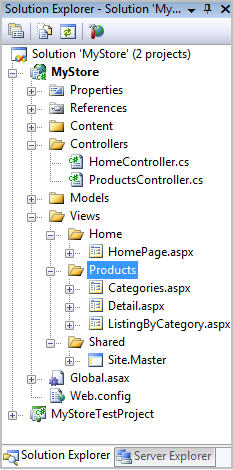
When we call the RenderView(string viewName) method within a specific Controller, the MVC framework will automatically first look for a corresponding .aspx or .ascx view template underneath the \Views\ControllerName directory, and then if it can't find an appropriate view template there it will check the \Views\Shared directory for one:
Creating a Categories View
We can create the "Categories" View for our ProductsController within Visual Studio by using the "Add New Item" menu option on the Products directory and selecting the "MVC View Page" item template. This will create a new .aspx page that we can optionally associate with our Site.Master master page to pick up the overall look and feel of the site (and just like with master pages you get full WYSIWYG designer support):
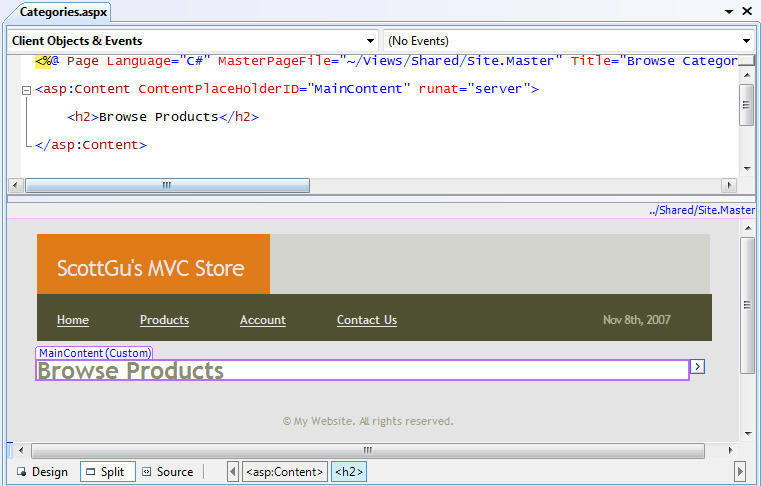
When building applications using an MVC pattern, you want to keep your View code as simple as possible, and make sure that the View code is purely about rendering UI. Application and data retrieval logic should only be written inside Controller classes. Controller classes can then choose to pass on the necessary data objects needed to render a view when they call their RenderView method. For example, below in the Categories action method of our ProductsController class we are passing a List collection of Category objects to the Categories view:
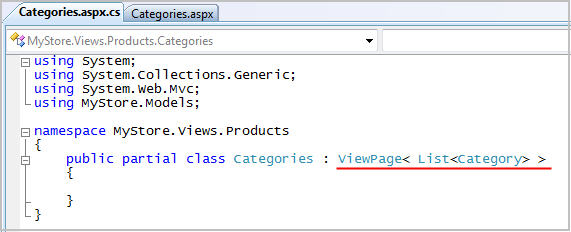
MVC View Pages by default derive from the System.Web.Mvc.ViewPage base class, which provides a number of MVC specific helper methods and properties that we can use in constructing our UI. One of these ViewPage properties is named "ViewData", and it provides access to the view-specific data objects that the Controller passed as arguments to the RenderView() method.
From within your View you can access the "ViewData" in either a late-bound or strongly-typed way. If your View derives from ViewPage, the ViewData property will be typed as a late-bound dictionary. If your View derives from the generics based ViewPage<T> - where T indicates the data object type of the ViewData the Controller is passing to the View - then the ViewData property will be strongly typed to match the same type that your Controller passed in.
For example, my Categories View code-behind class below is deriving from ViewPage<T> - where I am indicating that T is a List of Category objects:
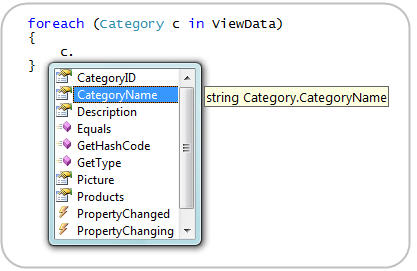
This means that I get full type-safety, intellisense, and compile-time checking within my View code when working against the ProductsController.Categories() supplied List<Category> ViewData:
Rendering our Categories View:
If you remember from the screenshots at the very beginning of this post, we want to display a list of the product categories within our Categories view:
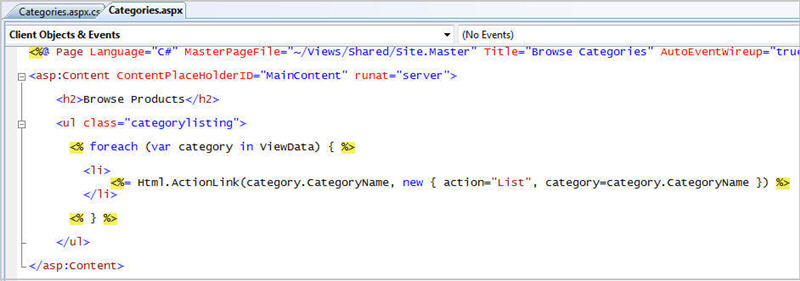
I can write this HTML UI generation code in one of two ways within my Categories View implementation: 1) Using Inline Code within the .aspx file, or 2) Using Server Controls within the .aspx file and Databinding from my Code Behind
Rendering Approach 1: Using Inline Code
ASP.NET Pages, User Controls and Master Pages today support <% %> and <%= %> syntax to embed rendering code within html markup. We could use this technique within our Categories View to easily write a foreach loop that generates a bulleted HTML category list:
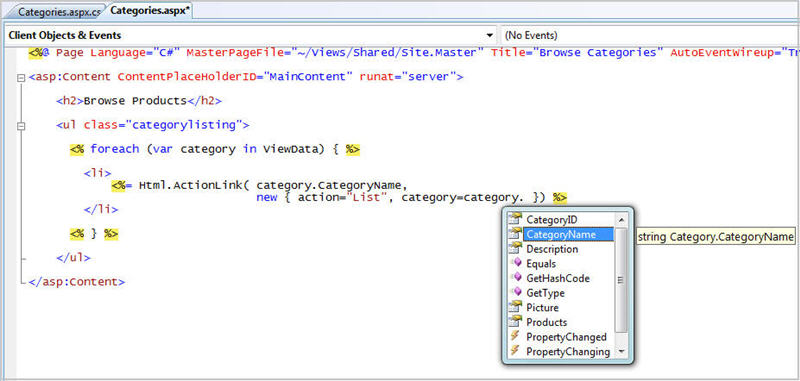
VS 2008 provides full code intellisense within the source editor for both VB and C#. This means we'll get intellisense against our Category model objects passed to the View:
VS 2008 also provides full debugger support for inline code as well (allowing us to set breakpoints and dynamically inspect anything in the View with the debugger):

Rendering Approach 2: Using Server Side Controls
ASP.NET Pages, User Controls and Master Pages also support the ability to use declarative server controls to encapsulate HTML UI generation. Instead of using inline code like above, we could use the new <asp:listview> control in .NET 3.5 to generate our bulleted list UI instead:
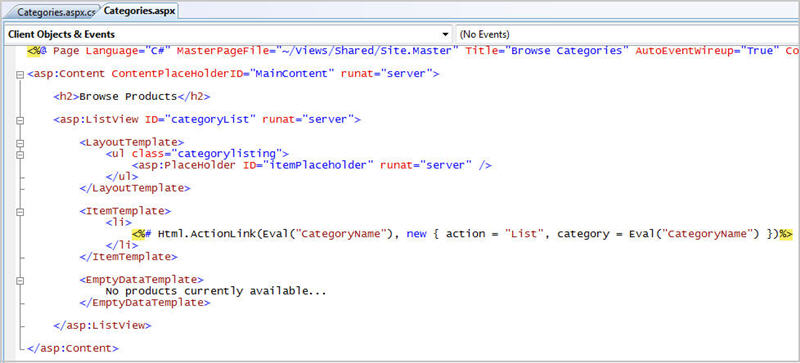
Notice above how the ListView control encapsulates both rendering a list of values, as well as handles the scenario where no items are in the list (the <EmptyDataTemplate> saves us from having to write an if/else statement in the markup). We could then databind our list of category objects to the listview control using code-behind code like below:
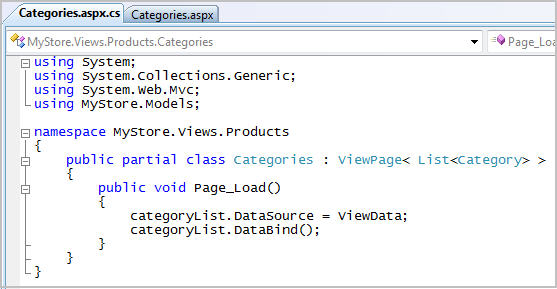
Important: In a MVC world we only want to put rendering logic in our View's code-behind class (and not any application or data logic). Notice above how the only logic we have is to assign the strongly typed ViewData collection of Category objects to the ListView control. Our ProductsController Controller class is the one that actually retrieves the list of Categories from the database - not the View.
This ListView server-control version of our View template will then generate the exact same HTML as our in-line code version. Because we don't have a <form runat="server"> control on the page, no viewstate, ID values or other markup will be emitted. Only pure CSS friendly HTML:
Html.ActionLink Method
One of the things you might have noticed in both the inline-code and the server-control versions of the View code snippets above are calls to an Html.ActionLink method:

The Html object is a helper property on the ViewPage base class, and the ActionLink method is a helper on it that makes it easy to dynamically generate HTML hyperlinks that link back to action methods on Controllers. If you look at the HTML output picture in the section above, you can see some example HTML output generated by this method:
<a href="http://weblogs.asp.net/Products/List/Beverages">Beverages</a>
The signature of the Html.ActionLink helper method I am using looks like this:
string ActionLink(string text, object values);
The first argument represents the inner content of the hyperlink to render (for example: <a>text goes here</a>). The second argument is an anonymous object that represents a sequence of values to use to help generate the actual URL (you can think of this as a cleaner way to generate dictionaries). I will go into more detail on how exactly this works in a future blog post that covers the URL routing engine. The short summary, though, is that you can use the URL routing system both to process incoming URLs, as well as to generate URLs that you can emit in outgoing HTML. If we have a routing rule like this:
/<controller>/<action>/<category>
And then write this code within a ProductController's Category View:
<%= Html.ActionLink("Click Me to See Beverages", new { action="List", category="Beverages" } %>
The ActionLink method will use the URL mapping rules of your application to swap in your parameters and generate this output:
<a href="http://weblogs.asp.net/Products/List/Beverages">Click Me to See Beverages</a>
This makes it easy within your application to generate URLs and AJAX callbacks to your Controllers. It also means you can update your URL routing rules in one place and have the code throughout your application automatically pick up the changes for both incoming URL processing and outgoing URL generation.
Important Note: To help enforce testability, the MVC framework today does not support postback events directly to server controls within your Views. Instead, ASP.NET MVC applications generate hyperlink and AJAX callbacks to Controller actions - and then use Views (and any server controls within them) solely to render output. This helps ensure that your View logic stays minimal and solely focused on rendering, and that you can easily unit test your Controller classes and verify all Application and Data Logic behavior independent of your Views. I'll blog more about this in the future.
Summary
This first blog post is a pretty long one, but hopefully helps provide a reasonably broad look at how all the different components of the new ASP.NET MVC Framework fit together, and how you can build a common real world scenario with it. The first public preview of the ASP.NET MVC bits will be available in a few weeks, and you'll be able to use them to do all of the steps I outlined above.
While many of the concepts inherent to MVC (in particular the idea of separation of concerns) are probably new to a lot of people reading this, hopefully this blog post has also show how the ASP.NET MVC implementation we've been working on fits pretty cleanly into the existing ASP.NET, .NET, and Visual Studio feature-set. You can use .ASPX, .ASCX and .MASTER files and ASP.NET AJAX to create your ASP.NET MVC Views. Non-UI features in ASP.NET today like Forms Authentication, Windows Authentication, Membership, Roles, Url Authorization, Caching, Session State, Profiles, Health Monitoring, Configuration, Compilation, Localization, and HttpModules/HttpHandlers all fully support the MVC model.
If you don't like the MVC model or don't find it natural to your style of development, you definitely don't have to use it. It is a totally optional offering - and does not replace the existing WebForms Page Controller model. Both WebForms and MVC will be fully supported and enhanced going forward. You can even build a single application and have parts of it written using WebForms and parts written using an MVC approach if you want.
If you do like what you've seen from the above MVC post (or are intrigued and want to learn more), keep an eye on my blog over the weeks ahead. I'll be covering more MVC concepts and use them to build out our e-commerce application to show more features of it.
Hope this helps,
Scott

 浙公网安备 33010602011771号