每日涉猎技术点存档(2019年02月)
2019年3月26日
解除SVN源代码管理绑定:在要解除版本控制的文件夹右键TortoiseSVN–>Export–>选择同一个文件夹(目标文件夹一定要和你右击的文件夹是同一个文件夹),这时就会出现“是否解除版本控制”的对话框。
2019年3月24日
.net测试数据生成库
- loresoft/DataGenerator:Automatically generate data for an object
- MisterJames/GenFu:GenFu is a library you can use to generate realistic test data. It is composed of several property fillers that can populate commonly named properties through reflection using an internal database of values or randomly created data. You can override any of the fillers, give GenFu hints on how to fill them.
.net常用Mock库
- Moq: the original Arrange-Act-Assert mocking library for .NET, and a big source of inspiration for NSubstitute.
- nsubstitute:A friendly substitute for .NET mocking libraries. https://nsubstitute.github.io
- FakeItEasy: another modern mocking library for .NET. If you're not sold on NSubstitute's syntax, try FIE!
- substitute.js: a mocking library for TypeScript inspired by NSubstitute's syntax (
@fluffy-spoon/substituteon NPM)
2019年3月1日
查看框架版本.bat
reg query "HKLM\Software\Microsoft\NET Framework Setup\NDP" /s /v version | findstr /i version | sort /+26 /r

set /p a=
2019年2月28日
微软office web apps 服务器搭建之在线文档预览(一)
微软office web apps 服务器搭建之在线文档预览(二)
如何整合Office Web Apps至自己开发的系统(二)
2019年2月26日
WSL
WSL(Windows上的Linux子系统)的简单介绍及安装 https://www.cnblogs.com/skyshalo/p/7724072.html
Windows10内置Linux子系统 https://www.cnblogs.com/huaxingtianxia/p/7999552.html
Kafka .net client
.NET https://cwiki.apache.org/confluence/display/KAFKA/Clients#Clients-.NET
RDKAFKA-DOTNET
rdkafka-dotnet是一个基于C++客户端librdkafka的.Net客户端,官方对librdkafka的介绍是
Robust high performance C/C++ library with full protocol support
总之就是健壮/高性能/全协议/全版本支持,可想而知基于librdkafka衍生的.Net客户端也不会差。 使用rdkafka-dotnet需要修改host文件,其他的Producer/Consumer的代码都非常简洁易懂,消费集群也非常容易配置,而且使用这个后根本就没碰到过Consumer接收不到消息的情况。
消息队列 Kafka 的基本知识及 .NET Core 客户端
2019年2月25日
https://mesosphere.com/blog/2017/05/30/solving-infrastructure-challenges-fast-data-applications/
Mesosphere DC/OS:
简化数据服务的部署和运维
Mesosphere致力于简化现代化弹性分布式软件的开发. Mesosphere DC/OS是市面上唯一一个在生产环境中被验证的能够同时运行容器和数据服务的平台。DC/OS 能够提高很多数据服务的部署速度,并简化它们的运维。这些数据服务包括数据库,消息队列,大数据分析引擎等等。
DC/OS的核心是Apache Mesos™,一个分布式系统内核。 它拥有一个两层资源调度机制,使得分布式系统之间能够更好的分享集群资源。正因为有了两层调度机制,使得DC/OS能够在和其他容器编排系统(Kubernetes,Docker Swarm)的对比中脱颖而出。它简化了数据服务的部署和运维,并且大幅度提高了资源利用率。
2019年2月23日
网页灰色


    <style type="text/css">
        html {
            filter: url("data:image/svg+xml;utf8,<svg xmlns=\'http://www.w3.org/2000/svg\'><filter id=\'grayscale\'><feColorMatrix type=\'matrix\' values=\'0.3333 0.3333 0.3333 0 0 0.3333 0.3333 0.3333 0 0 0.3333 0.3333 0.3333 0 0 0 0 0 1 0\'/></filter></svg>#grayscale"); /* Firefox 3.5+ */
            filter: gray; /* IE6-9 */
            -webkit-filter: grayscale(100%); /* Chrome 19+ & Safari 6+ */
        }
    </style>
2019年2月21日
Power BI
BIWORK 的微软 BI 博客 https://ask.hellobi.com/blog/id-biwork
Power BI是微软最新的商业智能(BI)概念,它包含了一系列的组件和工具。

Power BI的核心理念就是让我们用户不需要强大的技术背景,只需要掌握Excel这样简单的工具就能快速上手商业数据分析及可视化。
https://www.jianshu.com/p/7c0aa19127b3
Microsoft BI
从技术层面上来讲, Microsoft BI由三大部分以及其他的协同平台组成, 它们分别是SSIS, SSAS, SSRS以及与office, sharepoint产品.
通常我们所说的Microsoft BI, 指的主要是SSIS, SSAS, SSRS三大部分
ETL是数据抽取(Extract)、清洗(Cleaning)、转换(Transform)、装载(Load)的过程。
ETL是用SSIS来实现的,也就是说SSIS是ETL工具。而SSAS是建立多维数据集,SSRS是建立前台报表。
SSIS:Sql Server Integration Services
SSAS:SQL SERVER Analysis Services
SSRS:SQL Server Reporting Services
2019年2月18日
C# 实现 Snowflake算法
参考地址:
- https://blog.csdn.net/w200221626/article/details/52064976
- https://www.cnblogs.com/yxlblogs/p/10195664.html
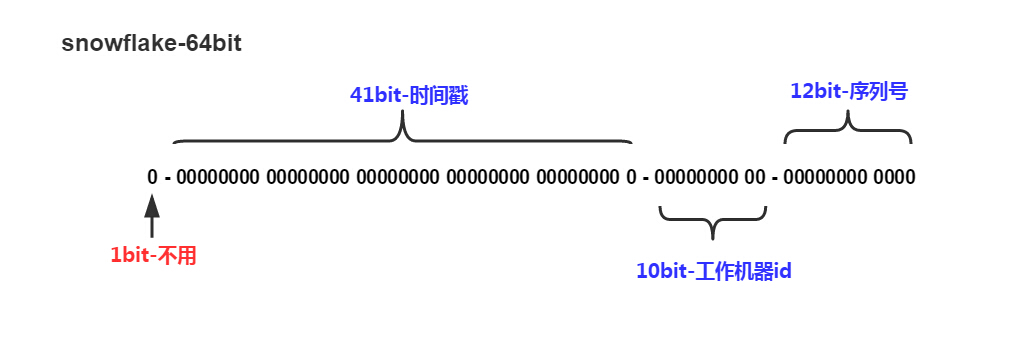
    /// <summary>
    /// 动态生产有规律的ID
    /// </summary>
    public class Snowflake
    {
        private static long machineId;//机器ID
        private static long datacenterId = 0L;//数据ID
        private static long sequence = 0L;//计数从零开始

        private static long twepoch = 687888001020L; //唯一时间随机量

        private static long machineIdBits = 5L; //机器码字节数
        private static long datacenterIdBits = 5L;//数据字节数
        public static long maxMachineId = -1L ^ -1L << (int)machineIdBits; //最大机器ID
        private static long maxDatacenterId = -1L ^ (-1L << (int)datacenterIdBits);//最大数据ID

        private static long sequenceBits = 12L; //计数器字节数,12个字节用来保存计数码
        private static long machineIdShift = sequenceBits; //机器码数据左移位数,就是后面计数器占用的位数
        private static long datacenterIdShift = sequenceBits + machineIdBits;
        private static long timestampLeftShift = sequenceBits + machineIdBits + datacenterIdBits; //时间戳左移动位数就是机器码+计数器总字节数+数据字节数
        public static long sequenceMask = -1L ^ -1L << (int)sequenceBits; //一微秒内可以产生计数,如果达到该值则等到下一微妙在进行生成
        private static long lastTimestamp = -1L;//最后时间戳

        private static object syncRoot = new object();//加锁对象
        static Snowflake snowflake;

        public static Snowflake Instance()
        {
            if (snowflake == null)
                snowflake = new Snowflake();
            return snowflake;
        }

        public Snowflake()
        {
            Snowflakes(0L, -1);
        }

        public Snowflake(long machineId)
        {
            Snowflakes(machineId, -1);
        }

        public Snowflake(long machineId, long datacenterId)
        {
            Snowflakes(machineId, datacenterId);
        }

        private void Snowflakes(long machineId, long datacenterId)
        {
            if (machineId >= 0)
            {
                if (machineId > maxMachineId)
                {
                    throw new Exception("机器码ID非法");
                }
                Snowflake.machineId = machineId;
            }
            if (datacenterId >= 0)
            {
                if (datacenterId > maxDatacenterId)
                {
                    throw new Exception("数据中心ID非法");
                }
                Snowflake.datacenterId = datacenterId;
            }
        }

        /// <summary>
        /// 生成当前时间戳
        /// </summary>
        /// <returns>毫秒</returns>
        private static long GetTimestamp()
        {
            return (long)(DateTime.UtcNow - new DateTime(1970, 1, 1, 0, 0, 0, DateTimeKind.Utc)).TotalMilliseconds;
        }

        /// <summary>
        /// 获取下一微秒时间戳
        /// </summary>
        /// <param name="lastTimestamp"></param>
        /// <returns></returns>
        private static long GetNextTimestamp(long lastTimestamp)
        {
            long timestamp = GetTimestamp();
            if (timestamp <= lastTimestamp)
            {
                timestamp = GetTimestamp();
            }
            return timestamp;
        }

        /// <summary>
        /// 获取长整形的ID
        /// </summary>
        /// <returns></returns>
        public long GetId()
        {
            lock (syncRoot)
            {
                long timestamp = GetTimestamp();
                if (Snowflake.lastTimestamp == timestamp)
                { //同一微妙中生成ID
                    sequence = (sequence + 1) & sequenceMask; //用&运算计算该微秒内产生的计数是否已经到达上限
                    if (sequence == 0)
                    {
                        //一微妙内产生的ID计数已达上限,等待下一微妙
                        timestamp = GetNextTimestamp(Snowflake.lastTimestamp);
                    }
                }
                else
                {
                    //不同微秒生成ID
                    sequence = 0L;
                }
                if(timestamp < lastTimestamp)
                {
                    throw new Exception("时间戳比上一次生成ID时时间戳还小,故异常");
                }
                Snowflake.lastTimestamp = timestamp; //把当前时间戳保存为最后生成ID的时间戳
                long Id = ((timestamp - twepoch) << (int)timestampLeftShift)
                    | (datacenterId << (int)datacenterIdShift)
                    | (machineId << (int)machineIdShift)
                    | sequence;
                return Id;
            }
        }
2019年2月15日
Docker查看容器IP
docker inspect -f "{{ .NetworkSettings.Networks.nat.IPAddress }}" containername
CMD TYPE命令
C:\Users\N3verL4nd>type /?
显示文本文件的内容。
TYPE [drive:][path]filename
C:\Users\N3verL4nd>
在批处理中配合参数 /c /k /s
/c 执行 String 指定的命令,执行完后停止,会退出。
/k 执行 String 指定的命令并继续,运行完会保持当前运行窗口及环境变量。
/s 修改 /c 或 /k 后对 String 的处理。
做测试的时候学到的一项用法,type in.txt | test.exe,即利用windows管道把in.txt的内容作为test的输入(一般我们都利用重定向这样测试的吧:test.exe < in.txt)想知道原理,搜到一个很有趣的东东:
fileA.jpg图片文件,fileB.rar为压缩文件,现在通过CMD type 命令合并这两个文件如下:
type fileA.jpg >> file.jpg
type fileB.rar >> file.jpg
把图片文件先写入,不然无法显示出图片来。因为图像浏览器在读取文件的时候,首先看到是图片的字节码,就把它显示出来了,如果相反就读的字节码不是图片,所以就无法实现披着羊皮的狼啊。哈哈
2019年2月8日
连接Redis测试代码
using System;
using StackExchange.Redis;

namespace TestRedisConnect
{
    class Program
    {
        static void Main(string[] args)
        {
            var redis = ConnectionMultiplexer.Connect("10.0.75.1:6379");
            var db = redis.GetDatabase();
            var name = db.StringGet("string1");
            Console.WriteLine(name);

        }
    }
}
2019年2月7日
Docker安装redis并挂载配置与文件
- 首先去redis获取对应版本的配置文件redis.conf
- 将 bind 127.0.0.1注释,daemonize yes注释掉,如果需要redis密码则找到requirepass 并填上你的密码
- 并建立好对应文件夹, usr/redis. usr/redis/data,将redis.conf放入 usr/redis中
- 最后docker run -d --privileged=true -p 6379:6379 -v /usr/redis/redis.conf:/etc/redis/redis.conf -v /usr/redis/data:/data --name redis1 redis:4.0 redis-server /etc/redis/redis.conf --appendonly yes
- -p 6379:6379:把容器内的6379端口映射到宿主机6379端口
- -v /usr/redis/redis.conf:/etc/redis/redis.conf:把宿主机配置好的redis.conf放到容器内的这个位置中
- -v /usr/redis/data:/data:把redis持久化的数据在宿主机内显示,做数据备份
- redis-server /etc/redis/redis.conf:这个是关键配置,让redis不是无配置启动,而是按照这个redis.conf的配置启动
- –appendonly yes:redis启动后数据持久化

 浙公网安备 33010602011771号