Spring框架深入(二)--AOP面向切面
一、AOP概述
1、AOP:面向切面编程,实现在不增加代码的基础上,增加一些新的功能(公共功能);
2、AOP并不是Spring框架持有的,Spring只是支持AOP编程的框架之一,可以整合第三方框架来实现面向切面编程(如:Aspect);
3、现实的应用场景:使用面向切面编程,AOP框架已经实现了面向切面的很多内容;
4、程序员使用AOP要做的事情:
编写公共功能,切面;
基于AOP框架的配置,直接把核心业务和切面关联起来;
5、Spring中实现AOP的方式有三种:
基于AspectJ注解的方式实现
基于schema的XML配置
基于ProxyFactoryBean代理实现
二、AOP的简单实现_基于AspectJ注解
编写步骤如下:
1、创建一个简单的工程,引入jar包:
2、编写核心业务的接口和实现类
public interface ServiceInterface {
    public void sayHello();

    public void sayBye();
}
/*
 * 核心关注点,核心业务
 * */
@Component("service")
public class ServiceImpl implements ServiceInterface {
    @Override
    public void sayHello() {
        // TODO Auto-generated method stub
        System.out.println("say Hello");
    }
    public void sayBye() {
        System.out.println("say Bye");
    }
}
3、编写一个切面类:我们就简单的做一个打印输出
/*
 * 公共功能:切面
 * */
@Component
@Aspect
public class AdviceMethod {
    //前置通知
    //将这个方法织入核心业务:
    //@Before,表示在核心业务之前织入;
    //execution,表示织入的位置在哪儿
    @Before("point()")
    public void befor() {
        System.out.println("日志");
    }
}
4、在核心配置文件中声明这个类为切面
<!-- 启用注解 -->
<context:annotation-config></context:annotation-config>
<!-- 扫描 -->
<context:component-scan base-package="service,advice"></context:component-scan>
<!-- 启用AOP aspectj 的配置 -->
<aop:aspectj-autoproxy></aop:aspectj-autoproxy>
5、最后新建一个测试类
public static void main(String[] args) {
        ApplicationContext ac = new ClassPathXmlApplicationContext("applicationContext.xml");
    //要使用接口来声明核心业务类
    //service就是一个代理对象
    ServiceInterface service = (ServiceInterface) ac.getBean("service");
    //sayHello代码不需要改变,会自动增加日志的功能
    service.sayHello();
    service.sayBye();
}
注:这儿必须要用接口来声明核心业务类
这样,一个简单的AOP案例就搭建完成了;
三、AOP详解
利用一种横切的技术,剖析封装的对象的内部,将影响了多个累的行为封装到了一个可重用的模块中,成为Aspect,切面;
将应用程序中的商业逻辑与其提供支持的通用服务进行分离;
1、AOP中的常用术语
(1)切面:公共功能、交叉功能的描述
(2)通知:实现切面功能的类
(3)目标对象:被通知的对象,核心关注点的对象
(4)代理对象:代理的是目标对象,通过代理目标对象就增加了切面功能
目标对象+切面功能
实现切面功能最早使用的是代理对象
(5)连接点:静态概念,代表通知执行的地方
(6)切入点:动态概念,运行时执行通知的地方,实现切面功能是,连接点就变为切入点;
(7)引入:静态概念,将切面与目标对象关联起来
(8)织入:将切面应用到代理对象,是一个过程
2、通知类型
前置通知:核心业务执行前执行
返回后通知:核心业务返回后执行
异常通知:核心业务发生异常时执行
后置通知:核心业务执行后执行
环绕通知:核心任务执行的时候执行
代码编写如下:使用注解的方式;
@Before("execution(* service.*.*.*())")
public void befor() {
    System.out.println("前置通知,日志");
}
@After("execution(* service.*.*.*())")
public void after() {
    System.out.println("后置通知,执行完成");
}
@AfterReturning("execution(* service.*.*.*())")
public void afterReturn() {
    System.out.println("返回后通知,得到返回值后");
}
@AfterThrowing("execution(* service.*.*.*())")
public void throwExp() {
    System.out.println("异常通知,异常执行时");
}
@Around("execution(* service.*.*.*())")
public Object round(ProceedingJoinPoint pjp) throws Throwable {
    System.out.println("环绕前。。。");
    Object o=pjp.proceed();//核心业务的正常执行
    System.out.println("环绕后。。。");
    return o;
}
执行结果:

3、AspectJ中使用的注解
(1)、AspectJ是一个面向切面的框架;
(2)、Spring通过AspectJ实现了一注解的方式定义AOP相关的配置,减少了对于配置文件的依赖
(3)、AspectJ提供的注解:
@AspectJ:在类上使用,声明该类为一个切面;
@Before:在方法上使用,声明该方法的通知类型;
@After:在方法上使用,声明该方法的通知类型;
@AfterReturn:在方法上使用,声明该方法的通知类型;
@AfterThrowing:在方法上使用,声明该方法的通知类型;
@Around:在方法上使用,声明该方法的通知类型;
@Pointcut:声明切入点;
@Pointcut("execution(* service.*.*.*())")
public void point() {
}
@Before("point()")
public void befor() {
    System.out.println("前置通知,日志");
}
4、execution表达式的使用
AOP配置时,不管是XML配置,注解配置,用于定义pointcut切入点
execution(* service.*.*.*(..))

5、AOP案例_基于schema
通过核心配置文件来实现AOP切面类
<!-- AspectJ所提供的基于AOP的配置项 -->
<aop:config>
    <aop:pointcut expression="execution(* service.*.*.*(..))" id="pointCut"/>
    <aop:aspect id="myAspect" ref="adviceMethod_xml">
        <aop:before method="before" pointcut-ref="pointCut"/>
        <aop:after method="after" pointcut-ref="pointCut"/>
        <aop:after-returning method="afterReturn" pointcut-ref="pointCut"/>
        <aop:after-throwing method="throwExp" pointcut-ref="pointCut"/>
        <aop:around method="round" pointcut-ref="pointCut"/>
    </aop:aspect>
</aop:config>
其实现效果和基于注解一样;
四、基于代理实现AOP
1、Spring的AOP包中提供了实现AOP的各种类
2、Spring上下文就可以有做AOP的实例,Spring直接基于代理实现AOP
3、Spring的代理有两种方式
(1)、JDK动态代理:代理的是接口,目标对象是有接口的
(2)、CGLIB:代理的就是目标对象本身
附上从参考文档拿过来的图

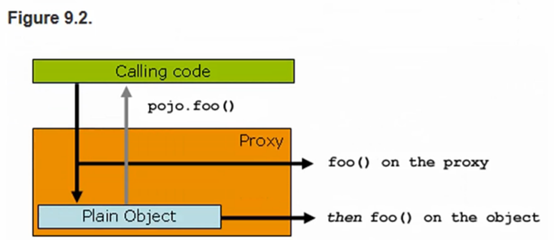
如果没有代理的时候,就会直接调用pojo.foo();
如果pojo对象生成了一个与之对应的代理对象,执行的时候,就会调用:代理对象.foo();
4、我们这儿来看一下基于接口代理实现AOP
(1)、先写一个要代理的接口
/*
 * 要代理的接口
 * */
public interface Subject {
    public void doSomething(String role) ;
}
(2)、书写目标对象,实现这个接口
/*
 * 目标对象
 * */
@Component
public class RealSubject implements Subject {
    @Override
    public void doSomething(String role) {
        // TODO Auto-generated method stub
        System.out.println("doSomething...");
    }
}
(3)、书写一个通知类,这个类需要实现类通知的接口。拦截下目标对象
/*
 * 通知类:实现类通知的接口,该类在Spring的上下文中能够被识别为通知
 * */
@Component
public class Advice implements MethodBeforeAdvice {
    /*
     * 拦截:做权限验证
     * arg0:被调用的方法
     * arg1:给这个方法传递的参数
     * arg2:被代理的对象
     * */
    @Override
    public void before(Method arg0, Object[] arg1, Object arg2) throws Throwable {
        // TODO Auto-generated method stub
        if("admin".equals(arg1[0])) {
            System.out.println("通过验证");
        }else {
            System.out.println("没有通过");
        }
    }
}
(4)、配置代理对象,也是一个bean,在bean中配置要代理的接口,要实现的通知以及代理的目标对象;
<!--
    已有了目标对象realsubject,已有了通知advice
    生成代理对象:代理realSubject,具备advice的功能
    Spring提供了一个类能够帮助我们生成代理对象
 -->
<bean id="proxyFactoryBean" class="org.springframework.aop.framework.ProxyFactoryBean">
    <!-- 要代理的接口 -->
    <property name="proxyInterfaces">
        <list>
            <value>proxyAOP.Subject</value>
        </list>
    </property>
    <!-- 要实现的通知 -->
    <property name="interceptorNames">
        <list>
            <value>advice</value>
        </list>
    </property>
    <!-- 代理的目标对象 -->
    <property name="target" ref="realSubject"></property>
</bean>
(5)、书写一个测试类。注意,测试类里得到的bean是上面代理的bean;
public static void main(String[] args) {
    ApplicationContext ac = new ClassPathXmlApplicationContext("proxyAOP/applicationContext.xml");
    //基于接口
    Subject subject=(Subject) ac.getBean("proxyFactoryBean");
    subject.doSomething("admin");
}
这样,一个简单的基于接口代理实现AOP就完成了
PS:因作者能力有限,如有误还请谅解

 浙公网安备 33010602011771号