
LYT-WPF-基础-布局-Canvas面板
已亲测!ZIndex实例有修改之处!!!本文转自:WPF教程五:布局之Canvas面板 - .NET开发菜鸟 - 博客园 (cnblogs.com),感谢~~
Canvas:画布面板
画布,用于完全控制每个元素的精确位置。他是布局控件中最为简单的一种,直接将元素放到指定位置,主要来布置图面。使用Canvas,必须指定一个子元素的位置(相对于画布),否则所有元素都将出现在画布的左上角。调整位置用Left、Right、Top和Bottom四个附加属性。如果Canvas是窗口主元素(即最外层的布局面板是Canvas),用户改变窗口大小时,Canvas也会随之变化,子元素的位置也会随之移动,以保证相对于Canvas的位置属性不变。
Canvas允许子元素的部分或全部超过其边界,默认不会裁剪子元素,同时可以使用负坐标,即溢出的内容会显示在Canvas外面,这是因为默认 ClipToBounds=”False”,因此画布不需要指定大小。如果想复制画布内容,将ClipToBounds设为true即可。
1、子元素不超出边界
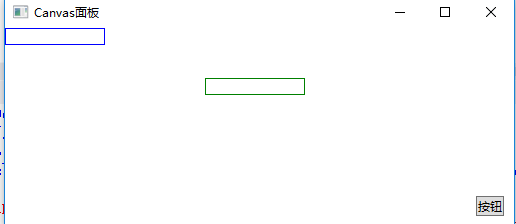
使用XAML代码实现:
<Window x:Class="WpfDemo.MainWindow"
        xmlns="http://schemas.microsoft.com/winfx/2006/xaml/presentation"
        xmlns:x="http://schemas.microsoft.com/winfx/2006/xaml"
        Title="Canvas面板" Height="237" Width="525" WindowStartupLocation="CenterScreen">
    <Canvas>
        <TextBox Width="100" BorderBrush="Blue"></TextBox>
        <TextBox Canvas.Left="200" Canvas.Top="50" Width="100" BorderBrush="Green"></TextBox>
        <Button Height="20" Canvas.Right="10" Canvas.Bottom="10" Content="按钮"></Button>
    </Canvas>
</Window>
2、子元素超出边界

使用XAML代码实现:
<Window x:Class="WpfDemo.MainWindow"
        xmlns="http://schemas.microsoft.com/winfx/2006/xaml/presentation"
        xmlns:x="http://schemas.microsoft.com/winfx/2006/xaml"
        Title="Canvas面板" Height="237" Width="525" WindowStartupLocation="CenterScreen">
    <Canvas>
        <TextBox Width="100" BorderBrush="Blue"></TextBox>
        <TextBox Canvas.Left="200" Canvas.Top="50" Width="100" BorderBrush="Green"></TextBox>
        <Button Height="200" Canvas.Right="10" Canvas.Bottom="-130" Content="按钮"></Button>
    </Canvas>
</Window>
在XAML设计界面,超出的部分不会进行裁剪,如图所示:

如果将ClipToBounds属性设为true,在设计界面将会对子元素的超出部分进行裁剪:

注意:要说明一点Canvas内的子控件不能使用两个以上的Canvas附加属性,如果同时设置Canvas.Left和Canvas.Right属性,那么后者将会被忽略。
二、ZIndex属性
Canvas面板中可能会有多个相互重叠的元素,可以设置Canvas的ZIndex附加属性,来控制他们的重叠方式 ZIndex属性默认值都是0,属性值必须是整数。(从大到小显示)
如图所示:
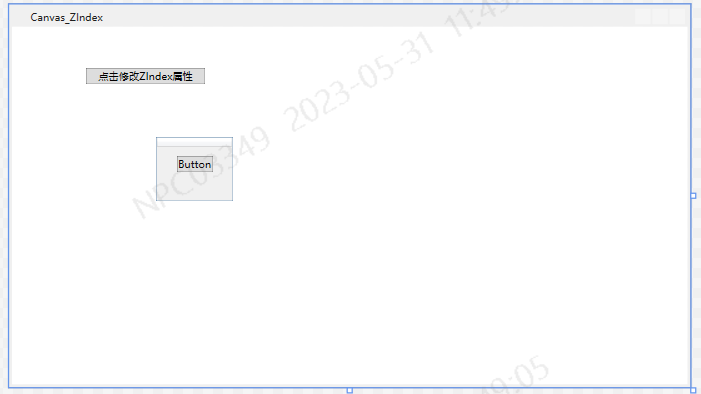
<Window x:Class="WpfExample01.Canvas_ZIndex"
        xmlns="http://schemas.microsoft.com/winfx/2006/xaml/presentation"
        xmlns:x="http://schemas.microsoft.com/winfx/2006/xaml"
        xmlns:d="http://schemas.microsoft.com/expression/blend/2008"
        xmlns:mc="http://schemas.openxmlformats.org/markup-compatibility/2006"
        xmlns:local="clr-namespace:WpfExample01"
        mc:Ignorable="d"
        Title="Canvas_ZIndex" Height="450" Width="800">
    <Canvas>
        <Button Canvas.Left="194" Canvas.Bottom="100" Canvas.Top="152" Panel.ZIndex="1" Name="btn">Button</Button>
        <Button Canvas.Left="86" Canvas.Top="49" Width="141" Name="btnClick" Click="btnClick_Click">点击修改ZIndex属性</Button>
        <DataGrid Canvas.Left="170" Canvas.Top="130" Height="75" Width="90" Name="Dg" Panel.ZIndex="0"></DataGrid>
    </Canvas>
</Window>
除此之外,我们还可以通过代码的方式设置ZIndex的值,代码如下:
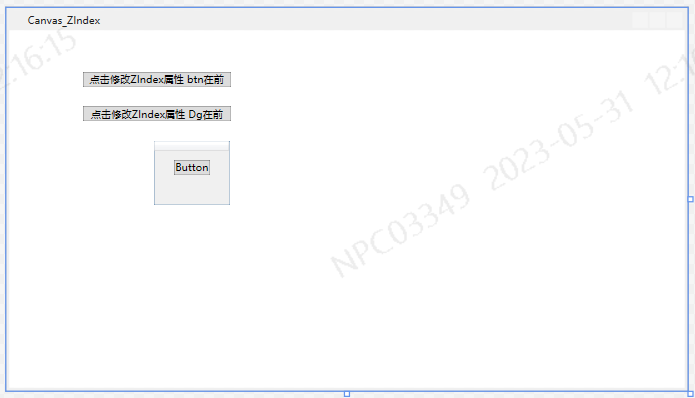
<Window x:Class="WpfExample01.Canvas_ZIndex"
        xmlns="http://schemas.microsoft.com/winfx/2006/xaml/presentation"
        xmlns:x="http://schemas.microsoft.com/winfx/2006/xaml"
        xmlns:d="http://schemas.microsoft.com/expression/blend/2008"
        xmlns:mc="http://schemas.openxmlformats.org/markup-compatibility/2006"
        xmlns:local="clr-namespace:WpfExample01"
        mc:Ignorable="d"
        Title="Canvas_ZIndex" Height="450" Width="800">
    <Canvas>
        <Button Canvas.Left="194" Canvas.Bottom="100" Canvas.Top="152" Panel.ZIndex="1" Name="btn">Button</Button>
        <Button Canvas.Left="86" Canvas.Top="49" Width="174" Name="btnClick" Click="btnClick_Click">点击修改ZIndex属性 btn在前</Button>
        <Button Canvas.Left="86" Canvas.Top="89" Width="174" Name="btnClick2" Click="btnClick2_Click">点击修改ZIndex属性 Dg在前</Button>
        <DataGrid Canvas.Left="170" Canvas.Top="130" Height="75" Width="90" Name="Dg" Panel.ZIndex="0"></DataGrid>
    </Canvas>
</Window>
using System;
using System.Collections.Generic;
using System.Linq;
using System.Text;
using System.Threading.Tasks;
using System.Windows;
using System.Windows.Controls;
using System.Windows.Data;
using System.Windows.Documents;
using System.Windows.Input;
using System.Windows.Media;
using System.Windows.Media.Imaging;
using System.Windows.Shapes;

namespace WpfExample01
{
    /// <summary>
    /// Canvas_ZIndex.xaml 的交互逻辑
    /// </summary>
    public partial class Canvas_ZIndex : Window
    {
        public Canvas_ZIndex()
        {
            InitializeComponent();
        }

        private void btnClick_Click(object sender, RoutedEventArgs e)
        {
            // 设置按钮的ZIndex属性
            Panel.SetZIndex(this.btn, 2);
            Panel.SetZIndex(this.Dg, 1);
        }

        private void btnClick2_Click(object sender, RoutedEventArgs e)
        {
            Panel.SetZIndex(this.btn, 1);
            Panel.SetZIndex(this.Dg, 2);
        }
    }
}
posted on 2023-05-31 12:22 Violin_Huang 阅读(367) 评论(0) 收藏 举报


 浙公网安备 33010602011771号