Spring——AOP原理及源码四【系列完】
前情回顾:
上文我们一路分析了从容器创建开始直到我们的AOP注解导入的核心组件AnnotationAwareAspectJAutoProxyCreator执行postProcessBeforeInstantiation()方法的整个过程
分析得到:在所有bean创建之前,都会调用resolveBeforeInstantiation方法来试图返回一个代理对象
本篇预告
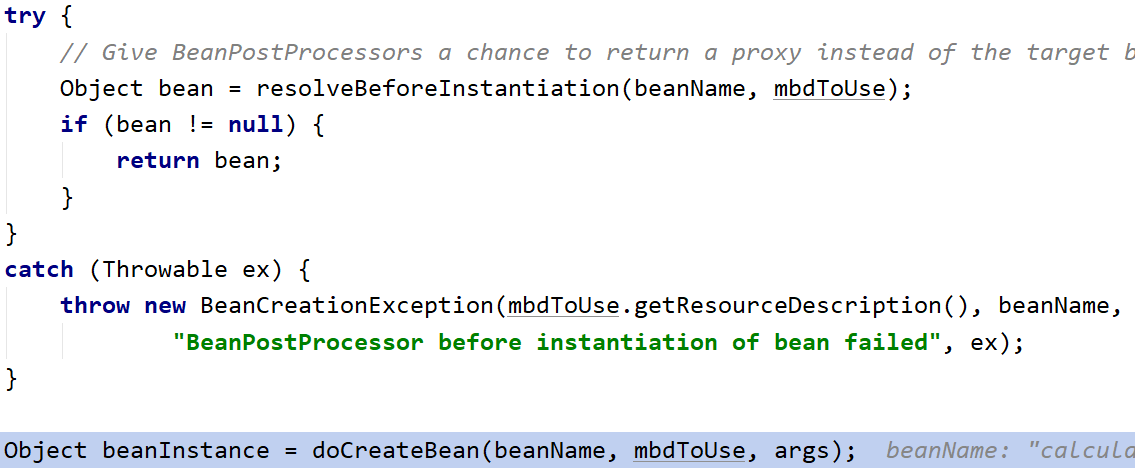
下图可以看到resolveBeforeInstantiation方法包含了
applyBeanPostProcessorsBeforeInstantiation(targetType, beanName);
applyBeanPostProcessorsAfterInitialization(bean, beanName);
两个方法
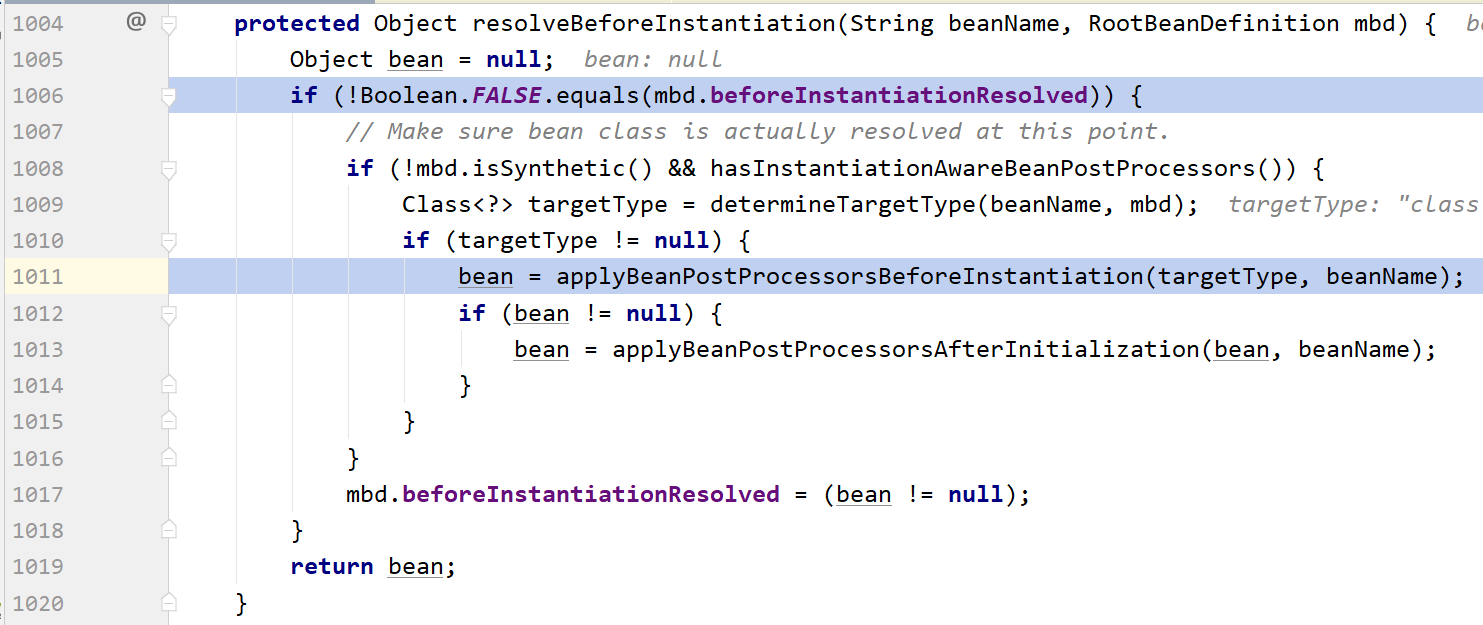
在本篇我们将完整走完 resolveBeforeInstantiation 全过程,并一直到返回代理对象为止
1、调试的起点
开始调试,还是一路跳到下一断点,直到AbstractAutoProxyCreator.postProcessBeforeInstantiation()(从resolveBeforeInstantiation方法进入到这里的过程上一篇已经分析了)


可以看到当前的bean为org.springframework.context.event.internalEventListenerProcessor,和我们要测试的AOP无关。
因为当前方法打上了断点,所以我们调到下一个断点直到来到class aop.MathCalculator


 1 @Override
 2     public Object postProcessBeforeInstantiation(Class<?> beanClass, String beanName) throws BeansException {
 3         Object cacheKey = getCacheKey(beanClass, beanName);
 4
 5         if (beanName == null || !this.targetSourcedBeans.contains(beanName)) {
 6             if (this.advisedBeans.containsKey(cacheKey)) {
 7                 return null;
 8             }
 9             if (isInfrastructureClass(beanClass) || shouldSkip(beanClass, beanName)) {
10                 this.advisedBeans.put(cacheKey, Boolean.FALSE);
11                 return null;
12             }
13         }
14
15         // Create proxy here if we have a custom TargetSource.
16         // Suppresses unnecessary default instantiation of the target bean:
17         // The TargetSource will handle target instances in a custom fashion.
18         if (beanName != null) {
19             TargetSource targetSource = getCustomTargetSource(beanClass, beanName);
20             if (targetSource != null) {
21                 this.targetSourcedBeans.add(beanName);
22                 Object[] specificInterceptors = getAdvicesAndAdvisorsForBean(beanClass, beanName, targetSource);
23                 Object proxy = createProxy(beanClass, beanName, specificInterceptors, targetSource);
24                 this.proxyTypes.put(cacheKey, proxy.getClass());
25                 return proxy;
26             }
27         }
28
29         return null;
30     }
从上往下一步步step voer,下面是对应行的讲解
3、获取bean在容器中的缓存
5、判断目标源Bean中是否存在有当前bean的缓存信息。
(可以在21行看到添加目标源bean的操作,在23行就创建了代理对象。所以这步也是相当于判断当前bean是否已经创建过代理对象。)
因为是第一次执行MathCalculator这个bean,这里我们是进入判断的
接下来 this.advisedBeans.containsKey(cacheKey) 判断advisedBeans中是否有缓存(这里我们将advisedBeans称为增强器)
我们这里判断是不满足的,接着往下走。
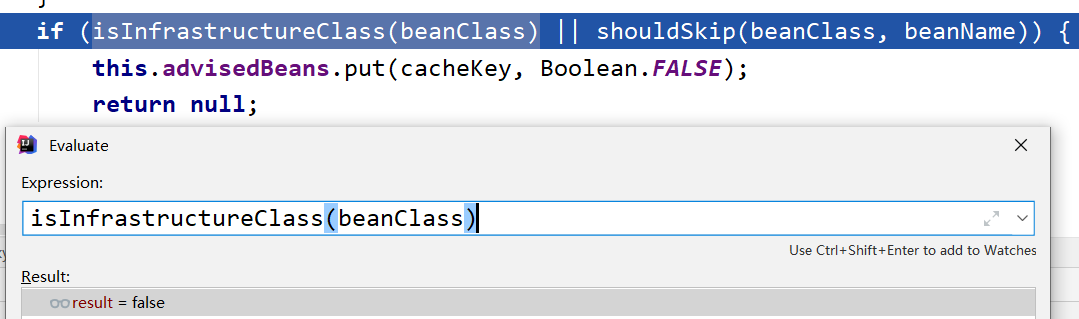
9、进行 isInfrastructureClass(beanClass) || shouldSkip(beanClass, beanName) 判断
下面分别进入第九行的两个方法进行查看。
1、isInfrastructureClass(beanClass) 是否是基础类型
进入后我们会发现有如下两个方法
super.isInfrastructureClass(beanClass) || this.aspectJAdvisorFactory.isAspect(beanClass)
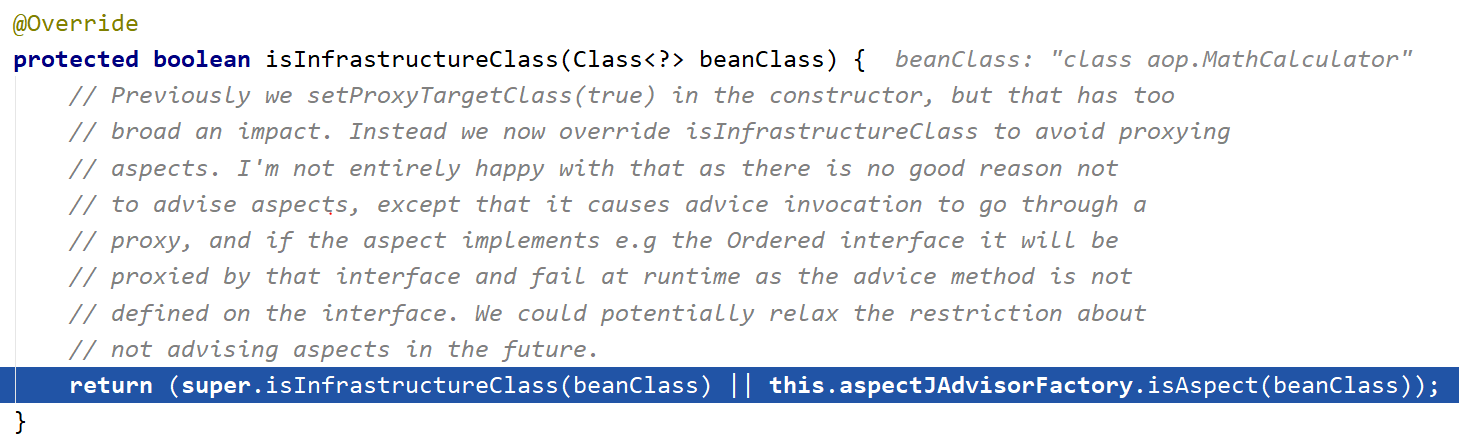
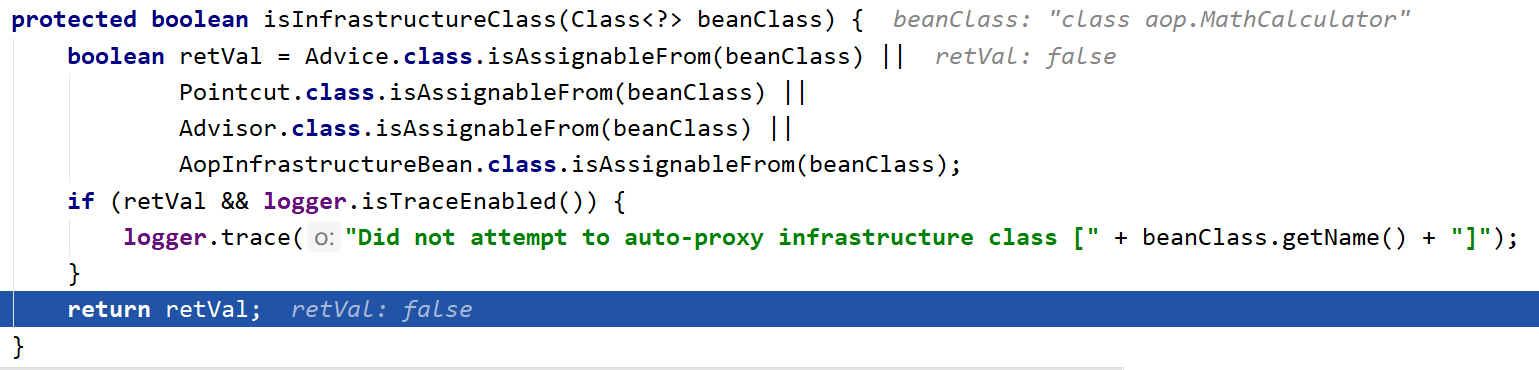
先进入父类的 isInfrastructureClass 方法,经过一系列判断,最后返回false,表明当前bean不是基础类型。
接着来到 isAspect(beanClass) ,通过类上是否有@Aspect注解来判断这个类是否是切面(这里 MathCalculator显然不是一个切面)

返回出来可以看到 isInfrastructureClass(beanClass) 的判断为false
2、shouldSkip 判断是否要跳过
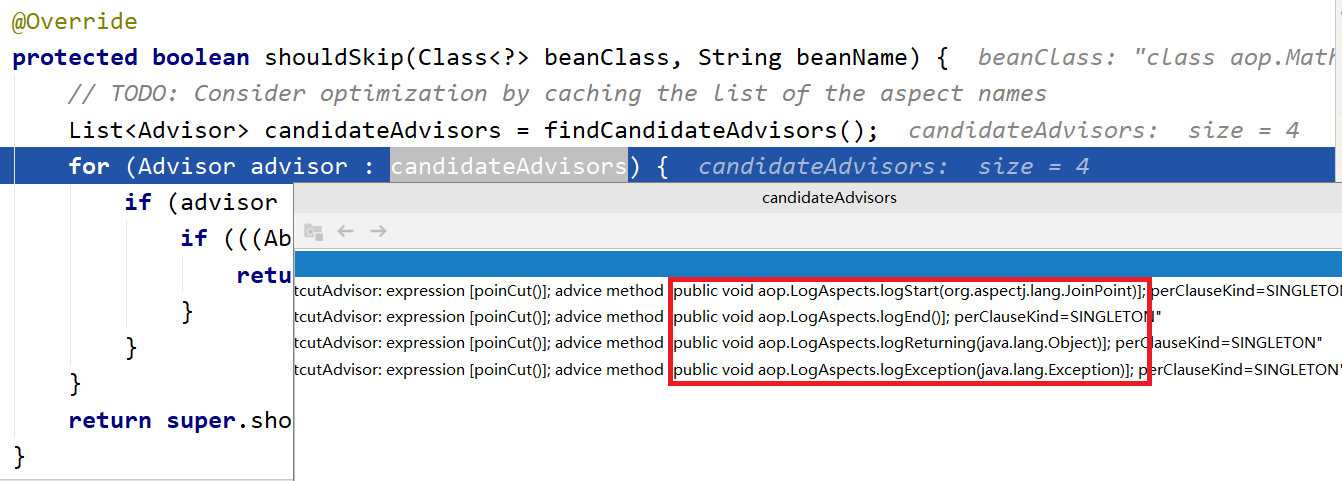
在方法中遍历所有的增强器,红框中表面获取的增强器便是日志方法。
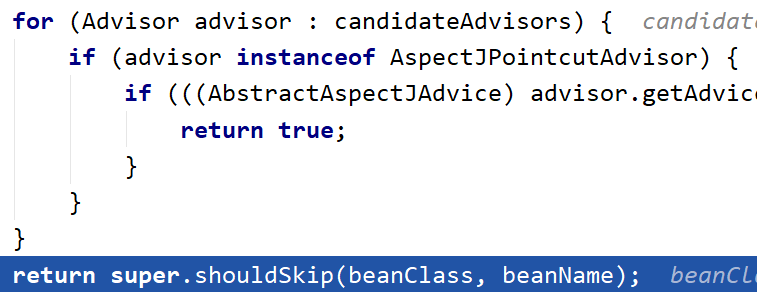
并判断增强器是否是AspectJPointcutAdvisor类型,我们这里判断不满足
末尾来到父类的 shouldSkip 方法,进入可以看到直接返回了 false

最终我们来到外层的判断,可以看到返回了false

2、退出 applyBeanPostProcessorsBeforeInstantiation 方法
接着来到下面这块代码,看注释表明如果存在自定义目标Source,我们将在此创建代理对象
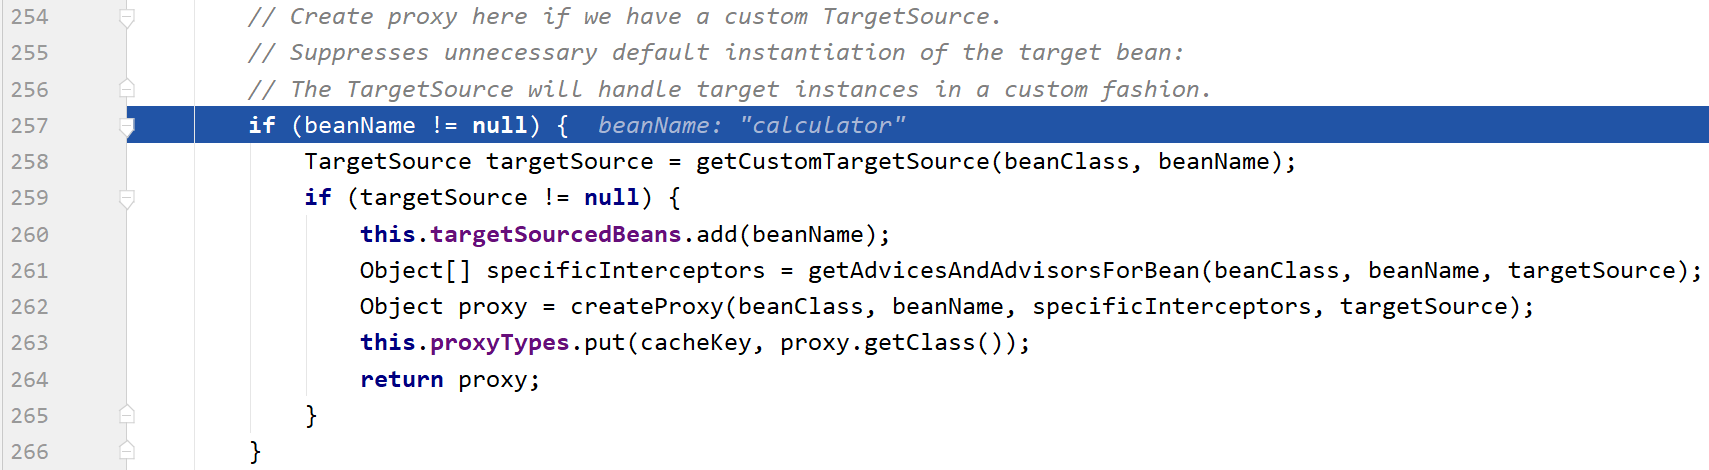
step voer,在259行判断targetSource为null,所以这里是没有自定义目标Source的
我们一直往下走,走完 applyBeanPostProcessorsBeforeInstantiation 方法,直到回到 resolveBeforeInstantiation 方法,返回的bean为null
所以接下来也不会进入 applyBeanPostProcessorsAfterInitialization 方法

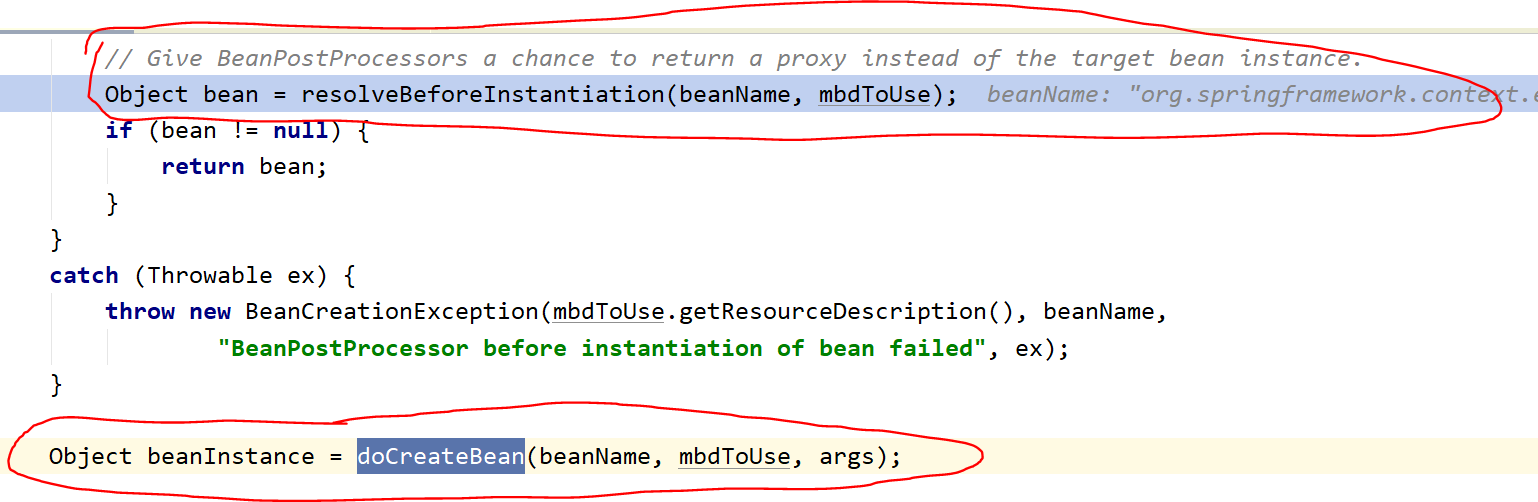
到此为止,我们的 resolveBeforeInstantiation 方法执行完了,从以上可以得知,方法没有给我们返回代理对象
如下图所示,我们将接着执行 createBean 流程,接下来将调用 doCreateBean
3、postProcessAfterInitialization方法探究
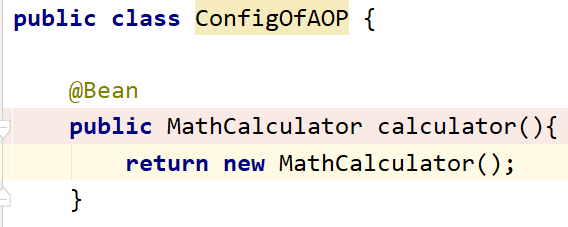
我们执行 doCreateBean 方法,来到了配置类的bean方法
接着跳到下一个断点直到 postProcessAfterInitialization 方法,下面的方法栈我们是熟悉的
从finishBeanFactoryInitialization一路到initializeBean
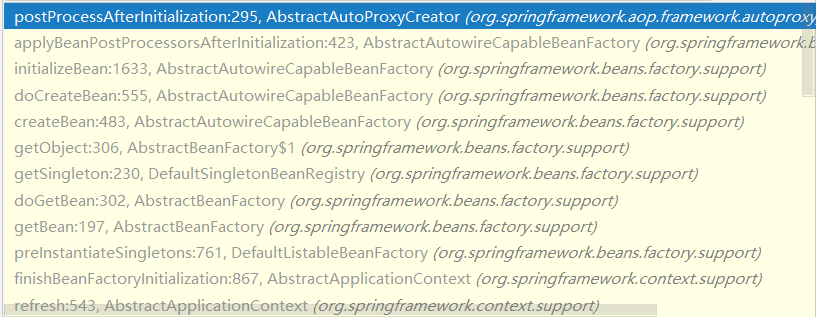
不过我们现在进入的是postProcessAfterInitialization
从下图的 initializeBean 方法的流程也可以看明白
前面执行完了 applyBeanPostProcessorsBeforeInitialization 和 invokeInitMethods 两个方法
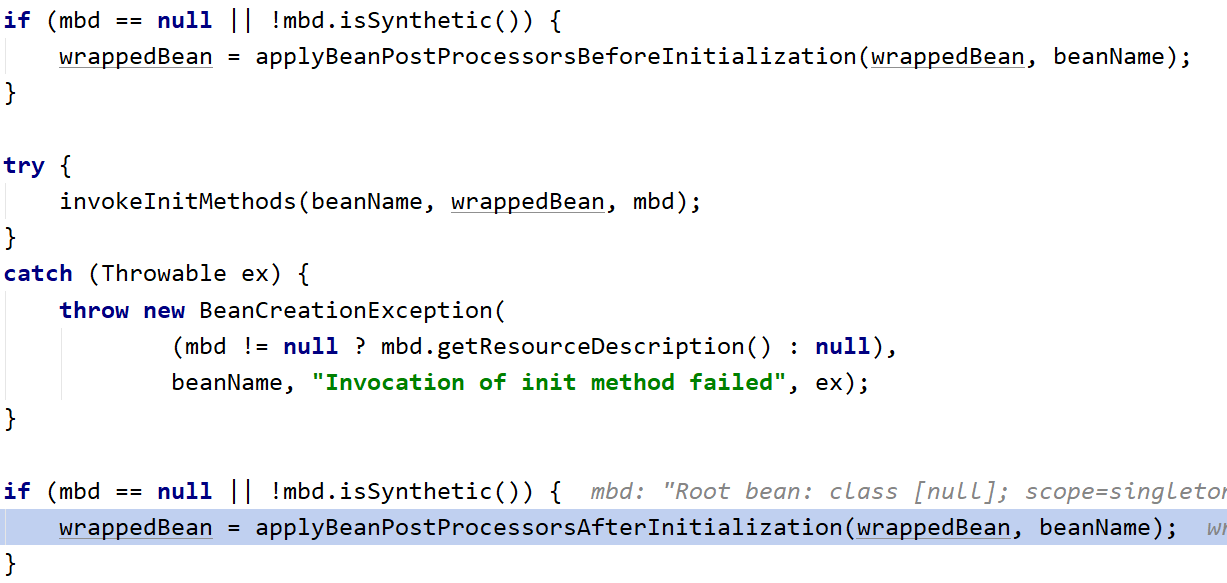
下面进入 postProcessAfterInitialization 方法:
如果先前的代理参考中不存在当前bean对象,就调用 wrapIfNecessary(bean, beanName, cacheKey) 并返回其结果

进入wrapIfNecessary(进行包装如果需要的话):
 1 /**
 2      * Wrap the given bean if necessary, i.e. if it is eligible for being proxied.
 3      * @param bean the raw bean instance
 4      * @param beanName the name of the bean
 5      * @param cacheKey the cache key for metadata access
 6      * @return a proxy wrapping the bean, or the raw bean instance as-is
 7      */
 8     protected Object wrapIfNecessary(Object bean, String beanName, Object cacheKey) {
 9         if (beanName != null && this.targetSourcedBeans.contains(beanName)) {
10             return bean;
11         }
12         if (Boolean.FALSE.equals(this.advisedBeans.get(cacheKey))) {
13             return bean;
14         }
15         if (isInfrastructureClass(bean.getClass()) || shouldSkip(bean.getClass(), beanName)) {
16             this.advisedBeans.put(cacheKey, Boolean.FALSE);
17             return bean;
18         }
19
20         // Create proxy if we have advice.
21         Object[] specificInterceptors = getAdvicesAndAdvisorsForBean(bean.getClass(), beanName, null);
22         if (specificInterceptors != DO_NOT_PROXY) {
23             this.advisedBeans.put(cacheKey, Boolean.TRUE);
24             Object proxy = createProxy(
25                     bean.getClass(), beanName, specificInterceptors, new SingletonTargetSource(bean));
26             this.proxyTypes.put(cacheKey, proxy.getClass());
27             return proxy;
28         }
29
30         this.advisedBeans.put(cacheKey, Boolean.FALSE);
31         return bean;
32     }
9~18行:还是先进行判断,是否是基础类型等,在这里我们判断都不是
21:拿到增强器放入 Object[] specificInterceptors 中
24~25:传入拿到的增强器等信息,创建代理对象
下面我们着重来看 getAdvicesAndAdvisorsForBean 拿增强器的过程:
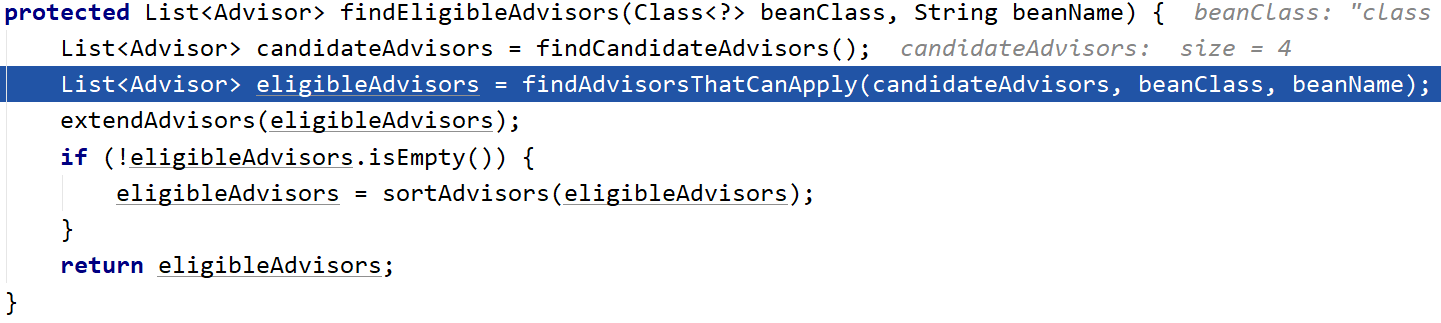
一进来先调用findEligibleAdvisors,找到合格的增强器(日志方法)

进入findEligibleAdvisors,方法先调用findCandidateAdvisors,获取所有候选增强器
然后又调用findAdvisoersThatCanApply从候选增强器中选出可以用于当前bean的
接着判断选出的增强器队列不为空,就给其排序,最后返回选出的增强器队列
findCandidateAdvisors 我们就不说了
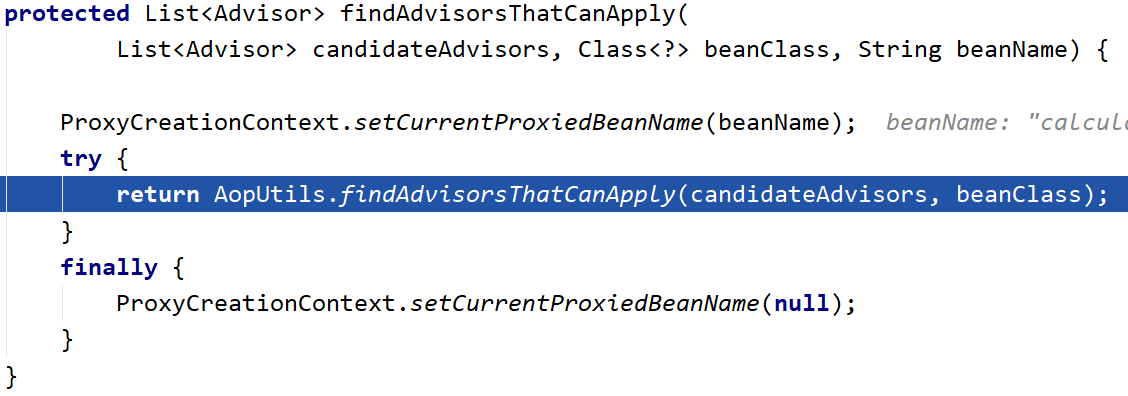
重点看看 findAdvisoersThatCanApply
如下图,可以发现它是利用AopUtils,也就是AOP工具类进行筛选
进入工具类方法,看到方法又进行了一层判断,将最终符合条件的增强器(日志方法)放入选择队列中

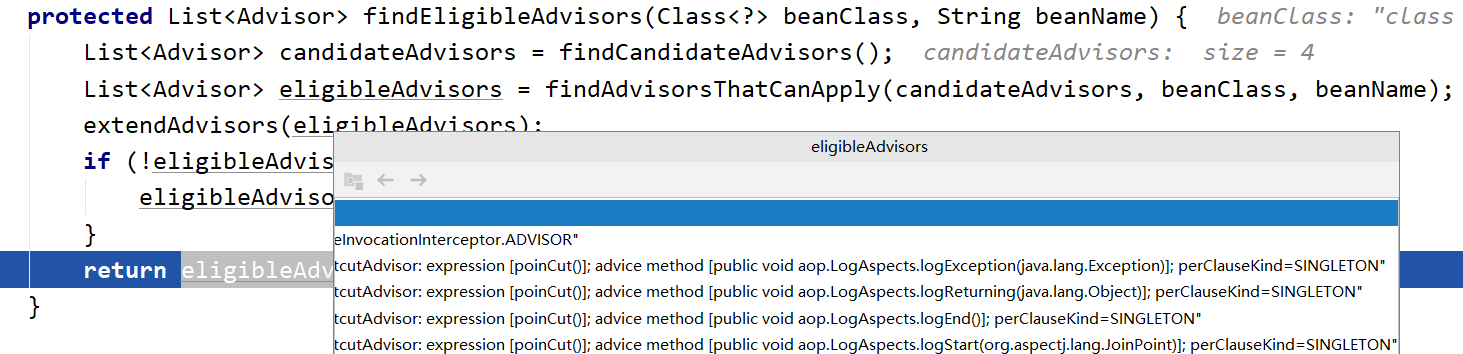
获取完后我们一路返回,又回到了 findEligibleAdvisors
如下图可以看到,最终排序完后将返回有五个增强器的增强器队列
4、创建代理对象
最终我们获取到了需要的增强器(日志方法)放入一个叫特殊拦截器的数组(这里暂且称为拦截器数组)
判断不为空后,将当前bean的缓存放入adviseBeans 中
接着调用createProxy来创建代理对象

 1 /**
 2      * Create an AOP proxy for the given bean.
 3      * @param beanClass the class of the bean
 4      * @param beanName the name of the bean
 5      * @param specificInterceptors the set of interceptors that is
 6      * specific to this bean (may be empty, but not null)
 7      * @param targetSource the TargetSource for the proxy,
 8      * already pre-configured to access the bean
 9      * @return the AOP proxy for the bean
10      * @see #buildAdvisors
11      */
12     protected Object createProxy(
13             Class<?> beanClass, String beanName, Object[] specificInterceptors, TargetSource targetSource) {
14
15         if (this.beanFactory instanceof ConfigurableListableBeanFactory) {
16             AutoProxyUtils.exposeTargetClass((ConfigurableListableBeanFactory) this.beanFactory, beanName, beanClass);
17         }
18
19         ProxyFactory proxyFactory = new ProxyFactory();
20         proxyFactory.copyFrom(this);
21
22         if (!proxyFactory.isProxyTargetClass()) {
23             if (shouldProxyTargetClass(beanClass, beanName)) {
24                 proxyFactory.setProxyTargetClass(true);
25             }
26             else {
27                 evaluateProxyInterfaces(beanClass, proxyFactory);
28             }
29         }
30
31         Advisor[] advisors = buildAdvisors(beanName, specificInterceptors);
32         proxyFactory.addAdvisors(advisors);
33         proxyFactory.setTargetSource(targetSource);
34         customizeProxyFactory(proxyFactory);
35
36         proxyFactory.setFrozen(this.freezeProxy);
37         if (advisorsPreFiltered()) {
38             proxyFactory.setPreFiltered(true);
39         }
40
41         return proxyFactory.getProxy(getProxyClassLoader());
42     }
从上往下看
19行创建代理对象对象工厂proxyFactory ,31~34在代理对象工厂中加入增强器、目标Source等属性
41行调用proxyFactory.getProxy(getProxyClassLoader()) 获取当前bean的代理对象

先创建Aop代理对象
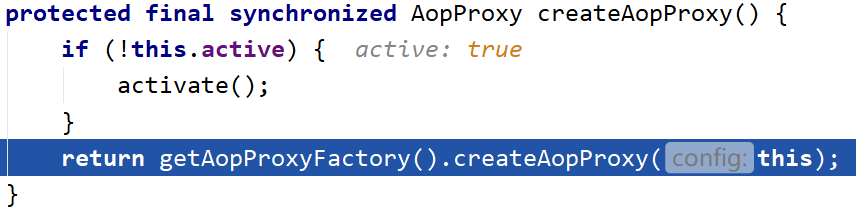
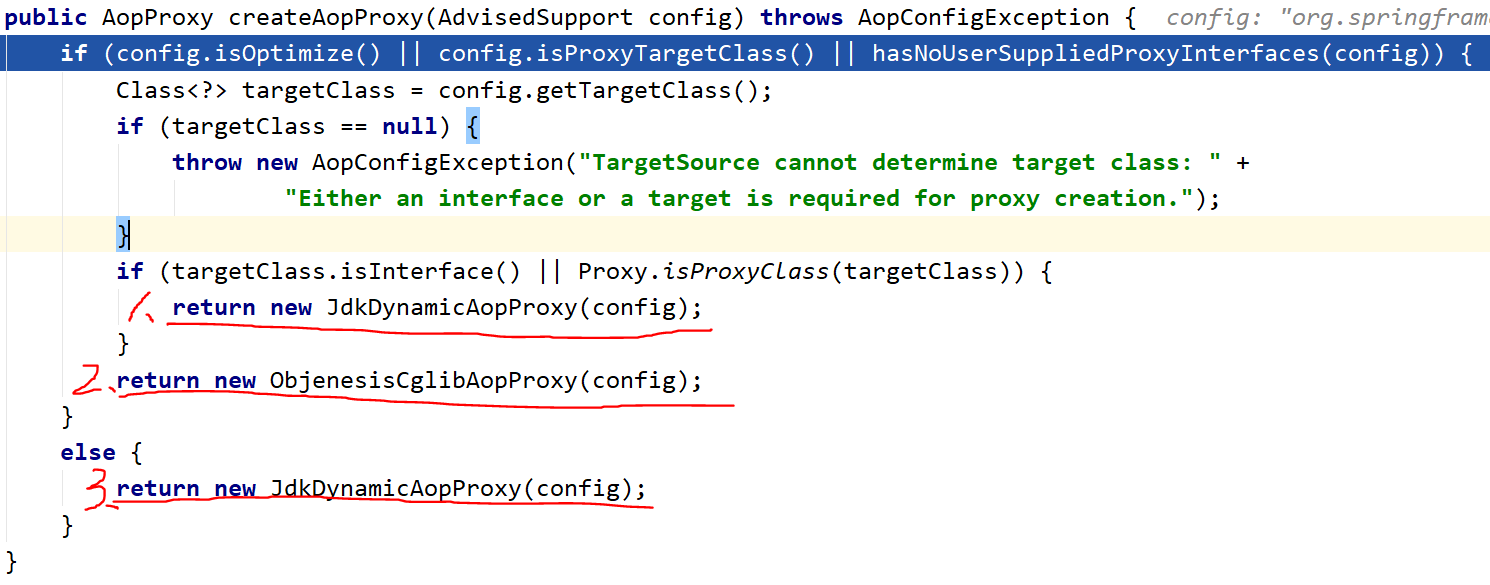
可以看到结果一系列调用后来到下图,有3种动态代理对象可能返回,我们这里返回的是Cglib动态代理对象
一步步将代理对象返回,执行完当前bean的 applyBeanPostProcessorsAfterInitialization方法,返回其代理对象


代理类的结构
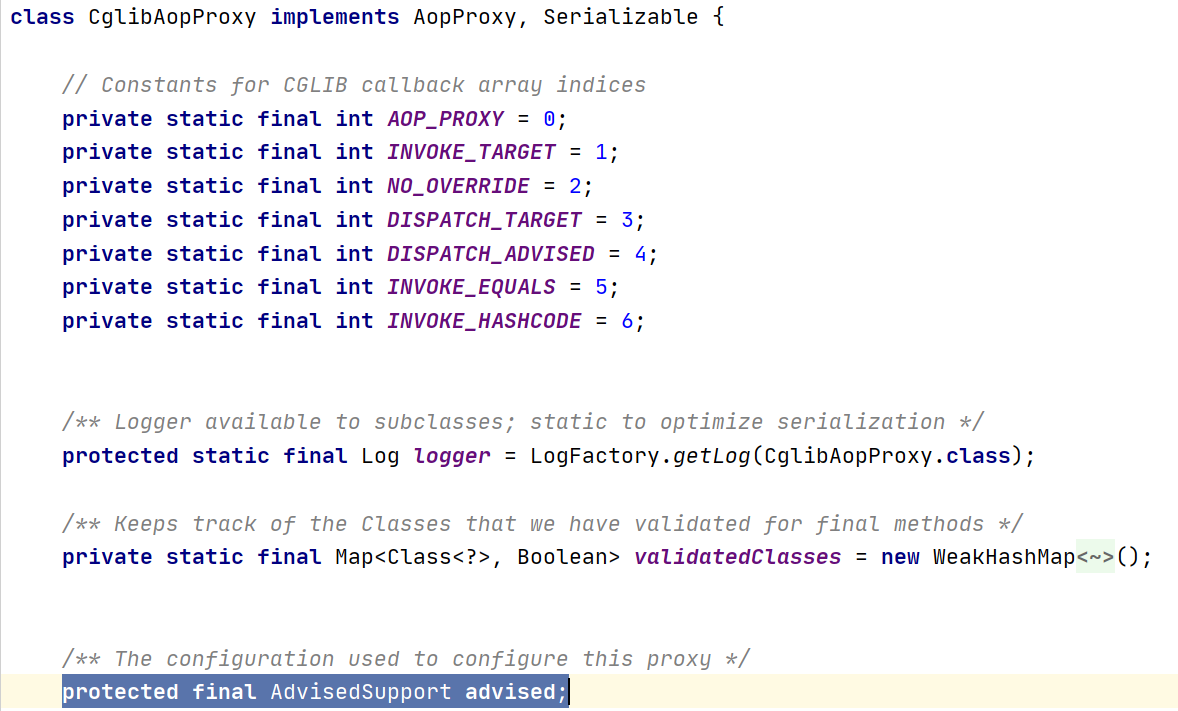
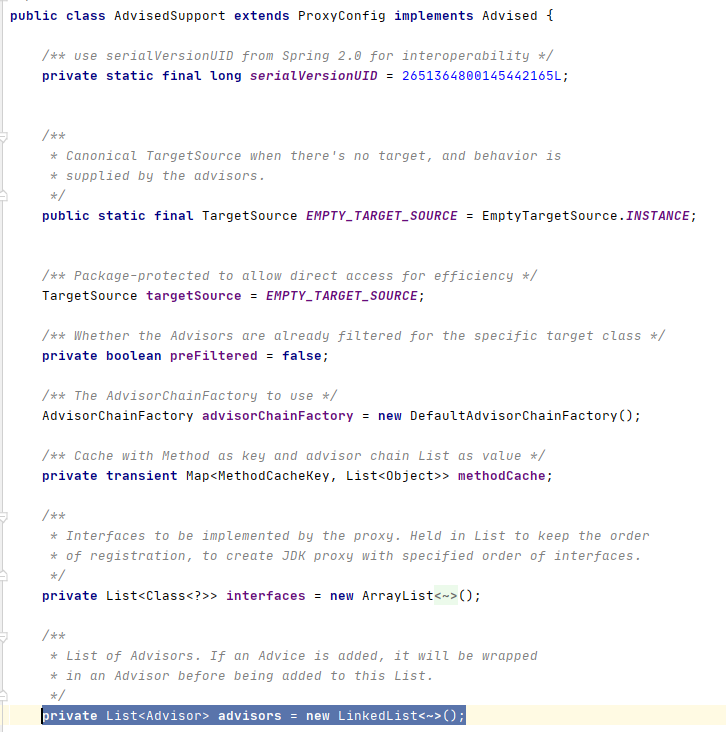
上图中targetSource即为目标代理类,advisors为增强器链
即代理类对目标类和切面类进行了两次包装
(1、先将目标类和切面类装入AdvisedSupport 2、将AdvisedSupport作为自身的属性)
可以得知:返回的代理对象将代替bean对象存入容器中
到此为止,我们的代理对象创建步骤就完成了。
总结:
initializeBean方法在初始化bean时,将通过 applyBeanPostProcessorsAfterInitialization 创建并返回目标bean的代理对象,并存入容器中。
目前为止的过程,都是在初始化bean前完成的
下面两张图中的代码流程是关键
1、initializeBean流程
2、refresh流程(AOP中我们需要了解的)
- postProcessBeanFactory(beanFactory);
- invokeBeanFactoryPostProcessors(beanFactory);
- finishBeanFactoryInitialization(beanFactory);
refresh完整流程参考如下:
 1 @Override
 2     public void refresh() throws BeansException, IllegalStateException {
 3         synchronized (this.startupShutdownMonitor) {
 4             // Prepare this context for refreshing.
 5             prepareRefresh();
 6
 7             // Tell the subclass to refresh the internal bean factory.
 8             ConfigurableListableBeanFactory beanFactory = obtainFreshBeanFactory();
 9
10             // Prepare the bean factory for use in this context.
11             prepareBeanFactory(beanFactory);
12
13             try {
14                 // Allows post-processing of the bean factory in context subclasses.
15                 postProcessBeanFactory(beanFactory);
16
17                 // Invoke factory processors registered as beans in the context.
18                 invokeBeanFactoryPostProcessors(beanFactory);
19
20                 // Register bean processors that intercept bean creation.
21                 registerBeanPostProcessors(beanFactory);
22
23                 // Initialize message source for this context.
24                 initMessageSource();
25
26                 // Initialize event multicaster for this context.
27                 initApplicationEventMulticaster();
28
29                 // Initialize other special beans in specific context subclasses.
30                 onRefresh();
31
32                 // Check for listener beans and register them.
33                 registerListeners();
34
35                 // Instantiate all remaining (non-lazy-init) singletons.
36                 finishBeanFactoryInitialization(beanFactory);
37
38                 // Last step: publish corresponding event.
39                 finishRefresh();
40             }
41
42             catch (BeansException ex) {
43                 if (logger.isWarnEnabled()) {
44                     logger.warn("Exception encountered during context initialization - " +
45                             "cancelling refresh attempt: " + ex);
46                 }
47
48                 // Destroy already created singletons to avoid dangling resources.
49                 destroyBeans();
50
51                 // Reset 'active' flag.
52                 cancelRefresh(ex);
53
54                 // Propagate exception to caller.
55                 throw ex;
56             }
57
58             finally {
59                 // Reset common introspection caches in Spring's core, since we
60                 // might not ever need metadata for singleton beans anymore...
61                 resetCommonCaches();
62             }
63         }
64     }
在下一篇中,也是本系列的最后一篇,我们将探究增强器(日志方法)是如何通过代理对象,在代理对象方法执行的时候发挥作用的。

 浙公网安备 33010602011771号