vue学习笔记
MVVM

    <!--导入vue-->
    <script src="https://cdn.jsdelivr.net/npm/vue/dist/vue.js"></script>
<body>
<!--改变方式对比-->
hello vue!<br>
<div id="app">
    <!-- {{}}等价v-bindm,只显示为文本。使用v-once一次性绑定值 -->
    {{message}}
    <!-- v-html显示为html语句 -->
    <span v-html="realHtml"></span>
</div>

<script>
    let message="hello vue!";
    let realHTML="<h1>hello vue!</h1>";
    let vm = new Vue({
        el: "#app",
        data: {
            message: message,
            realHTML: realHTML
        }
    });
</script>
</body>
vue
学习文档:官方文档
核心时DOM监听和数据绑定
判断-循环(v-if)
<!-- 判断v-if -->
<body>
<div id="app">
    <h3 v-if="message==='true'">Yes</h3>
    <h3 v-else="message==='false'">No</h3>
    <h3 v-else>null</h3>
</div>

<script>
    let vm = new Vue({
        el: "#app",
        data: {
            message: "true"
        }
    });
</script>
</body>

<!-- 循环v-for -->
<div id="app">
    <li v-for="item in items" :key="item.message">
        {{ item.message }}
    </li>
</div>

<script>
    let message = new Vue({
        el: '#app',
        data: {
            items: [
                {message: 'Foo'},
                {message: 'Bar'}
            ]
        }
    })
</script>
</body>
事件(v-on)
<body>
<!-- 事件v-on -->
<div id="app">
    <!-- `greet` 是在下面定义的方法名 -->
    <button v-on:click="greet">Greet</button>
</div>

<script>
    let message = new Vue({
        el: '#app',
        data: {
            name: 'Vue.js'
        },
        // 在 `methods` 对象中定义方法
        methods: {
            greet: function (event) {
                // `this` 在方法里指向当前 Vue 实例
                alert('Hello ' + this.name + '!')
                // `event` 是原生 DOM 事件
                if (event) {
                    alert(event.target.tagName)
                }
            }
        }
    })
</script>
</body>
双向数据绑定(v-model)
<body>
<!-- 双向数据绑定v-model -->
<div id="app">
    输入文本:<input type="text" v-model="message">{{message}}
</div>

<script>
    let vm = new Vue({
        el: '#app',
        data: {
            message: ''
        }
    });
</script>
</body>
v-model 会根据控件类型自动选取正确的方法来更新元素,在内部为不同的输入元素使用不同的 property 并抛出不同的事件:
- text 和 textarea 元素使用 value property 和 input 事件;
- checkbox 和 radio 使用 checked property 和 change 事件;
- select 字段将 value 作为 prop 并将 change 作为事件。
<body>
<!-- 双向数据绑定v-model -->
<div id="app">
    <select v-model="message">
        <option value="" selected disabled>--请选择--</option>
        <option>A</option>
        <option>B</option>
        <option>C</option>
    </select>
    {{message}}
</div>

<script>
    let vm = new Vue({
        el: '#app',
        data: {
            message: ''
        }
    });
</script>
</body>
组件
<body>
<div id="app">
    <blog-post v-for="post in posts" v-bind:key="post.id" v-bind:title="post.title"/>
</div>

<script>
    // 定义一个新组件
    Vue.component('blog-post', {
        // 通过 Prop 向子组件传递数据
        props: ['title'],
        template: '<h3>{{ title }}</h3>'
    })
    new Vue({
        el: '#app',
        data: {
            posts: [
                {id: 1, title: 'My journey with Vue'},
                {id: 2, title: 'Blogging with Vue'},
                {id: 3, title: 'Why Vue is so fun'}
            ]
        }
    })
</script>
</body>
axios
Axios 是一个基于 promise 的 HTTP 库
<body>
<div id="axios">
    <div>{{info.name}}</div>
    <div>{{info.address.street}}</div>
    <a v-bind:href="info.url">click me</a>
</div>

<script>
    let vm = new Vue({
        el: "#axios",
        data() {
            return {
                info: {
                    name: null,
                    url: null,
                    address: {
                        "street": null,
                        "city": null,
                        "cuntry": null
                    }
                }
            }
        },
        mounted() {
            axios.get('../data.json').then(response => (this.info = response.data));
        }
    });
</script>
</body>
计算属性
计算属性即一个方法,但是这个方法的结果会缓存以后当成一个属性来用。计算属性的主要目的就是为了将不常变化的结果缓存起来,节约系统开销。只在相关响应式依赖发生改变时它们才会重新求值.
<body>
<div id="app">
    <!-- 使用控制台可以发现vm.currentTime1()一直在变化,而vm.currentTime2不变 -->
    <p>调用方法:{{currentTime1()}}</p>
    <p>调用属性:{{currentTime2}}</p>
</div>

<script>
    let vm = new Vue({
        el: "#app",
        methods: {
            currentTime1: function () {
                return Date.now();
            }
        },
        //计算属性
        computed: {
            currentTime2: function () {
                return Date.now();
            }
        }
    });
</script>
</body>
插槽(v-slot)
<todo>
    <h1>hello vue!</h1>
</todo>

Vue.component("todo",{
    template: '<div>' +
        '<slot></slot>' +
        '</div>'
});
自定义事件($emit)
App.vue
<template>
  <div id="app">
    <mparent></mparent>
  </div>
</template>

<style>
</style>

<script>
//引入页面并导出
import mparent from "./views/Parent";
export default {
  components: {
    mparent
  }
};
</script>
第一个组件Parent.vue
<template>
  <div>
    <h1>parent</h1>
    <!-- 显示组件间传的值 -->
    <h3>{{msg}}</h3>
    <!-- 组件间传值 -->
    <mchild v-bind:msg="'from parent msg'" @showmsg="showthemsg"></mchild>
  </div>
</template>

<script>
import mchild from "./Child";
export default {
  data() {
    return {
      msg: ""
    };
  },
  components: {
    mchild
  },
  methods: {
    // 参数自动配置,不用再上面手写
    showthemsg(val) {
      this.msg = val;
    }
  }
};
</script>
<style scoped>
</style>>

</style>
第二个组件Child.vue
<template>
  <div>
    <h3>child</h3>
    <!-- 显示组件间传的值 -->
    <h3>{{msg}}</h3>
    <button @click="passmsg">emit事件传值</button>
  </div>
</template>

<script>
export default {
  // 通过<v-bind>、props组件间传值
  props: {
    msg: {
      type: String,
      default: ""
    }
  },
  // 通过自定义事件组件间传值
  methods: {
    passmsg() {
      this.$emit("showmsg", "emit事件传值");
    }
  }
};
</script>
<style scoped>
</style>>

</style>
也可用一个中间件,使用$emit触发事件,$on函数监听事件
vue-router
定义一个路由
写一个vue页面,之后在index.js中定义路由
    const router = new VueRouter({
    routes: [{
        path: '/home',
        component: () => import('../views/Home.vue')
    }]
    })
在想使用路由组件的地方添加
<router-view/>
或跳转到组件
    <!-- 使用<route-link>跳转 -->
    <router-link to="/home">home</router-link>
    <!-- 编程式导航 -->
    <button @click="tohome">homeb</button>
使用编程式导航编写函数实现跳转功能
  methods: {
    tohome() {
      this.$router.push({ path: "/home" });
    }
  }
动态路由
    // 动态路由,需传送一个叫id的参数
    path: '/home/:id',
使用时需传递参数,如
http://localhost:8080/#/home/234
动态路由传参
    // 编写方法时使用query属性传参
    this.$router.push({ path: "/home",query:{id:3}});
    // 编写方法时使用params属性传参,params一般和路由名字一起用
    this.$router.push({ name: "home",params:{id:3}});
嵌套路由(children)
  routes: [{
    // 动态路由,需传送一个叫id的参数
    path: '/home/:id',
    component: () => import('../views/Home.vue'),
    children: [{
      path: '/child',
      component: () => import('../views/Child.vue')
    }]
  }]
之后再home页中想使用的地方添加<router-view></router-view>就行了
钩子(mounted)
可用于检查登陆状态,cookie等等浏览器事件,例子
    router.beforeEach((to, from, next) => {
    console.log(to.path);
    next()
    });
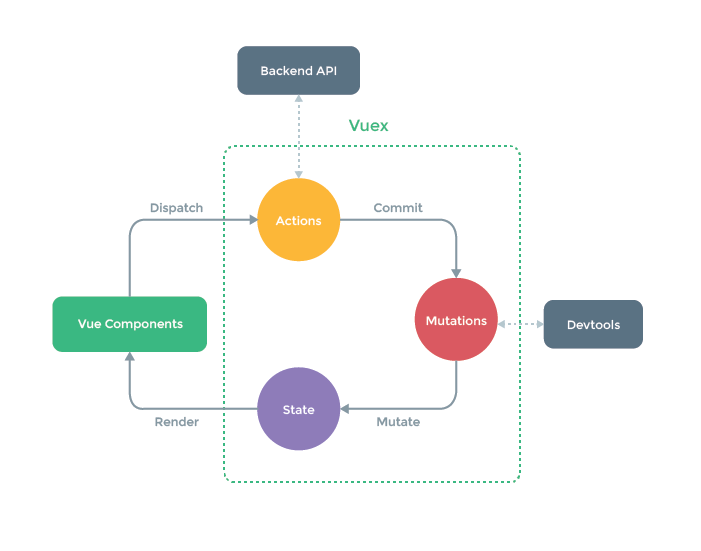
vuex

 浙公网安备 33010602011771号