SpringSecurity
SpringSecurity用处
- 在Springboot的请求前多加了一层检验用来做权限控制(实际上是15条过滤链)
- 我们能让用户看到我们想给他看见的功能,其它功能并不能给他看。
- 记住密码(功能)
- 能整合oauth2(第三方登入)
- 能颁发token(jjwt)
毕设可用的技能归纳
搭建环境
prom文件需要导入相关的依赖
依赖文件
   <parent>
        <!-- boot管理版本 https://mvnrepository.com/artifact/org.springframework.boot/spring-boot-starter-parent -->
        <groupId>org.springframework.boot</groupId>
        <artifactId>spring-boot-starter-parent</artifactId>
        <version>2.5.6</version>
    </parent>


    <dependencies>

    <!-- https://mvnrepository.com/artifact/org.springframework.boot/spring-boot-starter -->
    <dependency>
        <groupId>org.springframework.boot</groupId>
        <artifactId>spring-boot-starter</artifactId>
    </dependency>

    <!-- https://mvnrepository.com/artifact/org.springframework.boot/spring-boot-starter-web -->
    <dependency>
        <groupId>org.springframework.boot</groupId>
        <artifactId>spring-boot-starter-web</artifactId>
    </dependency>

        <!-- https://mvnrepository.com/artifact/org.springframework.boot/spring-boot-starter-security -->
        <dependency>
            <groupId>org.springframework.boot</groupId>
            <artifactId>spring-boot-starter-security</artifactId>
        </dependency>

        <!--记住我功能-->
        <!-- https://mvnrepository.com/artifact/org.mybatis.spring.boot/mybatis-spring-boot-starter -->
        <dependency>
            <groupId>org.mybatis.spring.boot</groupId>
            <artifactId>mybatis-spring-boot-starter</artifactId>
            <version>2.1.1</version>
        </dependency>

        <!-- https://mvnrepository.com/artifact/mysql/mysql-connector-java -->
        <dependency>
            <groupId>mysql</groupId>
            <artifactId>mysql-connector-java</artifactId>
            <version>5.1.47</version>
        </dependency>


    </dependencies>
使用该框架每次都会获得一次给定密码(默认拦截所有的请求)需要输入密码才能正常访问
实际开发并不符合这种每次自己生成输出密码的情况
于是我们可以自己设置自己的登入页面
自定义登录逻辑
正常我们需要获取表中的密码合账户然后通过判断账户密码是否正确来正常登入
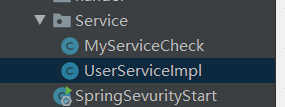
1.建立service
2.建立userserviceimpl
3.代码实现

首先我们为什么要写这个实现类?为了设置权限和密码:那么我们需要知道该框架使用那个接口那个类来存储这些数据的?答:UserDetailService接口和user类
必须继承UserDetailsService 接口实现loadUserByUsername 返回一个UserDetails对象
自定义登录逻辑代码
@Service
public class UserServiceImpl implements UserDetailsService {

    @Autowired
	//编码的工具类
    private PasswordEncoder pw;

    @Override
	//重写这个方法最后返回一个user对象(放了账户密码,还有权限角色等)
    public UserDetails loadUserByUsername(String username) throws UsernameNotFoundException {

        /*
        自定义登入逻辑用来检查账户密码
        * 1.进行数据库查询
        * 2.进行密码加密
        * 3.返回User对象
        * */

        String pwd=pw.encode("123456");

        return new User(username,pwd, AuthorityUtils.commaSeparatedStringToAuthorityList("admin,ROLE_user,dem.html"));
    }
}
登入页面
<!DOCTYPE html>
<html lang="en">
<head>
    <meta charset="UTF-8">
    <title>Title</title>
</head>
<body>
<h1>nihao</h1>
</body>
<form action="/login" method="post">
    <input name="user" type="text">
    <input name="pwd" type="password">
    <input type="submit" value="登入">
    <input type="checkbox" value="true" name="remember-me">记住我
</form>
</html>
编写配置类
我们需要配置
同时这个配置类也是重要的过滤设置器能够管理所有的请求(十分重要)

Securityconfig
package com.xsc.SpringSecurity.config;

import com.xsc.SpringSecurity.Service.MyServiceCheck;
import com.xsc.SpringSecurity.Service.UserServiceImpl;
import com.xsc.SpringSecurity.handel.MyAccessDenideHandler;
import com.xsc.SpringSecurity.handel.failurehandel;

import org.springframework.beans.factory.annotation.Autowired;


import org.springframework.boot.context.properties.ConfigurationProperties;
import org.springframework.context.annotation.Bean;
import org.springframework.context.annotation.Configuration;

import org.springframework.security.config.annotation.web.builders.HttpSecurity;
import org.springframework.security.config.annotation.web.configuration.WebSecurityConfigurerAdapter;

import org.springframework.security.crypto.bcrypt.BCryptPasswordEncoder;
import org.springframework.security.crypto.password.PasswordEncoder;
import org.springframework.security.web.authentication.rememberme.JdbcTokenRepositoryImpl;
import org.springframework.security.web.authentication.rememberme.PersistentTokenRepository;


import javax.sql.DataSource;


@Configuration
public class Securityconfig extends WebSecurityConfigurerAdapter {
    @Autowired
    private MyServiceCheck myServiceCheck;


    @Autowired
    private UserServiceImpl userServiceImpl;


    @Autowired
    private DataSource dataSource;


    @Autowired
    private PersistentTokenRepository persistentTokenRepository;


    @Override
    protected void configure(HttpSecurity http) throws Exception {
        //设置自定义登入页面
        http.formLogin()
                .passwordParameter("pwd")
                .usernameParameter("user")
                //设置自定义页面
                .loginPage("/login.html")
                 //设置响应table路径:与登录表单的action相同
                .loginProcessingUrl("/login")
                 //设置验证成功后发送请求 :只允许是post数据实际开发不用这两个因为现在都是前后端分离
                .successForwardUrl("/loginsuccess")
                //.failureForwardUrl("/loginfield")内部帮你转发
                //.successHandler(new successhandel("/loginsuccess"))
                .failureHandler(new failurehandel("/loginfield"));


        //设置自定义登入逻辑后拦截失效重新设置
        http.authorizeRequests()
                //这样自定义登入也会被拦截,设置、login不拦截
                .antMatchers("/login.html").permitAll()
                .antMatchers("/fiele.html").permitAll()
                //放行静态资源
                .antMatchers("/css/**,/js/**,images/**").permitAll()
                //放行后缀
                //.antMatchers("/**/*.png").permitAll();
                //正则匹配
                //.regexMatchers(".+[.]png").permitAll()
                //全匹配放行可以加上请求方式)
                //.regexMatchers("/demo").permitAll()
                //servletpath放行:这个是在yml文件设置servletpath时候使用的
                //.mvcMatchers("/demm").servletPath("/sss").permitAll()
                //所有请求都必须先通过认证,必须登入(必须先看到放行的所以必须放在最后面)


                //上面的permitAll是对全部的请求过滤(类似有5个),可以只真对权限放行
                //下面的这段话只真对admin权限放行(严格区分大小写),当没有权限返回403权限不足马
                //.regexMatchers("/demo").hasAuthority("Admin")放单个
                //hasAnyAuthority放多个只要有其中一个即可
               // .regexMatchers("/demo").hasAnyAuthority("sbc")

                 //根据角色放行(在自定义登录逻辑时候拼接的ROLE_要去掉)(严格区分大小写)
                //.regexMatchers("/demo").hasRole("user")


                //根据ip地址放行(把localhost换成127.0.0.1)
                //.regexMatchers("/demo").hasIpAddress("127.0.0.1")

                //所有的放行权限本质调用的都是access
                //.regexMatchers("/demo").access("hasAnyRole('user')")
                //access实际返回的就是ture合false而已,我们自定义当前用户能访问什么权限即可


               .anyRequest().authenticated();
               // .anyRequest().access("@myServiceCheck.check(httpServletRequest,authentication)");

           //自定义权限不足
          http.exceptionHandling()
                  .accessDeniedHandler(new MyAccessDenideHandler());

          //记住我
          http.rememberMe()
                  //设置数据源
                  .tokenRepository(persistentTokenRepository)
                  //设置名字
                  // .rememberMeParameter()
                  //有效时间
                  .tokenValiditySeconds(60)
                  .userDetailsService(userServiceImpl);


          http.logout()
                  //登入成功后跳转的页面,不需要再次经过controller 因为它直接清楚了userdetail 合 session,顺便把记录表都干掉了
                  .logoutSuccessUrl("/login.html");
        //关闭防火墙
        http.csrf().disable();
    }

    @Bean
    public PasswordEncoder pw(){
        return new BCryptPasswordEncoder();
    }

    @Bean
    public PersistentTokenRepository persistentTokenRepository(){
        //记住我底层依赖jdbc
        JdbcTokenRepositoryImpl jdbcTokenRepository=new JdbcTokenRepositoryImpl();
        //所以设置数据源
        jdbcTokenRepository.setDataSource(dataSource);
        //设置自己建表(第一次运行打开第二次关闭)
        //jdbcTokenRepository.setCreateTableOnStartup(true);
        return jdbcTokenRepository;
    }
}
 http.formLogin()
                //设置表格的name
                .passwordParameter("pwd")
                .usernameParameter("user")
                //设置自定义页面
                .loginPage("/login.html")
                //设置响应table路径:与登录表单的action相同
                .loginProcessingUrl("/login")
                //设置验证成功后发送请求 :只允许是post数据实际开发不用这两个因为现在都是前后端分离
                .successForwardUrl("/loginsuccess")
                //.failureForwardUrl("/loginfield")内部帮你转发
                //handler实现的是自定义逻辑
                .successHandler(new successhandel("/loginsuccess"))
                .failureHandler(new failurehandel("/loginfield"));
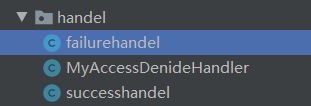
.successHandler需要实现自己的成功处理器
.failureHandler需要实现自己的失败处理器

失败处理器
package com.xsc.SpringSecurity.handel;

import org.springframework.security.core.AuthenticationException;
import org.springframework.security.web.authentication.AuthenticationFailureHandler;

import javax.servlet.ServletException;
import javax.servlet.http.HttpServletRequest;
import javax.servlet.http.HttpServletResponse;
import java.io.IOException;
//继承接口
public class failurehandel implements AuthenticationFailureHandler {
    private  String url;

    public failurehandel(String url) {
        this.url = url;
    }

    @Override
	//重写方法、转发请求即可
    public void onAuthenticationFailure(HttpServletRequest httpServletRequest, HttpServletResponse httpServletResponse, AuthenticationException e) throws IOException, ServletException {
        httpServletRequest.getRequestDispatcher(url).forward(httpServletRequest,httpServletResponse);
    }
}
成功处理器
package com.xsc.SpringSecurity.handel;

import org.springframework.security.core.Authentication;
import org.springframework.security.core.userdetails.User;
import org.springframework.security.web.authentication.AuthenticationSuccessHandler;

import javax.servlet.FilterChain;
import javax.servlet.ServletException;
import javax.servlet.http.HttpServletRequest;
import javax.servlet.http.HttpServletResponse;
import java.io.IOException;

public class successhandel implements AuthenticationSuccessHandler {
    private  String url;

    public successhandel(String url) {
        this.url = url;
    }

    @Override
    public void onAuthenticationSuccess(HttpServletRequest httpServletRequest, HttpServletResponse httpServletResponse, Authentication authentication) throws IOException, ServletException {
        //authentication获取user对象的
        User a = (User) authentication.getPrincipal();
        System.out.println(a.getUsername());
        System.out.println(a.getAuthorities());
        System.out.println(a.getPassword());
        httpServletRequest.getRequestDispatcher(url).forward(httpServletRequest,httpServletResponse);
    }


}
自定义权限不足
自定义权限不足代码
package com.xsc.SpringSecurity.handel;

import org.springframework.security.access.AccessDeniedException;
import org.springframework.security.web.access.AccessDeniedHandler;

import javax.servlet.ServletException;
import javax.servlet.http.HttpServletRequest;
import javax.servlet.http.HttpServletResponse;
import java.io.IOException;
import java.io.PrintWriter;

//自定义权限不足时要实现AccessDeniedHandler
public class MyAccessDenideHandler  implements AccessDeniedHandler {
    @Override
    public void handle(HttpServletRequest httpServletRequest, HttpServletResponse httpServletResponse, AccessDeniedException e) throws IOException, ServletException {
      httpServletResponse.setStatus(httpServletResponse.SC_FORBIDDEN);
        PrintWriter writer=httpServletResponse.getWriter();
        httpServletResponse.setHeader("Content-Type","application/json;charset=utf-8");
        writer.write("{\"status\":\"权限不足请联系管理员\"}");
        writer.flush();
        writer.close();
    }
}
http.exceptionHandling().accessDeniedHandler(new MyAccessDenideHandler());
记住我功能
设置自动生成表
 @Bean
    public PersistentTokenRepository persistentTokenRepository(){
        //记住我底层依赖jdbc
        JdbcTokenRepositoryImpl jdbcTokenRepository=new JdbcTokenRepositoryImpl();
        //所以设置数据源
        jdbcTokenRepository.setDataSource(dataSource);
        //设置自己建表(第一次运行打开第二次关闭)
        //jdbcTokenRepository.setCreateTableOnStartup(true);
        return jdbcTokenRepository;
    }
Config加上这段引用
  //记住我
          http.rememberMe()
                  //设置数据源
                  .tokenRepository(persistentTokenRepository)
                  //设置名字
                  // .rememberMeParameter()
                  //有效时间
                  .tokenValiditySeconds(60)
                  .userDetailsService(userServiceImpl);


 浙公网安备 33010602011771号