
ElasticSearch 配置
基础环境:
Linux 内核版本:4.14.77-81.59.amzn2.x86_64
Jdk版本:openjdk version "1.8.0_191"
Elasticsearch 版本:ElasticSearch 6.5.1
安装 Elasticsearch
es 下载地址:https://www.elastic.co/cn/downloads/past-releases
接下来就是进一步的操作,如下:
主机内核、文件句柄设置以及创建es启动用户(默认非root用户启动):
# sysctl -p
vm.max_map_count = 655360

vi /etc/security/limits.conf
* soft nofile 819200
* hard nofile 819200
* soft nproc 2048
* hard nproc 4096

useradd es
es 源码包下载:
#安装jdk
yum install java -y
#下载es 安装包
wget https://artifacts.elastic.co/downloads/elasticsearch/elasticsearch-6.5.1.tar.gz
# 解压安装包
tar xf elasticsearch-6.5.1.tar.gz
#
mv elasticsearch-6.5.1 /usr/local/elasticsearch-node-1
cp -a /usr/local/elasticsearch-node-1 /usr/local/elasticsearch-node-2
#创建数据和日志目录
mkdir /els/{data-node-1,data-node-2,logs-node-1,logs-node-2} -p
#赋予es用户权限
chown es.es -R /usr/local/elasticsearch-node-*
chown es.es /els -R
es nodes 1配置文件:
# egrep -v "^$|^#" elasticsearch.yml
cluster.name: es-s3-test
node.name: es-node-1
path.data: /els/data-node-1
path.logs: /els/logs-node-1
network.host: 172.31.11.46
http.port: 9200
transport.tcp.port: 9300
discovery.zen.ping.unicast.hosts: ["172.31.11.46:9301","172.31.11.46:9300"]
discovery.zen.minimum_master_nodes: 2 #该配置为es节点数/2+1(为防止脑裂)
es node 2 配置文件:
# egrep -v "^$|^#" elasticsearch.yml
cluster.name: es-s3-test
node.name: es-node-2
path.data: /els/data-node-2
path.logs: /els/logs-node-2
network.host: 172.31.11.46
http.port: 9201
transport.tcp.port: 9301
discovery.zen.ping.unicast.hosts: ["172.31.11.46:9301","172.31.11.46:9300"]
discovery.zen.minimum_master_nodes: 2 #该配置为es节点数/2+1(为防止脑裂)
es jvm设置:
vim jvm.options

# Xms represents the initial size of total heap space
# Xmx represents the maximum size of total heap space

-Xms1g
-Xmx1g
es 启动:
su - es -c "/usr/local/elasticsearch-node-1/bin/elasticsearch -d"
su - es -c "/usr/local/elasticsearch-node-2/bin/elasticsearch -d"
Elasticsearch head 安装
首先下载head插件:
下载链接:https://github.com/mobz/elasticsearch-head
点击右下角的 Download ZIP
接下来是解压和安装步骤:
# 解压包
unzip elasticsearch-head-master.zip
cd elasticsearch-head-master

#修改配置
vim elasticsearch-head-master/Gruntfile.js
                connect: {
                        server: {
                                options: {
                                        port: 9100,
                                        hostname: '*',
                                        base: '.',
                                        keepalive: true
                                }
                        }
                }

#添加hostname行


#安装nodejs
curl -sL https://rpm.nodesource.com/setup_8.x | bash -
yum install -y nodejs

#安装grunt
npm install -g grunt-cli
npm install

#启动 head 插件
grunt server

#es 的配置文件最后添加两行
http.cors.enabled: true
http.cors.allow-origin: "*"
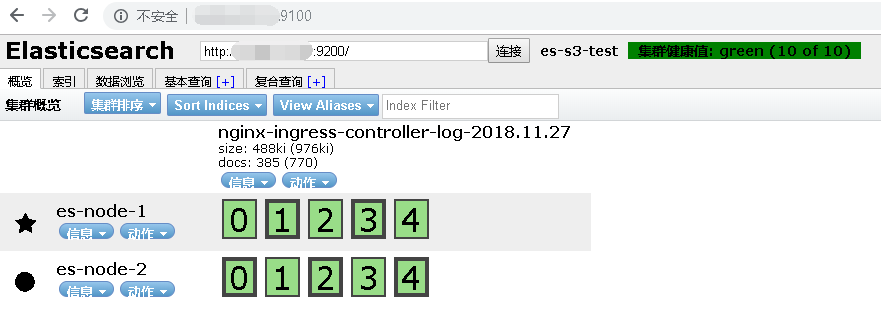
访问 http://IP:9100,页面就可以打开了。
本文来自博客园, 作者:Star-Hitian, 转载请注明原文链接:https://www.cnblogs.com/Star-Haitian/articles/10026339.html


 浙公网安备 33010602011771号