
备注现时状态
[root@oracle-db2 ~]# cat /etc/sysctl.conf
# Kernel sysctl configuration file for Red Hat Linux
#
# For binary values, 0 is disabled, 1 is enabled.  See sysctl(8) and
# sysctl.conf(5) for more details.

# Controls IP packet forwarding
net.ipv4.ip_forward = 0

# Controls source route verification
net.ipv4.conf.default.rp_filter = 1

# Do not accept source routing
net.ipv4.conf.default.accept_source_route = 0

# Controls the System Request debugging functionality of the kernel
kernel.sysrq = 0

# Controls whether core dumps will append the PID to the core filename.
# Useful for debugging multi-threaded applications.
kernel.core_uses_pid = 1

# Controls the use of TCP syncookies
net.ipv4.tcp_syncookies = 1

# Disable netfilter on bridges.
net.bridge.bridge-nf-call-ip6tables = 0
net.bridge.bridge-nf-call-iptables = 0
net.bridge.bridge-nf-call-arptables = 0

# Controls the default maxmimum size of a mesage queue
kernel.msgmnb = 65536

# Controls the maximum size of a message, in bytes
kernel.msgmax = 65536

# Controls the maximum shared segment size, in bytes
kernel.shmmax = 68719476736

# Controls the maximum number of shared memory segments, in pages
kernel.shmall = 4294967296
fs.aio-max-nr = 1048576

fs.file-max = 6815744

kernel.shmmni = 4096

kernel.sem = 250 32000 100 128

net.ipv4.ip_local_port_range = 9000 65500

net.core.rmem_default = 262144

net.core.rmem_max = 4194304

net.core.wmem_default = 262144

net.core.wmem_max = 1048586
[root@oracle-db2 ~]#

复制代码
二、修改实例2的SGA(10.10.0.18)
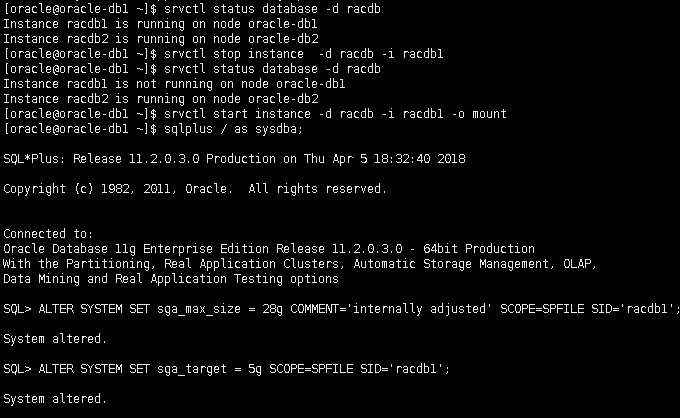
1、检查实例,确定各个实例均运行正常:srvctl status database -d racdb

2、开始关闭实例2:srvctl stop instance -d racdb -i racdb2

3、检查实例,确定实例2已关闭,确定一个数据库实例时候业务正常:srvctl status database -d racdb

4、db 2上启动数据库到mount状态:srvctl start instance -d racdb -i racdb2 -o mount

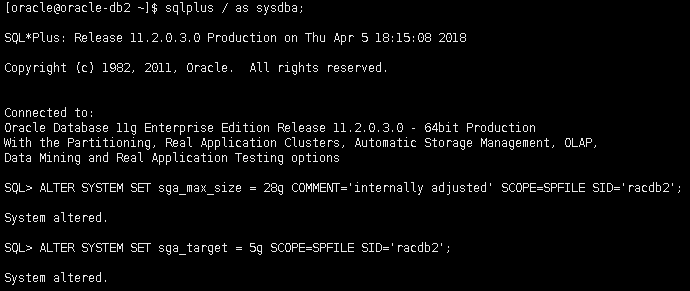
5、修改实例2的sga_max_size到8G:
sqlplus / as sysdba;
ALTER SYSTEM SET sga_max_size = 28g COMMENT='internally adjusted' SCOPE=SPFILE SID='racdb2'
修改db2的sga_target到5G:ALTER SYSTEM SET sga_target = 5g SCOPE=SPFILE SID='racdb2'
6、关闭实例2:srvctl stop instance -d racdb -i racdb2
7、启动实例2:srvctl start instance -d racdb -i racdb2 open

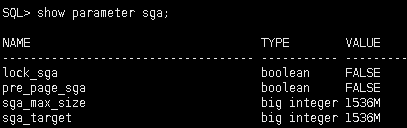
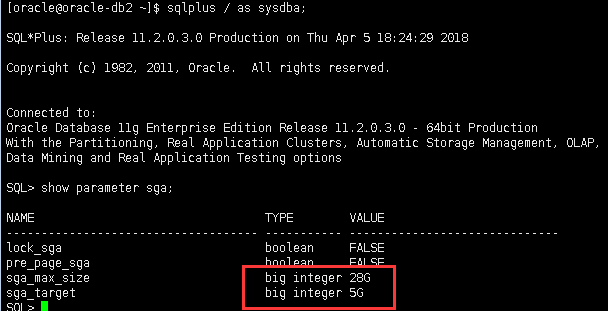
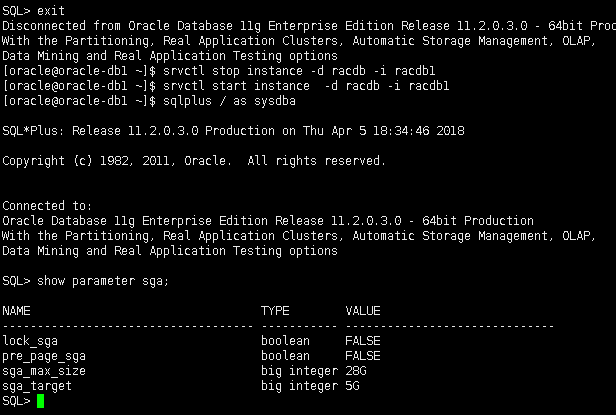
8、查看实例2的SGA信息:
sqlplus / as sysdba;
show parameter sga;
同样的方法修改实例1的SGA
备注:
1、如果在实例启动时﹐ SGA_MAX_SIZE < SGA_TARGET 或SGA_MAX_SIZE没设定﹐则启动后SGA_MAX_SIZE的值会等于SGA_TARGET的值。
2、SGA占数据库使用总内存的80%,PGA占数据库使用内存的20%(例如总物理内存4GB,PGA则需要占用约655MB)
建议计算公式
(1)OLTP系统:
SGA_TARGET = (total_mem * 0.8) * 0.8
PGA_AGGREGATE_TARGET=(total_mem * 0.8) * 0.2
(2)OLAP(DSS)系统:
SGA_TARGET= (total_mem * 0.8) * 0.5
PGA_AGGREGATE_TARGET =(total_mem * 0.8) * 0.5
3、shmall 是全部允许使用的共享内存大小,shmmax 是单个段允许使用的大小。这两个可以设置为内存的 90%。例如 16G 内存,16*1024*1024*1024*90% = 15461882265,shmall 的大小为 15461882265/4k(getconf PAGESIZE可得到) = 3774873。(15461882265/1024/4=3774873)
修改 /etc/sysctl.conf
kernel.shmmax=15461882265
kernel.shmall=3774873
kernel.msgmax=65535
kernel.msgmnb=65535
4、kernel.shmall该参数控制系统一次可以使用的共享内存总量(以页为单位,一页4k=4098),这个值的设定需要根据kernel.shmmax 大小来确定
kernel.shmall = 2097152 就是 2097152*4098= 8G 即最大一次可用8G的内存(这个在调整SGA时需要注意,SGA大小设置不可超过该值)
该值默认 2097152 ,但根据系统内存大小和使用的不同可以参考如下:
kernel.shmall = 2097152 ---内存8G
kernel.shmall = 4194304 ---内存16G
kernel.shmall = 8388608 ---内存32G

 浙公网安备 33010602011771号