
Spring SpringMVC Mybaits的整合
整合思路
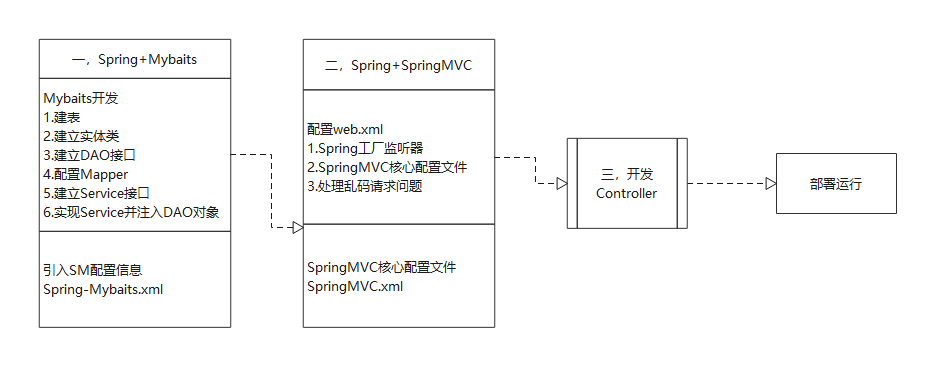
大体分为三步开发
更为详细的可以参考之前的Spring笔记的Spring和Mybatis的整合
这里只是加入Service层调用DAO层的一些实现
以及Mybaits的配置
配置Spring SpringMVC也同样可以参考之前的笔记
这里只是打通这个流程方便快速查阅,非常简单只不过是对之前的知识进行联系和衔接而已,建议自己多搭建几次熟悉流程
1.Spring和Mybaits的整合
1.建立数据库表
| ID | NAME | AGE | |
|---|---|---|---|
| XXX | XX | XXXXXXX | XX |
2.建立实体类
- 实体类成员变量要和数据库中字段保持一致
public class StudentBean {
    Integer id;
    String name;
    String email;
    Integer age;
    //节约篇幅 提供SET/GET方法
3.建立DAO接口
public interface StuentDAO {
    public void save(StudentBean student);
    public List<StudentBean> findAll();
}
4.配置Mapper
<?xml version="1.0" encoding="UTF-8" ?>
<!DOCTYPE mapper
        PUBLIC "-//mybatis.org//DTD Mapper 3.0//EN"
        "http://mybatis.org/dtd/mybatis-3-mapper.dtd">
<mapper namespace="com.Dao.StuentDAO">
    <!--save-->
    <insert id="save" parameterType="com.Entiry.StudentBean">
        insert into student (id,name,email,age) values( #{id},#{name},#{email},#{age})
    </insert>
    <!--findall-->
    <select id="findAll" resultType="com.Entiry.StudentBean">
        select * from student
    </select>
</mapper>
5.建立Service接口
public interface StuentService {
    List<StudentBean>Findall();
    void save(StudentBean studentBean);
}
6.编写Service接口的实现类
@Service("studentimpl")
public class StudentImpl implements StuentService{
    @Autowired
    private StuentDAO stuentDAO;
    @Override
    public List<StudentBean> Findall() {
        return stuentDAO.findAll();
    }

    @Override
    public void save(StudentBean studentBean) {
        studentBean.setId(1);
        studentBean.setName("SY");
        stuentDAO.save(studentBean);
    }
}
7.引入SM配置文件
<!--指定注解扫描方式-->
<context:component-scan base-package="com"/>
<bean id="dataSourse" class="com.alibaba.druid.pool.DruidDataSource" >
<property name="username" value="root"/>
<property name="url" value="jdbc:mysql://localhost:3306/jdbc_test?useSSL=false&allowPublicKeyRetrieval=true&serverTimezone=UTC"/>
<property name="password" value="123456"/>
<property name="driverClassName" value="com.mysql.cj.jdbc.Driver"/>
</bean>
<bean id="sqlSessionFactoryBean" class="org.mybatis.spring.SqlSessionFactoryBean">
<!--指定数据源-->
<property name="dataSource" ref="dataSourse"/>
<!--类型别名,日后直接用类名充当-->
<property name="typeAliases" value="com.Entiry.StudentBean"/>
<!--指定Mapper位置-->
<property name="mapperLocations" >
<list>
<value>
<!--通配写法,按照这个命名规范书写-->
classpath:Mapper/*Mapper.xml
</value>
</list>
</property>
</bean>
<bean id="scanner" class="org.mybatis.spring.mapper.MapperScannerConfigurer">
<!--对应上面的SqlSessionFactoryBean的名字-->
<property name="sqlSessionFactoryBeanName" value="sqlSessionFactoryBean"/>
<!--MapperScannerConfigurer到DAO下的包自动的找到对应DAO接口来创建对象-->
<!--注意!在通过Spring工厂获取对象时使用的时接口名首字母小写,我们在接口命名时就需要约定接口名首字母大写-->
<property name="basePackage" value="com.Dao"/>
</bean>
</beans>
2.Spring和SpringMVC的整合
1.配置web.xml
<web-app>
  <display-name>Archetype Created Web Application</display-name>
    <!--Spring工厂监听器-->
  <listener>
    <listener-class>org.springframework.web.context.ContextLoaderListener</listener-class>
  </listener>
  <context-param>
    <param-name>contextConfigLocation</param-name>
    <param-value>classpath:Spring*.xml</param-value>
  </context-param>
    <!--SpringMVC核心配置文件-->
  <servlet>
    <servlet-name>SpringMVC</servlet-name>
    <servlet-class>
      org.springframework.web.servlet.DispatcherServlet
    </servlet-class>
    <init-param>
      <param-name>contextConfigLocation</param-name>
      <param-value>classpath:SpringMVC.xml</param-value>
    </init-param>
    <!--SpringMVC字符处理-->
  </servlet>
  <servlet-mapping>
    <servlet-name>
      SpringMVC
    </servlet-name>
    <url-pattern>/</url-pattern>
  </servlet-mapping>
  <filter>
    <filter-name>charset</filter-name>
    <filter-class>org.springframework.web.filter.CharacterEncodingFilter</filter-class>
    <init-param>
      <param-name>encoding</param-name>
      <param-value>UTF-8</param-value>
    </init-param>
  </filter>
  <filter-mapping>
    <filter-name>charset</filter-name>
    <url-pattern>/*</url-pattern>
  </filter-mapping>

</web-app>
2.SpringMVC的核心配置文件
<context:component-scan base-package="com"/>
<mvc:annotation-driven/>
 <bean class="org.springframework.web.servlet.view.InternalResourceViewResolver" id="internalResourceViewResolver">
<property name="prefix" value="/"/>
<property name="suffix" value=".jsp"/>
</bean>
3.开发Contoller和视图
1.Controller
@Controller
@RequestMapping(value = "stuController")
public class StudentController {
        SqlSession sqlSession = null;
    	//注入Service对象
        @Autowired
        private StuentService service;
    	//查询所有操作
        @RequestMapping(value = "findall")
    public String findall(HttpServletRequest request){
        List<StudentBean>findall=service.Findall();
        request.setAttribute("findall",findall);
        return  "findall";
    }
   		 //插入操作
    @RequestMapping(value = "addinfo")
    public String add(StudentBean studentBean){
            try {
                service.save(studentBean);
                return  "redirect:/stuController/findall";
            }catch (Exception e)
            {
                e.printStackTrace();
                sqlSession.rollback();
                return "redirect:/Add.jsp";
            }

    }
}
2.视图
查询所有的视图
<html>
<head>
    <title>Title</title>
</head>
<body>
    <!--JSTL遍历-->
<c:forEach items="${requestScope.findall}" var="fa">
    ${fa.name}==${fa.id}==${fa.age}==${fa.email}<br>
</c:forEach>
</body>
</html>
添加视图
<head>
    <title>Title</title>
</head>
<body>
<form action="${pageContext.request.contextPath}/stuController/addinfo" method="post">
    用户名:<input type="text" name="name"/><br>
    id:<input type="text" name="id"/><br>
    email:<input type="text" name="email"/><br>
    年龄:<input type="text" name="age"/><br>
    <input type="submit" value="confirm">
</form>
</body>
</html>

 浙公网安备 33010602011771号