


安装vue.js。
1、安装node.js,有自带的npm管理工具
2、由于官网的链接在国外下载比较慢,可使用淘宝镜像(https://npm.taobao.org/)。
$ npm install -g cnpm --registry=https://registry.npm.taobao.org
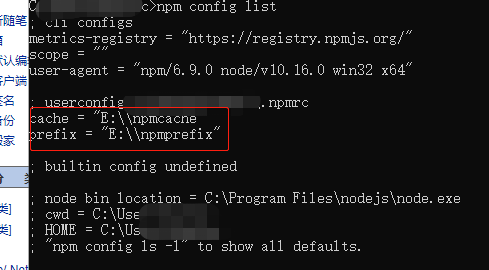
3、设置npm的全局模块存放的地址和缓存存放地址
npm config set prefix "c:\Program Files\nodejs\node_global"
npm config set cache "c:\Program Files\nodejs\node_global"
4、安装vue-cli:脚手架
全局安装->npm install -g vue-cli
切换到需要创建的目录下执行:vue init webpack projectName
(如vue命令提示不存在命令,可用以下命令查看prefix地址,找到vue.cmd目录,讲目录存放在系统环境变量中,如何设置环境变量就不细说)
前端UI:ELEMENT npm install element-ui --save-dev
5、vue-cli目录

6、初始化安装依赖并运行
npm install
npm run dev 生成环境使用 npm run build命令
7、vue指令
<!-- v-text -->
    {{ vText }}
    <!-- v-if/v-else-if/v-else -->
    <div v-if="vIf>5">v-if</div>
    <div v-else-if="vIf >2">v-else-if</div>
    <div v-else>v-else</div>
    <hr/>
    <!--
      v-html 将值中带html元素进行渲染
      v-text 当普通值输出
    -->
    <p>Using mustaches: {{ vHtml }}</p>
    <p>Using v-html directive: <span v-html="vHtml"></span></p>
    <hr/>
    <!--
      v-show 更改的css display样式
      v-if  只用条件满足时渲染
     -->
     <h1 v-show="1!=1">Hello!</h1>
    <!-- v-for
      只支持:Array|Object|number | String |Iterable
      v-for 不能与v-if一起使用
      <div v-for="(item, index) in items"></div>
      <div v-for="(val, key) in object"></div>
      <div v-for="(val, name, index) in object"></div>
      :key 特性为项提供唯一标识
     -->
    <ol>
      <li v-for="t in vFor" v-show="vIf==1" :key="t.id">
        {{ t.text }}
      </li>
      <li v-show="vIf==2"  v-for="(value,name) in object" :key="value">
        {{ name }}-{{ value.id}}-{{ value }}-
      </li>
      <li v-show="vIf==3"  v-for="(value,key) in vFor" :key="value.key">
        {{ key }}-{{ value.id}}-{{ value }}-
      </li>
      <li v-show="vIf==4"  v-for="(val, name, index) in object">
        {{ index }}-{{ name}}-{{ val }}-
      </li>
    </ol>
* v-model
 <!-- v-model
      主要用于表单控件<input><textarea><select>

    -->
    <input v-model="vHtml" placeholder="edit me">
    <p>Message is: {{ vHtml }}</p>
    <!-- 单选框 -->
    <!-- <input type="checkbox" id="checkbox" v-model="vIf">
    <label for="checkbox">{{ vIf }}</label> -->
    <!-- 复选框 -->
    <input type="checkbox" id="jack" value="Jack" v-model="checkedNames">
    <label for="jack">Jack</label>
    <input type="checkbox" id="john" value="John" v-model="checkedNames">
    <label for="john">John</label>
    <input type="checkbox" id="mike" value="Mike" v-model="checkedNames">
    <label for="mike">Mike</label><br/>
    <span>Checked names: {{ checkedNames }}</span>

    <select v-model="checkedNames" multiple>
      <option v-for="option in vFor" v-bind:value="option.id">
        {{ option.text }}
      </option>
    </select>
    <span>Selected: {{ checkedNames }}</span>
* v-on
<!-- v-on 监听HTML事件
      可以简写为@名称
      事件修饰符:
      .stop 阻止单击事件继续传播
      .prevent 提交事件不再重载页面
      .capture
      .self
      .once
      .passive
    -->
    <div>
      <button @click="doThis">v-on</button>
      <!-- 内联语句 -->
      <button @click="doThis('111')">v-on</button>
      <!-- 停止冒泡 -->
      <button @click.stop="doThis">v-on</button>
      <!-- 阻止默认行为 -->
      <button @click.prevent="doThis">v-on</button>
      <!-- 阻止默认行为,没有表达式 -->
      <form @submit.prevent>v-on</form>
      <!--  串联修饰符 -->
      <button @click.stop.prevent="doThis">v-on</button>
      <!-- 键修饰符,键别名 -->
      <input @keyup.enter="doThis">
      <!-- 键修饰符,键代码 -->
      <input @keyup.13="doThis">
      <!-- 点击回调只会触发一次 -->
      <button v-on:click.once="doThis">v-on</button>
      <!-- 对象语法 (2.4.0+) -->
      <button v-on="{ mousedown: doThis, click: doThat }">v-on</button>
      <!-- 提交事件不再重载页面 -->
      <form v-on:submit.prevent="doThis">submit.prevent</form>
      <!-- 修饰符可以串联 -->
      <a v-on:click.stop.prevent="doThat">click.stop.preven</a>
      <!-- 添加事件监听器时使用事件捕获模式 -->
      <!-- 即元素自身触发的事件先在此处理,然后才交由内部元素进行处理 -->
      <div v-on:click.capture="doThis">click.captur</div>

      <!-- 只当在 event.target 是当前元素自身时触发处理函数 -->
      <!-- 即事件不是从内部元素触发的 -->
      <div v-on:click.self="doThat">click.self</div>
      <!-- 滚动事件的默认行为 (即滚动行为) 将会立即触发 -->
      <div v-on:scroll="onScroll" style="height:50px;overflow-y: scroll;">
        scroll.passive<br/>
        scroll.passive<br/>scroll.passive<br/>scroll.passive<br/>scroll.passive<br/>scroll.passive<br/>
      </div>
      <input v-on:keyup.page-down="doThat">
    </div>
*
8、vue生命周期中的钩子函数
beforeCreate(){//在实例初始化之后
        console.log('beforeCreate');
    },
    created(){//在实例创建完成后被立即调用
        console.log('created');
    },
    beforeMount(){//在挂载开始之前被调用
        console.log('beforeMount');
    },
    mounted(){//el 被新创建的 vm.$el 替换,并挂载到实例上去之后调用该钩子
        console.log('mounted');
        this.doThis();
    },
    beforeUpdate(){//数据更新时调用,发生在虚拟 DOM 打补丁之前
        console.log('beforeUpdate');
    },
    updated(){//由于数据更改导致的虚拟 DOM 重新渲染和打补丁,在这之后会调用该钩子。
        console.log('updated');
    },
    beforeDestroy(){//实例销毁之前调用。在这一步,实例仍然完全可用
        console.log('beforeDestroy');
    },
    destroyed(){//Vue 实例销毁后调用
        console.log('destroyed');
    },
    errorCaptured(){//当捕获一个来自子孙组件的错误时被调用
        console.log('errorCaptured');
    }
9、组件的使用
1)全局调用,
Vue.component('my-component-name', { // ... 选项 ... })
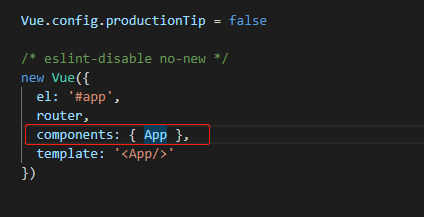
在vue-cli项目中main.js
2)局部调用
import ButtonCounter from '../components/ButtonCounter'

export default {
  name: 'HelloWorld',
  data () {}
  components:{
    ButtonCounter
  }
}
3)父级传值给子级组件
* 在自己vue props: ['title',...],可以自定参数的属性
props: {
    // 基础的类型检查 (`null` 和 `undefined` 会通过任何类型验证)
    propA: Number,
    // 多个可能的类型
    propB: [String, Number],
    // 必填的字符串
    propC: {
      type: String,
      required: true
    },
    // 带有默认值的数字
    propD: {
      type: Number,
      default: 100
    },
    // 带有默认值的对象
    propE: {
      type: Object,
      // 对象或数组默认值必须从一个工厂函数获取
      default: function () {
        return { message: 'hello' }
      }
    },
    // 自定义验证函数
    propF: {
      validator: function (value) {
        // 这个值必须匹配下列字符串中的一个
        return ['success', 'warning', 'danger'].indexOf(value) !== -1
      }
    }
  }
* 父级插入子级组件:<ButtonCounter :title ="'111111'"></ButtonCounter>
4)子级传值给父级
* 在自己的事件中定义 this.$emit('enlarge-text', 0.1)
* 父级使用
<template>
    <button-counter @enlarge-text="onEnlargeText"  :title ="'333'"></button-counter>
</template>

import ButtonCounter from '../components/ButtonCounter'

export default {
  name: 'HelloWorld',
  data () {}
  components:{
    ButtonCounter
  }
}
10、插槽的使用
11、js模拟双向绑定数据
    <div id="app">
        {{ message }}
        <span v-bind:title="message">
            鼠标停留
        </span>
        <!-- v-if -->
        <p v-if="seen">现在你看到我了</p>
        <input type="text" id="txt">
        <p id="show"></p>
        <!-- v-for -->
    </div>
    <script>
        var obj = {}
        Object.defineProperty(obj, 'txt', {
            get: function () {
                return obj
            },
            set: function (newValue) {
                document.getElementById('txt').value = newValue
                document.getElementById('show').innerHTML = newValue
            }
        })
        document.addEventListener('keydown', function (e) {
            obj.txt = e.target.value
        });
        document.addEventListener('keyup', function (e) {
            obj.txt = e.target.value
        })
    </script>
12、
