HttpRunnerManager接口测试平台部署在服务器上(Centos + python3.6 + Mysql5.7 + uwsgi + nginx)
整个思路:HttpRunnerManager + python3.6 + Mysql5.7 + uwsgi + nginx
安装依赖环境,将源代码传到服务器,修改settings,增加uwsgi配置,增加nginx配置并启动,用公网ip访问平台。
1.我这边是用的华为云服务器,系统是centos7.3,登录后,从安全组添加80和8000端口(nginx监听80端口用于访问,8000端口用于部署时的调试工作,部署完成后关闭8000端口)
2.下载了远程连接工具SSH Secure ,这个可以远程连接和上传/下载源代码,以及本地修改配置后上传,因为新手对vim不太熟悉,可以用这个工具,不过不建议,因为在部署的过程中用vim也能逐步熟悉vim和常用的命令。
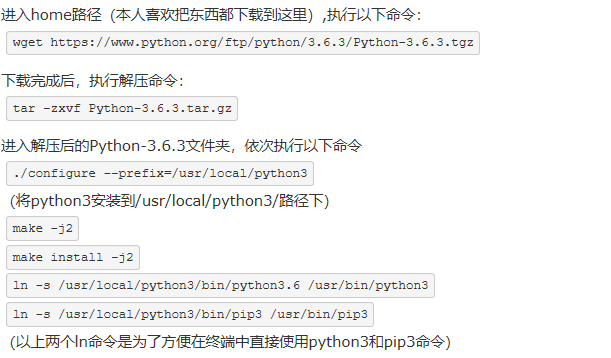
3.连接后安装python3,过程:下载安装包,解压,configure,make,make install,建立软连接。参考:https://www.cnblogs.com/levelksk/p/7921066.html
4.利用远程工具SSH secure上传源代码及requirement.txt, 并在服务器上安装依赖 pip3 install -r requirement.txt
5.安装mysql5.7,安装完成后,需要用如下命令拿到默认密码:grep 'temporary password' /var/log/mysqld.log
可以参考:https://blog.csdn.net/a394268045/article/details/79288718
安装完成后,登录mysql,创建所需的HttpRunner数据库:
CREATE DATABASE `HttpRunner` DEFAULT CHARACTER SET utf8 COLLATE utf8_general_ci;
并在源代码路径下修改HttpRunnerManager下的settings文件的sql部分(账号 秘密 数据库名等),顺便关闭debug模式:
DEBUG = False
ALLOWED_HOSTS = ["114.115.203.178",]
6.安装uwsgi,pip3 install uwsgi
7.安装nginx,pip install nginx
8.配置uwsgi和nginx的启动文件
uwsgi配置可以新建一个uwsgi.ini的文件放到项目根目录,配置如下:
[uwsgi]
#http= 0.0.0.0:8000

# Django-related settings

project = HttpRunnerManager-master 项目根目录
project1= HttpRunnerManager   项目settings和wsgi所在目录
base = /home  #源代码存放的服务器目录


chdir = %(base)/%(project)
module = %(project1).wsgi:application
env = DJANGO_SETTINGS_MODULE = %(base)/%(project)/%(project1).settings

master = true
processes = 5
#daemonize = wsgi.log

socket = %(base)/%(project)/%(project1).sock
chmod-socket = 666
vacuum = true
nginx配置:需要进入切换到/etc/nginx/ 目录,打开nginx.conf文件进行server部分配置添加如下:
    server {
        listen       80 default_server;     #默认监听端口
        listen       [::]:80 default_server;
        server_name  xxx.xxx.xxx.xxx;      #公网ip地址

        #root         /usr/share/nginx/html;
        root          /home/HttpRunnerManager-master;   #项目目录

        # Load configuration files for the default server block.
        include /etc/nginx/conf.d/*.conf;

            access_log /var/log/nginx/httprunnermanager_access.log; #增加正常日志
            error_log /var/log/nginx/httprunnermanager_error.log;  #增加异常日志

    #增加静态文件目录
        location /static/ {
            root /home/HttpRunnerManager-master;
            }

        location /media/ {
            root /home/HttpRunnerManager-master;
        }
    #连接到uwsgi
        location / {
            include         uwsgi_params;
            uwsgi_pass      unix:/home/HttpRunnerManager-master/HttpRunnerManager.sock;
        }

            error_page 404 /404.html;
        location = /40x.html {
        }

        error_page 500 502 503 504 /50x.html;
        location = /50x.html {
        }
    }
配置后先启动uwsgi,启动方式,进入uwsgi.ini文件所在目录,执行命令:uwsgi --ini uwsgi.ini ,如果需要在后台运行,可以加上-d
配置后启动nginx,启动方式,直接输入nginx即可。部署过程中,修改后需要重新启动服务,可以先杀掉端口然后重启,如fuser -k 80/tcp
或者:ps -ef|grep uwsgi 查到PID后使用kill -9 PID XXX
然后web登录,OK就说明部署成功了。然后将启动写入默认启动,关闭服务器的8000端口。本篇虽然没有说8000端口那些事,但实际情况是有先用uwsgi启动http连接确认源代码及配置是否正常,因为uwsgi只能单用户登录,所以加入nginx反向代理服务器。

然后还有rabbitMQ中间件后面再部署啦。 看起来是不是很简单,实则首次部署真的好多的坑。列举下我遇到的坑:
1. mysql安装后无法登录,因为不知道默认密码
2.python3安装错误位置导致覆盖在自带的python2目录下
3. 数据库从windows中备份,linux中部分数据无法导入
4.uwsgi安装后,执行命令报无此command,需要建立软链接
5.uwsgi nginx配置有部分后发现总是无法访问,报server internal error
6.uwsgi nginx配置,这部分我在这绕了很久,网上都写的很复杂而且有些有错误。
rabbitMQ中间件部分请移步:https://www.cnblogs.com/Sandy-1128/p/linux-sandy-0326.html

 浙公网安备 33010602011771号