NestJs 快速入门
npm i -g @nestjs/cli(以后更新用npm update -g @nestjs/cli),nest new car-report创建项目。src目录下的main.ts,监听3000端口,因此它是项目的入口文件,因为服务器都会监听一个端口。main.ts import了AppModule,但AppModule什么都没做,只是用@Module装饰。@Module接收一个对象,有三个属性,imports、controllers和providers。controllers用于注册控制器类,控制器来源于MVC架构,接受请求,返回响应。来到AppController,它装饰了@Controller,方法getHello装饰了@Get,怎么接受请求,返回响应的?@Get就是接受get请求,装饰到的方法处理请求,方法参数接受请求参数,返回值就是响应。请求的路径是@Controller()和@Get()参数的拼接,相当于以下express.js路由
app.get('/', (req, res) => "Hello World!") // @Controller()和@Get()都没有参数,那就是根URL
所以在Nest.js中,处理请求就是写一个@Controller() 装饰的类,用@Get,@Post定义请求路径并装饰方法,方法中处理请求,然后把这个类注册到@Module的controllers中。providers中的类是一个用Injectable()装饰的纯TypeScript类,Injectable是可注入的,这涉及到依赖注入。A对象依赖B对象,但它不直接创建B对象,而是用参数声明它依赖B对象,使用A对象之前,要先把B对象注入进来。
class B { sayHello() {console.log( 'Hello World')} }

/*  不使用依赖注入 */
class A {
    constructor() {this.b = new B()} // 创建依赖的实例对象
    sayHello() { this.b.sayHello()}
}

(new A()).sayHello() // 直接使用A对象

/* 使用依赖注入 */
class A {
    constructor(b) {this.b = b;} // 声明使用的依赖,没有创建依赖对象
    sayHello() { this.b.sayHello()}
}

const b = new B();
const a = new A(b) // 创建A对象时,要把它的依赖注入进去
a.sayHello() // 再调用A对象的方法
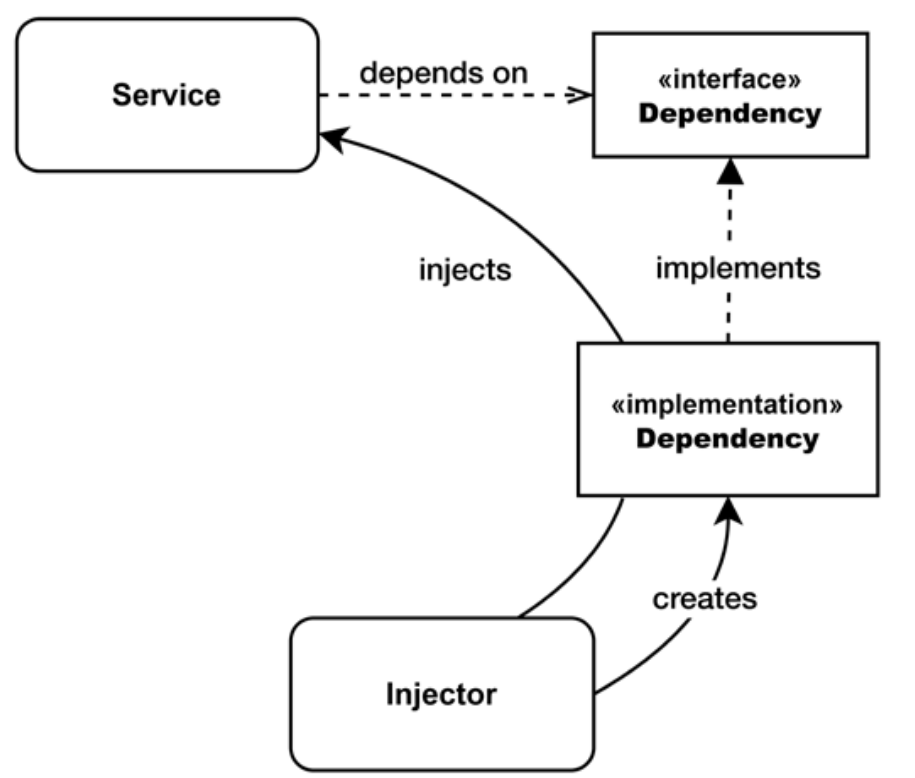
依赖的创建和注入通常由容器处理,NestJs就实现了这么一个容器。如下图所示,Service类只声明了它依赖特定接口的dependency, injector(容器)创建了一个实现接口的实例,把它注入到service中。
AppController中构造函数,
constructor(private readonly appService: AppService) {}
就声明它需要Appservice实例,provider中的AppService正好是可注入的。NestJs就会创建AppService类的对象,然后在创建Controller对象时注入进来。其实这是简写版的依赖注入,构造函数的完整版如下所示
constructor(@Inject(AppService) private readonly appService: AppService) {}
@inject(AppService)表示注入AppService这个token指定的实例,只是@Inject中的参数和方法参数都是AppService,前面的@Inject(AppService)被省略了。@inject引出了providers的完整版,它是一个对象,一个key是provide,表示提供什么,值是一个token标示符,用于@inject。另一个key是useValue或useClass或useFactory,值分别是value,类和工厂方法。
providers: [{provide: AppService, useClass: AppService}],
provide的值和useClass的值一样,就简写了。当NestJs遇到@inject(token)后,就找provide中的这个token,然后用useValue指定的值,或useClass指定的类的实例对象,或useFactory返回的对象(工厂方法创建对象),来注入到@Inject(token)修饰的参数。
写一个登录注册模块。在服务端开发时,controller负责接受客户端请求,service负责处理业务逻辑,repository负责和数据库打交道,controller调用service,service调用repository。新建users目录,里面users.module.ts,users.controller.ts,users.service.ts, users.repository.ts。controller调用service,依赖service, users.controller.ts
import { Controller, Get, Post } from '@nestjs/common';
import { UsersService } from './users.service';

@Controller('users')
export class UsersController {
    constructor(private usersService: UsersService) { } // 声明需要的依赖

    @Post('/signup')
    async createUser() { }

    @Post('/signin')
    async singin() { }

    @Get('/:id')
    async getUser() { }
}
先看createUser,Post请求接受请求体,返回创建的User。Express.js中有请求对象和响应对象来获取它们。在Nest.js中,方法的参数用@Req和@Res进行装饰,就变了请求对象和响应对象。
async createUser(@Req() request: Request, @Res() response: Response) {
    const body = request.body;
    response.json({body})
}
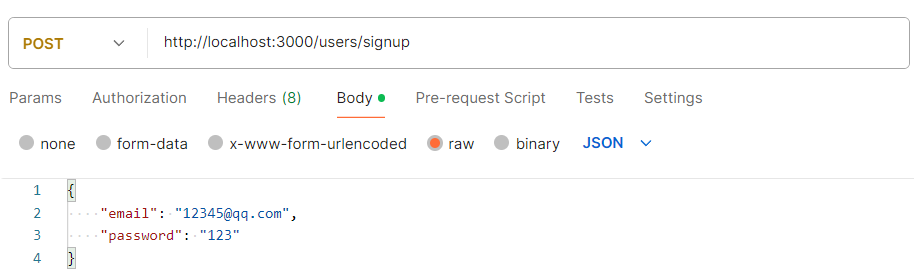
更简单的,用@Body装饰方法的参数,直接获取请求体,函数直接返回对象。请求体需要约定传递什么参数,参数是什么类型。那就定义一个类来描述,方法的参数就是这个类类型。创建用户需要email和password, user目录下创建User.ts(User类),有email 和password属性
export class User { email: string; password: string}
然后,createUser参数就是User类型。
async createUser(@Body() body: User) {
    await this.usersService.create(body.email, body.password)
    return { message: 'create successfully'}  // 当controller的方法返回对象或数组时,会序列化为json
}
默认情况下,NestJS会自动解析传入的JSON请求体,然后创建一个User对象,把解析出来的数据赋值给对象,再把对象赋值给user参数。最好对请求体进行验证,使用ValidationPipe。它利用 class-validator包进行声明式验证,npm install class-validator class-transformer, User类添加验证
import { IsNotEmpty, IsString } from "class-validator";
export class User {
    @IsString()
    @IsNotEmpty()
    // @IsNotEmpty({ groups: ['create'] }) groups限制 @IsNotEmpty() 规则何时应用。仅当{ groups: ['create']显式传递到验证管道时才会执行验证。
    email: string;

    @IsString()
    @IsNotEmpty()
    password: string;
}
可以@Body(new ValidationPipe()) 验证单个请求,但最好对每个请求都验证,使用全局验证。useGlobalPipes对所有的请求都应用它包含的pipe。当然,参数类型要添加验证规则,要不然也没办法验证。main.ts
import { ValidationPipe } from "@nestjs/common";
async function bootstrap() {
  const app = await NestFactory.create(AppModule);
  app.useGlobalPipes(new ValidationPipe())
  await app.listen(3000);
}
pipe就是专门对请求数据进行验证和转换的,ValidationPipe是内置的一个pipe。users.service.ts创建UsersService类,添加create方法,servcie被依赖,所以它要被@Injectable()装饰,同时声明它的依赖repository
import { Injectable } from "@nestjs/common";
import { UserRepo } from "./users.repository";

@Injectable()
export class UsersService {
    constructor(private userRepo: UserRepo) { this.userRepo = userRepo } // 声明需要的依赖,
    async create(email: string, password: string) {
        return this.userRepo.create({ email, password, admin: true });
    }
}
repository需要操作数据库,通常使用ORM,比如Drizzle,

那就要创建drizzle实例。由于这个实例在整个应用都会用到,需要依赖注入到其他模块,但每个provider,都属于自己的模块(只能注册到@Module中的providers里面),怎么被其他模块使用?export出去。创建db目录,再创建db.module.ts。假设使用pg数据库,npm i drizzle-orm pg 和npm i -D @types/pg
import { Module } from '@nestjs/common';
import { Pool } from 'pg'
import { drizzle } from 'drizzle-orm/node-postgres';

export const DATABASE_CONNECTION = 'database_connection';
const dbProvider = {
    provide: DATABASE_CONNECTION,
    useValue: drizzle(new Pool({ user: 'postgres', host: 'localhost', database: 'postgres', password: '123456', port: 5432 }))
}

@Module({
    providers: [dbProvider],
    exports: [DATABASE_CONNECTION]
})
export class DBModule { }
一个模块使用另一个模块的功能,就要import另一个模块。@Module中的imports只能import模块,所以干啥都要创建模块。功能模块就创建provider,然后export出去。import一个模块,这个模块export出来的provider,就相当于自己模块写了这个provider,和本模块中的其他provider没有什么区别。在本模块中碰到@inject的token,就会注入进来。users.module.ts引入DBModule,顺便把controller和provider 都注册了,
import { Module } from '@nestjs/common';
import { DBModule } from 'src/db/db.module';
import { UsersController } from './users.controller';
import { UserRepo } from './users.repository';
import { UsersService } from './users.service';

@Module({
    imports: [DBModule], // 使用db模块的功能
    providers: [UsersService, UserRepo], //service和repository都是被注入,要在module的provider中,表明遇到哪个token才注入
    controllers: [UsersController]
})
export class UsersModule { }
创建schema.ts
import { integer, pgTable, varchar } from "drizzle-orm/pg-core";

export const usersTable = pgTable("users", {
  id: integer().primaryKey().generatedAlwaysAsIdentity(),
  password: varchar({ length: 10 }).notNull(),
  admin: integer().notNull(),
  email: varchar({ length: 255 }).notNull().unique(),
});
users.repository.ts
import { Inject, Injectable } from "@nestjs/common";

@Injectable()
export class UserRepo {
    constructor(@Inject('PG_CONNECTION') private db: any) { } // 注入数据库的连接实例
    async create({ email, password, admin }: any) {
        /* pg中创建users表
            CREATE TABLE users (id SERIAL PRIMARY KEY, email VARCHAR(50), password VARCHAR(50),admin BOOLEAN);
        */
const user: typeof usersTable.$inferInsert = {
    name: 'John',
    age: 30,
    email: 'john@example.com',
  };
await this.db.insert(usersTable).values(user); console.log('New user created!')const res =await this.db.insert(usersTable).values(user);
} }
整个Users模块开发完了,怎么使用?main.ts启动文件中只import了AppModule。AppModule的@Module装饰器中有import,可以引入其他module
import { Module } from '@nestjs/common';
import { UsersModule } from './users/users.module';

@Module({
  imports: [UsersModule]
})
export class AppModule {}
npm run start:dev启动服务,
登录singin,都会返回token,以后每一个请求都带有token,就知道谁在请求。npm install @nestjs/jwt。在UsersModule中,
import { JwtModule } from '@nestjs/jwt';
export const secret = 'addfsdsfdf'

imports: [TypeOrmModule.forFeature([Users]), JwtModule.register({secret,signOptions: { expiresIn: '1h' }})]
再UsersService中注入JwtService,实现signIn方法
import { JwtService } from '@nestjs/jwt';

async signIn(email: string, password: string) {
    const user = await this.userRepo.findOne({where: { email }});
    if (user?.password !== password) { throw new Error("登录失败");}
    return await this.jwtService.signAsync({ sub: user.id });
}
在UsersController 中
async singin(@Body() body: User) {
    const token = await this.usersService.signIn(body.email, body.password)
    return { access_token: token };
}
getUser方法,用户登录才能访问,没有登录不能访问,这些路由需要保护。这就用到guard,它有一个canActivate()方法, 返回true表示允许访问,可以继续到其它路由处理程序,返回false则拒绝访问,无法继续了。用户登录就是验证token,创建AuthGuard.ts
import { CanActivate, ExecutionContext, Injectable, UnauthorizedException } from '@nestjs/common';
import { JwtService } from '@nestjs/jwt';
import { secret } from './users.module';

@Injectable()
export class AuthGuard implements CanActivate {
    constructor(private jwtService: JwtService) { }

    async canActivate(context: ExecutionContext) {
        const request = context.switchToHttp().getRequest();
        const token = request.headers.authorization;
        if (!token) { throw new UnauthorizedException(); }

        try { await this.jwtService.verifyAsync(token,{secret}); }
        catch { throw new UnauthorizedException(); }
        return true;
    }
}
getUser方法,那就使用UseGuard进行保护
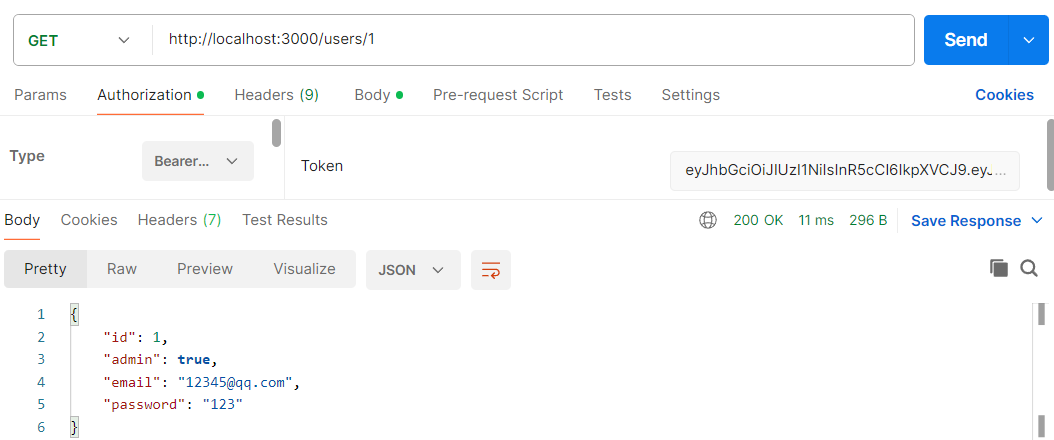
@Get('/:id')
@UseGuards(AuthGuard) // AuthGuard此时是方法作用域,位于整个模块的controller内,所以它里面的jwtService,能被注入这个模块注册的jwt provider
// @Param 有两种使用方式,不带参数,获取整个对象,带参数,获取指定的某个参数。// ParseIntPipe 把id转换成number类型。
async getUser(@Param('id', ParseIntPipe) id: number, @Param('sex') sex: string, @Param() all: any) {
    return await this.usersService.findOne(id);
}
userService实现findOne,
async findOne(id: number) {
    if (!id) throw new Error("没有id");
    return await this.userRepo.findOneBy({id});
}
返回值中有password,需要去掉,可以用拦截器。拦截器实现一个NestInterface,intercept方法中正常写,拦截请求,return next.handle() 拦截响应,对路由处理函数的返回值进行处理。它返回的是rxjs的observer,map中的data 就是路由处理器返回的data。创建serialInteceptor.ts
import { CallHandler, NestInterceptor } from "@nestjs/common";
import { map } from "rxjs";

export class SerializeIntercepter implements NestInterceptor {
    intercept(_, next: CallHandler<any>) {
        return next.handle().pipe( // pipe方法将多个操作符链接在一起,操作符对数据进行处理
            map(data => { // map操作符,类似数组中的map,对流中的每一个值进行处理,返回新值
                Reflect.deleteProperty(data, 'password'); // 删除password
                return data;
            })
        )
    }
}
getUser用userInterceptor.
@Get('/:id')
@UseGuards(AuthGuard)
@UseInterceptors(SerializeIntercepter)
async getUser(@Param('id', ParseIntPipe) id: number) {
    return await this.usersService.findOne(id);
}
可以把拦截器包起来,形成一个装饰器,serialInteceptor.ts
export function Serialize() {
    return UseInterceptors(SerializeIntercepter);
}
getUser 去掉@UseInterceptors(SerializeIntercepter), 直接使用@Serialize()。在以上方法中都抛出了异常,NestJs有一层Exception filter,当程序抛出了异常,而没有被捕获时,它会把异常转换成合适response,比如 throw NotFoundExeption, nextJs会返回404,not found。对exception 进行过滤,返回合适的响应。
TypeORM模块调用forRoot方法返回一个模块,这种模块称为动态模块,之所以动态,是因为它能接受参数,能配置,返回不同的内容。相应的,UsersModule是静态模块,模块功能是固定的。不管是静态还是动态,模块一旦创建,都是单例,存在某个地方,不全局可用(every module has its own set of imported modules in its scope)。
再创建一个report模块,一辆汽车的报告,用户创建它,admin 用户批准它。nest cli 提供了一些命令来创建module,controller和service, nest g module reports,nest g controller reports, nest g service reports,手动在reports目录建reports.entity.ts
import { Entity, Column, PrimaryGeneratedColumn, ManyToOne } from 'typeorm';

@Entity()
export class Report {
  @PrimaryGeneratedColumn()
  id: number;

  @Column({default: false})
  approved: boolean;

  @Column()
  price: number;

  @Column()
  year: number

  @Column()
  mileage: number
}
然后在AppModule 中,Typeorm的配置项entities中,添加Report
entities: [Users, Report],
用户创建report, createReport 中要知道用户的信息,admin批准report,那还要判断登录的用户是不是admin,如要不是,批准的api就不能被调用,需要创建AdminGuard。从客户端请求中,只能得到userId,所以其它信息还要从数据库里面取。这里要用到中间件,这是由中间件,guard,拦截器的执行顺序决定的。

在中间件中,调用userService,获取到用户信息,然后把信息添加到request对象上,后面执行的guard,拦截器,路由处理器都能获取到request对象上在user信息。在src目录下,创建current-user.middlewire.ts。 Middleware is great for tasks that do not involve decision-making concerning the continuation of the request-response cycle based on business logic. 中间件非常适合那些不涉及基于业务逻辑的请求-响应周期延续的决策的任务。
import { Injectable, NestMiddleware } from '@nestjs/common';
import { Request, Response, NextFunction } from 'express';
import { UsersService } from './users/users.service';
import { JwtService } from '@nestjs/jwt';
import { secret } from './users/users.module';

@Injectable()
export class CurrentUserMiddleware implements NestMiddleware {
    constructor(private user: UsersService, private jwtService: JwtService) { }

    async use(req: Request, res: Response, next: NextFunction) {
        const [, token] = req.headers.authorization?.split(' ') ?? [];
        if (token) {
            try {
                const result = await this.jwtService.verify(token, { secret });
                const user = await this.user.findOne(result.sub);
                // @ts-ignore
                req.currentUser = user;
            } catch (error) {
                console.log(error)
            }
        }
        next();
    }
}
中间件的使用比较特别,使用中间件的module要实现NestModule, 在configure中配置,比如在AppModule中配置中间件
import { CurrentUserMiddleware } from './current-user.middlewire';
import { MiddlewareConsumer, NestModule } from '@nestjs/common';

export class AppModule implements NestModule  {
  configure(consumer: MiddlewareConsumer) {
    consumer
      .apply(CurrentUserMiddleware)
      .forRoutes('*'); // 或for('/reports')
  }
}
由于中间件在AppModule中引入的,使用了UserService,UserModule还要exports 出去UserService。
@Module({
  // ....
  providers: [UsersService],
  exports: [UsersService]
})
export class UsersModule { }
现在createReport可以获取到user信息了,但怎么在report中保存user信息呢?这涉及到了关系,report和user有1对多的关系,
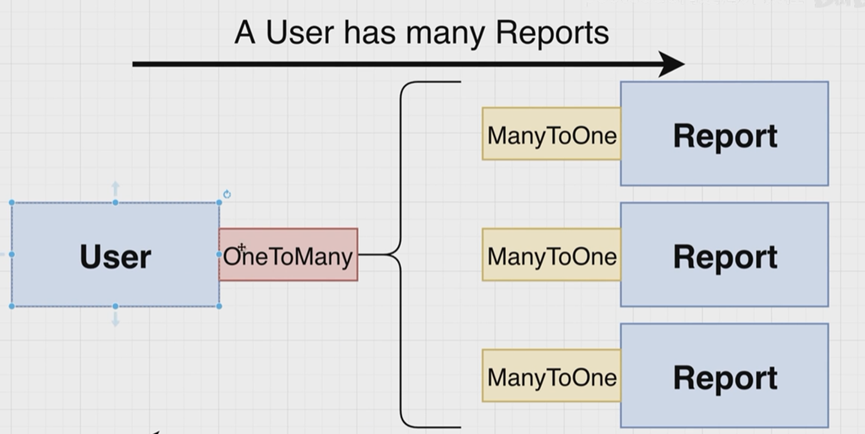
在user实体中, 添加属性
@Entity()
export class User {
  // ...
  @OneToMany(() => Report, (report) => report.user )
  reports: Report[] // 数组表示多个report
}
在report 实体添加属性
@Entity()
export class Report {
  // ...
  @ManyToOne(() => User, (user) => user.reports)
  user: User
}
oneToMany或ManyToOne为什么第一个参数是函数。这是因为,User Entity中使用Report Entity, Report Entity 中又使用User Entity,循环依赖了,不能直接使用,所以要用函数包起来,以后执行,而不是加载文件的时候执行。第二个函数参数的意思是关联的实体,返回值是定义的实体, 通过关联的实体report怎么找回到定义report的实体(User),report entity 有一个user字段,就是定义reports的实体(User实体中有reports属性)。Report实体有一个user字段,存储report时,给report的user属性赋值一个user实体,当真正存储到数据库时,会从user实体中取出id,存储到数据库。ReporstController
import { Body, Controller, Post, Req, UseGuards } from '@nestjs/common';
import { AuthGuard } from '../users/AuthGuard';
import { ReportsService } from './reports.service';

@Controller('reports')
export class ReportsController {
    constructor(private readonly reportsService: ReportsService) { }

    @Post()
    @UseGuards(AuthGuard)
    async createReport(@Body() body: any, @Req() req: any) { //body 的类型本来是一个DTO类型,简单起见,写了any
        const userReturn = await this.reportsService.create(body, req.currentUser)
        return userReturn
    }
}
ReportsService
import { Injectable } from '@nestjs/common';
import { InjectRepository } from '@nestjs/typeorm';
import { User } from 'src/users/users.entity';
import { Repository } from 'typeorm';
import { Report } from './reports.entity'

@Injectable()
export class ReportsService {
    constructor(
        @InjectRepository(Report)
        private reportsRepository: Repository<Report>,
    ) { }
    create(reportDto: any, user: User) {
        const report = this.reportsRepository.create(reportDto);
        // @ts-ignore
        report.user = user;
        return this.reportsRepository.save(report)
    }
}
由于在Service中注入了Report,所以在ReportsModule中 imports: [TypeOrmModule.forFeature([Report])],
repository的save方法把整个关联的user 实体都返回了。还有就是controller 接收了@req参数,能不能也像@Body一样,直接获取user?这要自定义一个参数装饰器createParaDecorator. 在src目录下,currentUser.ts
import {createParamDecorator, ExecutionContext} from '@nestjs/common'

export const CurrentUser = createParamDecorator(
    (data: never, context: ExecutionContext) => {
        const request = context.switchToHttp().getRequest();
        return request.currentUser
    }
)
controller
import { CurrentUser } from '../currentUser';
import { User } from '../users/users.entity';

@Post()
@UseGuards(AuthGuard)
async createReport(@Body() body: any,  @CurrentUser() user: User) {
    const userReturn = await this.reportsService.create(body, user)
    // @ts-ignore
    const newUser = { ...userReturn, userId: userReturn.user.id };
    // @ts-ignore
    delete newUser.user;
    return newUser
}
现在写一个approve, 就是把report的approve属性,改成true. 它需要admin权限,写一个AdminGuard。在report目录下,admin.guard.ts
import { CanActivate,  ExecutionContext} from '@nestjs/common'

export class AdminGuard implements CanActivate {
    canActivate(context: ExecutionContext): boolean {
        const request = context.switchToHttp().getRequest();
        if(!request.currentUser) {
            return false
        }

        if(request.currentUser.admin) {
            return true
        } else {
            return false
        }
    }
}
ReportsController 添加一个patch 路由
@Patch('/:id')
@UseGuards(AdminGuard)
async approveReport(@Param('id') id: number, @Body() body: { approved: boolean }) {
    return await this.reportsService.changeApproval(id, body.approved);
}
ReportsService 添加 changeApproval 方法
async changeApproval(id: number, approved: boolean) {
    const report = await this.reportsRepository.findOne({ where: { id } })
    if (!report) {
        throw new NotFoundException('not found')
    }

    report.approved = approved;

    return this.reportsRepository.save(report)
}
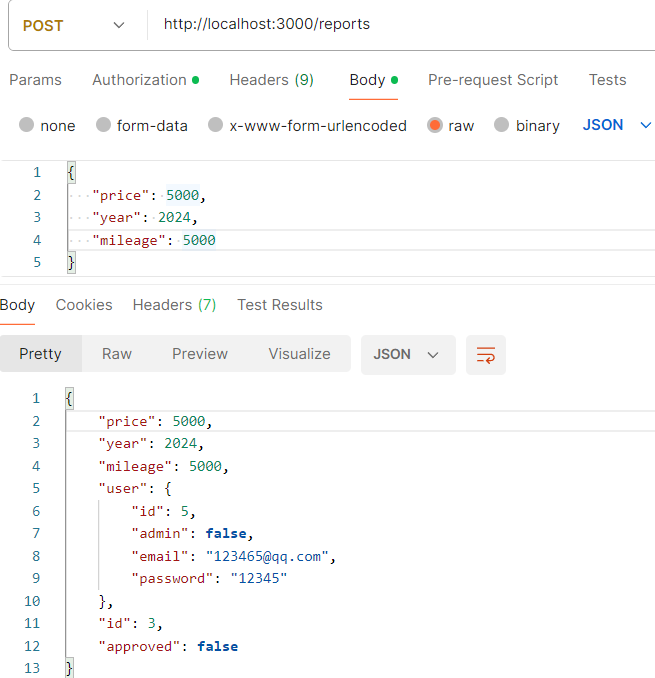
当查询条件比较复杂的时候,就不能简单地用findOne和find了,就要使用createQueryBuilder,比如查询price是5000, mileage 也是5000等。在Controller 中,
@Get()
async getOneReport() {
   return this.reportsService.getReport();
}
在Service 中
async getReport() {
  return await this.reportsRepository.createQueryBuilder('report')
        .where('report.price= :price', {price: 5000})
        .andWhere("report.mileage = :mileage", { mileage: 5000 })
        .getOne()

}
当fetch reprot时,不会自动fetch user。同样的,当fetch user的时候,也不会自动fetch report。
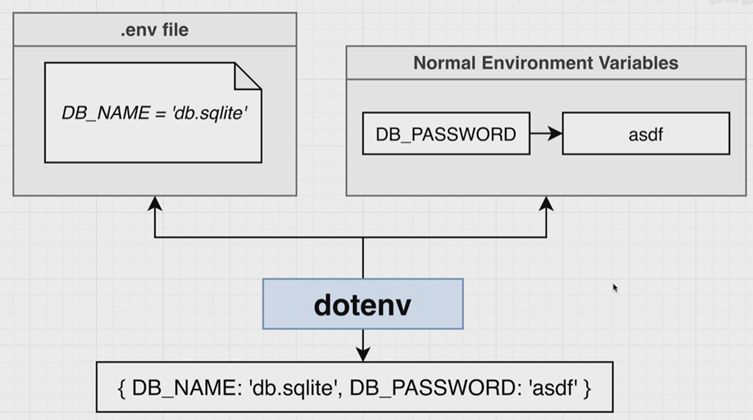
配置环境变量,npm i @nestjs/config, @nestjs/config内部使用dotenv。Dotenv的目的是, 把不同的环境变量(命令行定义的环境变量, .env 文件定义的环境变量)收集起来, 形成一个对象(process.env),返回给你。 如果各个方法定义的环境变量有冲突,命令行中定义的优先级高。
"start:dev": "cross-env ENV=dev nest start --watch",
"start:prod": "cross-env ENV=prod node dist/main",
app.setGlobalPrefix('api');
app.getHttpAdapter().get('/', (req, res: Response) => res.send('ok'));
const uploadsPath = join(__dirname, '../../uploads');
app.useStaticAssets(uploadsPath, {
prefix: '/uploads/',
});
A good approach for using this technique in Nest is to create a ConfigModule that exposes a ConfigService which loads the appropriate .env file.
@nestjs/config 提供了依赖注入的功能。 每一个环境不同的.env 文件,然后,configroot.forRoot() 加载不同的配置文件(命令行配置env环境变量),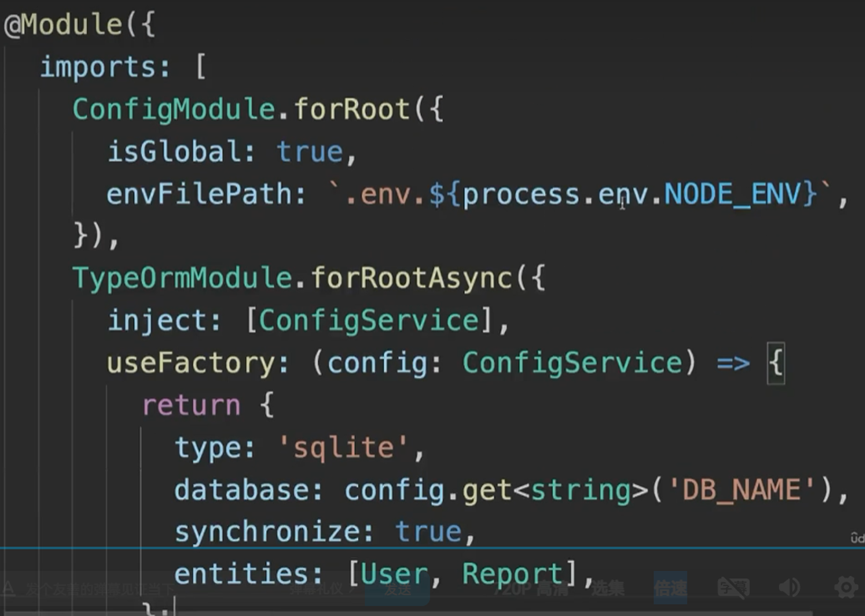
isGlobal全局模块。envFilePath加载哪一个环境变量配置文件。
    // my-service.service.ts
    import { Injectable } from '@nestjs/common';
    import { ConfigService } from '@nestjs/config';

    @Injectable()
    export class MyService {
      constructor(private readonly configService: ConfigService) {}

      getDatabaseHost(): string {
        return this.configService.get<string>('DATABASE_HOST');
      }
    }
日志的作用,记录错误并定位问题,比如什么时候发生的,发生了什么事情,错误是什么?日志的等级,waring,error。按照功能分,错误日志,调试日志,请求日志,通常记录到文件中,比较敏感的日志,记录到数据库中。生产环境通常用第三方日志库,Winston。
VS Code 调试
点击调试图标(Ctrl+Shift+D),简单的,面板中点击"Show all automatic debug configurations", 选Node.js...,弹出Run Script命令,选“Run Script: start:debug” 开启调试。复杂的,面板中点击“创建launch.json文件”,选Node.js,自己配置。configurations 数组中,输入npm,弹出提示
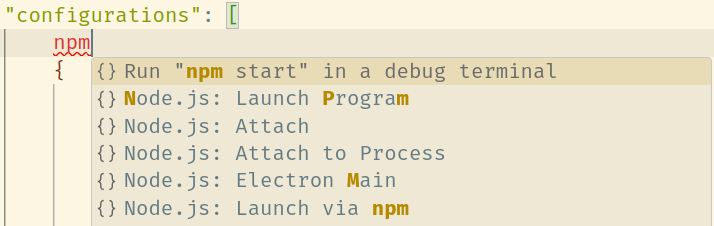
选择Node.js: Launch via npm
{
    "name": "Launch via NPM",
    "request": "launch",
    "runtimeArgs": [
        "run-script",
        "start:debug" // npm 要执行的命令
    ],
    "runtimeExecutable": "npm",
    "runtimeVersion": "18", // 如果是nvm切换过版本,要指定本项目使用的node版本
    "internalConsoleOptions": "neverOpen", // 要不要打开VS code 内置的debug console
    "skipFiles": [
        "<node_internals>/**"
    ],
    "type": "node"
}

 浙公网安备 33010602011771号